Table of Contents >> Show >> Hide
- 25 Clever Kitchen Storage Ideas
- 1. Install Pull-Out Shelves in Base Cabinets
- 2. Use Deep Drawers for Pots, Pans, and Lids
- 3. Add Drawer Dividers for Everyday Utensils
- 4. Stand Baking Sheets and Cutting Boards Vertically
- 5. Turn the Toe-Kick into Hidden Drawers
- 6. Use Clear, Airtight Containers in the Pantry
- 7. Create “Zones” for How You Actually Cook
- 8. Use Door-Mounted Racks for Spices and Small Bottles
- 9. Add Risers and Lazy Susans on Pantry Shelves
- 10. Hang a Pegboard for Pans and Tools
- 11. Use Rails, Hooks, and Magnetic Strips on the Backsplash
- 12. Add Slim Shelves or Ledges for Everyday Items
- 13. Use the Space Above Cabinets Wisely
- 14. Hang a Pot Rack or Ceiling Rail (If You Have the Height)
- 15. Put a Slim Rolling Cart in Tight Gaps
- 16. Tame Corner Cabinets with Carousels or Slide-Outs
- 17. Add a Pull-Out Trash and Recycling Center
- 18. Build Under-Sink Pull-Out Trays or Caddies
- 19. Use Over-the-Sink Racks and Cutting Boards
- 20. Choose Collapsible and Nesting Cookware
- 21. Add a Rolling Island or Cart with Shelves
- 22. Create a “Breakfast or Beverage Center” Cabinet
- 23. Use Bins and Turntables in the Fridge
- 24. Store Seasonal or Specialty Items Elsewhere
- 25. Label, Label, Label (But Keep It Simple)
- What I Learned After Trying These Kitchen Storage Ideas
If your kitchen cabinets are playing Tetris with your pans and your pantry attacks every time you open the door,
welcome you’re officially among friends. A smart kitchen isn’t just about pretty backsplashes and shiny
countertops. It lives or dies by one thing: storage. Clever, hardworking, “why didn’t I do this years ago?”
storage.
Pull-out shelves, labeled jars, and sneaky toe-kick drawers are no longer “nice to have” they’re how real
people with real clutter make small and large kitchens work. Below are 25 clever kitchen storage ideas inspired
by professional organizers, DIY pros, and home-design experts, all reimagined with practical tips you can use in
any kitchen.
25 Clever Kitchen Storage Ideas
1. Install Pull-Out Shelves in Base Cabinets
Standard cabinets are a black hole. Pull-out shelves fix that in one move. They glide out like a drawer, so you
can finally reach the slow cooker hiding in the back without crawling on the floor. Use them for heavy pots,
pantry staples, or stacks of plastic containers. If you’re on a budget, start with the two cabinets you open most
often (usually next to the stove and under the main prep area) and add more over time.
2. Use Deep Drawers for Pots, Pans, and Lids
Deep drawers are the overachievers of kitchen storage. Instead of stacking pots in a cabinet, store them in wide,
deep drawers with heavy-duty glides. Add a simple lid organizer, or stand lids vertically using an adjustable
rack so you’re not playing “which lid fits this pan?” every night. This setup also works beautifully for mixing
bowls and small appliances.
3. Add Drawer Dividers for Everyday Utensils
Tossing everything into the “junk drawer” is not a storage strategy. Use adjustable drawer dividers or expandable
trays to separate utensils, gadgets, and meal-prep tools. Keep what you use every day spatulas, tongs, favorite
knife near the stove, and demote the corn-on-the-cob holders to the back or a secondary drawer. The goal is to
be able to close a drawer without saying “please don’t jam, please don’t jam” under your breath.
4. Stand Baking Sheets and Cutting Boards Vertically
Horizontal stacks of baking sheets are a guaranteed avalanche. Swap that for vertical storage using file-sorter
style dividers, tension rods, or a built-in tray organizer. Install these in a lower cabinet near the oven or in a
narrow space next to the range. It turns that skinny, awkward cabinet into prime real estate for sheet pans,
cooling racks, and cutting boards.
5. Turn the Toe-Kick into Hidden Drawers
The space under your cabinets the toe-kick is usually wasted. With shallow, custom drawers, it becomes bonus
storage for flat items: extra baking sheets, large serving platters, reusable shopping bags, or kids’ craft
supplies you’d rather keep out of sight. It’s a clever storage hack that doesn’t change how your kitchen looks,
but absolutely changes how it works.
6. Use Clear, Airtight Containers in the Pantry
Clear, airtight containers are the pantry’s version of leveling up. Decant flour, sugar, rice, pasta, and snacks
into see-through bins with tight lids. You’ll see what you have at a glance, ingredients stay fresher longer, and
half-open bags stop spilling everywhere. Add simple, bold labels so family members can put things back where they
belong instead of starting their own “creative” system.
7. Create “Zones” for How You Actually Cook
Instead of storing things by category alone, think by task. Create a baking zone with flour, sugar, measuring
cups, and baking pans grouped together. Make a coffee zone with mugs, filters, coffee beans, and syrups in one
area. A kid snack zone, at their height, keeps them from climbing like tiny mountain goats to reach crackers.
Zoning your kitchen makes morning routines and dinner prep smoother with less back-and-forth wandering.
8. Use Door-Mounted Racks for Spices and Small Bottles
The back of a pantry or cabinet door is premium unused space. Add a shallow, door-mounted rack to corral spices,
oils, vinegar, and small jars. Just make sure bottles are secure and the rack is narrow enough so the door still
closes. For maximum sanity, group spices by cuisine or by “daily use” versus “holiday only.”
9. Add Risers and Lazy Susans on Pantry Shelves
Pantry shelves are deep, but your arms are not. Tiered risers make cans and shorter jars visible in the back, and
a lazy Susan turns those lost corners into accessible storage. Use turntables for oils, sauces, nut butters, or
baking extracts. If you find yourself saying, “Oh, I forgot we had that,” you probably need a lazy Susan there.
10. Hang a Pegboard for Pans and Tools
A pegboard isn’t just for garages. Mounted on a kitchen wall, it gives you flexible, vertical storage for pots,
pans, colanders, and even measuring cups. Trace around each item so everything has a designated spot (and so
whoever unloads the dishwasher knows exactly where things go). It also frees up precious cabinet space for less
attractive items.
11. Use Rails, Hooks, and Magnetic Strips on the Backsplash
Maximize the space above your countertop with a rail system or magnetic knife strip. Hang ladles, spatulas, small
colanders, and even herb planters. A magnetic strip keeps knives sharp and easy to reach while freeing a whole
drawer. The key is to hang only what you use often so the wall looks curated, not cluttered.
12. Add Slim Shelves or Ledges for Everyday Items
Even a few inches of wall space can hold a ledge or shallow shelf. Use them for cooking oils, salt and pepper,
hot sauce, or pretty everyday dishes. Ledges are particularly useful in tiny kitchens where cabinet space is maxed
out but you still want a few things within reach and off the counter.
13. Use the Space Above Cabinets Wisely
The gap above upper cabinets tends to become a dusty graveyard for random decor. Instead, use matching baskets or
bins to store infrequently used items like holiday platters, canning gear, or party supplies. Label the front of
each basket so you don’t have to guess what’s inside. It looks intentional, not like a storage emergency.
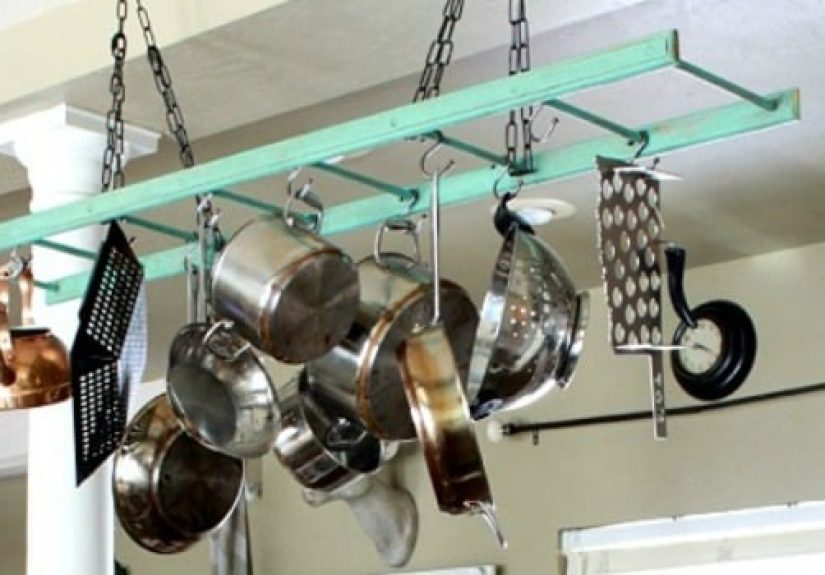
14. Hang a Pot Rack or Ceiling Rail (If You Have the Height)
If you have tall ceilings, a pot rack can free a huge amount of cabinet space. Hang your everyday pots and pans,
plus a few pretty pieces you love. Just don’t overload it or hang it too low nobody wants to leave the kitchen
with a lid imprint on their forehead.
15. Put a Slim Rolling Cart in Tight Gaps
That skinny gap between the fridge and the wall or between two cabinets is the perfect spot for a slim rolling
cart. Use it for canned goods, baking supplies, bottles of oil, or cleaning products. Roll it out when you need
it, and slide it back out of sight when you’re done. It’s like adding a mini pantry that only needs six inches of
floor space.
16. Tame Corner Cabinets with Carousels or Slide-Outs
Corner cabinets are famously annoying. Fix them with spinning carousels (classic lazy Susans) or custom pull-out
shelves that bring contents right to you. Reserve this space for bulky items like small appliances or mixing
bowls. Once you don’t have to crawl halfway inside the cabinet, you’ll use that space much more efficiently.
17. Add a Pull-Out Trash and Recycling Center
Few things clutter a kitchen faster than visible trash and recycling bins. A pull-out waste center built into a
base cabinet keeps bins hidden but convenient. Look for a two- or three-bin system so you can sort trash,
recycling, and even compost. If a full custom pull-out isn’t possible, at least standardize your bins so they
stack or nest neatly.
18. Build Under-Sink Pull-Out Trays or Caddies
The area under the sink is a maze of pipes and forgotten sponges. Add a shallow pull-out tray or tiered caddy to
hold cleaning supplies, dish soap refills, and trash bags. Use stackable bins or a small tension rod to hang
spray bottles. The goal is to be able to reach what you need without knocking over six half-empty cleaners.
19. Use Over-the-Sink Racks and Cutting Boards
In a small kitchen, your sink can act like bonus countertop. Over-the-sink drying racks, colanders, and cutting
boards let you prep, wash, and dry dishes in layers instead of spreading out all over the counters. This trick is
especially helpful in apartments or galley kitchens where every square inch of workspace is precious.
20. Choose Collapsible and Nesting Cookware
If your cabinets are cramped, make your items smaller literally. Collapsible colanders, nesting mixing bowls,
stackable measuring cups, and space-saving food storage containers all store more compactly. Investing in
stackable or nesting versions of things you use every day instantly multiplies your cabinet capacity without any
remodeling.
21. Add a Rolling Island or Cart with Shelves
No island? No problem. A rolling cart with shelves or drawers can triple as prep station, serving cart, and extra
storage. Use baskets on the lower shelves for potatoes, onions, or baking supplies, and keep the top clear as a
movable countertop. When you’re not cooking, roll it against a wall and style it with a plant and a fruit bowl so
it still looks intentional.
22. Create a “Breakfast or Beverage Center” Cabinet
Designate one cabinet or small area as a breakfast or beverage center. Store coffee, tea, mugs, sugar, cereal,
granola, and bowls together. Add bins to group items and a small tray for stir spoons and sweeteners. This keeps
the morning rush contained in one area instead of having people “foraging” through every cabinet at 7 a.m.
23. Use Bins and Turntables in the Fridge
Refrigerators get cluttered just as quickly as cabinets. Use clear bins for snacks, deli meat, cheese, and
produce. A small lazy Susan in the fridge can hold sauces and condiments so bottles don’t get lost in the back.
Designate shelves or bins for “eat me first” leftovers to reduce food waste and Sunday night fridge regret.
24. Store Seasonal or Specialty Items Elsewhere
Your kitchen shouldn’t have to store everything you’ve ever bought. Move rarely used appliances (like the giant
turkey roaster) and seasonal platters to a basement shelf, garage cabinet, or high shelf in a nearby closet. Free
your day-to-day kitchen storage for what you actually reach for weekly. Your cabinets should reflect your current
life, not your “maybe one day I’ll make a seven-layer wedding cake” dreams.
25. Label, Label, Label (But Keep It Simple)
Labels are the traffic signs of a well-organized kitchen. Label pantry bins, baskets above cabinets, fridge bins,
and even drawer interiors. You don’t need fancy calligraphy clear, legible labels are enough. When everyone
knows where things live, your kitchen stays organized longer than one weekend after a big cleanup.
What I Learned After Trying These Kitchen Storage Ideas
Implementing clever kitchen storage sounds like a weekend project, but the real magic isn’t just in installing a
pull-out shelf or buying a few bins. It’s in how those changes affect your daily routines.
The first thing most people notice after upgrading storage is how much calmer the kitchen feels. You open a
cabinet and things don’t fall out. You know where the olive oil is. You can actually see how many cans of diced
tomatoes you own instead of buying more “just in case.” That mental load reduction is huge, especially for busy
households where meals happen fast and often.
Another big lesson: form and function must work together. Clear containers, matching bins, and labeled baskets
don’t just look good for photos they make it easier to stick with your system long-term. When your pantry looks
visually organized, you feel more motivated to keep it that way. That’s why many organizers recommend investing
in a few anchor pieces (like quality containers, a sturdy lazy Susan, or a solid pull-out shelf kit) instead of
constantly buying random storage doodads that don’t really fit your space.
It also becomes obvious very quickly which ideas are worth the effort. Pull-out shelves, for instance, take a bit
more planning and installation, but they pay off every single day. Under-sink trays and corner carousels fall
into that same category they turn notoriously frustrating areas into genuinely useful storage. On the other
hand, if an organizer requires disassembling something every time you cook, it’s probably not going to survive
more than two weeks.
One surprising benefit of better storage is how it changes your shopping habits. When your pantry is zoned and
labeled, it becomes much clearer what you actually need. You can see at a glance that you’re low on pasta but
fully stocked on rice, or that you have three jars of peanut butter and probably don’t need a fourth. That means
fewer duplicates, less food waste, and a grocery list that matches what your household truly uses.
Families also tend to function more smoothly when the kitchen layout makes sense to everyone, not just the person
who did the organizing. Kid-height snack bins encourage independence (and fewer “Mom, where are the crackers?”
questions). A beverage center means guests don’t have to awkwardly open every cabinet to find a mug. A labeled
bin system in the fridge makes it easier for partners and roommates to put groceries away in the right spot.
Finally, testing these ideas reinforces an important truth: you don’t have to do everything at once. Start with
one pain point maybe the spice disaster, the under-sink chaos, or the pot-and-pan avalanche zone. Fix that one
spot with a pull-out, a divider, or a simple rail and hook system. Live with it for a couple of weeks. Notice how
it feels. Then move on to the next area. Over time, these small changes add up to a kitchen that works with you,
not against you.
In the end, “clever kitchen storage” isn’t about having a magazine-perfect space. It’s about creating clear,
simple systems that match how you cook, shop, and live and that make it easier to enjoy being in your kitchen
instead of constantly cleaning up after it.