Table of Contents >> Show >> Hide
- Before You Start: Why Microwave Grilled Cheese Gets Weird
- Method 1: The Paper-Towel Press (Fast, Simple, Less Soggy)
- Method 2: The Crisping Sleeve Trick (Crispier Without a Pan)
- Method 3: The Microwave Crisper Pan (Closest to Classic “Grilled”)
- Troubleshooting: Fix the 5 Most Common Microwave Grilled Cheese Problems
- Microwave Food Safety (Quick, Not Scary)
- Real-Life Microwave Grilled Cheese Experiences (What You’ll Notice)
- Conclusion: Pick Your Microwave Grilled Cheese Personality
The microwave is the underdog of grilled cheese. People act like it can only produce two things:
lava-hot cheese and bread with the personality of a wet sock. But with the right approach, you can
get a melty, satisfying grilled cheese fastno stove, no drama, no “who left the pan on?” moment.
In this guide, you’ll learn three practical microwave methodseach with clear steps, timing cues,
and “don’t do this unless you enjoy sadness” tips. We’ll also cover the best breads and cheeses for
microwaving, how to reduce sogginess, and how to get closer to that classic toasted vibe using
microwave-friendly tools.
Before You Start: Why Microwave Grilled Cheese Gets Weird
Traditional grilled cheese is a two-part magic trick: the bread browns and crisps while the cheese melts.
A microwave is great at melting (hello, stretchy cheese pull) but terrible at browning. It heats water
molecules efficiently, which means bread can steam from the inside out. Translation: the cheese melts,
and the bread can go soft, chewy, or rubbery if moisture gets trapped.
Your goal is to manage steam and choose a method that matches your expectations:
fast and melty, less soggy, or actually crispy.
That’s why these three methods exist.
Quick Equipment Checklist
- Microwave-safe plate (flat, not bowl-shaped)
- Paper towels or parchment paper
- Butter or mayonnaise (optional, for flavor and moisture barrier)
- A microwave crisper sleeve or microwave crisper pan (depending on the method)
- Knife (because grilled cheese tastes 12% better when sliced diagonallyscience-ish)
Best Bread and Cheese Picks for the Microwave
In the microwave, thinner slices and tighter crumbs perform better because they heat quickly and hold shape.
If your bread is extra thick, the cheese may melt before the bread warms through, and you’ll end up with a
hot center and cool cornerslike a weather forecast you didn’t ask for.
- Bread: white sandwich bread, soft wheat, brioche, sourdough (thin slices), potato bread
- Cheese (best melters): American, cheddar (mild/medium), Monterey Jack, Havarti, provolone
- Pro tip: use sliced cheese for tidy coverage, or shredded cheese for faster melting and fewer cold spots
Method 1: The Paper-Towel Press (Fast, Simple, Less Soggy)
This is the “I need grilled cheese in minutes” method. It won’t create a crunchy skillet crust,
but it will deliver warm bread and properly melted cheese with a lot less microwave sogginess.
The paper towels act like a steam bouncer: they escort excess moisture out of the building.
Ingredients (1 sandwich)
- 2 slices bread
- 2–3 slices cheese (or about 1/2 cup shredded)
- 1–2 teaspoons softened butter or mayo (optional)
Step-by-step
-
Assemble smart: Place cheese edge-to-edge so it melts evenly and “glues” the bread together.
If using butter or mayo, spread a thin layer on the outside of the bread for flavor and a tiny moisture barrier. -
Set up the steam control: Put a folded paper towel on a microwave-safe plate. Place the sandwich on top.
Add a second paper towel on top of the sandwich. -
Microwave in short bursts: Start with 20–25 seconds on high for average bread and sliced cheese.
Flip the sandwich, then microwave another 15–25 seconds. - Rest briefly: Let it sit for 30–60 seconds. The cheese finishes melting and the steam calms down.
-
Press (optional but helpful): Press the sandwich gently with a second plate for 10–15 seconds.
This improves contact and reduces that “bread floating on cheese” feeling.
Timing guide (because microwaves have personalities)
- 700–900W microwaves: 25 sec + 20 sec (flip in between)
- 1000–1200W microwaves: 20 sec + 15–20 sec
- Thick bread or cold cheese: add 10-second increments until cheese is fully melted
Make it better
- Add a “melt booster”: a teaspoon of cream cheese or a thin swipe of Dijon inside helps melt and flavor.
- Go for a cheese blend: American for melt + cheddar for flavor is a classic combo.
- Avoid watery fillings: tomatoes and pickles are delicious but can make microwave bread soggy fast.
Best for: dorm rooms, office lunches, and anyone who wants grilled cheese quickly without buying special gear.
Method 2: The Crisping Sleeve Trick (Crispier Without a Pan)
If you’ve ever microwaved a Hot Pocket and noticed the sleeve gets the outside less sad than plain microwaving,
you’ve met a microwave crisping sleeve. These sleeves use a special material that helps brown and crisp
the surface by converting microwave energy into heat. It’s basically a tiny legal loophole in the microwave’s
“no browning allowed” policy.
What you need
- 1 microwave crisping sleeve (from certain microwave snacks, or a reusable crisping sleeve designed for microwaves)
- Microwave-safe plate
- Your assembled grilled cheese sandwich
Step-by-step
-
Assemble the sandwich: Keep it compact. If your sandwich is huge, it won’t fit well and may heat unevenly.
(Big grilled cheese is a noble dream; microwave geometry is not.) - Insert into the sleeve: Center it so both sides contact the sleeve surface.
- Microwave: Start with 60 seconds on high. If the cheese isn’t fully melted, add 10–15 seconds.
- Flip for even crisping (if the sleeve design allows): Carefully flip and microwave another 20–40 seconds.
- Rest: Let it stand for 1 minute. The sleeve stays hot, and the bread continues to firm up.
Safety notes
- Use only sleeves designed for microwave crisping. Do not improvise with foil or random wrappers.
- Careful handling: The sleeve can get very hot. Use a towel or oven mitt if needed.
- Watch for smoke: If something smells scorched, stop immediately and reduce time next round.
Flavor upgrades that work well here
- Garlic butter: brush a tiny amount on the outside before crisping (not too much or it may over-brown)
- “Cheese skirt”: add a pinch of shredded cheese near the edges for a crisp, savory border
- Spice it: a small pinch of smoked paprika or black pepper inside wakes everything up
Best for: people who want a crisper bite without buying a microwave crisper pan.
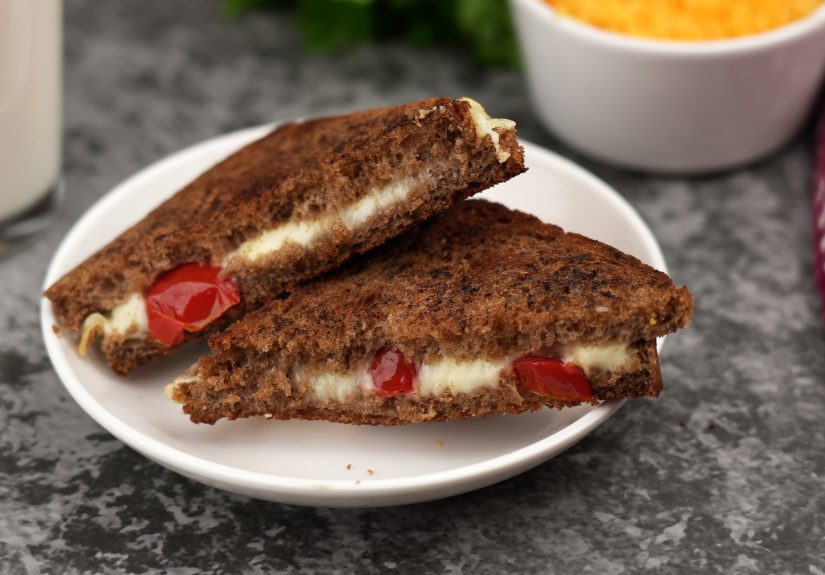
Method 3: The Microwave Crisper Pan (Closest to Classic “Grilled”)
If you want the most convincing microwave grilled cheeseactual crispness, toasted vibes, and a sandwich that
doesn’t feel like it came from a damp clouduse a microwave crisper pan or a microwave grill press.
These tools are designed to heat up in the microwave and brown the outside of foods.
This method takes a few minutes longer than the paper-towel press, but it gives you the best texture payoff.
Think of it as: “microwave grilled cheese, but make it respectable.”
What you need
- Microwave crisper pan (or microwave grill press) and its instructions
- Butter (recommended for browning and flavor)
- Spatula (microwave-safe if you’re working inside the microwave)
Step-by-step
-
Preheat the crisper pan: Many crisper pans work best if you microwave the empty pan first
(often 2–4 minutes, depending on the product). Follow your pan’s instructions. -
Build the sandwich: Butter the outside of both bread slices. Add cheese inside.
Keep fillings minimal so the sandwich heats evenly. - Cook side 1: Place sandwich on the hot crisper pan. Microwave 1–2 minutes (depending on your pan and microwave).
- Flip: Carefully flip the sandwich (the pan is hot). Microwave another 1–2 minutes.
- Rest: Let the sandwich sit 1 minute before cutting. This helps the cheese settle so it doesn’t all escape at once.
How to nail the texture
- Use real butter on the outside: it browns better and tastes more like classic grilled cheese.
- Choose sturdy bread: sourdough (thin cut) and potato bread hold up well on hot surfaces.
- Don’t overstuff: more cheese is great, but too much slows heating and can cause uneven melt.
Best for: anyone who wants the closest microwave version of skillet grilled cheesecrispy edges included.
Troubleshooting: Fix the 5 Most Common Microwave Grilled Cheese Problems
1) “My bread is soggy.”
- Use paper towels above and below the sandwich (Method 1).
- Microwave in shorter bursts and flip more often.
- Let the sandwich rest uncovered for 30–60 seconds after heating.
2) “The cheese melted but the bread is still cold.”
- Use room-temp bread or warm it for 5–8 seconds before assembling.
- Switch to thinner bread slices.
- Try shredded cheese for faster, more even melting.
3) “The cheese exploded out the sides.”
- Reduce power to 70–80% and heat a bit longer.
- Don’t overload the center; spread cheese evenly edge-to-edge.
- Rest the sandwich so bubbling calms down before slicing.
4) “It tastes bland.”
- Add a pinch of saltyes, even on grilled cheese.
- Try a cheese blend: American + cheddar is a reliable upgrade.
- Add a thin spread inside: Dijon, pesto, or a swipe of garlic butter.
5) “I want it crispier.”
- Use a crisping sleeve (Method 2) or a crisper pan (Method 3).
- Choose bread with structure (thin sourdough, potato bread).
- Skip watery fillings, or blot them very dry.
Microwave Food Safety (Quick, Not Scary)
Grilled cheese is generally low-risk because you’re melting cheese and warming breadnot cooking raw meat.
Still, microwaves heat unevenly, so a few habits help:
- Heat evenly: flip the sandwich and use short bursts for better consistency.
- Standing time matters: letting food sit after microwaving helps heat spread more evenly.
- Use microwave-safe materials: no foil, no mystery metals, no “I think this plate is fine” guesses.
Real-Life Microwave Grilled Cheese Experiences (What You’ll Notice)
If you grew up with skillet grilled cheese, your first microwave version can feel like meeting your favorite
celebrity… through a foggy FaceTime call. It’s still technically them, but you’re thinking, “Where’s the crisp?
Where’s the buttery crunch?” That’s a normal reaction, not a personal failure.
Most people’s first experience is with the basic “bread + cheese + microwave” approach, and the biggest surprise
is how quickly the cheese melts compared to how slowly the bread firms up. Cheese is basically a microwave’s best
friendsoft, fatty, and eager to melt. Bread, on the other hand, tends to steam. That’s why Method 1 feels like
a small revelation: the paper towels don’t just sit there looking helpful; they actively absorb moisture so the
bread stays closer to “soft-toast” instead of “sad sponge.”
Another common experience is realizing that timing is everything. In a skillet, you can watch browning happen.
In a microwave, you’re working with short bursts, flipping, and checking the edges like a cautious scientist.
The good news? Once you find your microwave’s sweet spotmaybe 20 seconds, flip, 20 secondsyou can repeat it
consistently. People who microwave grilled cheese regularly often develop a personal “microwave recipe” that’s
more precise than anything written on the internet. It’s not because they’re intense; it’s because microwaves vary,
and your kitchen is its own tiny universe.
Texture expectations also evolve. Many folks end up liking the microwave version for different reasons than the
skillet version. It can be softer, more uniformly melty, and less greasyespecially if you skip heavy butter on
the outside. If you’re packing lunch, you may even prefer the softer bite because it reheats without turning into
a crunchy brick. And if you’re the type who dunks grilled cheese into tomato soup, a slightly softer sandwich can
be a feature, not a bug.
The “aha” moment for crisp lovers usually happens with Method 2 or 3. A crisping sleeve or crisper pan makes the
microwave feel like it’s cheatingin the best way. Suddenly the outside has structure, the bite has contrast, and
your brain stops yelling, “This is just warm bread!” People who try a crisper pan often describe the experience
as the closest thing to classic grilled cheese without touching a stove: you still get that toasty aroma, that
little bit of browned fat flavor, and the satisfying crunch when you cut it in half.
Finally, there’s the emotional experience: microwave grilled cheese is comfort food that respects your schedule.
It’s what you make between Zoom calls, after school, during a late-night snack raid, or when you’re too tired to
babysit a pan. It may not always be “restaurant perfect,” but it reliably delivers the core promise of grilled
cheese: warm, melty, cozy, and instantly mood-improving. And honestly? That’s the whole point.