Table of Contents >> Show >> Hide
- Before You Repair Anything: Identify the Type of Damage
- Way #1: Disguise Light Scratches and Scuffs (Repair Marker, Crayon, or Wax Pencil)
- Way #2: Fill Chips, Dents, and Small Gouges (Putty or Hard Wax Repair)
- Way #3: Replace a Damaged Plank (The “Actually Fixed” Fix)
- Quick Troubleshooting: If the Same Problem Keeps Returning
- Prevent Damage Like You Mean It (Without Turning Your Floor Into a Museum Exhibit)
- of Real-World Repair “Experience” (So You Can Avoid the Greatest Hits)
- Conclusion
Laminate flooring is basically the “tough-but-sensitive” friend of the flooring world: it can handle busy feet, rolling chairs,
and the occasional dropped snack… but it will absolutely hold a grudge against water, grit, and sharp furniture legs.
The good news? Most laminate damage falls into a few predictable categoriesand once you name the problem, you can fix it
without turning your weekend into a full-blown home renovation reality show.
This guide breaks laminate floor repair into three practical paths:
(1) disguise small cosmetic issues, (2) fill chips and dents, or (3) replace a plank when the damage is deep (or the floor is doing that “mountain range” thing).
You’ll also get real-world tips, common mistakes to avoid, and a final “experience” section that feels like learning from someone else’s
messwithout having to make the mess yourself.
Before You Repair Anything: Identify the Type of Damage
Laminate is a layered product. It has a tough wear layer on top, a printed image layer, and a wood-based core.
That structure matters because laminate can’t be sanded and refinished like solid hardwood. In other words: your repair strategy is about
blending and stabilizing, not “making it new again” with a sander.
Use this quick checklist to diagnose what you’re seeing:
- Light surface scratches / scuffs: you can feel them with a fingernail only slightly (or not at all), and the color change is subtle.
- Chips, dents, or small gouges: the top layer is missing in a spot, often near edges or from dropped objects.
- Swelling, buckling, or raised seams: boards look puffy, edges lift, or planks “tent” upward. Often tied to moisture or lack of expansion space.
- Deep scratches exposing darker core: the damage goes past the wear layer and looks noticeably different in color/texture.
- Loose gaps between planks: seams open up, typically from movement, installation issues, or temperature/humidity changes.
Once you’ve got the damage type, choose the repair method below. If you pick the wrong method (like trying to “buff out” laminate),
you’ll usually make the spot look worselike putting concealer on a bruise and then rubbing it with sandpaper.
Way #1: Disguise Light Scratches and Scuffs (Repair Marker, Crayon, or Wax Pencil)
Think of this as cosmetic repair: you’re not rebuilding the flooryou’re making the damage visually disappear (or at least stop yelling at you every time you walk by).
This method works best when the laminate surface is intact and you’re mainly dealing with color disruption.
Best for
- Light scratches that don’t break through the wear layer
- Scuffs from shoes, chair legs, or moving lightweight furniture
- Small, thin “white lines” that look worse in sunlight
What you’ll need
- Microfiber cloth
- A gentle floor cleaner (or a barely damp cloth and water)
- Laminate touch-up marker, crayon, or wax pencil (ideally color-matched)
- Optional: a clear topcoat/varnish if your kit includes it
Step-by-step
- Clean the area. Wipe away dust and grit so you don’t “seal in” dirt. Let it dry completely.
- Test firstseriously. Try the product in a closet corner or behind furniture. Lighting changes everything, and “close enough” can turn into “why is there a brown stripe?”
-
Apply in thin layers. Use gentle strokes with a marker, or lightly rub a wax pencil/crayon across the scratch.
Build color gradually; it’s easier to add than to remove. - Blend. Buff lightly with a clean cloth. If the laminate has a printed grain pattern, you can mimic it with small strokes (don’t overdo itthis is not a fine art class).
- Seal if your kit instructs it. Some systems include a small topcoat to protect the repair. If included, follow the directions and keep the area ventilated.
Common mistakes (and how to avoid them)
- Skipping the test spot: The fastest way to create a new, more dramatic problem.
- Using too much product at once: Thick wax can look shiny or “globbed,” especially on matte laminate.
- Trying to sand laminate: Light sanding might be part of some repair kits’ finishing steps, but aggressive sanding can damage the wear layer and make the spot permanently obvious.
- Cleaning with too much water afterward: Keep moisture minimalespecially at seams.
Pro tip: Many “scratches” are actually transferred material (rubber, paint, metal scuff).
Before you color anything, try wiping with a damp microfiber cloth and a little cleaner. If it improves a lot, you may be dealing with scuff transfernot a cut in the surface.
Way #2: Fill Chips, Dents, and Small Gouges (Putty or Hard Wax Repair)
When laminate loses materiallike a chip at the edge of a plank or a dent from dropping something heavyyou need a filler.
This is less like makeup and more like a tiny bit of reconstruction. The goal is to restore the surface profile (flatness), then match color.
Best for
- Chipped corners or edges
- Small dents from dropped objects
- Gouges smaller than a couple of inches that don’t compromise multiple seams
What you’ll need
- Laminate repair putty/paste kit (often includes multiple colors you can blend)
- Plastic putty knife (plastic is safer on laminate than metal)
- Clean cloths
- Optional: fine sanding pad if your kit calls for it (light touch only)
Step-by-step
- Clean and dry the damaged spot. Remove dust and any loose bits. Let it dry fully.
-
Blend your color. Many kits allow mixing tones on a small board/palette.
Take your time heregood color matching is 80% of a “wow, I can’t even find it” result. - Press filler into the defect. Pack it into the chip/dent so there are no air gaps. Overfill slightly if your product shrinks as it cures.
- Level it. Use the putty knife to scrape flush with the surrounding floor. Wipe away excess before it hardens.
- Let it cure. Follow your product’s timing. Don’t “test it” with your finger every five minutes unless you enjoy fingerprints forever.
- Finish (if required). Some systems include a topcoat. Apply lightly and feather edges for a blended look.
How big is “too big” for filler?
A good rule: filler is ideal for small, contained damage that doesn’t run along multiple plank edges.
If the damage is large, crosses a joint, or you see swelling/softness underneath, filler becomes a temporary cover-up.
In those cases, plank replacement is usually the better long-term fix.
Specific example
Let’s say a cast-iron pan slips off the counter and takes a bite out of a plank edge.
A marker won’t help because there’s a real divot. But a blended repair paste can rebuild the missing corner,
hide the lighter core material, and give you a smooth surface that won’t snag socks (or bare feetif you enjoy living dangerously).
Pro tip: Keep the sheen consistent. If your laminate is matte, a glossy topcoat can make the repair “shine like a sticker.”
Choose a kit designed for laminate and follow its finishing steps carefully.
Way #3: Replace a Damaged Plank (The “Actually Fixed” Fix)
If your laminate has deep scratches into the core, swelling from water exposure, buckling, or a big chunk missing,
plank replacement is the most reliable repair. And yesreplacing one plank is possible, even if it’s in the middle of the room.
There are two main approaches:
Option A: unclick and swap from the nearest wall (cleaner, more “factory”),
or Option B: cut and drop-in (surgical, but effective).
Option A: Unclick-and-Swap (Best if the damage is near a wall)
This method keeps the locking system intact because you’re reversing the installation.
It’s the preferred approach when the damaged plank is only a few rows in from a wall.
- Remove baseboards or quarter-round near the damaged area (carefully, so you can reuse them).
- Work backward plank by plank. Lift and unclick rows until you reach the damaged board.
- Keep boards in order. Stack them neatly so reassembly is easier and you don’t “accidentally” create new gaps.
- Swap in the new plank. Ideally, use leftover planks from the original install for the best color match.
- Reinstall in reverse order. Lock boards back together, then reinstall trim.
Smart move: If your replacement plank has been sitting in a garage or a different room, let it acclimate in the space before installation.
That helps it match the room’s temperature and humidity conditions.
Option B: Cut-and-Drop-In (Best for a plank in the middle of the room)
This is the “open heart surgery” version of laminate repairbut it works when unclicking from a wall would require removing half the room.
The basic idea is: cut out the damaged plank, modify the replacement plank’s locking profile, glue it in place, and weight it until cured.
Tools you’ll likely need (depending on your floor and comfort level):
- Utility knife
- Drill (small bit)
- Circular saw or oscillating multi-tool (set to plank thickness)
- Chisel or scraper
- Vacuum
- Laminate glue (recommended by the flooring manufacturer)
- Heavy weights (books, toolboxes, anything that won’t leak oil onto your floor)
Step-by-step (generalized “best practice” approach)
- Mark the cut zone. Create an inner rectangle so you’re not cutting right on the seams.
- Drill starter holes near corners of your cut zone (this helps you stop cleanly).
- Set saw depth to plank thickness. You want to cut the planknot the subfloor.
- Cut and remove the center first, then work carefully toward edges. Remove the remaining pieces without damaging neighboring boards.
- Clean the opening. Vacuum debris. If there’s dried adhesive from a glued system, scrape it carefully.
-
Modify the replacement plank.
Many drop-in repairs require removing part of the groove lip on the replacement piece so it can “drop” into place. - Dry fit. Test the plank in the opening. Adjust gently if needed (light sanding may help in some systems).
- Apply laminate glue as directed (often to tongues/grooves), then set the plank into place.
- Wipe excess glue immediately. Then add weight evenly and let it cure fully.
Reality check: A drop-in repair can look fantastic, but take your time. The two most common “tells” are
(1) a slightly raised edge (lippage) and (2) glue haze that dries on the surface.
Both are avoidable if you dry fit and clean as you go.
What about swelling, buckling, and raised seams?
These issues often have an underlying cause. If you replace a plank without fixing the cause, the floor will simply find a new way to complain later.
Here’s how to think about it:
-
If water caused swelling: dry the area fast. Use fans, reduce humidity, and don’t let moisture sit at seams.
If boards are permanently puffed or the core feels soft, replacement is usually the lasting fix. -
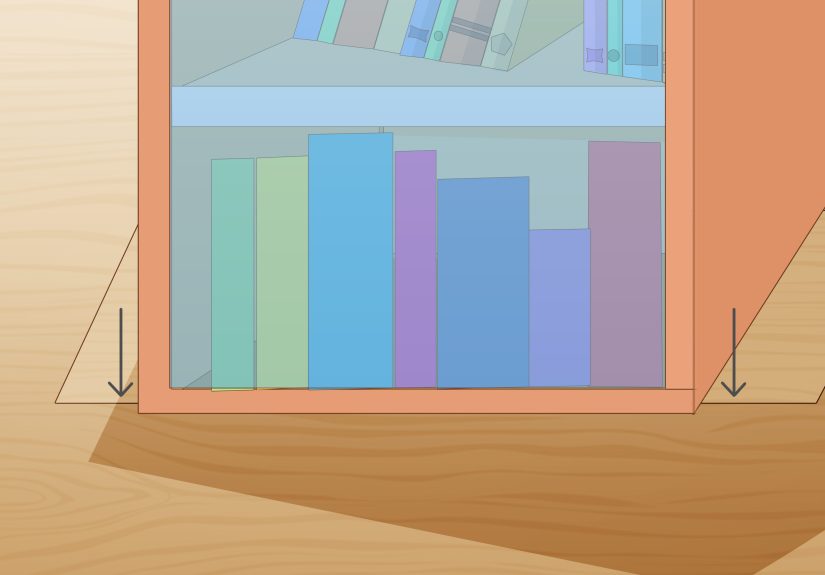
If the floor is buckling/tenting without a spill: it may be trappedtoo tight at walls, under trim, or against fixed objects.
Restoring proper expansion space (often by trimming edges after removing baseboard/quarter-round) can solve the pressure problem. -
If seams are lifting: check for debris in the joint, an uneven subfloor spot, or moisture intrusion.
In some cases, plank replacement plus correcting the underlying issue is the cleanest answer.
Quick Troubleshooting: If the Same Problem Keeps Returning
Laminate problems repeat when the cause repeats. If you’re on “Repair Attempt #3,” run this quick audit:
- Too much water during cleaning? Switch to a barely damp method and avoid soaking the floor, especially near seams.
- No walk-off mats? Grit is basically sandpaper. Mats and regular sweeping reduce micro-scratches dramatically.
- Furniture sliding? Add felt pads. Replace hard chair casters with soft/rubber ones if possible.
- Pets + sharp nails? Trim them (your floor is not a scratching post).
- Gaps or movement? Temperature and humidity swings can shift floating floors. Also check transitions and trim that may be pinching the floor.
Prevent Damage Like You Mean It (Without Turning Your Floor Into a Museum Exhibit)
Prevention doesn’t have to be dramatic. You don’t need to ban shoes, cancel your pets, or forbid chairs.
A few habits do most of the work:
- Sweep, dust mop, or vacuum regularly to remove grit before it scratches.
- Use minimal moisture. Laminate hates puddles and over-wet mopping.
- Wipe spills immediately. Especially near seams and baseboards.
- Use mats and felt pads. Entry mats catch grit; felt pads prevent chair-leg micro-cuts.
- Avoid “miracle” products that add waxy buildupmany laminate systems don’t want wax, polish, or abrasive cleaners.
If you want a simple mantra: Less grit, less water, less sliding.
That’s the laminate floor wellness plan.
of Real-World Repair “Experience” (So You Can Avoid the Greatest Hits)
Here are a few very common laminate repair storiesshared in the spirit of “learn from this,” not “live through this.”
If you’ve ever wondered why laminate repairs get a bad reputation, it’s usually because someone skipped a boring step
(like cleaning, testing color, or letting glue cure). Boring steps are secretly the hero.
Story #1: The Marker That Was “Basically the Same Color.”
A homeowner spots a pale scratch, grabs a touch-up marker, and colors it in like they’re signing an autograph.
Under warm kitchen lights, it looks fine. The next morning, sunlight hits it andsurprisenow there’s a stripe that looks like
a tiny fence post running across the plank. The fix was simple but annoying: clean off what could be lifted, then redo it with a
lighter tone applied in thin passes. The lesson? Always test in a hidden spot, and build color gradually. Laminate doesn’t forgive bold strokes.
Story #2: The Chip Repair That Became a “Shiny Sticker.”
Someone fills a chip with a repair compound and tops it with a high-gloss sealant. The chip is gonebut now the spot reflects light like a disco ball.
They did the “repair” part correctly, but the sheen didn’t match the surrounding floor. The second attempt used a more matte-compatible finish and
a softer buffing technique. The lesson? Matching texture and sheen matters as much as matching color.
Story #3: The Drop-In Plank That Floated… Literally.
A mid-room plank replacement goes well until the last step. The installer glues, drops the plank in, wipes the glue, and walks away.
No weights. No cure time respect. Two hours later, the edge lifts slightly, and the seam becomes a dirt magnet. The repair is to re-seat it properly
(sometimes meaning redoing the drop-in), then apply evenly distributed weight for the full cure window. The lesson? Glue needs pressure to bond flat.
Gravity is helpful, but it’s not a clamp.
Story #4: The Buckle That Wasn’t a Water Problem.
A floor tents up near a wall. Everyone assumes “water damage.” But the real issue is the floor had no breathing room:
baseboard was installed tight, and the floating floor couldn’t expand naturally with seasonal humidity changes.
Once trim was removed and proper expansion space restored, the pressure released and the floor settled back down.
The lesson? Buckling can be moisture… or it can be a floor that’s trapped and trying to escape.
Story #5: The Plant Pot That Quietly Ruined a Plank.
A decorative pot sits on laminate. It “never spills,” except it doesslowlythrough condensation and tiny overwatering moments.
Over time, a seam swells and the core puffs up. The fix isn’t a miracle cleaner; it’s replacing that plank and adding a waterproof tray.
The lesson? Laminate usually fails from repeated small moisture exposure, not just dramatic floods.
If there’s one big takeaway from these experiences: the best laminate repairs are calm, slow, and slightly boring.
Clean first. Test color. Use thin layers. Respect cure time. Fix the underlying cause. Then enjoy the deeply satisfying moment
when you can’t find the repair anymoreeven when you squat down and stare at it like a detective.
Conclusion
Laminate flooring repairs don’t have to be intimidating. Most problems can be handled with one of three methods:
disguise small scratches, fill chips and dents, or replace a plank when damage is deep or structural.
The key is choosing the right approach for the problemand being just patient enough to do the “boring steps” that make repairs look professional.
If your laminate is swelling, buckling, or repeatedly gapping, don’t just patch the symptom. Find the causemoisture, trapped expansion space,
or movementand fix that first. When you do, you’ll stop playing repair whack-a-mole and get back to enjoying your floor like a normal person.