Table of Contents >> Show >> Hide
- First, Play “Leak Detective” (10 Minutes, Max)
- Way 1: Unclog (and Unfreeze) the Defrost Drain
- Way 2: Fix the Water Supply Line (Plus the Inlet Valve and Filter Housing)
- Way 3: Stop Condensation Leaks by Leveling the Fridge and Fixing the Door Seal
- Way 4: Inspect the Drain Pan (Cracks, Shifts, and Overflow)
- When to Call a Pro (A.K.A. When DIY Stops Being Fun)
- Prevent Leaks With These 5-Minute Habits
- Extra: Real-World “Leak Experiences” (The Stuff People Actually Run Into)
- Conclusion
A leaking refrigerator is basically your kitchen’s way of saying, “Surprise! You’re a plumber now.”
The good news: most fridge water leaks come from a handful of predictable culprits, and several fixes are
totally DIY-friendlyno cape required, just towels and a little patience.
In this guide, you’ll learn how to diagnose where the water is coming from and tackle four of the most common
repairs: clearing a clogged defrost drain, fixing a leaky water line (and the parts connected to it), stopping
condensation by leveling the fridge and sealing the doors, and dealing with a cracked or overflowing drain pan.
First, Play “Leak Detective” (10 Minutes, Max)
Before you start unscrewing panels like you’re auditioning for a home improvement show, do a quick check to narrow
down the source. Where the water shows up is usually the biggest clue.
Quick Clue Map
- Water under the crisper drawers (fresh food section): often a clogged defrost drain.
- Ice or a sheet of water on the freezer floor: typically a frozen/clogged defrost drain tube.
- Puddle behind the fridge: water supply line or inlet valve leak (especially if you have an ice maker).
- Water near the front corners or under the doors: door seal/condensation or an out-of-level fridge.
- Random puddles that come and go: drain pan issues (cracked, shifted, or not evaporating properly).
Safety Notes (Because Electricity + Water Is a Bad Duo)
- Unplug the refrigerator before opening internal panels or working near wiring.
- If you have a water dispenser/ice maker, turn off the water shut-off valve before touching any tubing.
- Use warm (not boiling) water when flushing drains to avoid warping plastic parts.
- If water is pooling near electrical components and you’re not sure what you’re looking at, call a pro.
Way 1: Unclog (and Unfreeze) the Defrost Drain
This is the heavyweight champion of refrigerator water leak causes. Modern refrigerators regularly run a defrost
cycle to melt frost off the evaporator coils. That meltwater is supposed to flow into a small drain hole, down a
drain tube, and into a drain pan where it evaporates. When the drain hole or tube gets blocked by ice, food crumbs,
or mystery sludge, the water takes the scenic routeusually into your fridge or onto your floor.
Signs This Is Your Problem
- Water pooling under crisper drawers or inside the fridge.
- Ice buildup or a puddle on the bottom of the freezer.
- The leak seems worse a day or two after a big grocery restock (more door opening = more moisture).
What You’ll Need
- Towels, a sponge, and a bowl
- A turkey baster (yes, the one you bought for Thanksgiving and never used again)
- Warm water (hot tap water is fine), baking soda
- Pipe cleaner or bottle brush
- Optional: hair dryer on low to melt ice (keep it moving, don’t cook your freezer)
Step-by-Step Fix
- Unplug the fridge and remove food from the freezer section (or at least clear the bottom area).
-
Find the drain area. On many models, the drain hole sits below the evaporator coils behind the rear
freezer panel or under a small trough. -
Melt any ice blocking access. Use a hair dryer on low or let the door stand open for a bit. Mop up
meltwater so it doesn’t refreeze into a mini skating rink. -
Flush the drain hole. Mix a gentle solution (for example, baking soda + hot tap water) and use a
turkey baster to push it through the drain hole. You want to hear water running down into the drain pan underneath. -
Clear the tube if needed. If it still won’t drain, gently work a pipe cleaner or bottle brush into
the opening. Don’t use anything sharp enough to puncture the tubeyour goal is “unclog,” not “create a new leak.” - Reassemble the panel, restore power, and monitor over the next 24 hours.
Pro Tip: Keep It From Coming Back
Once you’ve cleared it, a periodic flush (a couple times a year) keeps gunk from building up. Think of it like
flossingannoying, but cheaper than a root canal… or in this case, a warped floor.
Way 2: Fix the Water Supply Line (Plus the Inlet Valve and Filter Housing)
If your fridge has an ice maker or water dispenser, you’ve got pressurized water running into the appliance. That’s
convenient for iced coffee and questionable for cabinetry. A tiny crack, a loose fitting, or a worn-out valve can
drip steadily and create a puddle that looks like your fridge is slowly melting into the earth.
Signs This Is Your Problem
- Puddle behind the fridge, near the wall connection.
- Water appears even when the freezer is clean and the defrost drain is clear.
- Leak worsens when you dispense water or when the ice maker cycles.
- Drips or moisture around the water filter area or filter housing.
What You’ll Need
- Adjustable wrench or open-end wrench
- Towels (always towels)
- Flashlight
- Optional replacement: braided stainless steel water supply line, new filter, or a correct-fit O-ring (model-specific)
Step-by-Step Fix
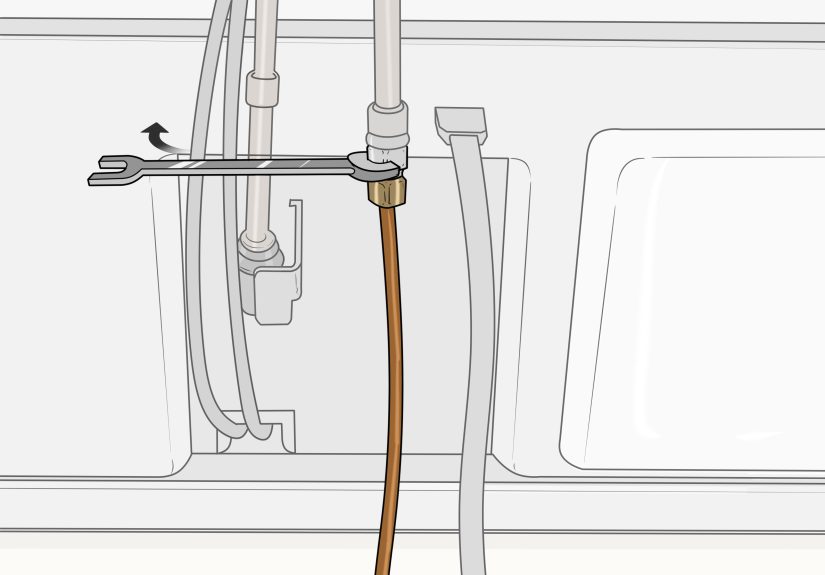
- Turn off the water shut-off valve feeding the refrigerator.
- Unplug the fridge and carefully pull it forward (slowlydon’t turn your water line into a jump rope).
-
Inspect the supply line. Look for cracks, kinks, or dampness at the connections. If it’s a plastic
line that’s seen some things, consider upgrading to braided stainless steel for durability. - Tighten fittings gently. Snug is good; over-tightening can crack plastic fittings and make the leak worse.
-
Check the water inlet valve. This is typically where the supply line connects to the fridge. If the
valve body is cracked, corroded, or visibly leaking, it usually needs replacement. -
Check the water filter and housing. A filter that isn’t locked in correctly can leak. Remove it,
inspect for cracks, confirm O-rings are present and seated, then reinstall firmly according to your model’s design. -
Restore water and test. Turn the shut-off valve back on and watch closely with a flashlight while
you dispense water (if applicable) and while the ice maker fills.
A Small Example That Saves Big Money
If you see a puddle that only shows up after someone fills a water bottle at the dispenser, the culprit is often a
loose fitting near the inlet valve or a filter that isn’t fully seated. Tightening the connection or reinstalling the
filter can turn “recurring flood” into “minor inconvenience” in about five minutes.
Filter Reminder (Yes, Again)
Many manufacturers recommend replacing the water filter on a schedule (often around every six months, depending on
usage and water quality). A clogged or incorrect filter can cause weird pressure behavior and leaks around the housing.
Always use the correct filter model for your refrigerator.
Way 3: Stop Condensation Leaks by Leveling the Fridge and Fixing the Door Seal
Sometimes the leak isn’t a “pipe leak” at allit’s your fridge sweating. Warm, humid air sneaks past a worn or dirty
door gasket, hits cold surfaces, turns into condensation, and eventually becomes a puddle. If the refrigerator isn’t
level, water can also collect in places it shouldn’tlike the front edge of a drain panthen spill out onto the floor.
Signs This Is Your Problem
- Water droplets on door gaskets, shelves, or interior walls.
- Moisture near the front of the fridge or along the door frame.
- Doors that don’t close easily or seem slightly misaligned.
- You live somewhere humid (or your kitchen doubles as a sauna when you cook).
Part A: Level the Refrigerator
- Place a bubble level on top of the fridge (front-to-back and side-to-side).
-
Adjust the leveling legs. Many designs use front leveling legs that you rotate to raise or lower the unit.
(A common pattern: clockwise raises, counterclockwise lowersbut check your manual for your exact model.) - Eliminate side tilt. A fridge leaning left or right can cause doors to seal poorly and can affect drainage behavior.
- Recheck after adjustments and confirm doors close smoothly.
Part B: Inspect and Refresh the Door Gasket
- Clean the gasket with warm water and mild dish soap. Sticky residue can prevent a good seal.
-
Do the “dollar bill test.” Close the door on a dollar bill so half sticks out. If you can slide it out
with almost no resistance, the gasket may be weak in that spot. - Look for damage like tears, hardened sections, or gaps at corners.
-
Replace if needed. A new gasket can be one of the best “bang for your buck” repairs: better sealing,
fewer condensation issues, and a happier energy bill.
Bonus: Door Alignment Matters
Even a good gasket can fail if the door is sagging or misaligned. If you notice uneven gaps around the door, check hinge
hardware (and your manual). A simple alignment tweak can stop warm air leaksand stop your fridge from “crying” on the floor.
Way 4: Inspect the Drain Pan (Cracks, Shifts, and Overflow)
Your refrigerator’s drain pan is basically the “catch basin” for defrost water and condensation. Under normal conditions,
water drips into the pan and evaporates. But if the pan is cracked, shifted out of position, or collecting more water than
can evaporate (hello, high humidity), you’ll see leaks underneath the unitoften near the front.
Signs This Is Your Problem
- Water shows up underneath the fridge even when defrost drain and water line look fine.
- The puddle seems to appear in cycles (for example, after a defrost period).
- You recently moved the fridge and the leak started afterward (a pan can get knocked out of place).
Step-by-Step Fix
- Unplug the fridge and pull it forward carefully.
-
Locate the drain pan. Depending on the model, it may be accessed from the front toe-kick area or from the rear.
Some models have non-removable pans. - Inspect for cracks and check that it’s sitting correctly on its supports or rails.
- Clean it with warm soapy water (and rinse well). Built-up grime can cause odors and slow evaporation.
-
Replace if cracked (usually a part replacement, sometimes DIY depending on design). If the pan isn’t easily accessible,
or if you suspect a related fan/airflow issue, a service tech may be the smartest move. - Re-level the fridge after moving it backan uneven fridge can cause pan overflow at the front edge.
Small but Important Detail
If you recently deep-cleaned your fridge and shoved it back hard against the wall, you might have pinched a water line or
shifted the drain pan. “Accidental sabotage” is surprisingly commonso don’t skip a careful look after any move.
When to Call a Pro (A.K.A. When DIY Stops Being Fun)
- The leak appears to come from inside sealed walls or inaccessible internal plumbing.
- You see water near control boards, wiring, or electrical connectors.
- The water inlet valve appears stuck “open,” or leaks persist even with the shut-off valve on.
- Your refrigerator requires major disassembly to access the drain tube (common for some top-freezer designs).
- You’ve tried the fixes and the leak returns quicklysomething deeper may be going on (defrost system, fan airflow, or internal tubing).
Prevent Leaks With These 5-Minute Habits
- Keep the defrost drain area clear: avoid blocking vents and drain channels with food packages.
- Replace filters on schedule: wrong or worn filters can cause housing leaks and pressure issues.
- Wipe gaskets regularly: clean seals seal better (and mold has fewer hobbies).
- Don’t overload door shelves: a sagging door can weaken the seal and invite condensation.
- Check leveling after moves: even a small tilt can cause drainage problems over time.
Extra: Real-World “Leak Experiences” (The Stuff People Actually Run Into)
You can read troubleshooting lists all day, but leaking refrigerators have a special talent for showing up in the least
convenient wayslike five minutes before guests arrive or right after you stocked up on groceries. Here are a few common
“experience patterns” homeowners and repair techs talk about all the time, plus what usually fixes them.
1) “The Crisper Drawer Lake”
This one starts with a mystery: the kitchen floor is dry, but the bottom of the fridge looks like it’s hosting a tiny
water park under the produce drawers. It’s easy to blame a leaky containeruntil you wipe everything down and the water
comes back. In many cases, it’s the defrost drain partially clogged, so water can’t flow down fast enough and ends up
spilling into the fresh food section. The classic “aha!” moment is when you flush the drain and finally hear water
trickling into the drain pan below. The best part? The fix is usually cheap. The worst part? You have to remove and
clean out drawers that have been marinating in confirmation that you forgot the spinach two weeks ago.
2) “The Puddle That Only Appears on Ice Day”
Some leaks are dramatic and constant. Others are sneaky and performance-basedonly happening when the ice maker fills.
People often notice a puddle behind the fridge that comes and goes, or they find dampness right after a new batch of ice
drops. That points you toward the water supply line, inlet valve, or fittings. Sometimes it’s as simple as a connection
that loosened over time. Other times, the fridge got pushed back a little too aggressively and kinked the line just enough
to create a slow drip. The “experience lesson” here is to pull the fridge out and watch it like a hawk while the ice maker
cycles. A flashlight and patience beat guessing.
3) “The Filter Change That Turned Into a Water Feature”
Replacing a water filter feels like the safest DIY task on earthuntil it isn’t. A surprisingly common story is:
“I changed the filter and now my refrigerator is leaking.” Usually the filter didn’t lock in fully, the wrong model was used,
or an O-ring got mis-seated. The fix is often to remove the filter, inspect for cracks, make sure the sealing rings are present,
then reinstall it firmly. It’s a good reminder that “hand-tight” doesn’t mean “kind of in there.” With filters, the final click
matters. Also: if your new filter looks slightly different from the old one, double-check the model compatibility before you blame
your fridge for having opinions.
4) “The Door That Doesn’t Want to Close”
Another real-life favorite: someone notices the fridge door doesn’t shut as smoothly anymore (or a kid leaves it ajar by half an inch),
and suddenly there’s condensation and water near the front of the unit. Warm air sneaks in, moisture condenses, and the fridge starts
sweating like it ran a marathon. The combination fix is often leveling + gasket care: adjust the leveling legs so the fridge isn’t leaning,
clean the gasket so it seals, and use the dollar bill test to find weak spots. People are often shocked that a dirty gasket can cause
a leakbut grime can keep the seal from contacting the frame evenly. A little cleaning can save you from a lot of towel laundry.
5) “The Leak After a Move”
If the fridge started leaking right after you rearranged the kitchen or moved into a new place, suspect a shifted drain pan, a pinched water
line, or a unit that’s now sitting on an uneven floor. It’s not that the refrigerator suddenly became “old”it’s that it’s now parked at a
weird angle or something got bumped. In these cases, the simplest experience-based approach works best: re-level the fridge, inspect the drain
pan position, and check the water line routing so it isn’t kinked. Many “mystery leaks” vanish once the fridge is sitting correctly again.
The big takeaway from these real-world patterns is that refrigerator leaks are often mechanical, not magical. They tend to come from the same few
systems: defrost drainage, pressurized water supply, door sealing/condensation, and the drain pan. If you tackle those in a logical order, you’ll
usually solve the issue without replacing the entire applianceor turning your kitchen into a slip-and-slide.
Conclusion
Fixing a leaking refrigerator is mostly about matching the symptom to the system: if water is inside, suspect the defrost drain; if it’s behind the
fridge, suspect the water line and inlet valve; if it’s near the doors, think condensation and leveling; and if it’s underneath, don’t forget the
drain pan. Take it step-by-step, stay safe, and remember: the goal is a dry kitchen floor, not a new hobby in emergency mopping.