Table of Contents >> Show >> Hide
- Before You Start: A Quick Reality Check
- Way 1: Replace an Existing Built-In Dishwasher (Same Location)
- Way 2: Install a Built-In Dishwasher With a Plug-In Power Cord
- Way 3: Install a Built-In Dishwasher as a New Add-On (No Previous Dishwasher)
- Way 4: Install a Portable or Countertop Dishwasher (No Permanent Plumbing)
- Common Installation Mistakes (and How to Avoid Them)
- Final Test & First-Run Checklist
- Conclusion
- Real-World Experiences: 10 Lessons People Learn the Hard Way (About )
- 1) The “it should fit” moment is a lie unless you measured height and flooring
- 2) The high loop is boringuntil it prevents a gross problem
- 3) The garbage disposal plug has humbled many confident DIYers
- 4) Old supply lines don’t enjoy being “repositioned”
- 5) “Snug” beats “gorilla tight” on plastic parts
- 6) Leveling matters more than it seems
- 7) The door needs clearance you didn’t think about
- 8) The first test cycle is not optional
- 9) Retail delivery crews aren’t always installers
- 10) Sometimes the smartest DIY move is hiring out one piece
Installing a new dishwasher can feel like adopting a small, stainless-steel pet: it needs food (electricity),
water, a place to live (a cabinet opening), and it will occasionally make mysterious noises at 2 a.m.
The good news? Most dishwasher installation projects fall into a few common scenariosand once you know
which one you’re in, the process becomes a lot less “DIY panic” and a lot more “I’ve got this.”
Below are four practical ways to install a new dishwasher, from the simplest swap to a full
retrofit. You’ll get step-by-step guidance, decision points, and the real-life gotchas that trip people up
(spoiler: the garbage disposal plug has ruined many a Saturday).
Before You Start: A Quick Reality Check
Dishwasher installation touches plumbing and electricity. That’s a power couple,
but not the fun kind. If you’re not comfortable shutting off the breaker, identifying a water shutoff valve,
or verifying connections for leaks, it’s smart to hire a licensed pro for at least the electrical portion.
There’s zero shame in outsourcing the parts that can biteliterally or financially.
Measure like you mean it
Most built-in dishwashers are designed for a standard under-counter opening. Still, “standard” in home projects
often means “standard-ish.” Measure width, height, and depth, and check door clearance so the door can open fully
without smacking an oven handle or trapping you in the kitchen like a stainless-steel escape room.
Gather common tools and parts
- Screwdrivers (Phillips and flathead)
- Adjustable wrench or two (because the first one will vanish)
- Pliers and/or channel-locks
- Level (short torpedo level works great)
- Towel and shallow pan (for “surprise water”)
- New water supply line (often braided stainless)
- Hose clamp(s) for the drain connection
- Thread seal tape (as needed for threaded fittings)
- Mounting brackets (top-mount or side-mount, depending on your counter/cabinets)
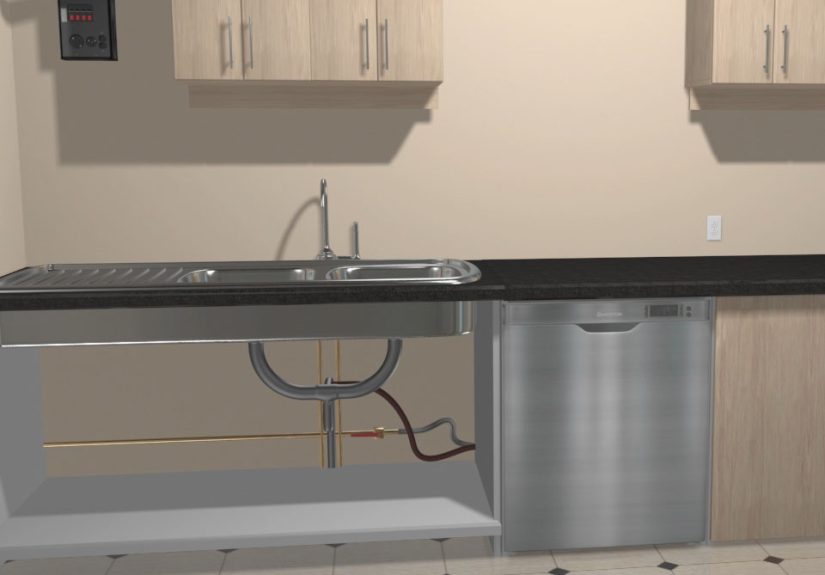
Know your three essential connections
- Hot water supply: typically from a shutoff valve under the sink.
- Drain hose: runs to a garbage disposal inlet or a sink drain tailpiece.
- Power: either plug-in (cord) or hardwired (direct wire) depending on the setup and local requirements.
Way 1: Replace an Existing Built-In Dishwasher (Same Location)
This is the classic “out with the old, in with the new” scenario. If you already have a built-in dishwasher
in the same spot, with existing water, drain, and power nearby, you’re in the easiest lane of dishwasher
installation.
Best for
- Replacing a dishwasher that’s already under the counter
- Keeping the same location and hookup points
- DIYers who can handle careful disconnect/reconnect work
Step-by-step: swap-in installation
-
Turn off power. Switch off the dishwasher circuit at the breaker panel. Don’t rely on the
control panel being “off.” Dishwashers can still be energized even when they look asleep. -
Shut off the water supply. Under the sink, close the hot water shutoff valve feeding the dishwasher.
If you’re not sure which valve it is, follow the small line that heads toward the dishwasher opening. -
Remove the toe-kick panel. The toe kick is the skinny panel at the bottom front. Unscrew it to access
the water line and electrical junction (varies by model). This is also where dust bunnies go to retire. -
Disconnect the drain hose. Look under the sink for where the dishwasher drain hose attachesusually
to the garbage disposal inlet or sink drain tailpiece. Loosen the clamp and pull the hose off. Keep a towel handy. -
Disconnect the water line. Under the dishwasher (behind the toe kick), you’ll typically see the water
supply connection. Place a pan, then loosen the fitting slowly. -
Disconnect power. If it’s plug-in, unplug it from the outlet under the sink. If it’s hardwired,
open the junction box and disconnect the wire connections (and ground). -
Remove mounting screws. Dishwashers are usually secured to the underside of the countertop (top-mount)
or to the sides of the cabinet (side-mount). Remove the screws holding it in place. -
Slide the old unit out. Gently pull it forward. If it feels stuck, check for hidden screws, snagged
hoses, or leveling legs catching the floor. -
Prep the new dishwasher. Install the manufacturer-recommended fittings, such as the 90-degree elbow
at the water inlet. Attach mounting brackets as instructed. -
Route the hoses and power. Feed the drain hose, water line, and power cord (or wiring) through the cabinet
opening toward the sink. Keep lines from kinking. -
Connect the drain correctly. Attach the drain hose to the disposal or tailpiece using a clamp.
Create a high loop under the counter (or use an air gap if required in your area) to help prevent backflow. -
Connect the water supply. Attach the supply line to the dishwasher inlet elbow and to the shutoff valve.
Tighten snuglydon’t Hulk-smash plastic threads. -
Slide, level, and secure. Carefully push the dishwasher into the opening, level it side-to-side and front-to-back,
then fasten it with the mounting screws. -
Restore water and power, then test. Turn the water back on, check for leaks, then restore power at the breaker.
Run a short cycle and watch the connections during fill and drain.
Pro tip
If you’re connecting the drain hose to a garbage disposal inlet, confirm the knockout plug inside the disposal’s
dishwasher port has been removed. If not, the dishwasher will fill, try to drain, and then sulkloudly.
Way 2: Install a Built-In Dishwasher With a Plug-In Power Cord
Some dishwashers are designed to be plugged into an outlet (often located in the cabinet under the sink).
This method can make future servicing easier because you can unplug the unit without opening wiring connections.
Still, your setup has to be safe and code-compliant for your area.
Best for
- Kitchens with an accessible outlet under the sink (or nearby cabinet)
- Dishwashers that allow cord-connection (many do, with a cord kit)
- Homeowners who want easier disconnect for servicing
How it differs from Way 1
The plumbing steps are similar. The difference is the electrical connection: instead of hardwiring in a junction box,
you install a power cord kit (if not pre-installed) and plug the dishwasher into an outlet.
Step-by-step: plug-in power setup
- Confirm your dishwasher supports a power cord. Check the manual. Some models can be hardwired or corded; others are fixed.
- Install the cord kit. Usually this involves connecting the cord leads in the dishwasher’s electrical box using a strain relief clamp.
- Route the cord safely. Keep it away from sharp edges and moving parts. Don’t pinch it when sliding the dishwasher into place.
- Plug into the outlet. Use the correct outlet location as recommended. If your outlet situation is questionable, hire an electrician.
Why people like this option
- Easier service: unplug instead of opening a junction box
- Cleaner troubleshooting: quick way to fully reset power
- Fewer wire connections inside the dishwasher (depends on model)
Way 3: Install a Built-In Dishwasher as a New Add-On (No Previous Dishwasher)
This is the “we’re adding a dishwasher to a kitchen that never had one” scenario. It’s absolutely doable, but it’s
more like a small remodel than a quick appliance swap. You may need cabinet modifications, a dedicated electrical
circuit, a new shutoff valve, and a clean drain connection.
Best for
- Older kitchens or rentals you own (with permission) that never had a dishwasher
- Homeowners ready for light carpentry and possibly electrical work
- Anyone who wants a built-in look and long-term convenience
Key planning questions
- Where will it fit? Many installs replace a base cabinet, a set of drawers, or a narrow cabinet section.
- Can you run water and drain lines safely? Typically you tap into the hot water line under the sink and run a drain line to the same area.
- Do you have proper electrical supply? Many dishwashers require a correctly sized circuit and safe connection method per local rules.
Step-by-step: new dishwasher retrofit
-
Create the opening. Remove the cabinet section (or modify it) to match your dishwasher’s required opening.
Protect surrounding cabinets and flooring from damage. -
Plan the route for utilities. You’ll typically drill access holes in the side of the sink base cabinet for:
water supply line, drain hose, and power cord/wiring. - Add a shutoff valve (if needed). Many installations use a dedicated shutoff for the dishwasher supply line under the sink.
-
Set up the drain connection. Connect to a garbage disposal inlet or dishwasher tailpiece above the trap.
Add a high loop under the counter (or an air gap if required). -
Handle electrical safely. If you need a new circuit or outlet, hire a licensed electrician. This is not the place for
“I watched a video once.” - Install, level, and secure the dishwasher. Slide it into the new opening, level carefully, then anchor using top- or side-mount brackets.
- Test thoroughly. Run a short cycle and inspect the plumbing connections during fill and drain. Check the door seal area for drips.
Cost and complexity notes (no sugarcoating)
A retrofit can cost more than a replacement because you may be paying for cabinet work, electrical upgrades, and new plumbing connections.
If you’re on the fence, price out the electrical and cabinetry pieces firstthose are usually the “big swings.”
Way 4: Install a Portable or Countertop Dishwasher (No Permanent Plumbing)
If you can’t (or don’t want to) modify cabinets and run new lines, a portable or countertop dishwasher is the “commitment-light”
approach. Many portable models connect to a kitchen faucet with a special adapter and drain back into the sink.
Countertop units often do something similar, just from a higher altitude.
Best for
- Renters (with landlord restrictions)
- Small kitchens with limited cabinetry
- People who want dishwasher convenience without a remodel
Step-by-step: portable dishwasher hookup (typical setup)
- Confirm faucet compatibility. Many setups require removing the faucet aerator and attaching an adapter.
- Attach the hose coupler. Connect the portable dishwasher’s coupler to the faucet adapter and ensure it’s seated properly.
- Turn on hot water. Portable units often use the hot water line from the faucet. Open the faucet fully as instructed by your model.
- Check for leaks immediately. Watch the adapter and hose connection during the first minute of filling.
- Drain safely. Ensure the drain hose is routed securely to the sink so it won’t whip around like an angry garden hose.
- Disconnect and store. When done, shut off water, release pressure per the unit instructions, and disconnect the coupler.
Important caution
Many manufacturers advise against connecting portable appliances to certain pull-out/pull-down spray faucet wands.
If you have a modern pull-down faucet, check your faucet and dishwasher guidance carefullyor consider a countertop model that can be filled differently.
Common Installation Mistakes (and How to Avoid Them)
1) Skipping the high loop (or air gap)
A properly routed drain hose helps prevent dirty sink water from sneaking back into your dishwasher. Create a high loop
under the countertop as instructed, or install an air gap where required.
2) Forgetting the garbage disposal knockout plug
If you connect the dishwasher drain to a disposal inlet that still has the plug inside, the dishwasher won’t drain properly.
Result: standing water, weird smells, and you googling “why is my dishwasher mad at me.”
3) Not leveling the dishwasher
A dishwasher that’s out of level can wash poorly, leak, or leave the door alignment slightly off. Take the extra five minutes.
Your future self will thank you with clean plates and fewer curse words.
4) Reusing old, tired supply lines
Old lines can fail after being disturbed. Replacing the water supply line during a new dishwasher installation is often inexpensive insurance.
5) Over-tightening fittings
Tight is good. Over-tight is cracked plastic and regret. Tighten to snug and leak-free, then re-check after a test cycle.
Final Test & First-Run Checklist
- Water on? Shutoff valve fully open.
- Power on? Breaker restored and unit powers up.
- No leaks? Check water inlet, shutoff valve, and drain connection under the sink during fill and drain.
- Door seals correctly? No rubbing, no odd gaps.
- Unit is secure? Mounting screws installed; dishwasher doesn’t tip when racks slide out.
- Drain works? Water exits the tub and flows freely to the sink/disposal.
If anything looks off, stop and fix it before you declare victory. Water damage is an expensive houseguest.
Conclusion
There isn’t just one “right” way to install a new dishwasherthere’s the right way for your kitchen.
A simple replacement can be a solid DIY project when hookups already exist. A plug-in setup can make future service easier.
A brand-new retrofit is bigger but totally achievable with good planning (and professional help where needed).
And if permanent installation isn’t an option, portable and countertop dishwashers can still save you from a life of endless handwashing.
Whatever route you choose, focus on the basics: safe power, solid plumbing connections, a proper drain setup, and a dishwasher that’s level and secured.
Do that, and your new machine will quietly handle the dinner mess while you do something more importantlike enjoying your evening.
Real-World Experiences: 10 Lessons People Learn the Hard Way (About )
People who install a new dishwasher tend to share the same “wish I’d known that sooner” moments. Here are ten real-world
lessons that pop up again and againthink of them as the unofficial folklore of dishwasher installation.
1) The “it should fit” moment is a lie unless you measured height and flooring
Many kitchens have had new flooring installed over old flooring. That can slightly raise the floor height and make it harder
to slide a dishwasher out (or in). Installers often discover this only after the old dishwasher is halfway out and stuck like a ship
in a canal. Measuring height and checking leg adjustment range before you start saves frustration.
2) The high loop is boringuntil it prevents a gross problem
Homeowners sometimes skip the high loop because it “looks optional.” Then they notice cloudy water in the dishwasher after the sink backs up,
or odors that won’t quit. A proper high loop (or air gap, where required) is a small detail that protects your dishwasher from backflow drama.
3) The garbage disposal plug has humbled many confident DIYers
A brand-new disposal often ships with the dishwasher inlet knockout still intact. The dishwasher fills, washes, and then fails to drainperfect.
People usually assume a defective new dishwasher. The fix is simple, but the lesson sticks: always verify the drain path is open before you run a full cycle.
4) Old supply lines don’t enjoy being “repositioned”
A supply line that hasn’t moved in ten years can start leaking after you disturb it. Many installers routinely replace the supply line and the
fitting washers as cheap prevention. It’s not glamorous, but neither is mopping at midnight.
5) “Snug” beats “gorilla tight” on plastic parts
Over-tightening fittings can crack plastic valves or strip threads. People often learn this when a slow leak appears after the first hot cycle.
The smarter move: tighten gently, run a test, then re-tighten only if needed.
6) Leveling matters more than it seems
A slightly unlevel dishwasher can cause the door to misalign or let water splash where it shouldn’t. Installers often spend extra time on the front legs
and check level in multiple spots. It’s one of those “annoying now, lifesaving later” steps.
7) The door needs clearance you didn’t think about
Even if the dishwasher fits the opening, the door has to open fully without hitting an adjacent cabinet pull or the edge of an oven door.
People sometimes discover the conflict only after installationthen come the awkward compromises and re-alignments.
8) The first test cycle is not optional
The best installers treat the first run as a supervised probation period. They watch fill, peek under the sink during drain, and check connections
right away. Catching a drip early is far cheaper than finding it after the cabinet base swells.
9) Retail delivery crews aren’t always installers
Many shoppers assume delivery includes installation. In reality, installation may be separate or require a scheduled pro. Knowing that ahead of time prevents
the “now I have a dishwasher in my living room” situation.
10) Sometimes the smartest DIY move is hiring out one piece
A common approach is DIY for removal, cabinet prep, and plumbing connectionsthen hiring an electrician for the circuit or hardwiring if anything is uncertain.
That hybrid strategy keeps the project affordable while reducing risk.
Bottom line: a new dishwasher installation is mostly about thoughtful prep and small detailsrouting hoses cleanly, preventing backflow, leveling carefully,
and testing like you actually want to sleep tonight.