Table of Contents >> Show >> Hide
- Before You Cut: Denim Prep That Makes Everything Easier
- 1) The Pocket Wall Organizer (a.k.a. Your New “Where Did I Put My…” Station)
- 2) The Two-Jeans Tote Bag (Sturdy Enough for Groceries, Cute Enough for Compliments)
- 3) The Gardening Apron / Tool Belt (Because Pockets Are a Lifestyle)
- 4) Denim Coasters (Tiny Projects, Big Satisfaction)
- 5) The Patchwork Denim Pillow Cover (Your Sofa’s New Favorite Accessory)
- Donate the Rest (Without Donating Your Guilt)
- Common “Denim Problems” (And How to Outsmart Them)
- Extra : Real-World Experiences from Denim Upcyclers
- Conclusion
You know that “donation pile” chair? The one that’s basically a denim-based lifeform at this point? Before you hand over your retired jeans,
consider giving a few pairs one more glorious tour of dutyas a tote, an organizer, or the cutest coasters your coffee table has ever seen.
Upcycling isn’t just a feel-good hobby; it’s a practical way to keep sturdy fabric in use longer. Denim is basically the golden retriever of textiles:
loyal, tough, and oddly willing to do anything you askcarry groceries, hold garden tools, and protect your table from sweaty iced coffee.
Below are five denim crafts that use the “best parts” of jeans (pockets, waistbands, seams, and those bulletproof hems) without requiring couture-level
sewing skills. Expect specific steps, smart shortcuts, and a few friendly warningslike why your sewing machine may briefly sound like it’s chewing gravel.
Before You Cut: Denim Prep That Makes Everything Easier
1) Sort your jeans like a crafty librarian
- Keep: sturdier pairs (non-stretch or low-stretch), jeans with fun pocket stitching, and darker washes for a cleaner look.
- Use for small projects: ripped knees, stained thighs, or jeans that are “fine” except for one tragic zipper situation.
- Donate: gently used jeans in good condition that someone can actually wear (more on donation standards later).
2) Pre-wash (yes, even if they’ve already lived through college)
Wash and dry your jeans before crafting. This removes dirt and helps avoid surprise shrinkage after you’ve made something that fits perfectly…
until it doesn’t. If you’re mixing washes (light + dark), consider washing them separately to reduce dye transfer.
3) Deconstruct strategically (a.k.a. don’t fight thick seams unless you must)
- Use a seam ripper to free belt loops, remove waistbands, and save pockets cleanly.
- Cut next to bulky seams instead of through them when you don’t need the thickness.
- Save hems and flat-felled seams for projects where thickness is a feature (coasters, handles, straps).
4) Quick sewing settings for denim success
- Needle: a jeans/denim needle (often around 90/14 for medium-weight denim; size up for thicker layers).
- Thread: all-purpose is fine for many crafts; topstitch thread looks great on handles and visible seams.
- Stitch length: slightly longer stitches can help when topstitching or sewing thicker layers.
- Pro tip: slow down over bulky intersections (like pocket corners). Your needle will thank you by not snapping dramatically.
1) The Pocket Wall Organizer (a.k.a. Your New “Where Did I Put My…” Station)
Jean pockets are already tiny storage units with reinforced edgesso turning them into a wall organizer is basically denim fulfilling its destiny.
This craft is ideal for mail, sunglasses, dog leashes, craft scissors, or that one charger that’s always missing right when your phone hits 2%.
What you’ll need
- 4–8 back pockets (cut from jeans with at least 1/2″ fabric around each pocket)
- A sturdy backing: a canvas frame, corkboard, or a wood board
- Staple gun or short screws (or strong fabric glue for a no-sew version)
- Optional: grommets + a dowel/rod for hanging, labels, iron-on patches
How to make it
- Harvest pockets: Cut pockets out with extra fabric around them to make attaching easier.
- Plan the layout: Arrange pockets on your backing. Mix sizes, alternate washes, and leave room for “tall-pocket” items.
- Attach pockets:
- Fast: Staple along the sides and bottom edges (avoid stapling the pocket opening shut).
- Clean: Sew pockets onto a denim panel first, then attach the panel to the backing.
- No-sew: Use heavy-duty fabric glue, press firmly, and let cure fully before loading.
- Hang it: Add picture hooks, D-rings, or grommetswhatever matches your wall situation and patience level.
- Upgrade: Add a strip of denim at the top as a “header,” label each pocket, or sew on key hooks under the bottom row.
Clever variations: Make one pocket row shallow for mail, one deep for tools, and one “junk drawer pocket” for everything else. It’s like a dresser, but vertical.
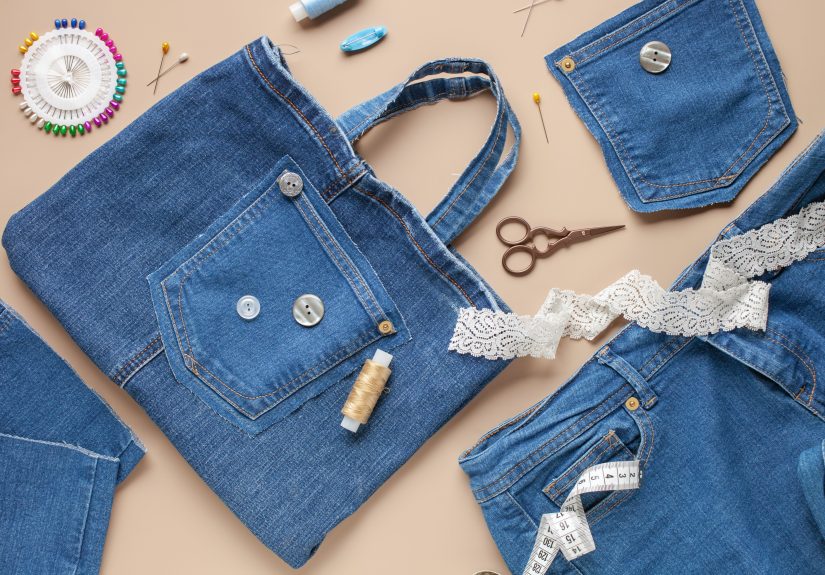
2) The Two-Jeans Tote Bag (Sturdy Enough for Groceries, Cute Enough for Compliments)
Denim totes are popular for a reason: they’re durable, washable, and forgiving if your stitching isn’t perfectly runway-ready.
Using existing pocket panels adds instant charmplus you get built-in compartments without doing extra math.
What you’ll need
- 2 pairs of jeans (more fabric options, more pocket choices)
- 1 yard of lining fabric (cotton works well)
- Fusible interfacing (optional but helpful for structure)
- Denim needle, thread, clips/pins, scissors/rotary cutter
- Optional: magnetic snap, zipper pocket, or key leash
How to make it (simple tote version)
- Cut large panels: Open the legs into flat pieces. Cut two rectangles for the outer bag (about 14″ x 16″ each is a friendly size).
- Add pockets: Position a back pocket panel on one tote side and stitch around the sides and bottom to secure.
- Create depth: Sew the tote sides together, then box the bottom corners (pinch corners into triangles and stitch across).
- Make straps: Use the waistband, belts, or long denim strips. Stitch straps securely with an X-box (a square with an X through it).
- Add lining: Sew a lining bag, insert it inside the denim bag (right sides facing), stitch around the top, then turn and topstitch.
- Finish strong: Topstitch the top edge for structure and a polished look. Add a snap if you want closure.
Clever upgrade: Combine different washes (light + dark) intentionallylike “patchwork, but make it modern.” If your jeans panels are small,
piece them together like a mini quilt before cutting your tote shape.
3) The Gardening Apron / Tool Belt (Because Pockets Are a Lifestyle)
If you’ve ever gardened, painted, or tried to do a home project while holding 14 things at once, you already understand why aprons exist.
Denim aprons are especially great for messy tasksdirt, mulch, wood shavings, and “oops, I dropped the screws again.”
What you’ll need
- The top half of jeans (waistband + pockets) or a large thigh section with pockets attached
- Straps: cotton webbing, extra denim strips, or even an old belt
- Optional: grommets, D-rings, or a towel loop
How to make it
- Cut the base: If using the jeans top, cut straight across the legs below the pockets (leave a little extra length if you want more coverage).
- Reinforce edges: Fold raw edges under twice and stitch, or bind with bias tape. (Denim frays enthusiastically, like it’s competing in a sport.)
- Add straps:
- Waist tie: Stitch ties to each side seam area.
- Neck strap: Add a strap to the waistband and create an adjustable loop with D-rings.
- Customize pockets: Sew smaller denim scraps on the front to create tool slots (pruners, seed packets, pens, small trowel).
- Optional upgrades: Add a hammer loop made from a belt loop, or a towel loop made from a strip of hem.
Clever variation: Make it a half-apron (tool belt style) for comfort, or add a split front panel so you can kneel without feeling like you’re wearing a denim parachute.
4) Denim Coasters (Tiny Projects, Big Satisfaction)
Denim coasters are the perfect “I want to craft but I also want to finish something today” project.
Bonus: thick denim is great at protecting surfaces, especially when layeredlike a tiny quilt that lives under your mug.
What you’ll need
- Denim scraps (pocket corners, seams, or flat sections)
- Backing: cork circles/squares, felt, or extra denim layers
- Optional: batting for a puffier “mug rug” feel
- Thread, scissors, sewing machine (or fabric glue for no-sew)
Three easy coaster styles
A) Pocket-Square Coasters (instant design, zero fuss)
- Cut 4″ x 4″ squares from pocket sections so the stitching becomes the “pattern.”
- Layer with felt or cork behind it.
- Topstitch around the edge, or glue and clamp until set.
B) “Mini Patchwork” Coasters (use the tiniest scraps)
- Sew small denim strips together into a square larger than your coaster size.
- Trim to shape, add backing, and stitch around edges.
- Optional: quilt lines across the top for texture and extra stability.
C) Rolled-Seam Coasters (if you love a chunky look)
- Cut long seam strips and coil them like a cinnamon roll (but less delicious).
- Secure coils with stitching or hot glue as you spiral outward.
- Finish by stitching around the outer edge for strength.
Clever tip: If you want a more “intentional farmhouse vibe,” lightly sand the top surface and wash once to soften edges and bring out the texture.
5) The Patchwork Denim Pillow Cover (Your Sofa’s New Favorite Accessory)
If your donation pile includes multiple shades of denim, a patchwork pillow cover is where that variety shines.
Light wash + dark wash + black denim? Congratulationsyou’ve accidentally created a color palette.
What you’ll need
- Denim scraps in a few washes
- One pillow insert (18″ x 18″ is a common size)
- Backing fabric (denim or cotton)
- Optional: fusible interfacing to stabilize stretchy denim pieces
- Closure: envelope back (easiest) or zipper (fancier)
How to make it
- Choose your patch size: 4″ squares are easy to cut and assemble without losing your mind.
- Make a patchwork panel: Sew squares into rows, then sew rows together. Press seams as you go.
- Stabilize if needed: If your denim is stretchy, fuse interfacing to the back of the patchwork panel.
- Cut backing pieces: For an envelope back, cut two rectangles that overlap in the middle (hem the overlap edges).
- Assemble: Place patchwork front right-side up, lay backing pieces on top (right sides down), pin, stitch around edges.
- Finish: Trim corners, turn right-side out, and topstitch for a crisp edge.
Clever upgrade: Use a back pocket as a “remote control holster” on the pillow front.
It’s décor that also prevents the Great Remote Disappearance of 9:47 p.m.
Donate the Rest (Without Donating Your Guilt)
After you’ve rescued the best parts for crafting, you’ll probably still have denim leftovers. If the jeans are wearableclean, safe, and in good condition
donation centers often accept clothing and accessories. If they’re not wearable (heavy stains, severe tears), look for textile recycling options in your area
or repurpose the scraps for stuffing (pet beds), cleaning rags, or future patchwork.
The goal isn’t “save every thread ever.” The goal is smarter use: craft with what you love, donate what can be used, and recycle what can’t.
That’s how your donation pile turns into an actual systemand not a denim-themed reality show.
Common “Denim Problems” (And How to Outsmart Them)
Problem: My machine hates thick seams
Slow down, use a denim needle, and avoid sewing through the thickest parts when you can. If you must cross a bulky seam, hand-walk the needle
(turn the handwheel) to keep control.
Problem: Everything frays like crazy
Double-fold hems, use bias tape, zigzag raw edges, or add a simple line of stitching close to the edge to reduce fraying. Denim will always try to fray a little.
That’s part of its personality. Like a cat. Or glitter.
Problem: My projects look “too homemade”
Topstitching is the fastest way to look more polished. Use consistent seam allowances, press seams, and repeat design details (same pocket style, matching thread)
so it looks intentional, not accidental.
Extra : Real-World Experiences from Denim Upcyclers
Ask anyone who’s tackled a donation pile of jeans and you’ll hear a familiar story: the first cut is the hardest, and then suddenly you’re unstoppable.
The jeans have been sitting there for monthsmaybe yearsbecause they feel “too useful” to toss, but also too broken (or too emotionally complicated) to wear.
Turning them into crafts is often the sweet spot where practical meets satisfying.
One common experience is discovering how different jeans behave once they’re off-duty. Non-stretch denim usually feels like a dreamstable, crisp, and easy to
sew into clean shapes. Stretch denim can be sneakier: it looks normal until you stitch it, and then it grows or ripples like it’s trying to escape the project.
Many crafters learn to stabilize stretch denim with interfacing or reserve it for smaller pieces (like coasters) where a little flexibility isn’t a dealbreaker.
Another “aha” moment is realizing that jeans are basically pre-engineered craft kits. The back pockets are already reinforced and decorative.
The waistband is already structured and strong. The hems are already finished. Once you start seeing jeans this way, your crafting brain rewires itself:
you stop thinking, “I need to sew a pocket,” and start thinking, “I already have eight pocketswhat do I want them to do?”
That shift is why projects like a pocket wall organizer feel so empowering. You’re not building from scratch; you’re remixing something that already works.
People also tend to underestimate the emotional payoff of small finishes. A tote bag that stands up on its own. A patchwork pillow that pulls together a room.
Coasters that make your coffee routine feel oddly fancy. These wins matter because they turn “old clothes” into useful objects you see every day.
And unlike some crafts that end up in a drawer, denim projects often earn a permanent spot in your actual life.
Of course, there are learning momentslike the first time you hit a thick seam and your machine makes a sound best described as “regret.”
That’s when you discover the value of slowing down, swapping to a denim needle, and trimming bulky seam allowances.
Many denim upcyclers also become passionate advocates for using clips instead of pins (because pins + thick denim = tiny bent metal souvenirs).
The most relatable experience might be this: you start with one projectjust oneand suddenly your donation pile feels less like clutter and more like inventory.
You begin sorting jeans by wash, pocket style, and fabric weight like you’re running a tiny denim boutique (open weekends, payment accepted in compliments).
And when you finally donate what’s still wearable, it feels lighternot because you “got rid of stuff,” but because you made intentional choices.
That’s the secret magic of denim crafting: it’s not only about making things. It’s about turning indecision into momentum, one pocket at a time.
Conclusion
If you’ve got a stack of jeans waiting to be donated, you’ve also got a stack of opportunities. Start small with coasters or a pocket organizer,
then level up to a tote or patchwork pillow when you’re ready. Denim is forgiving, durable, and practically begs to be repurposedso pick one project,
raid the pocket stash, and give your donation pile a glow-up.