Table of Contents >> Show >> Hide
- 1. Seed Starting Trays (or Cell Packs)
- 2. High-Quality Seed Starting Mix
- 3. Grow Lights for Strong, Healthy Seedlings
- 4. Heat Mats for Reliable Germination
- 5. Humidity Domes (Seedling Covers)
- 6. Plant Labels (Because You Will Forget What You Planted)
- 7. Watering Tools (Gentle Makes All the Difference)
- 8. Fertilizer for Seedlings (Weak but Consistent)
- Putting It All Together: Creating an Indoor Seed-Starting Setup
- Additional : Real-World Experiences with Starting Seeds Indoors
- Lesson 1: Light Distance Truly Matters
- Lesson 2: Overwatering Happens Fast
- Lesson 3: Heat Mats Are Worth the Hype
- Lesson 4: Airflow Prevents Problems
- Lesson 5: Don’t Skip Hardening Off
- Lesson 6: Use Labels Like Your Life Depends on It
- Lesson 7: Seed Quality Makes a Difference
- Lesson 8: Starting Seeds Indoors Saves MoneyLots of It
If you’ve ever dreamed of raising garden seedlings so perfect that even your local nursery side-eyes you with respect, starting seeds indoors is your gateway hobby. It’s budget-friendly, wildly satisfying, andif we’re being honestjust a little addictive. But to give those tiny green babies their best chance at life, you need the right setup. Not an over-the-top hydroponic spaceship (unless that’s your thing), just a curated collection of practical tools and materials trusted by gardeners across the United States.
After digging through dozens of expert tips from reputable U.S. gardening sitesthink Better Homes & Gardens, Family Handyman, Gardener’s Supply Company, Fine Gardening, The Spruce, Modern Farmer, and othersI’ve distilled what actually matters. Below are the eight essential items you need to successfully start seeds indoors, keep them thriving, and avoid rookie frustrations (like leggy seedlings and moldy soil). Let’s get growing.
1. Seed Starting Trays (or Cell Packs)
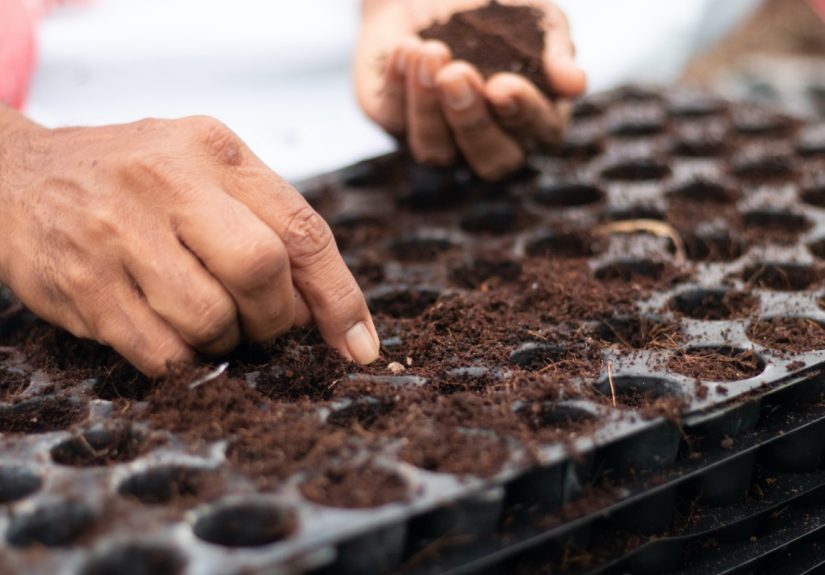
Seed starting trays are the backbone of any indoor seed-starting system. They come in various configurationsindividual cells, open trays, or plug traysand help you keep seedlings organized and easy to transplant. Beginners often lean toward cell packs because they reduce root disturbance and keep moisture levels more consistent.
For sturdier setups, reusable plastic trays or biodegradable options like peat or coir pots work well. They’re ideal for tomatoes, peppers, herbs, annual flowers, and more. Look for trays with matching humidity domes to create a mini-greenhouse environment during germination.
2. High-Quality Seed Starting Mix
Regular garden soil? Too heavy. Potting mix alone? Still not airy enough. A high-quality seed starting mix is the gold standard because it’s lightweight, fine-textured, and drains beautifully. Many gardeners prefer mixes containing peat moss or coco coir, perlite, and vermiculite. They retain moisture without waterlogging seeds.
The magic here is sterility. A sterile mix dramatically reduces the risk of damping-off diseasea fungal issue that causes seedlings to collapse dramatically overnight, ruining your day (and your tray). So start with the right mix and keep stress levels low.
3. Grow Lights for Strong, Healthy Seedlings
If you’ve tried starting seeds in a dark kitchen corner, you know how quickly seedlings stretch into spindly, floppy noodles. This happens because indoor light is rarely bright enough. LED grow lights or full-spectrum fluorescent fixtures fix this instantly. They allow you to control distance, duration, and intensity.
Keep lights about 2–4 inches above seedlings and run them for 14–16 hours a day. Your seedlings won’t just survivethey’ll bulk up like tiny powerlifters. Many U.S. gardeners swear by adjustable light stands for flexibility as plants grow.
4. Heat Mats for Reliable Germination
Most seeds germinate best in warm soilusually between 70°F and 80°F. Heat mats provide consistent bottom warmth, speeding up germination for warmth-loving crops like tomatoes, peppers, and eggplants.
Even cool-season vegetables such as lettuce or kale benefit from a little warmth during germination. Just remove the mats once seedlings sprout to prevent overheating. A simple tool, but one that can improve germination rates dramatically.
5. Humidity Domes (Seedling Covers)
Humidity domes trap moisture and warmth, creating a cozy incubator that seeds adore. They prevent the mix from drying out too quickly and help maintain even temperatures. Domes are especially useful for slow or stubborn seeds.
Just remember: once your seedlings appear, crack the dome or remove it entirely. Too much humidity after emergence leads to mold, fungal growth, and other drama you don’t want in your seed-starting setup.
6. Plant Labels (Because You Will Forget What You Planted)
Every gardener has done itthinking, “I’ll remember which row is basil!” Spoiler: you won’t. Plant labels save you confusion and help you track what sprouted when. Use anything from wooden stakes to plastic tags or even repurposed popsicle sticks.
For bonus points, jot down the sowing date. You’ll thank yourself later when comparing germination timelines or mapping your garden layout.
7. Watering Tools (Gentle Makes All the Difference)
Seedlings are delicate creatures; blasting them with a kitchen spray hose is basically a natural disaster. Instead, use a gentle spray bottle, a fine-mist pump, or a watering can with a narrow rose head. The goal is to moisten the surface without disturbing seeds or compacting the soil.
Bottom wateringadding water to the tray and letting the soil wick it upwardis a favorite among expert gardeners. It keeps foliage dry, reduces fungal issues, and encourages stronger root development.
8. Fertilizer for Seedlings (Weak but Consistent)
Seedlings don’t need fertilizer immediately (their seeds contain built-in nutrients), but once they grow their first set of true leaves, a diluted, balanced liquid fertilizer works wonders. Many gardeners use a half-strength mix every 1–2 weeks to help plants grow strong before transplanting outdoors.
Organic options like fish emulsion or kelp-based fertilizers are popular, while synthetic all-purpose solutions work just as well. The key is consistency and avoiding heavy-handed feeding.
Putting It All Together: Creating an Indoor Seed-Starting Setup
These eight tools and materials form a reliable, practical foundation for starting seeds indoors. You don’t need every gadget under the sunjust the essentials that directly impact germination, disease prevention, light exposure, and healthy growth.
Arrange your trays, add your seed starting mix, place them on a heat mat, cover with a dome, and position your grow lights. Water gently, label your rows, and watch the magic unfold. Starting seeds indoors is part science, part art, and entirely thrilling when you see that first green sprout pop through the soil like it’s saying hello.
Additional : Real-World Experiences with Starting Seeds Indoors
Every gardener who starts seeds indoors accumulates storiessometimes triumphant, sometimes humbling, always educational. After years of working alongside gardening pros, studying advice from U.S. horticultural universities, and comparing experiences from home growers across forums and publications, here are some practical insights and real-world lessons that pair perfectly with your eight seed-starting essentials.
Lesson 1: Light Distance Truly Matters
One of the most common beginner mistakes is leaving grow lights too far above the seedlings. I once watched a tray of kale seedlings stretch skyward like desperate giraffes because the lights were hung a foot too high. The fix? Lowering lights to just a few inches above the leaves. The result was night-and-day differentcompact, sturdy seedlings instead of floppy, pale stems.
Lesson 2: Overwatering Happens Fast
The first time I started seeds indoors, I thought I was being nurturing by watering every day. Turns out, seedlings prefer a slightly drier cycle. Wet soil leads to fungal issues, algae, and sad seedlings. Bottom watering changed everything. It encourages strong roots and keeps the surface dry enough to prevent mold.
Lesson 3: Heat Mats Are Worth the Hype
If you’ve ever sown pepper seeds in a chilly room, you know they can take what feels like forever to germinate. With a heat mat, germination happens in half the time. Professional growers frequently use them because they stabilize temperature, especially in winter or drafty homes. Once seedlings sprout, simply turn the mat off to avoid overheating.
Lesson 4: Airflow Prevents Problems
Good airflow is a secret weapon. A small fan on low speed helps reduce fungal disease and encourages sturdier stems. Many gardeners rotate their trays so seedlings don’t lean toward the light. These tiny adjustments make a big difference in plant health.
Lesson 5: Don’t Skip Hardening Off
Starting seeds indoors is only half the journey. If you move seedlings outdoors without hardening them off, they will protest dramaticallydrooping, sun-scorching, or getting windburned. Gradual exposure over 7–10 days is essential, and it separates successful gardeners from frustrated ones.
Lesson 6: Use Labels Like Your Life Depends on It
There’s nothing worse than raising beautiful seedlings only to forget which variety is which. Was this the cherry tomato or the beefsteak? Labels solve this instantly. Some gardeners even color-code tags by plant typevegetables, herbs, and flowers each get their own color.
Lesson 7: Seed Quality Makes a Difference
Even the best tools can’t rescue poor-quality seeds. Choose reputable brands known for high germination rates. Freshness matters tooold seeds may sprout slowly or unevenly. Store seeds in a cool, dry place in airtight containers to preserve viability.
Lesson 8: Starting Seeds Indoors Saves MoneyLots of It
With rising prices at garden centers, starting your own seedlings is one of the most cost-effective ways to garden. A packet of seeds can produce dozens of plants for the cost of a single nursery pot. Beyond savings, the satisfaction of growing from seed is unmatched. It’s an experience that deepens your connection to gardening and gives you more control over varieties, timing, and overall plant health.
When you combine the eight essential tools with real-world experience, seed starting becomes less intimidating and far more rewarding. You’ll grow healthier seedlings, avoid preventable issues, and feel like a plant whisperer every time those first sprouts emerge.