Table of Contents >> Show >> Hide
- Quick Jump
- Before You Build: The Indoor Greenhouse Checklist
- The 9 DIY Indoor Greenhouses
- 1) The Glass Cabinet Greenhouse (a.k.a. the Plant Penthouse)
- 2) The Clear Storage Tote Mini Greenhouse (Cheap, Effective, Slightly Magical)
- 3) The Seed-Starting Tray + Humidity Dome (The Classic Starter Greenhouse)
- 4) The DIY “Grow Rack Greenhouse” (Wire Shelf + Plastic Wrap = Power Couple)
- 5) The Picture-Frame Tabletop Greenhouse (Tiny Greenhouse, Big Personality)
- 6) The Mason Jar or Bell-Cloche Greenhouse (Single-Plant VIP Booth)
- 7) The Repurposed Aquarium Greenhouse (Because Fish Tanks Deserve a Second Act)
- 8) The DIY Propagation Box (High-Humidity “Rooting Nursery”)
- 9) The Zip-Up Mini Greenhouse Shelf (Indoor “Greenhouse Closet”)
- Troubleshooting: Condensation, Mold, and “Why Are They Leggy?”
- Real-World Experience: What DIYers Learn Fast (500+ Words)
- 1) “I built a humidity paradise… and accidentally hosted a mold convention.”
- 2) “My seedlings are strong… but only on the side closest to the light.”
- 3) “I thought my window was bright… until I tried growing basil in January.”
- 4) “I sealed my cabinet perfectly. Now it’s 85°F in there. Help.”
- 5) “Cuttings looked great for two weeks… then melted.”
- 6) “My greenhouse is working… but now I own 73 plants.”
- 7) “The best upgrade wasn’t expensiveit was routine.”
- Final Thoughts
- SEO Tags (JSON)
DIY indoor greenhouse projects are the gardening equivalent of turning your home into a five-star resort… for plants. If you’ve ever stared at a sad winter windowsill and thought, “I could do better,” you’re right. An indoor greenhouse is simply a way to create a tiny, controllable microclimatewarmer, brighter, and/or more humid than the room around itso seeds sprout reliably, cuttings root faster, and tropical houseplants stop acting like they’re auditioning for a drama series.
In this guide, you’ll get 9 DIY indoor greenhouse ideas you can build with everyday materials (and a reasonable amount of patience). Each option includes what it’s best for, how to build it, and the practical “don’t-learn-this-the-hard-way” tips that separate thriving plants from a science experiment you didn’t sign up for.
Before You Build: The Indoor Greenhouse Checklist
An indoor greenhouse is less about the “box” and more about controlling four things: light, humidity, airflow, and temperature. Nail these, and your plants will behave like they’re on a wellness retreat.
1) Light: Your plants want a schedule, not a vibe
Most seedlings and many indoor edible crops do best with long, consistent lightoften around 14–16 hours a day (sometimes up to 16–18 for seed-started transplants). When using LEDs or fluorescents, keep lights close to the canopy so seedlings don’t stretch and flop like tiny giraffes.
- Tip: Use a timer. Your future self will thank you.
- Tip: “Brighter” is not always “closer.” Follow the manufacturer’s distance guidelines, then adjust based on plant response (leggy = needs more light, bleached = too intense/too close).
2) Humidity: High humidity is helpful… until it’s a mold spa
Many tropical houseplants, cuttings, and germinating seeds appreciate higher humidity than a typical heated home. But humidity without ventilation can encourage fungal problems. The sweet spot depends on what you’re growing, but the strategy is universal: trap moisture early, vent gradually later.
- For seed starting: Use a humidity cover during germination, then remove or vent once sprouts appear.
- For cuttings: A humid enclosure helps prevent wilting while roots form, but open it periodically for fresh air.
3) Airflow: The unglamorous secret to sturdy plants
Plants in still, humid air are more likely to develop mold issues, and seedlings may stay weak and spindly. Gentle airflow also helps stems strengthen. A small fan on low (not a hurricane) can make a big difference, especially for seed-starting setups.
4) Temperature: Warm is good, “cooked in a jar” is not
Most indoor greenhouses run warmer than the surrounding room just by trapping air. Add heat mats or direct sun, and temperatures can spike quicklyespecially inside glass containers. If your greenhouse sits in a sunny window, monitor it like you’d monitor a toddler near a marker set.
5) Cleanliness: Prevent problems before they start
Indoor greenhouses concentrate moisture, which means sanitation matters. Clean trays and tools, use fresh seed-starting mix, and avoid overwatering. Many common seedling losses trace back to overly wet conditions and pathogens that thrive in cool, damp environments.
The 9 DIY Indoor Greenhouses
Pick the option that matches your space, budget, and the level of “plant parenting” you actually want to commit to. (No judgment. We all have seasons.)
1) The Glass Cabinet Greenhouse (a.k.a. the Plant Penthouse)
Best for: Tropical houseplants (anthuriums, alocasias, begonias), propagation, and anyone who wants their greenhouse to look like decor instead of “laundry room survival station.”
What it is: A glass-front display cabinet (often IKEA-style) converted into a humidity-holding, lighted growing space.
- Materials: Glass/metal cabinet, LED grow light bars/strips, small USB fans, weatherstripping (optional), power strip, hygrometer/thermometer.
- Build steps:
- Assemble the cabinet and decide where cords will exit (often a small gap or drilled pass-through).
- Mount grow lights at the top (or under shelves) so light reaches every level.
- Add one or two small fans for gentle circulation.
- If you want higher humidity, apply weatherstripping along door seams and add a pebble tray or small humidifier nearby.
- Place plants on trays to catch drips (humidity is great; water damage is not).
- Pro tips: Start unsealed and see how humidity behaves. Many people over-seal, then wonder why the cabinet turns into a fog machine with bonus fungus.
2) The Clear Storage Tote Mini Greenhouse (Cheap, Effective, Slightly Magical)
Best for: Seed starting, rooting cuttings, and “I need something today” greenhouse energy.
What it is: A clear plastic tote used as a lidded mini greenhouse. It traps humidity and warmth, and it’s surprisingly versatile.
- Materials: Clear tote with lid, shallow trays or seedling cells, optional heat mat, optional small vent holes, optional mini fan nearby.
- Build steps:
- Wash and dry the tote (start clean).
- Place trays inside and water lightly.
- Close the lid for germination/rooting. If condensation is extreme, crack the lid or add a few small holes.
- Once seeds sprout or cuttings perk up, vent more often to reduce mold risk.
- Pro tips: Put a label on the lid (date + plant variety). Your future self does not possess telepathy, no matter how confident you feel today.
3) The Seed-Starting Tray + Humidity Dome (The Classic Starter Greenhouse)
Best for: Starting vegetables, flowers, herbs, and anything you want to grow from seed without guessing if your heating system just turned your home into a desert.
What it is: A standard seed tray (often 1020 size or smaller cell packs) topped with a clear humidity cover.
- Materials: Seedling trays/cell packs, humidity dome, seed-starting mix, spray bottle or bottom-watering tray, grow light.
- Build steps:
- Fill cells with damp (not soggy) seed-starting mix.
- Sow seeds at the recommended depth and mist gently.
- Cover with the dome until germination begins.
- As soon as sprouts appear reliably, start venting or remove the dome and move under strong light.
- Pro tips: A dome is a germination tool, not a permanent roof. The longer seedlings live in still, wet air, the more likely you’ll see mold or damping-off issues.
4) The DIY “Grow Rack Greenhouse” (Wire Shelf + Plastic Wrap = Power Couple)
Best for: High-volume seed starting, microgreens, overwintering tender plants, or anyone who wants a compact indoor grow station with room to expand.
What it is: A multi-tier wire shelving unit wrapped in clear plastic to retain humidity and heat, with lights mounted under each shelf.
- Materials: Wire shelf unit, clear plastic sheeting (or a clear shower curtain), clips/zip ties, LED shop-style grow lights, timer, small fan.
- Build steps:
- Assemble the shelf and plan spacing for trays and lights.
- Hang grow lights under each shelf level.
- Drape plastic around the sides and front; secure with clips or magnets (for metal shelving).
- Leave a flap or opening so you can access plants and exchange air.
- Add a small fan to prevent stagnant air pockets.
- Pro tips: If the plastic is fully sealed, you’ll likely need more ventilation. Think “jacket,” not “space suit.”
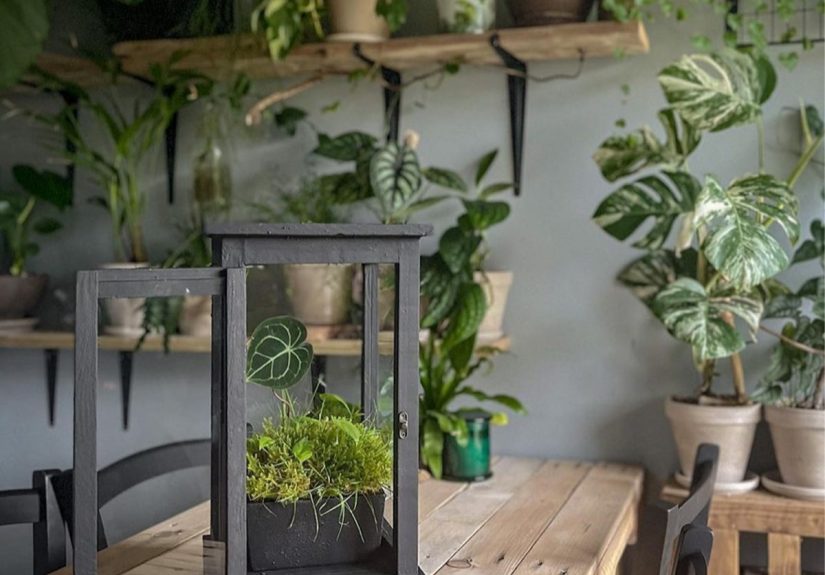
5) The Picture-Frame Tabletop Greenhouse (Tiny Greenhouse, Big Personality)
Best for: Small succulents (with ventilation), starter plants, decorative propagation, and gifts that make people say, “Waityou MADE that?”
What it is: A miniature greenhouse built from glass picture frames (often thrifted), joined at the edges to create a tabletop structure.
- Materials: 4–6 matching frames (glass), strong glue suitable for glass/metal, optional hinges, small tray for the base.
- Build steps:
- Remove photos/backings and clean the glass thoroughly.
- Arrange frames into walls and a roof shape.
- Glue edges and allow to cure fully in a ventilated area.
- Place a shallow tray inside to protect surfaces from moisture.
- Pro tips: Don’t put this in harsh direct sun. Glass + trapped air can overheat quickly, and your “cute mini greenhouse” can become “tiny plant sauna.”
6) The Mason Jar or Bell-Cloche Greenhouse (Single-Plant VIP Booth)
Best for: Rooting a cutting, boosting humidity for one fussy plant, or protecting a newly potted start while it acclimates.
What it is: A clear jar or cloche placed over a pot to trap humidity around one plantsimple, fast, and oddly satisfying.
- Materials: Large mason jar, glass cloche, or clear dome; small saucer; optional stick/chopstick to prop for ventilation.
- Build steps:
- Water the plant lightly (avoid soggy soil).
- Cover with the jar/cloche.
- If you see heavy condensation all day, prop it open slightly for airflow.
- Remove for a short “fresh air break” daily or every few days, depending on humidity.
- Pro tips: If leaves touch the glass and stay wet, you may get rot or spotting. Choose a container with a little headroom.
7) The Repurposed Aquarium Greenhouse (Because Fish Tanks Deserve a Second Act)
Best for: Terrarium plants, moss gardens, humidity-loving tropicals in pots, and propagation trays (depending on tank size).
What it is: A clean, empty aquarium used as a glass growing chamber, often with a partial lid for humidity control.
- Materials: Aquarium, optional glass lid or acrylic sheet, drainage layer (pebbles/leca) for terrarium builds, grow light above.
- Build steps:
- Clean the tank thoroughly and ensure it’s dry.
- Decide: pots inside (easy mode) or planted terrarium (ecosystem mode).
- For terrariums: add drainage layer, then substrate, then plants; mist lightly.
- Cover partially to hold humidity but allow some ventilation.
- Use a grow light above if window light is weak.
- Pro tips: Closed containers can maintain high humidity, but many plants still benefit from occasional ventilation. If the glass is constantly dripping, vent more.
8) The DIY Propagation Box (High-Humidity “Rooting Nursery”)
Best for: Rooting cuttings (especially those that wilt easily), rehab for stressed plants, and “I swear it was fine yesterday” rescues.
What it is: A clear lidded container used specifically to keep cuttings humid while they form rootsoften with moss/perlite or small pots inside.
- Materials: Clear container with lid, small pots or cups, propagation medium (e.g., perlite/moss mix), labels, optional hygrometer.
- Build steps:
- Set cuttings in a suitable medium (not waterlogged).
- Mist container walls lightly and close the lid.
- Open briefly on a schedule (daily or every few days) to refresh air.
- Once roots form, gradually “harden off” by increasing vent time.
- Pro tips: If you smell anything funky, don’t negotiate with itclean the box, replace medium, and vent more. Your nose is a better early-warning system than your optimism.
9) The Zip-Up Mini Greenhouse Shelf (Indoor “Greenhouse Closet”)
Best for: Apartment growers, overwintering tender plants, and anyone who wants a ready-made structure that still feels DIY once you customize it with lights and airflow.
What it is: A small portable greenhouse shelf (typically a metal frame with clear zip cover) used indoors near an outlet and (ideally) away from drafty doors.
- Materials: Mini greenhouse shelf, LED grow lights, timer, small fan, trays.
- Build steps:
- Assemble the shelf and cover.
- Add trays to protect floors and catch runoff.
- Install grow lights and set a consistent photoperiod.
- Keep the zipper slightly cracked or add a fan to prevent stagnant humidity.
- Pro tips: Treat it like a micro-room: light + airflow are the difference between “lush” and “why is everything fuzzy?”
Troubleshooting: Condensation, Mold, and “Why Are They Leggy?”
If everything is dripping with condensation
- Vent more often (crack the lid/zipper).
- Add gentle airflow (small fan on low).
- Reduce watering frequencymany setups are wet because the soil is too wet, not because the air is too dry.
If you see white fuzz on soil or seedlings
- Improve airflow and reduce moisture.
- Remove humidity covers after germination.
- Start clean: wash trays, use fresh seed-starting mix, and avoid overcrowding.
If seedlings are tall, thin, and collapsing (aka “leggy”)
- Move lights closer (within safe distance for your fixture).
- Increase light intensity or duration (within a reasonable daily range).
- Add gentle airflow to strengthen stems.
If leaves look scorched or bleached
- Increase distance between light and plants.
- Reduce direct sun exposure on closed glass/plastic setups.
- Vent heat: trapped warmth can spike quickly, especially by windows.
Real-World Experience: What DIYers Learn Fast (500+ Words)
Let’s talk about the part that never makes it into the pretty “after” photos: the learning curve. DIY indoor greenhouses are incredibly forgivinguntil they aren’t. Here are the most common experiences people report after building their first setup, plus what they do next to turn “oops” into “oh, wow.”
1) “I built a humidity paradise… and accidentally hosted a mold convention.”
The first big win is usually seeing condensation. It feels like proof that the greenhouse is “working.” Then a week later, the soil surface looks fuzzy and seedlings start dropping like fainting goats. The fix is almost always the same: vent sooner and add airflow. Domes and closed lids are great for germination and early rooting, but most plants don’t want to live in still air forever. DIYers often switch to a routine: dome on for germination, then dome off (or vents open) once sprouting is underway, with a small fan nearby to keep air moving.
2) “My seedlings are strong… but only on the side closest to the light.”
Light distribution surprises a lot of people. A bright window can be uneven, and one grow light placed too high can create a “spotlight effect.” The result is seedlings leaning dramatically, like they’re trying to overhear a conversation. DIYers fix this by adding reflective surfaces (simple white poster board works), rotating trays, or upgrading to lights that cover the full shelf width. Many end up loving the “grow rack” approach because each tier can have its own evenly spaced light.
3) “I thought my window was bright… until I tried growing basil in January.”
Winter light is humbling. People often begin with a windowsill greenhouse, then realize the sun angle and short days aren’t enough for vigorous growth. The good news: you don’t need stadium lighting. A basic LED grow light on a timer can transform an indoor greenhouse from “surviving” to “thriving.” DIYers commonly report that once they add a consistent light schedule, they stop fighting legginess and slow growth.
4) “I sealed my cabinet perfectly. Now it’s 85°F in there. Help.”
Cabinet greenhouses are gorgeous, but they can trap heatespecially with strong lights and weatherstripping. Many DIYers back off the seal, add fans, or run lights during cooler hours. A simple thermometer/hygrometer becomes the MVP because it turns guesswork into data. The cabinet still holds helpful humidity, but it stops acting like a miniature sauna.
5) “Cuttings looked great for two weeks… then melted.”
Propagation boxes are amazing, but they can encourage rot if media stays too wet. DIYers often refine their method by switching to an airier medium (like perlite blends), misting container walls instead of soaking the substrate, and giving the box quick “fresh air breaks.” The big lesson: humidity supports leaves; oxygen supports roots. Your goal is moisture in the air and enough oxygen around the base of the cutting.
6) “My greenhouse is working… but now I own 73 plants.”
This is less a problem and more a lifestyle event. Indoor greenhouses make plant care easier, so people expand. A small tote becomes a shelf. The shelf becomes a cabinet. The cabinet becomes “a plant corner.” If you’re trying to stay sane, DIYers recommend choosing one “lane” per greenhouse: seed starting on one shelf, cuttings in the tote, tropicals in the cabinet. Mixing everything can work, but it’s harder to balance humidity and airflow when you have succulents and rainforest plants in the same microclimate.
7) “The best upgrade wasn’t expensiveit was routine.”
After a month or two, the most successful DIYers tend to do the same boring (effective) things: check moisture before watering, vent when condensation is heavy, keep lights on a timer, and clean trays between batches. Indoor gardening rewards consistency. Your DIY indoor greenhouse doesn’t need to be perfectit just needs to be predictable.
Final Thoughts
A great indoor greenhouse DIY isn’t about building the fanciest setup; it’s about building the right microclimate for the plants you want to grow. Start smalltote, dome, or clochethen level up to a rack or cabinet once you know what your plants actually need in your home. Give them steady light, manage humidity with ventilation, and add airflow like it’s your greenhouse’s love language. Your plants will respond with faster germination, stronger growth, and far fewer dramatic episodes.