
Table of Contents >> Show >> Hide
- First: Collect a Soil Sample Like You Mean It
- Way #1: The Jar Test (DIY Soil Texture Test)
- Way #2: At-Home Soil pH Test (Strips or Meter)
- Way #3: Nutrient Testing (Home Kits vs. Mail-In Lab Tests)
- Putting It All Together: A “Soil Test to Next Step” Cheat Sheet
- Common Home Soil Testing Mistakes (So You Don’t Join the Club)
- Conclusion
- Experiences From the Garden: What People Commonly Learn After Testing Their Soil (Extra)
- 1) The “Why Does Everything Dry Out by Noon?” moment
- 2) The “My plants are yellow, so I fed them… and they got yellower” mystery
- 3) The “Clay: beautiful when wet, heartbreak when dry” realization
- 4) The “Lab test saved me from doing something dumb” experience
- 5) The “My garden is actually multiple gardens” lesson
Before you buy another bag of “miracle” fertilizer (that mostly works miracles for the bag manufacturer’s profits), do the one thing great gardeners do: find out what your soil is actually like. A home soil test is basically a background check for your yardpH, nutrients, texture, drainageso you can stop guessing and start growing.
The good news: you don’t need a lab coat or a PhD in Dirtology. With a few simple tools, you can learn a lot about your garden soil right from your kitchen counter (just… maybe don’t do it next to the salad prep).
In this guide, you’ll learn three practical ways to test soil at homefrom a classic jar test to at-home pH checks to the “mail-it-in” option that gets you real numbers and recommendations. Along the way, we’ll cover sampling tips, what results mean, and what to do nextbecause a soil test without an action plan is just dirt gossip.
First: Collect a Soil Sample Like You Mean It
Your results are only as good as your sampling. If you scoop one random handful from the spot where the dog always pees, congratulations: you’ve tested “dog pee,” not your garden.
Quick sampling rules (the “don’t sabotage yourself” checklist)
- Pick the right depth: For most garden beds, sample from the root zone. A common approach is to take a shallow surface sample and another from deeper in the bed (think top inch and the next several inches) if you want a more detailed picture.
- Take multiple subsamples: Grab small scoops from 8–12 spots in the same area (lawn, veggie bed, front border), then mix in a clean bucket for a composite sample.
- Remove debris: Toss out mulch, roots, rocks, and “mystery items.” (If you find a Lego, your soil is officially a family habitat.)
- Let it air-dry for test kits/labs: If you’re sending to a lab or using some nutrient kits, drying helps stabilize results and prevents funky chemistry surprises.
- Label areas separately: Don’t mix “tomato bed” soil with “shady hydrangea corner.” Those are different realities.
Once you have a good composite sample, you’re ready. Now let’s test.
Way #1: The Jar Test (DIY Soil Texture Test)
Best for: figuring out whether your soil is sandy, silty, clay-heavy, or a dreamy loamand why water either disappears instantly or sits there like it paid rent.
Soil texture matters because it affects drainage, nutrient-holding capacity, compaction, and root growth. Sand drains fast but doesn’t hold nutrients well. Clay holds nutrients but can drain slowly and compact easily. Loam is the “Goldilocks” blend.
What you need
- A straight-sided clear jar with a tight lid (mason jar works)
- Soil (your composite sample)
- Water
- A tiny bit of dish soap (optional, helps particles separate)
- Ruler + marker (or tape)
How to do the jar test
- Fill the jar about 1/3 with soil.
- Add water almost to the top. Leave a little air space.
- Add a small squirt of dish soap (optional) to help break up clumps.
- Shake like you’re mixing a fancy cocktail. Go hard for 2–3 minutes.
- Set it down and let it settle. You’ll see layers form over time:
- Sand settles first (often within ~1 minute)
- Silt settles next (hours)
- Clay settles last (up to ~24 hours), leaving the water cloudy longer
- Measure the layers once settled. Calculate approximate percentages by layer height relative to total sediment.
How to interpret results
- Mostly sand: gritty feel, fast drainage, nutrients leach quickly. Plants may look “hungry” even after feeding.
- Mostly clay: smooth/sticky when wet, hard clods when dry, slow drainage, compaction risk.
- Loam-ish mix: distinct layers but relatively balancedoften easiest to manage.
What to do with what you learn
If your soil is sandy: Add organic matter (compost, leaf mold) to increase water and nutrient holding. Mulch regularly to reduce evaporation.
If your soil is clay-heavy: Organic matter is still your best friend. Compost improves structure over time and helps water move through. Avoid working wet clay (it compacts like a grudge). Skip the classic mistake of “fixing clay with sand”unless you’re aiming for a DIY brick project.
Bonus add-on: A simple infiltration (drainage) check
Texture tells you the “what.” Drainage tells you the “so what.” Dig a small hole about 6 inches deep, fill it with water, let it drain, then fill again and time how long it takes to drop. Very slow drainage can suggest compaction or heavy clay; extremely fast drainage suggests sand or low organic matter.
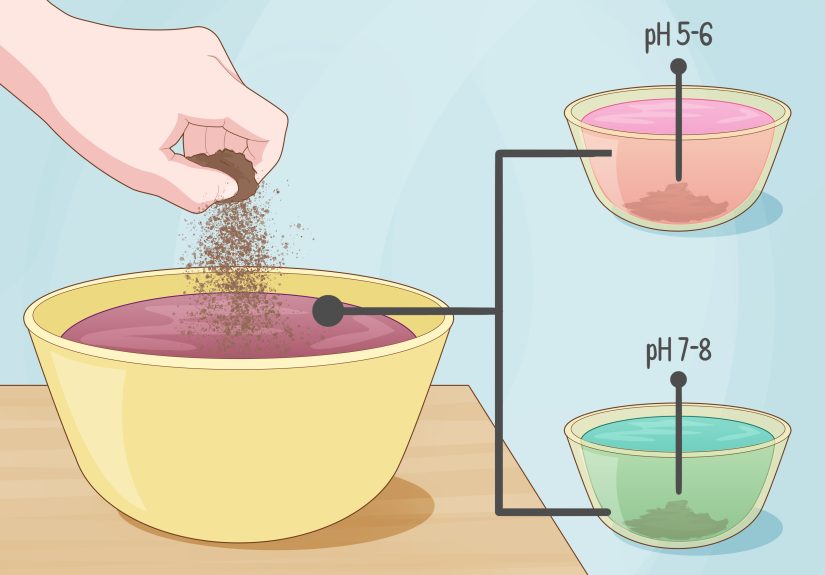
Way #2: At-Home Soil pH Test (Strips or Meter)
Best for: finding out if your soil is acidic, neutral, or alkalinebecause pH affects how easily plants can access nutrients. You can have nutrients in the soil, but if pH is off, plants may still act like the pantry is empty.
Most vegetables and many ornamentals tend to do well in slightly acidic to near-neutral soil (often around the mid-6 range), while acid-loving plants (like blueberries and azaleas) prefer lower pH. pH also influences microbial activity and nutrient availabilityespecially for phosphorus and micronutrients.
Your options
- pH test strips / color kits: Affordable, quick, “close enough” for many home gardens.
- Digital pH meter: Convenient, but quality varies. Some require careful calibration to be trustworthy.
- Extension/lab pH test: Most accurate and often includes lime/sulfur recommendations.
How to test pH with a kit (general method)
- Use dry, crumbled soil with debris removed.
- Mix soil with distilled water to create a slurry (kits specify ratios).
- Add reagent or dip the strip as directed.
- Read color promptly under good light.
- Repeat 2–3 times and average your result.
How to test pH with a digital meter (without getting fooled)
- Follow calibration instructions if your meter supports it (buffers matter).
- Use a consistent soil-to-water slurry for repeatable readings.
- Clean the probe between samples to avoid cross-contamination.
- Take multiple readings and look for consistency.
What pH results usually mean (and what to do next)
- Low pH (acidic): Some nutrients (like iron and manganese) may become too available; others may be less available. If you’re growing most veggies and pH is low, you may need limebut the amount depends on your soil (especially clay/organic matter).
- Near neutral: Nutrient availability is generally favorable for many plants.
- High pH (alkaline): Iron and some micronutrients become less available, leading to yellowing leaves (chlorosis) even when you fertilize. You may need sulfur or acidifying amendments for certain plantsor choose plants that tolerate alkaline soil.
Pro tip: pH adjustments aren’t instant. Lime and sulfur take time, and soil buffering means clay-heavy soils change more slowly than sandy soils. A lab test often gives the best “how much” recommendation so you don’t accidentally turn your garden into a chemistry experiment.
Way #3: Nutrient Testing (Home Kits vs. Mail-In Lab Tests)
Best for: learning what nutrients your soil has (or lacks)and avoiding the common habit of throwing fertilizer at problems like it’s confetti.
Nutrient tests typically focus on nitrogen (N), phosphorus (P), potassium (K), and sometimes secondary nutrients like calcium and magnesium. Here’s the reality: home kits can be useful for rough trends, especially for pH, but lab tests are usually the best route if you want accurate numbers plus recommendations.
Option A: Home nutrient test kits (colorimetric kits)
These kits often use reagents and color charts to estimate N-P-K. They’re popular because they’re quick and feel science-yin a fun, “I’m basically a backyard researcher” way.
Pros: fast, inexpensive, helpful for broad “low/medium/high” signals.
Cons: accuracy varies; results can be influenced by soil conditions; many kits don’t provide fertilizer rate recommendations. Some extension sources caution that home kits may be “ballpark” rather than precise.
Option B: Mail-in lab soil tests (often via university/extension labs)
This is the “grown-up” optionand it’s usually not expensive. Many states and universities offer soil testing programs that measure pH, lime requirement, and key nutrients. The big win is the interpretation: you often get recommendations for lime and fertilizer tailored to your crop or lawn.
How to do a mail-in soil test (simple workflow)
- Choose your lab: Look for your state university or cooperative extension soil testing lab.
- Collect a composite sample: Multiple subsamples mixed together for each area.
- Air-dry if instructed.
- Fill out the crop info: “Vegetable garden,” “turfgrass,” “blueberries,” etc. This affects recommendations.
- Ship and wait for results: Most labs return a report with numbers and guidance.
What a lab report often includes
- Soil pH and sometimes buffer pH / lime requirement
- Phosphorus and potassium levels (and sometimes calcium, magnesium)
- Organic matter (in many tests)
- Recommended lime and fertilizer rates based on your crop/goal
Example: Turning results into action (mini case study)
Scenario: Your tomatoes look pale, and you’re ready to blame the seedlings, the weather, and that one squirrel with a vendetta.
Home checks: Jar test shows sandy soil (fast drainage). pH kit reads ~7.6 (a bit alkaline).
What it suggests: Nutrients may leach quickly (sand) and iron/micronutrients may be less available (higher pH), leading to chlorosis.
Action plan: Add compost to increase nutrient-holding capacity, use a mulch layer, and consider targeted fertilization plus plant-appropriate strategies for high pH (or choose varieties tolerant of your conditions). If symptoms persist, a mail-in lab test can confirm nutrient levels and recommend rates so you don’t overcorrect.
Putting It All Together: A “Soil Test to Next Step” Cheat Sheet
If your soil is compacted or drains poorly
- Add compost regularly (top-dress or incorporate when appropriate).
- Avoid working soil when it’s wet.
- Consider gentle aeration (for lawns) and deep-rooted cover crops (for beds) when feasible.
If your soil drains too fast
- Increase organic matter (compost, leaf mold).
- Mulch to reduce evaporation.
- Use slow-release fertilizers and smaller, split applications if needed.
If pH is too low (acidic) for your plants
- Use limebut ideally follow a recommendation based on soil type and buffer capacity.
- Retest after a few months (or next season) rather than reapplying blindly.
If pH is too high (alkaline) for your plants
- Consider sulfur-based amendments (carefully) or choose plants adapted to alkaline soils.
- Watch for micronutrient issues like iron chlorosis; a lab test can help confirm.
If nutrients are low (confirmed by lab or consistent evidence)
- Use the lab’s fertilizer rate recommendations whenever possible.
- Focus on building soil organic matter for long-term fertility.
Common Home Soil Testing Mistakes (So You Don’t Join the Club)
- Testing only one spot: Soils vary a lot, even in small yards.
- Skipping crop info on lab forms: Recommendations depend on what you grow.
- Overreacting to one reading: Retest, average, and look for patterns.
- Changing pH too aggressively: Slow and steady wins the garden.
- Assuming fertilizer fixes everything: Texture, drainage, and organic matter are the real foundation.
Conclusion
A home soil test is the quickest way to stop gardening by vibes and start gardening by evidence. Use the jar test to understand texture, a pH test to unlock nutrient availability, and a nutrient test (ideally mail-in lab) to get clear recommendations. Do those three things, and you’ll spend less money on random productsand get better results from whatever you plant next.
Now go forth and test that soil. Your plants are counting on you. (And your wallet is quietly cheering.)
Experiences From the Garden: What People Commonly Learn After Testing Their Soil (Extra)
Soil testing has a funny way of turning “I think I have a black thumb” into “Ohhh, my soil was basically trolling me.” Here are a few real-world patterns gardeners often run intoplus what changes once they do even a simple home soil test.
1) The “Why Does Everything Dry Out by Noon?” moment
A lot of gardeners discovervia the jar testthat their soil is far sandier than they assumed. The plants look thirsty constantly, fertilizer seems to “wear off” fast, and watering becomes a daily ritual that feels suspiciously like a part-time job. Once they see a thick sand layer in the jar, it clicks: water and nutrients are slipping through like gossip in a small town.
What changes? Instead of watering more and more (which often just leaches nutrients faster), gardeners start adding compost, mulching consistently, and using slow-release feeding strategies. The garden becomes less dramatic. Tomatoes stop acting like they’re in a desert movie. And the gardener stops sprinting outside with a hose every afternoon.
2) The “My plants are yellow, so I fed them… and they got yellower” mystery
This is a classic pH story. A quick soil pH test shows the soil is on the alkaline side. The gardener has been adding fertilizer, but leaves still yellowespecially new growth. Often, the issue isn’t that nutrients are missing; it’s that certain nutrients (like iron) aren’t easily available at higher pH. It’s like having a fridge full of food… but the door is stuck.
What changes? Gardeners get more targeted. They stop blanket-feeding everything and instead work on pH-aware solutions: adding organic matter, choosing plants that tolerate the local pH, or using carefully selected amendments where appropriate. In many cases, they also realize the value of a lab test for specific guidance, because pH adjustment is not the place for “eh, seems fine” math.
3) The “Clay: beautiful when wet, heartbreak when dry” realization
Some folks don’t need a jar test to suspect claythey can feel it the moment the shovel hits the ground with a sad thunk. But the jar test confirms it: a slow-settling sample, cloudy water, and a thick clay layer that takes its sweet time. The garden might puddle after rain, then bake into concrete when it’s hot. Roots struggle. Plants sulk. The gardener contemplates moving.
What changes? They focus on structure, not shortcuts. Compost becomes a yearly habit. Beds may get raised. Foot traffic is minimized when wet. Over time, clay can become incredibly productivebecause it holds nutrients wellonce it’s loosened and aggregated with organic matter. Gardeners often report that after a couple seasons of consistent compost and mulch, digging gets easier and plants become noticeably sturdier.
4) The “Lab test saved me from doing something dumb” experience
Many gardeners start with home kits (which are great for quick insights), then send a sample to a lab when they want to get seriousespecially for lawns, fruit trees, or vegetable beds they care about. A common surprise: phosphorus might already be high. Without testing, they would’ve added a general fertilizer with extra phosphorus “just because,” which doesn’t help and can create runoff concerns. Or they learn lime is neededbut the recommended amount is smaller (or larger) than they guessed.
What changes? Confidence. Instead of treating the garden like an endless experiment, they treat it like a managed system: adjust pH thoughtfully, fertilize based on real needs, and build organic matter as the long-term engine. It’s less chaotic, more effective, and weirdly satisfyinglike finally reading the instructions after assembling something backwards.
5) The “My garden is actually multiple gardens” lesson
One of the most useful “experiences” people report is realizing that their yard isn’t one uniform soil. The front bed might be sandy fill. The backyard might be heavier, darker topsoil. A side yard near the foundation might be more alkaline (thanks to concrete influence and runoff). When gardeners test areas separately, the results explain why one spot thrives and another struggleseven with the same plants and care.
What changes? They stop forcing one solution everywhere. They amend strategically, plant more intelligently, and get better outcomes with less effort. The garden becomes less of a mystery novel and more of a well-labeled map.
If there’s one takeaway from these common experiences, it’s this: testing turns frustration into a plan. Even simple home soil tests can reveal the “why” behind garden problemsand once you know the why, the fix is usually a lot cheaper (and less dramatic) than you feared.


