
Table of Contents >> Show >> Hide
- Quick heads-up: what “Developer Mode” means on Chromebooks
- Before you start: the “don’t skip this” checklist
- How to enable Developer Mode on most Chromebooks (keyboard models)
- How to enable Developer Mode on ChromeOS tablets or keyboardless devices
- What changes after Developer Mode is enabled
- How to disable Developer Mode (return to normal / Verified Mode)
- Troubleshooting: when things don’t go as planned
- Safety and common-sense tips (especially if you’re using this for school or work)
- FAQ: quick answers people actually need
- Real-world experiences related to enabling Developer Mode (about )
- Conclusion
Chromebooks are the golden retrievers of laptops: friendly, fast, and generally not interested in letting you dig holes in the backyard.
But sometimes you need to diglike when you want deeper system access, troubleshooting tools, or you’re experimenting with development workflows.
That’s where Chromebook Developer Mode comes in.
This guide walks you through enabling Developer Mode on a Chromebook step-by-step, explains what it changes (and what it breaks),
and includes practical tips so you don’t accidentally turn your device into a dramatic startup screen that yells at you every boot.
Quick heads-up: what “Developer Mode” means on Chromebooks
On ChromeOS, “Developer Mode” is a system-level boot mode that turns off certain security checks (notably Verified Boot / OS verification)
and enables deeper access, including a more powerful shell experience.
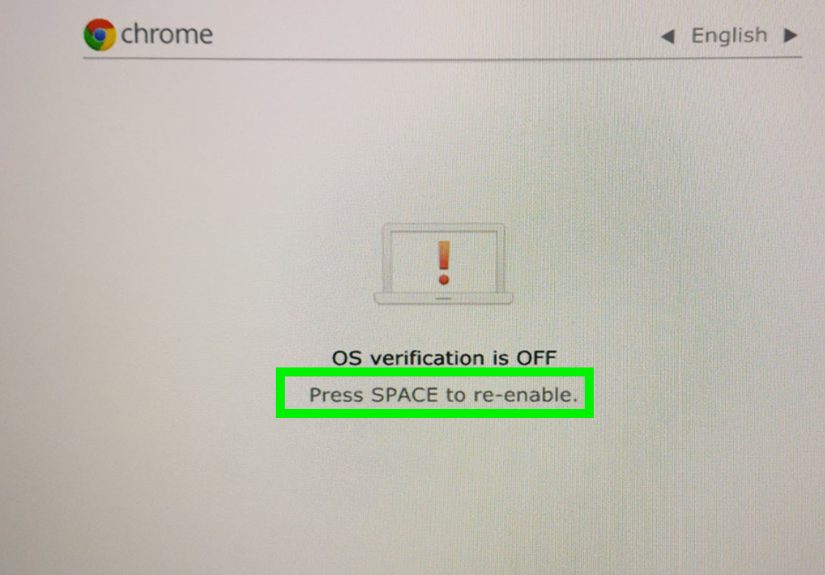
You’ll typically see a message like “OS verification is OFF” on startup when it’s enabled.
Don’t confuse that with:
- Developer options inside ChromeOS Settings (a menu of toggles, often related to debugging)
- Android Developer Options (inside the Android subsystem on Chromebooks that support Android apps)
This article focuses on the real deal: system Developer Mode (the one that requires Recovery Mode and wipes local data).
Before you start: the “don’t skip this” checklist
1) Back up anything you care about
Enabling (or disabling) Developer Mode triggers a reset that wipes locally stored data. Files in your Downloads folder, offline files,
and anything not synced to Google Drive can vanish like socks in a dryer.
- Move important files to Google Drive (or another cloud storage provider).
- Copy critical items to an external USB drive if you prefer offline backups.
- Double-check offline documents and screenshotsthose are the usual “oops” files.
2) Make sure the Chromebook is yours to modify
If your Chromebook is school-issued or work-managed, Developer Mode may be blocked by policy.
In that case, the correct path is to contact the administratornot to “try random tricks.”
(Also: attempting to bypass management can violate policies and get you in trouble. Not fun.)
3) Plug it in and budget a little time
The mode transition can take several minutes, and your Chromebook will reboot. Keep it plugged in to avoid a mid-process power loss.
How to enable Developer Mode on most Chromebooks (keyboard models)
This method works for the majority of Chromebooks with a built-in keyboard. The core idea is:
enter Recovery Mode → press Ctrl + D → confirm turning OS verification off.
Step 1: Shut down your Chromebook
Save your work, then fully power off. (Not “sleep.” Not “close the lid and hope.” A real shutdown.)
Step 2: Enter Recovery Mode (the “three-finger salute”)
- Press and hold Esc and Refresh (the circular arrow key).
- While holding them, press the Power button.
- Release the Power button when the recovery screen appears (you can release the other keys once you see the screen).
You should see a recovery message such as “ChromeOS is missing or damaged” (it’s not actually missingthis is expected).
Step 3: Trigger Developer Mode
- On the recovery screen, press Ctrl + D.
- You’ll see a prompt about turning OS verification OFF.
- Press Enter to confirm.
At this point, ChromeOS begins the transition into Developer Mode and performs the wipe/reset.
Your Chromebook will reboot and take a few minutes to prepare.
Step 4: Boot past the “OS verification is OFF” screen
Once Developer Mode is enabled, you’ll see a warning screen at every startup. This is normal.
- Press Ctrl + D to continue booting, or
- Wait for the automatic timeout (the device may beep first).
Step 5: Set up your Chromebook again
You’ll go through the initial setup just like a fresh device: Wi-Fi, Google account sign-in, preferences, and so on.
How to enable Developer Mode on ChromeOS tablets or keyboardless devices
If your ChromeOS device is a tablet/detachable with no keyboard attached, the button combo is different.
The general flow is still: enter Recovery → confirm Developer Mode via on-screen menu.
Step-by-step (keyboardless / tablet mode)
- Detach the keyboard (if it’s a detachable). This matters because the device may behave differently when it thinks a keyboard is present.
-
Enter Recovery Mode: press and hold Power + Volume Up + Volume Down for about 10 seconds.
(If the screen flickers on/off, keep holdingtiming can be picky.) - In the Recovery menu, use the volume buttons to navigate if needed.
-
To enable Developer Mode: while in Recovery Mode, press Volume Up + Volume Down together,
then select Confirm Enabling Developer Mode and confirm with Power.
As with keyboard Chromebooks, the device resets and you’ll see the Developer Mode warning screen on future boots.
What changes after Developer Mode is enabled
You’ll get deeper system access (and fewer safety rails)
Developer Mode loosens ChromeOS security protections. In plain English:
your Chromebook becomes more flexible, but less locked down.
You’ll see the startup warning every time
That “OS verification is OFF” screen is now part of your life. Some people get used to it. Others treat it like a jump-scare with keyboard shortcuts.
Your device is more vulnerable if you’re careless
Developer Mode isn’t automatically dangerousbut it gives you the ability to do things that can reduce security or stability.
Use trusted apps, avoid sketchy downloads, and keep your device updated.
How to disable Developer Mode (return to normal / Verified Mode)
Want the training wheels back? Disabling Developer Mode is straightforward, but it will wipe the device again.
Steps to turn Developer Mode off (keyboard Chromebooks)
- Restart your Chromebook.
- At the “OS verification is OFF” screen, press the Spacebar.
- Confirm when prompted. The Chromebook resets and returns to Verified Mode.
Steps to turn Developer Mode off (keyboardless devices)
On tablets, you typically use the volume buttons to select an option like Enable OS Verification, then confirm with Power.
Troubleshooting: when things don’t go as planned
“Ctrl + D doesn’t do anything”
- Make sure you are truly on the Recovery screen. The correct screen usually mentions ChromeOS being missing/damaged.
- Try the Recovery key combo again. Timing mattersespecially on some models.
- If the device is managed, Developer Mode may be blocked by policy (see below).
“Developer Mode is blocked by system policy / administrator”
This typically means the Chromebook is enterprise- or school-managed with policies that prevent Developer Mode.
The legitimate solution is to contact the administrator or verify the device was properly deprovisioned if it was purchased refurbished.
My Chromebook boots to the warning screen and I think it’s “stuck”
If you see “OS verification is OFF”, the device may already be in Developer Mode.
Press Ctrl + D to continue booting. Pressing Spacebar usually disables Developer Mode and wipes the device.
Boot feels slower now
That warning screen adds a pause. If you want a clean, fast boot experience again, disable Developer Mode.
Safety and common-sense tips (especially if you’re using this for school or work)
- Don’t enable Developer Mode on a managed Chromebook unless your admin approves it.
- Keep backups. Mode changes wipe local data. Twice if you flip it on and off.
- Be careful with downloads. Developer Mode reduces protections; you’re responsible for what you install and run.
- Know how to exit. Remember: Spacebar at the warning screen typically returns to verified mode (and wipes).
FAQ: quick answers people actually need
Does enabling Developer Mode delete my files?
Yeslocal data is wiped during the mode transition. Back up first.
Will Developer Mode void my warranty?
Policies vary by manufacturer and situation. Some guidance warns it may affect warranty support or requires returning to normal mode before service.
If you’re worried, disable Developer Mode before you seek warranty repair and keep your device in supported configurations.
Can I enable Developer Mode just to get Linux tools?
Many users don’t need full Developer Mode just to run Linux apps.
ChromeOS includes a built-in Linux environment feature on many devices, which is generally safer and doesn’t require turning off OS verification.
Developer Mode is usually for deeper system-level experimentation.
How do I know if my Chromebook is in Developer Mode?
If you see the “OS verification is OFF” screen at startup, that’s the big clue.
Real-world experiences related to enabling Developer Mode (about )
If you’ve never enabled Developer Mode before, the first experience can feel oddly dramatic for something that’s basically a settings change.
You press a key combo, the screen announces your operating system is “missing or damaged,” and your brain immediately goes,
“Well, that seems… suboptimal.” The good news is that this is a normal part of the process, and the Chromebook is intentionally trying to prevent accidental toggles.
ChromeOS is built for simplicity, so it makes a big deal when you step outside the lines.
One of the most common “first-timer” moments is realizing how much you store locally without thinking about it.
People remember Google Drive documents, but forget about the Downloads folder: a PDF for class, a couple of screenshots, maybe a file named
final_final_reallyfinal.docx. Developer Mode wipes local storage, so the best real-world habit is doing a quick “Downloads audit” before you begin.
If you treat it like moving housespack first, then renovateyou’ll have a better time.
Another real-world lesson: the startup warning screen becomes a routine faster than you expect.
At first, it feels like a warning label the size of a billboard, but after a week you’ll press Ctrl + D automatically,
like muscle memory for opening a door. Still, the warning screen can surprise other people who borrow your Chromebook.
If a friend or family member powers it on and sees that message, they may assume the device is broken. A simple heads-up helps:
“If you see that screen, press Ctrl + D. If you press Spacebar, it will wipe everything.” That last part is importantbecause accidental wipes are a thing.
Troubleshooting stories are also common. “Ctrl + D doesn’t work” usually boils down to either (1) not actually being on the correct recovery screen,
(2) a timing issue entering Recovery Mode, or (3) the Chromebook being managed and blocked by policy.
That third one shows up a lot with refurbished devices or school/work units. In real life, the fix isn’t a secret shortcutit’s administrative ownership.
If a device is tied to an organization, the organization controls whether Developer Mode is allowed. That’s annoying when you bought it secondhand,
but it’s also the whole point of device management.
Finally, there’s the “why did I do this?” moment, which is surprisingly healthy.
Developer Mode is powerful, but it’s not automatically the best tool for every goal. Plenty of people enable it thinking it’s required for basic tinkering,
only to discover they could have used built-in Linux features or normal ChromeOS settings instead.
The best experience is when you enable Developer Mode with a clear purposetesting a dev workflow, learning how ChromeOS boots, running deeper diagnosticsand
then you keep it enabled only as long as you need it. Think of it like using the ladder to paint the ceiling: useful, but you don’t sleep on it.
Conclusion
Enabling Developer Mode on a Chromebook is simple once you know the steps: enter Recovery Mode, press Ctrl + D, confirm turning OS verification off,
and expect a reset. The real “expert move” is everything around itbacking up files, understanding the startup warning, and knowing when Developer Mode is
the right tool (and when it’s overkill).
If you’re doing this on a personal device for development or learning, it can be a great way to explore what ChromeOS can do.
If it’s managed by a school or workplace, treat Developer Mode like a locked door: if you don’t own the building, talk to the person who does.


