
Table of Contents >> Show >> Hide
- What Are Faux Tin Ceiling Tiles, Really?
- Planning Your Faux Tin Ceiling Tile Instillation
- Tools and Materials You’ll Need
- Step-by-Step: How to Install Faux Tin Ceiling Tiles
- Faux Tin Ceiling Tile Ideas Inspired by Hometalk
- Common Mistakes (and How to Avoid Them)
- Real-World Experiences: What DIYers Learn the Hard Way
- Conclusion: A High-Impact Upgrade Over Your Head
If you’ve ever stared at your plain white ceiling and thought, “You could be so much more,”
faux tin ceiling tiles might be your new favorite DIY obsession. They deliver the look of
vintage pressed metal without the weight, cost, or the heart-pounding fear of having real
metal fall on your head in the middle of the night. Inspired by popular makeover projects on
sites like Hometalk, homeowners are transforming bedrooms, kitchens, and dining rooms with
lightweight PVC and foam tiles that simply glue right over existing ceilings.
In this guide, we’ll walk through everything you need to know about faux tin ceiling tile
installationfrom planning and prep work to step-by-step glue-up instructions, plus real-life
lessons learned from DIYers who’ve actually climbed the ladder, juggled a caulk gun, and
lived to tell the tale. Grab your measuring tape and your sense of humor; your “fancy”
ceiling is closer than you think.
What Are Faux Tin Ceiling Tiles, Really?
Faux tin ceiling tiles are decorative panels made to look like classic pressed tin, but they’re
usually crafted from PVC, polystyrene (Styrofoam), or other
lightweight plastics. Many styles measure 2 feet by 2 feet and come in overlapping or butt-joint
edges so they can be installed as glue-up or drop-in tiles in a grid system.
Compared with traditional metal tiles, faux tin ceiling tiles are:
- Lighter: Easy to cut with scissors or a utility knife and gentle on your neck and back.
- More affordable: A full room makeover often costs less than a single custom light fixture.
- DIY-friendly: Designed for glue-up installation over drywall, plaster, or even popcorn ceilings (when safe).
- Style-flexible: Available in metallic finishes like antique copper, silver, and bronze, plus paintable white tiles you can customize.
Many PVC tiles are also manufactured with fire ratings appropriate for residential interiors, but
always check the product specifications and local codes before you buy.
Planning Your Faux Tin Ceiling Tile Instillation
A gorgeous ceiling starts long before you crack open the adhesive. A bit of planning will save
you from awkward slivers of tile along the walls and “oops” moments halfway through the room.
1. Measure the Room and Calculate Tile Quantity
Measure the length and width of your room in feet, then multiply
them to find the square footage. For example, a 12-by-14-foot room equals 168 square feet.
Most faux tin ceiling tiles cover about 4 square feet (24 x 24 inches), so divide your room’s
square footage by 4 to estimate how many tiles you’ll need.
Always add at least 10–15% extra for waste, cuts, and the inevitable “I cut this
one backwards” moment. Ordering a few extra tiles now is much cheaper than paying a second
shipping fee later.
2. Check the Condition of Your Existing Ceiling
Faux tin ceiling tiles are only as good as the surface they’re stuck to. Your ceiling should be:
- Clean: Remove dust, grease, and spiderwebs. (Sorry, spiders.)
- Sound: Scrape off loose paint or plaster, and repair any cracks or holes.
- Stable: If you have a popcorn ceiling, press on it firmly. If it crumbles easily, it’s better to remove or skim-coat it rather than gluing over it.
In older homesespecially those built before the late 1970stextured ceilings may contain
asbestos. If there’s any doubt, use a test kit or hire a professional before disturbing the
surface. Safety beats style every time.
3. Choose Your Material, Pattern, and Color
This is the fun part. Consider:
- Material: PVC tiles are durable and easy to wipe clean, great for kitchens and bathrooms. Foam tiles are feather-light and excellent for covering popcorn.
- Pattern scale: Large patterns look dramatic in big rooms; small, detailed patterns suit hallways and small bedrooms.
- Finish: Metallic finishes mimic real tin; white and paintable tiles let you customize your palette. A soft white or pale metallic can make low ceilings feel taller.
Scroll through makeover photos on Hometalk and similar DIY sites for inspiration. You’ll see
faux tin ceilings over beds, in dining rooms, and even used as wall accents and headboard
backdropsproof that these tiles can do a lot more than just hide an ugly ceiling.
Tools and Materials You’ll Need
- Faux tin ceiling tiles (plus 10–15% extra)
- Instant-grab or construction adhesive recommended by the tile manufacturer
- Caulk gun
- Measuring tape
- Chalk line or straightedge and pencil
- Utility knife or heavy-duty scissors
- Ladder or scaffold
- Level
- Optional: Painter’s caulk to hide seams, paint and roller if finishing after install
Before you start, read the installation guide that comes with your tiles. Different brands may
have slightly different recommendations for adhesive placement, overlap, and spacing.
Step-by-Step: How to Install Faux Tin Ceiling Tiles
While every manufacturer has its own exact instructions, most glue-up faux tin ceiling tile
installations follow a similar pattern. Here’s a general overview you can adapt to your specific
product.
Step 1: Prep the Surface
Wipe the ceiling with a damp cloth or sponge to remove dust and residue. Scrape away any loose
paint or texture. For glossy paint, a quick scuff with fine-grit sandpaper can help the adhesive
grip better. Allow the surface to dry completely before moving on.
Step 2: Find Your Starting Point
Decide whether you’ll start in the center of the room or from a
straight wall. Many DIYers like to find the center so border tiles on each side
are evenly sized, creating a more balanced look.
Use a chalk line to snap two lines that intersect at a right angle (90 degrees) in the center
or in a corner, depending on your layout. This intersection is your reference point for the
first tile.
Step 3: Dry-Fit a Few Tiles
Before committing with adhesive, hold several tiles in place to see how the pattern lines up
and how the borders will look. Adjust your reference lines if you need to shift the layout by
an inch or two to avoid skinny slivers of tile along the walls.
Step 4: Apply Adhesive to the First Tile
Apply a generous bead of adhesive on the back of the tile. For PVC tiles, focus on the
edges and the raised pattern lines. For foam tiles, a pattern of small
dabs or an “X” plus a border bead usually works well. Follow your product’s instructions for
any “open time” (when the adhesive needs to sit a minute before bonding).
Step 5: Press the Tile into Place
Carefully align the first tile with your chalk lines and press it firmly into the ceiling.
Use the flat of your hand (or a clean, soft trowel) to apply even pressure across the entire
tile. Hold for several seconds so the adhesive can grab.
This first tile is the boss: every tile after it will follow its lead, so take the time to get
it perfectly straight.
Step 6: Install the Remaining Tiles
Continue installing tiles row by row:
- For overlapping-edge tiles, slide the new tile’s edge over the previous one according to the manufacturer’s arrows or markings.
- For butt-joint tiles, butt the edges together snugly without overlapping.
- Check alignment frequently with your chalk lines and a level, especially in the first few rows.
When you reach the edges of the room, measure carefully and cut tiles to size with scissors,
a utility knife, or an oscillating saw, depending on the material. It’s usually better to keep
border tiles at least a few inches wide so the pattern still reads nicely.
Step 7: Work Around Light Fixtures and Vents
For ceiling fans, light boxes, or vents, hold a tile in position and mark where the opening
needs to be. Cut cautiously, creeping up on the exact size rather than cutting too much at
once. Decorative medallions, trim rings, or vent covers can help disguise any small gaps.
Step 8: Finish Seams and Touch-Ups
Once all the tiles are up, step back and scan for small gaps. A thin bead of paintable
caulk along seams or corners can hide minor imperfections. If your tiles are designed
to be painted, apply a light coat of latex paint in your chosen color to unify everything and
tone down the sheen if desired.
Faux Tin Ceiling Tile Ideas Inspired by Hometalk
Hometalk and similar DIY communities are packed with creative faux tin ceiling projects. Here
are a few ways people are using these tiles beyond the standard dining room makeover:
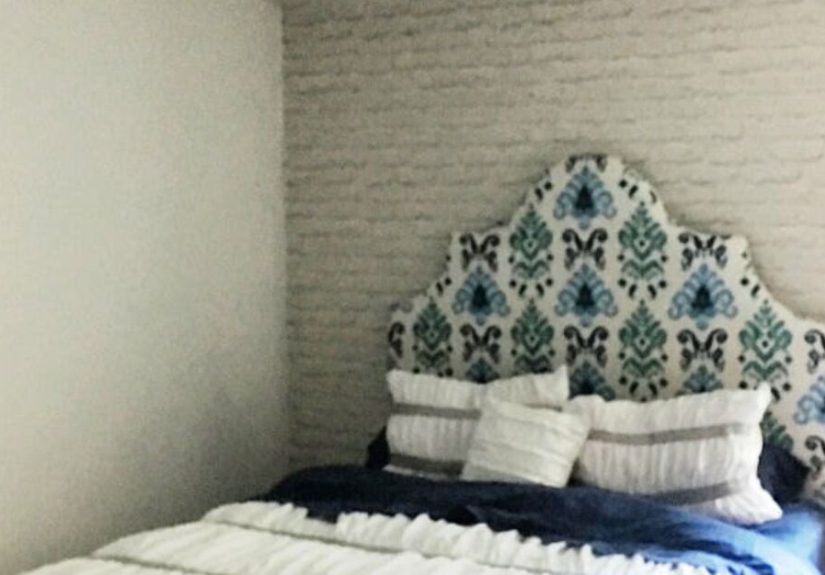
- Bedroom feature ceiling: A patterned “tin” ceiling above the bed acts like a giant piece of artwork and instantly makes the space feel more intentional.
- Ceiling “rug” over an island: Some homeowners only tile the center section of the room over a kitchen island, framing it with wood beams or trim for a coffered effect.
- Accent wall paneling: Tiles installed vertically behind a headboard, sofa, or bathtub create a textured focal wall.
- Paint tricks: Painting foam tiles in layered metallics or glazes can mimic aged copper, tin, or pewter at a fraction of the cost.
The best part? Most of these projects are weekend-friendly. With a helper, you can often
install faux tin ceiling tiles in a medium-size room in a day, then tackle paint and finishing
touches the next.
Common Mistakes (and How to Avoid Them)
Using the Wrong Adhesive
Not all adhesives are created equal. Some general-purpose glues don’t play well with plastics
or foam and may cause tiles to sag over time. Always use the adhesive type recommended by the
manufactureroften a solvent-free construction adhesive or instant-grab formula suitable for
PVC or polystyrene.
Skipping Surface Prep
If your ceiling is dusty, greasy, or flaking, even the best adhesive will struggle. A quick
cleaning and patching session dramatically increases the long-term success of your project.
Ignoring Layout
Eyeballing the layout might seem faster, but it almost always ends with crooked patterns and
awkward border tiles. Take a few extra minutes to snap straight layout lines and dry-fit tiles
before gluing anything permanently.
Forgetting About Lighting
Faux tin tiles are great at catching light and shadows. That’s a feature in most rooms, but it
can also highlight uneven surfaces or poor cuts. Make sure you look at your ceiling under the
room’s actual lightingrecessed cans, chandeliers, or pendant lightsbefore calling the job
finished.
Real-World Experiences: What DIYers Learn the Hard Way
Reading instructions is helpful; hearing what actually happens in real homes is priceless.
Here are a few experience-based lessons that often show up in community posts and project
recaps about faux tin ceiling tile instillation.
Ladders, Necks, and Pacing Yourself
The physical part of ceiling work is no joke. Most people underestimate how tiring it is to
look up, hold tiles overhead, and climb up and down a ladder hundreds of times in a single
day. A common refrain from DIYers: “We should’ve taken more breaks.” Plan to work in sections,
stretch your shoulders and neck regularly, and switch roles with your helper so no one person
is doing all the overhead work.
One smart strategy is to pre-cut as many tiles as possible while standing on the ground. Mark
border pieces and tiles that go around light fixtures beforehand so you’re not guessing with a
utility knife at the top of a ladder.
The Glue Learning Curve
The first few tiles often feel like a sticky disaster. Too much adhesive and the tile slides
around; too little and it won’t stay put. Many DIYers report that by the third or fourth tile,
they’ve figured out the sweet spot: usually a consistent bead along the perimeter and extra
dabs on the raised pattern lines.
If you notice a tile sagging in the first few minutes, gently pull it down, add more adhesive,
and press it back into place. Don’t wait until the glue skins over or you may create a weak
bond that fails later.
Pattern Direction Matters More Than You Think
Faux tin patterns often have a subtle directionmaybe a floral motif, a fan shape, or a medallion
that looks “right side up” from one angle. DIYers sometimes realize halfway through that a tile
is rotated 90 degrees. It’s not dangerous, but once you see it, you can’t unsee it.
Before starting, decide which way the pattern should face (usually toward the main entry or
focal point of the room), then keep all the tiles oriented the same way. Some people draw a
small arrow on the back of each tile to avoid rotation mistakes.
Popcorn Ceilings: To Cover or Not to Cover?
Many faux tin ceiling tile projects start with one simple goal: hide that popcorn. DIYers who
have had the best results with glue-up tiles over popcorn ceilings usually:
- Test the ceiling for asbestos when the home is old enough for concern.
- Make sure the texture is firmly attached and doesn’t crumble under moderate pressure.
- Knock down or skim-coat very sharp textures so tiles sit flatter.
- Use a little extra adhesive to bridge minor texture inconsistencies.
If the popcorn is unstable or potentially hazardous, it’s safer to have it removed or properly
encapsulated by professionals instead of just gluing tiles on top.
Budget Surprises (Good and Bad)
On the plus side, faux tin tiles can transform a room’s ceiling for far less than a full
remodel. On the minus side, some DIYers forget to factor in the “extras”adhesive, caulk,
paint, trim, and possibly new light fixtures that suddenly look wimpy next to a fabulous new
ceiling.
A helpful approach is to create a mini budget that includes:
- The tiles themselves (with 10–15% overage).
- Adhesive (often several tubes or buckets).
- Ladder or scaffold rental if you don’t already own one.
- Optional trim, medallions, or new lighting to finish the look.
Even with these extras, most homeowners still find faux tin ceiling tile instillation to be a
cost-effective way to add major character and perceived value to their home.
The “Wow” Moment
Nearly every faux tin ceiling story ends the same way: someone walks into the room after the
project is complete and says, “I had no idea a ceiling could look like this.” Whether you’re
going for vintage charm or modern glam, the combination of texture, pattern, and light
reflection makes the entire room feel more finished.
And yes, the spelling in some project titles really is “instillation” instead of
“installation”a little inside joke that has become oddly iconic in some Hometalk-style
projects. Fortunately, your ceiling will look amazing no matter how you spell it.
Conclusion: A High-Impact Upgrade Over Your Head
Faux tin ceiling tiles offer one of the highest style-to-effort ratios in DIY home décor. With
some basic tools, thoughtful planning, and a free weekend, you can cover an outdated or damaged
ceiling and replace it with a gleaming, patterned surface that looks straight out of a historic
brownstoneor a boutique hotel lobby.
Measure carefully, choose a pattern and finish that match your room, and follow a simple
glue-up installation process. Add in a few of the real-world tips from seasoned DIYerstake
breaks, double-check layout lines, and respect your ceiling’s conditionand you’ll be well on
your way to your own “Faux Tin Ceiling Tile Instillation | Hometalk” moment.


