
Table of Contents >> Show >> Hide
- Why a Rolling Tool Cart Makes More Sense Than a Stuffed Toolbox
- Choose the Right DIY Rolling Tool Cart Style First
- Core Features Every Good Rolling Tool Cart Plan Should Include
- A Practical DIY Rolling Tool Cart Plan You Can Adapt
- How to Organize a Rolling Tool Cart So It Actually Stays Useful
- Common DIY Rolling Tool Cart Mistakes to Avoid
- Should You Build or Buy a Rolling Tool Cart?
- Experience: What DIYers Learn After Building a Rolling Tool Cart
- Conclusion
If your toolbox has reached the “careful, that drawer bites” phase of life, a rolling tool cart might be the upgrade your shop has been begging for. A good DIY cart does more than hold tools. It cuts down on back-and-forth trips, keeps your most-used gear within arm’s reach, and turns workshop chaos into something closer to civilized behavior. Not perfect behavior, of course. This is still a garage. There will still be mystery screws.
The beauty of rolling tool cart plans is that they can be tailored to the way you actually work. Weekend woodworker? Build a compact cart with shelves and a durable top. Garage mechanic? Add drawers for sockets, wrenches, and fasteners. Small-shop DIYer? Make your cart double as an outfeed surface, charging station, and mobile command center. The point is not to build the fanciest cart on the block. The point is to stop wasting time hunting for pliers like they joined witness protection.
Below, you’ll find a practical, SEO-friendly guide to planning and building a DIY rolling tool cart that simplifies your toolbox, improves your workflow, and makes your shop feel a lot more intentional.
Why a Rolling Tool Cart Makes More Sense Than a Stuffed Toolbox
A traditional toolbox is fine until your tool collection expands from “starter set” to “why do I own five tape measures?” That’s when a rolling tool cart becomes the smarter solution. It gives you mobility, layered storage, and a flat top surface for staging tools during a project. In smaller garages and workshops, that combination matters.
A well-designed mobile tool cart can also serve as a secondary workbench. That means you can roll it beside a miter saw, park it near a project bench, or use it as temporary support for boards and parts. Instead of one giant static storage chest in a corner, you get flexible storage that moves with the job.
It also solves a common frustration: tools scattered across multiple surfaces. When your drill is on the bench, your square is on a shelf, and your driver bits are in a coffee can you swear made sense at the time, momentum disappears. A rolling tool cart keeps your workflow tighter, cleaner, and faster.
Choose the Right DIY Rolling Tool Cart Style First
Before cutting plywood, decide what kind of rolling cart you actually need. This is where most DIY plans go right or very, very wrong.
1. Open-Shelf Rolling Tool Cart
This is the simplest build and a great option for beginners. It usually features a sturdy frame, two or three shelves, and heavy-duty casters. It works well for power tools, glue, boxes of screws, and project supplies. If you want a fast, affordable DIY rolling tool cart, this style is hard to beat.
2. Drawer-Based Tool Cart
If your main problem is small-tool clutter, go with drawers. A drawer cart keeps sockets, layout tools, fasteners, drill bits, and hand tools organized and easy to grab. It takes longer to build, but it pays off every single time you don’t have to dig through a random bin for a 10mm socket that has once again fled the scene.
3. Hybrid Workstation Cart
This version combines drawers or shelves with a larger top and sometimes a side rack, pegboard panel, or power strip. It is ideal for a garage workshop where every square foot has to earn its keep. A hybrid cart can function as storage, staging table, and compact workbench all in one.
4. Machine-Specific Cart
Some of the best rolling tool cart plans are built around a single benchtop machine, such as a planer, drill press, spindle sander, or portable table saw. This setup gives the tool a home base while adding storage for blades, bits, jigs, and accessories underneath.
Core Features Every Good Rolling Tool Cart Plan Should Include
Use a Sturdy Structure
The cart needs to resist racking, sagging, and wobble. For most DIY builds, 3/4-inch plywood is the sweet spot because it balances strength, availability, and ease of construction. A thinner material may save money up front, but a tool cart loaded with steel hand tools gets heavy fast. If the cart feels flimsy empty, it will feel tragic when loaded.
Build to Comfortable Working Height
A cart that doubles as a work surface should land near a comfortable bench height for you. In many home shops, that means somewhere in the mid-30-inch range. Too low, and you’ll hunch. Too tall, and the top becomes awkward for assembly, measuring, or supporting stock.
Choose the Right Casters
Casters are not the place to get cheap and inspirational. If the wheels are undersized or low quality, the whole project loses its purpose. Use heavy-duty casters rated above your expected load. Locking casters are essential, especially if you want the top surface to be useful for actual work instead of gentle drifting.
For tight garages, four swivel casters improve maneuverability. For longer straight pushes, some builders prefer a mix of fixed and swivel wheels. Either way, match the wheel material to your floor and keep the cart’s full weight capacity in mind. A cart that glides well loaded is a joy. A cart that fights back becomes permanent furniture.
Create Logical Storage Zones
The best tool cart organization follows how you work, not how a catalog photo looks. Group tools by task. Keep measuring and marking tools together. Keep drilling and driving supplies together. Store sanding gear near abrasives. Put fasteners in labeled bins. Build the cart around your workflow so the right tool is always one move away instead of six.
Design a Useful Top
The top should not be an afterthought. It is prime real estate. A laminated plywood top, sacrificial hardboard surface, or even a rubber mat over plywood can turn the cart into a durable project station. Add a slight lip if you want to keep small parts from rolling off. Leave it flat if you want to use it as an outfeed or assembly surface.
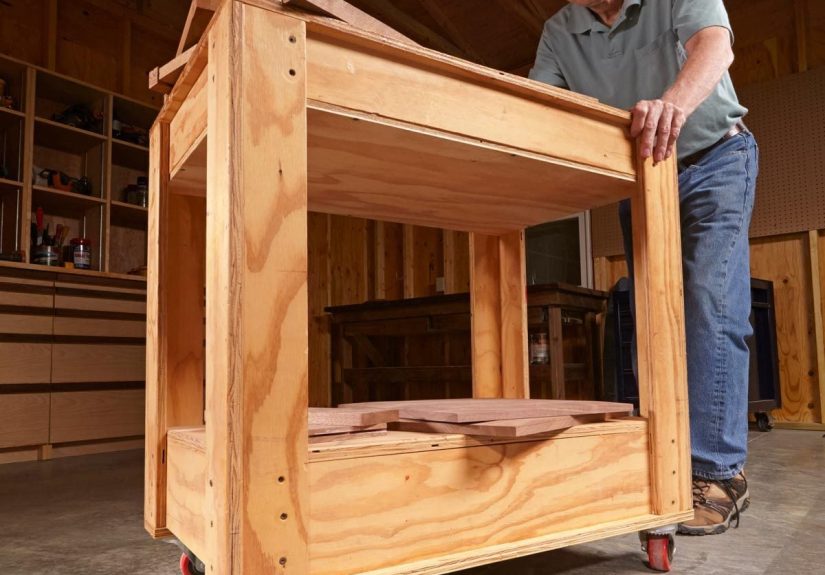
A Practical DIY Rolling Tool Cart Plan You Can Adapt
Here’s a flexible cart concept that works for most garages and home workshops: a plywood cabinet cart with one top shelf, one lower shelf, one narrow drawer bank, and locking casters. It is simple enough for an intermediate DIYer and useful enough to stay in service for years.
Suggested Layout
- Top: flat worksurface for staging tools and parts
- Upper zone: shallow drawer or open tray for frequently used hand tools
- Middle zone: open shelf for drills, nailers, chargers, or cases
- Lower zone: deeper shelf for larger tools or boxed supplies
- Sides: peg hooks, magnetic strip, or rack for clamps and long tools
Suggested Materials
- 1 sheet of 3/4-inch plywood for the main carcass and shelves
- 1/2-inch plywood for drawer boxes or dividers
- 1/4-inch panel for the back
- Wood glue and quality screws or pocket-hole fasteners
- Four heavy-duty casters, with at least two locking
- Drawer slides if adding drawers
- Handle, side hooks, label holders, and optional rubber mat or hardboard top skin
Step-by-Step Build Strategy
Step 1: Measure your tool load. Start with honesty. If you mostly use compact hand tools and one drill, don’t build a battleship. If you want to store an impact driver, circular saw, charger, bits, clamps, and fasteners, plan for real load capacity.
Step 2: Build the base and sides. Cut two side panels and a bottom panel from 3/4-inch plywood. Join them with glue and screws. Add a back panel to stiffen the cart and prevent side-to-side wobble.
Step 3: Install shelves. Add one fixed middle shelf and one lower shelf, or leave one area open for taller tools. Fixed shelves add rigidity, so don’t be too quick to make everything adjustable.
Step 4: Add drawers where they matter most. A couple of shallow drawers near the top can transform organization. Use them for layout tools, screwdrivers, pliers, sockets, bits, blades, and other small pieces that normally disappear into the void.
Step 5: Build a strong top. Make the top slightly larger than the carcass for a little overhang. That extra lip can make the cart easier to grip and gives the piece a more finished look.
Step 6: Mount the casters carefully. Reinforce the bottom if needed so the caster plates sit on a solid surface. Check the total load rating before installation. Then roll the cart empty and loaded to test stability.
Step 7: Customize the sides. Add a pegboard panel, magnetic strip, spray-can rack, clamp hooks, or charging station depending on your tools. Side storage can dramatically increase capacity without increasing footprint.
Step 8: Organize before you use it. Do not promise yourself you’ll “sort it later.” That is how clean carts become junk islands. Label bins, assign zones, and give every tool a home on day one.
How to Organize a Rolling Tool Cart So It Actually Stays Useful
Building the cart is only half the job. The real win comes from organizing it intelligently.
Store by Task, Not by Random Survival Instinct
One of the best workshop organization rules is to group items by the jobs they perform together. Put drill bits near the drills. Keep countersinks, drivers, and spare batteries in the same area. Put measuring tools together. Store sanding discs with sanding tools. When the cart mirrors your process, projects move faster.
Keep Frequently Used Items Between Hip and Shoulder Height
This sounds annoyingly practical because it is. The tools you grab all the time should live in the easiest reach zone. Heavy or bulky items should sit lower for stability. That keeps the cart from getting top-heavy and reduces awkward lifting.
Use Drawer Inserts or Foam
Custom foam organizers are especially useful for hand tools and socket sets. They stop tools from sliding around, make missing items obvious, and turn a messy drawer into something that feels suspiciously professional. Even simple dividers or trays can make a huge difference.
Let the Cart Work With Wall Storage
A rolling tool cart should complement your workshop, not replace every other storage method. Pegboards, magnetic strips, wall shelves, and labeled hardware bins are still helpful. Use the cart for active tools and project supplies, and let the walls handle overflow and specialty items.
Common DIY Rolling Tool Cart Mistakes to Avoid
Making it too deep: A deep cart seems useful until tools get buried in the back. Keep it shallow enough that you can see and reach what you own.
Choosing tiny wheels: Small casters may work on a showroom floor. In a dusty garage with cracks, cords, and sawdust, they become tiny circles of regret.
Ignoring weight distribution: Put the heaviest items low. A cart loaded top-heavy is more dangerous and harder to move.
Skipping locks: If the cart is going to support measuring, cutting, assembly, or heavy tools, locking wheels are non-negotiable.
Building without a workflow plan: The prettiest cart in the world is still annoying if your most-used tools are hidden behind paint cans and mystery brackets.
Should You Build or Buy a Rolling Tool Cart?
If you want something fast and generic, buying makes sense. But if you want a cart tailored to your tools, your height, your shop footprint, and your projects, DIY wins. A homemade rolling tool cart also lets you build in features that off-the-shelf units often skip, like custom side storage, outfeed-friendly dimensions, removable bins, or a top made specifically for woodworking or mechanical repairs.
And perhaps most importantly, a DIY tool cart can evolve. Start with shelves. Add drawers later. Add a power strip next month. Add a clamp rack when your collection becomes slightly ridiculous. Your workshop changes, and your cart can change with it.
Experience: What DIYers Learn After Building a Rolling Tool Cart
One of the most common experiences people have after building a rolling tool cart is realizing the project was never just about storage. It was really about friction. Every workshop has little points of resistance: walking across the room for a square, setting screws on a random surface, hunting for the charger, balancing a drill on a paint can because the bench is already full. A good mobile cart removes that friction. Suddenly, your tools move with you instead of making you orbit them all day.
Many DIYers also discover that the first version teaches them more than any sketch ever could. On paper, a big cart sounds amazing. In a real garage, especially a crowded one-car setup, oversized carts can feel like you built a kitchen island for a submarine. The cart may hold everything, but if it can’t turn easily, park neatly, or roll past your car bumper, it quickly becomes less “mobile workstation” and more “wooden monument to optimism.” That is why experienced builders often prefer a narrower footprint with smarter vertical storage.
Another common lesson is that the top surface becomes the cart’s social center. That flat top is where tools land, parts wait, screws gather, coffee cups appear, and tape measures briefly retire. If the top is flimsy, slick, or cluttered, the whole cart feels less useful. Builders who love their carts usually gave the top real thought. Some add a sacrificial hardboard skin they can replace later. Others add a rubber mat, a lip around the edge, or just enough overhang to make clamping easier.
Then there is the wheel lesson. Everyone talks about wheels. And they should. Cheap casters may technically roll, in the same way a grocery cart with one rebellious wheel technically “steers.” DIYers who upgrade to better casters almost always say the same thing afterward: they wish they had done it sooner. Good wheels make a heavily loaded cart feel controlled. Bad wheels make a modest load feel like you are dragging a filing cabinet through peanut butter.
Organization habits change too. Once every drawer, shelf, and side hook has a purpose, putting tools away starts to feel easier because there is less decision-making involved. The hammer goes here. The impact driver lives there. The drill bits stop wandering. The cart becomes a reset button at the end of a project. Instead of one giant cleanup session on Sunday night, the shop stays more manageable all week.
Finally, builders often realize the cart improves confidence as much as convenience. A cleaner, more mobile workspace makes projects feel less overwhelming. You start jobs faster because setup is easier. You finish stronger because the mess never gets out of hand. And when a DIY solution quietly saves time on every project, that is when you know you built the right thing. Not flashy. Not complicated. Just smart, sturdy, and ready to roll whenever the next project calls.
Conclusion
The best rolling tool cart plans do not try to do everything. They do the right things well: strong structure, smooth mobility, practical storage, and a top surface that helps you work instead of getting in the way. Whether you build a simple shelf cart or a drawer-packed mobile workstation, the goal is the same: simplify your toolbox, tighten your workflow, and make your garage or workshop feel a lot less chaotic.
If your current storage system involves three mismatched boxes, a bench covered in clamps, and at least one screwdriver living permanently in a cup holder, this is your sign. Build the cart. Your future projects, your lower back, and your missing 10mm socket may all thank you.


