
Table of Contents >> Show >> Hide
- What Is Kintsugi and Why It Works So Well on Coasters
- Supplies You’ll Need for DIY Kintsugi Concrete Coasters
- Step-by-Step: How to Make Easy DIY Kintsugi Coasters Using Concrete
- Design Ideas: Three Stylish Kintsugi Looks
- Common Problems (and How to Fix Them)
- How to Care for Kintsugi Concrete Coasters
- Real-Life Experiences, Tips, and Creative Variations
If your coffee table’s been begging for an upgrade, DIY kintsugi concrete coasters are the glow-up it deserves.
They’re modern, they’re sturdy, and those gold “cracks” look like something you picked up in a fancy design shop,
not something you made on your kitchen counter while wearing paint-splattered sweatpants. The best part?
This project is surprisingly beginner friendly, especially when you use fast-setting concrete and silicone molds
designed for coasters.
In this tutorial, we’ll walk through how to make easy DIY kintsugi coasters using concrete, inspired by projects
shared on Hometalk and other U.S. DIY craft sites. You’ll learn what kintsugi is, which materials actually work
(and which just make a mess), step-by-step instructions, plus troubleshooting and styling ideas so your coasters
look intentional and not like a cement accident.
What Is Kintsugi and Why It Works So Well on Coasters
Kintsugi is a traditional Japanese technique that repairs broken pottery by filling the cracks with lacquer and
dusting them with gold, silver, or platinum. Instead of hiding damage, it highlights itturning flaws into a
focal point. In home decor, makers have adopted the “kintsugi look” using paint or gold
leaf to draw delicate lines that resemble cracks, without actually sacrificing perfectly good plates or mugs.
Concrete coasters are perfect for this style. The smooth, matte surface makes the metallic “veins” pop, and
concrete is tough enough to handle hot coffee, icy drinks, and minor drops. Tutorials from concrete-focused makers
show that when you combine pigmented concrete with fine gold lines, you get a sleek, minimalist version of
kintsugi that feels modern and sculptural.
Supplies You’ll Need for DIY Kintsugi Concrete Coasters
You don’t need a full workshop to pull this off. Here’s a solid starter list:
- Fast-setting concrete mix (such as a “cement all” or craft concrete designed for small molds)
- Silicone coaster molds – round or square. Molds with shallow built-in grooves for “cracks” make the kintsugi lines super easy, but plain molds work too.
- Concrete pigment or universal tint (optional, for gray, charcoal, or colored coasters)
- Disposable mixing cups and stir sticks
- Small digital scale or measuring cups (for consistent mix ratios)
- Gold paint pen, metallic acrylic paint, or gold leafing pen for the kintsugi lines
- Fine-grit sandpaper (220–400 grit) for smoothing edges
- Concrete sealer (clear, water-based; food-safe if possible)
- Self-adhesive cork or felt pads for the bottoms of the coasters
- Nitrile gloves, dust mask, and a drop cloth for safety and easy cleanup
Step-by-Step: How to Make Easy DIY Kintsugi Coasters Using Concrete
1. Prep Your Molds and Workspace
Cover your work surface with a plastic sheet or old tableclothconcrete dust has a talent for traveling.
Set your silicone molds on a flat, level surface so the coasters cure evenly. If your molds aren’t super shiny
inside, you usually don’t need mold release, but a very light spritz of silicone mold release or cooking spray,
wiped back out, can make demolding smoother.
Put on your gloves and dust mask before you open the concrete bag. Cement particles are fine and you don’t want
them in your lungs or under your nailsno matter how committed you are to DIY.
2. Mix and Tint the Concrete
Most small-project concrete mixes use roughly a 3:1 ratio of mix to water by volume, but always
double-check the bag instructions. Tutorials for concrete coasters often describe the right consistency as a
“thick milkshake” or “runny peanut butter”fluid enough to self-level, but thick enough that it doesn’t separate
into watery puddles.
- Measure the dry mix into a cup or mixing tub.
- If you’re using pigment, blend it into the dry mix first for even color.
- Add water gradually, stirring as you go. Stop as soon as the mix is smooth and pourable.
If the mix looks chalky or crumbly, you need a bit more water. If it’s sloshing around like soup, add a small
spoonful of dry mix at a time until it thickens back up.
3. Pour, Tap, and Let It Cure
Slowly pour the concrete into each coaster cavity. Fill them to your desired thicknessaround 1/4 to 3/8 inch is
a comfortable height for everyday use. Concrete coaster tutorials often recommend gently tapping the molds on the
table or vibrating them to release air bubbles; this helps eliminate pinholes on the finished surface.
Use a craft stick to skim off any excess and level the top. Then let the coasters cure. Fast-setting mixes can be
ready to demold in 30–60 minutes, but give them a few hours before handling roughly. Full cure and maximum
strength usually take 24 hours or more.
4. Demold and Sand the Coasters
Once the concrete is firm, flex the silicone molds and pop the coasters out like giant gray cookies.
Inspect the edges: if there are rough spots or small ridges, use fine-grit sandpaper to soften them. Many makers
like to do a quick wet sanddampen the coaster and the sandpaperto keep dust down and achieve a smoother finish.
Let the coasters dry thoroughly after sanding. If the surface still looks dusty, wipe it with a barely damp cloth.
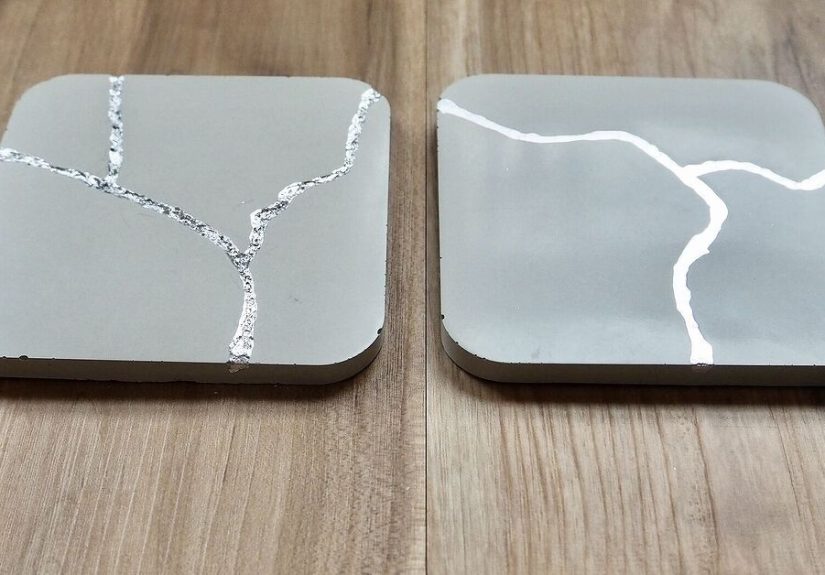
5. Draw and Paint the Kintsugi “Cracks”
Now for the fun, dramatic part: the golden lines.
If you’re using molds with built-in kintsugi grooves, you’ll already see subtle lines in the cured coasters.
Simply trace these with a pencil first so you know where to paint. If your coasters are completely smooth, sketch
your own organic “cracks.” Avoid perfectly straight or symmetrical lineskintsugi looks best when it feels random
and natural.
Using a gold paint pen or tiny brush with metallic acrylic paint:
- Work slowly along the lines, loading only a little paint at a time so it doesn’t pool.
- Allow the first coat to dry fully.
- Add a second coat to deepen the color and shine.
Many kintsugi coaster tutorials show that slightly thicker lines at intersections and thinner ones along the
rest of the crack mimic how lacquer and gold naturally pool in real repaired pottery.
6. Seal and Finish
Concrete is porous, so a clear sealer helps protect against drink rings and stains. Makers who specialize in
concrete coasters often recommend a water-based acrylic sealer because it doesn’t yellow and is easy to brush or
spray on in thin coats.
- Brush or spray a light coat of sealer over the top and sides of each coaster.
- Let it dry completely, then apply a second coat if needed.
- Once cured, stick cork or felt pads to the underside so the coasters don’t scratch your table.
At this point, you can stop and admire your work. They should look like tiny concrete sculptures with delicate
gold rivers running across themvery “I shop at designer boutiques,” not “I bought a big bag of cement on sale.”
Design Ideas: Three Stylish Kintsugi Looks
1. Moody Charcoal and Gold
A dark gray or charcoal base with bright gold lines is the classic kintsugi-inspired combo. Concrete artists who
sell coasters online often lean into this palette because it works with almost any decor stylemodern, industrial,
Japandi, even farmhouse. Add just enough pigment to deepen the mix without
making it streaky, and keep the lines fine and crisp for a refined look.
2. Soft Stone Neutrals
Prefer something lighter? Skip the pigment or add only a touch of warm beige to mimic natural stone. Draw a few
subtle “cracks” and use a muted gold or champagne metallic so the design whispers instead of shouts. This style
pairs beautifully with light woods, linen, and minimalist spaces.
3. High-Drama “Broken and Reformed” Look
Some makers create true kintsugi-inspired cement pieces by casting a coaster, gently breaking it, and then
re-assembling the pieces with gold-tinted resin or adhesive before sealing everything in a protective topcoat.
It’s a more advanced route, but the result looks incredibly sculptural and one-of-a-kind. If you try this,
wear eye protection and break the coasters carefullysmall controlled fractures, not flying shrapnel.
Common Problems (and How to Fix Them)
Air Bubbles and Pits
Tiny craters on the surface usually come from trapped air. To prevent them, tap the mold firmly on the table right
after pouring. If you still end up with a few pits, you can embrace the texture as “industrial charm” or lightly
dab a bit of tinted sealer into the holes before your final coat. Concrete coaster tutorials from DIY makers
repeatedly emphasize vibration as the secret weapon against bubbles.
Crumbly or Weak Coasters
If the coasters feel chalky or crumble at the edges, the mix probably had too much water or wasn’t allowed to cure
long enough. Use the recommended ratio on the package, and resist the urge to demold too early. Allowing coasters
to cure for at least a full day (longer in cool or humid conditions) significantly improves their strength.
Bleeding or Blurry Gold Lines
Gold paint can feather out if the surface is dusty or very rough. Wipe each coaster clean before painting, and
use thin coats of paint with a light touch. If you accidentally go too thick in one spot, let it dry and carefully
sand back the excess, then repaint just that area.
Sealer Streaks or Shine You Don’t Like
High-gloss sealer can sometimes make concrete look plastic. If you prefer a soft, stone-like finish, choose a
matte or satin sealer and apply very thin layers with a foam brush or small sprayer. Makers who specialize in
concrete decor often recommend two light coats instead of one heavy coat to avoid streaks and puddles.
How to Care for Kintsugi Concrete Coasters
Once your coasters are sealed and cured, they’re pretty low-maintenance, but a little care helps them last longer:
- Let them cure fully for several days before heavy use so the sealer has time to harden.
- Wipe spills promptly, especially wine, coffee, or citrus, which can stain porous surfaces if the sealer wears down.
- Clean gently with a damp cloth and mild dish soapskip abrasive scrubbers.
- Reseal occasionally if the finish starts looking dull or water stops beading on the surface.
With basic care, concrete coasters used in home settings can stay looking good for years, even with daily coffee
duty.
Real-Life Experiences, Tips, and Creative Variations
People who try DIY kintsugi concrete coasters for the first time often say the project feels oddly calming.
There’s something satisfying about drawing those winding gold linesalmost like adult coloring, but on a solid,
stone-like surface. Many crafters report that even when the concrete doesn’t cure perfectly smooth, the kintsugi
effect makes “imperfections” look intentional and artistic, which is exactly the philosophy behind the original
Japanese technique.
One common pattern across tutorials and shared experiences is that the first batch is usually the test
run. Makers often start with plain gray coasters, experiment with line thickness and gold colors, and
then adjust the second batch based on what they like best. Some realize they prefer just a couple of subtle
“cracks” instead of a spiderweb of lines; others lean into dramatic, branching veins that almost resemble
lightning bolts.
DIYers also love using these coasters as personalized gifts. It’s easy to match the pigment and metallic paint to
someone’s home stylecharcoal and bright gold for a modern loft, pale stone and champagne gold for a neutral
living room, or even tinted blue concrete with warm gold lines for a coastal vibe. Because each pour and each set
of lines are slightly different, every coaster feels one-of-a-kind, which makes them perfect for housewarmings,
weddings, and holiday gift exchanges.
Another frequently shared tip is to pour in small batches if you’re new to concrete. Instead of
filling a giant mixing bucket and racing against the clock, mix enough for just two or three coasters at a time.
This gives you more control over the consistency and reduces waste if something goes wrong. Once you’re confident
in your ratio and timing, you can scale up for bigger batches or even coordinate a mini craft night.
Speaking of craft nights, kintsugi coasters are surprisingly group-friendly. One person can handle the mixing and
pouring while others design and paint the gold lines on coasters that are already cured. People with different
artistic comfort levels can all participate: some might freehand intricate, branching networks of lines, while
others stick with a single bold crack across the surface. By the end of the evening, everyone walks away with a
stack of custom coasters and at least a few funny stories about concrete mishaps.
For more advanced variations, makers experiment with combining concrete and other materials. Some embed thin
slices of stone or ceramic into the surface and integrate the kintsugi lines around them. Others pour a two-tone
baseone color in half the mold, another in the restthen draw gold lines where the colors meet. There are even
versions where the edges of the coasters are dipped in metallic paint, echoing the crack lines and giving the
pieces a subtle “gilded” border.
The biggest takeaway from all those shared experiences? Don’t stress about perfection. Kintsugi is literally an
art form built on celebrating what’s imperfect and repaired. If your lines wobble, your pigment swirls, or your
coasters don’t match exactly, that’s a feature, not a failure. Once there’s a mug of coffee or a glass of wine
sitting on top, what people notice is the glow of the gold and the feeling that these pieces have a storyone you
got to create with your own two (concrete-dusted) hands.


