
Table of Contents >> Show >> Hide
- Why the Washer Gasket Gets Dirty So Fast
- Signs Your Front-Loading Washing Machine Gasket Needs Cleaning
- What You Need Before You Start
- How to Clean a Front-Loading Washing Machine Gasket Step by Step
- Best Cleaners for a Front-Load Washer Gasket
- Common Mistakes to Avoid
- How Often Should You Clean a Front-Loading Washer Gasket?
- How to Prevent Mold and Odors from Coming Back
- When the Gasket Needs More Than Cleaning
- Real-Life Experiences and Lessons from Cleaning Washer Gaskets
- Final Thoughts
If your front-loading washer smells less like “fresh cotton” and more like “mystery swamp,” the gasket is probably the star of that unpleasant show. That soft rubber ring around the door, also called the door seal or boot, does an important job: it keeps water inside the machine where it belongs. Unfortunately, it also loves collecting the exact things you do not want lingering in a damp, dark placedetergent residue, lint, pet hair, body soil, stray socks, and the occasional coin that has been living rent-free since who knows when.
The good news is that cleaning a front-loading washing machine gasket is not hard. The better news is that once you know how to do it properly, you can keep mildew, odors, and slimy buildup from turning your laundry routine into a science experiment. In this guide, you will learn exactly how to clean the gasket, what products to use, what to avoid, and how to keep the problem from coming right back.
Why the Washer Gasket Gets Dirty So Fast
Front-load washers are efficient, which is great for your water bill. But that efficiency also means they use less water and keep more moisture tucked into tight spaces. The folds in the rubber gasket trap leftover suds, grime, and water after each cycle. That damp little pocket becomes the perfect hangout for mildew and odor-causing bacteria.
This is why the gasket is usually the first place to blame when clean laundry comes out smelling oddly “not clean.” It is also why a washer can look spotless on the outside while hiding enough gunk in the seal to ruin your confidence in modern appliances.
Signs Your Front-Loading Washing Machine Gasket Needs Cleaning
You do not need to wait until the washer starts smelling like a wet basement. Clean the gasket when you notice any of these signs:
- A musty or sour smell coming from the washer drum
- Black, pink, gray, or slimy residue inside the folds of the rubber seal
- Pet hair, lint, or dirt stuck near the bottom of the gasket
- Water pooling in the lower edge of the seal after a wash
- Fresh laundry that somehow smells less fresh than it should
- Small items, like baby socks or hair ties, disappearing into gasket territory
What You Need Before You Start
You do not need a laboratory. You need a few practical supplies and a little patience.
- Microfiber cloths or soft cleaning rags
- Warm water
- Mild dish soap or a washer-safe cleaner
- An old toothbrush or small soft-bristle brush
- Rubber gloves
- A dry towel
- Optional: diluted bleach solution or diluted vinegar solution if your washer manual allows it
Important: Never mix bleach and vinegar. Pick one cleaning method, not both at once, and always check your owner’s manual before using bleach or any cleaner in or on the machine. Some brands allow diluted bleach for stained gaskets; others recommend mild soap or specific washer cleaners.
How to Clean a Front-Loading Washing Machine Gasket Step by Step
1. Empty the Washer Completely
Start with an empty machine. No clothes, no forgotten towel, no lonely sock hiding in the back. Open the door wide so you can see the full gasket.
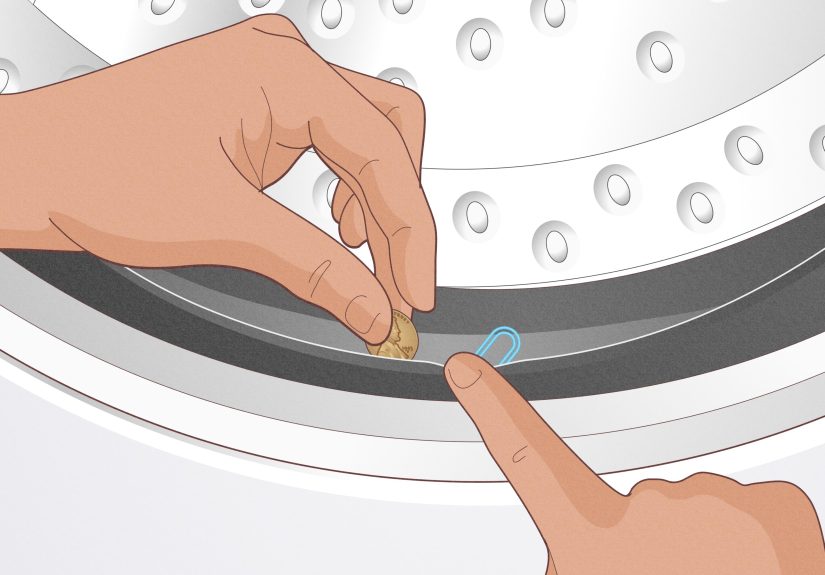
2. Inspect the Gasket Like a Detective
Gently pull back the folds of the rubber seal. Go slowly. You are looking for trapped lint, hair, dirt, detergent sludge, and small objects. The bottom section of the gasket is usually the messiest part because water tends to settle there.
It is common to find coins, bobby pins, pet fur, and even children’s socks tucked in the lower fold. Remove everything by hand first before you start scrubbing. Cleaning is easier when you are not fighting a hidden quarter and three mystery crumbs.
3. Wipe Away Loose Residue
Use a damp microfiber cloth to wipe the front, underside, and inner folds of the gasket. This first pass removes loose grime and lets you see what is left. If the buildup is light, warm water and a cloth may already make a dramatic difference.
4. Use a Gentle Cleaning Solution for Everyday Dirt
For regular maintenance, use warm water with a little mild soap. Dip your cloth into the solution and wipe every part of the gasket, especially the creases. Use a soft brush or old toothbrush for corners and tight spots.
This method is ideal for routine cleaning because it is gentle on the rubber and effective on detergent film, body soil, and general residue.
5. Treat Mold or Heavy Mildew Carefully
If you see black spots, pink slime, or stubborn mildew, you may need a stronger approach. Depending on your washer manufacturer’s care guidance, this could mean a diluted bleach solution, an oxygen bleach solution, or another approved cleaner. Some brands also allow diluted vinegar for surface cleaning.
Apply the cleaner to a cloth rather than dumping it directly into the gasket folds. Wipe the stained area thoroughly, let it sit briefly if the product instructions allow, then rinse with clean water. Avoid abrasive pads and harsh scrubbing that could damage the rubber.
If the mildew is severe, repeat the cleaning rather than attacking the gasket like it personally offended you. Rubber seals last longer when treated firmly but gently.
6. Clean the Glass Door and Door Frame Too
The gasket is not the only problem area. Wipe the inside of the washer door, the frame around the seal, and the area where residue splashes and dries. If you clean only the gasket and ignore the surrounding surfaces, odor-causing grime can easily return.
7. Dry the Gasket Completely
This step matters more than people think. Use a dry towel or clean microfiber cloth to dry the gasket inside and out. Get into the folds. Moisture left behind is the reason the smell keeps coming back.
If your machine has been especially funky, leave the door open for several hours after cleaning so the interior can air out thoroughly.
8. Run a Washer Cleaning Cycle
After cleaning the gasket by hand, run the washer’s cleaning cycle if your machine has one. It may be called Clean Washer, Tub Clean, Self Clean, or something similar. If your machine does not have a dedicated cycle, run the hottest empty cycle your manual recommends.
This helps remove residue deeper in the drum, internal surfaces, and drainage pathways. In other words, it cleans the parts you cannot reach without becoming a full-time appliance technician.
Best Cleaners for a Front-Load Washer Gasket
The best cleaner depends on the condition of the gasket and your washer brand’s instructions. Here is the simplest way to think about it:
- Warm water and mild soap: Best for routine upkeep and light residue
- Washer-safe all-purpose cleaner: Good for grime and detergent film if approved for appliance use
- Diluted bleach solution: Effective for visible mildew or staining when your manual permits it
- Oxygen bleach solution: A gentler option some manufacturers recommend for gasket stains
- Diluted vinegar solution: Useful for deodorizing and light residue on some machines, but always check compatibility first
What should you skip? Abrasive scrubbers, straight undiluted harsh chemicals, and random internet potions that sound like they were invented during a cleaning-related fever dream.
Common Mistakes to Avoid
Using Too Much Detergent
More detergent does not mean cleaner clothes. In high-efficiency washers, too many suds can leave residue behind, which contributes to odor and buildup. Use HE detergent and measure it correctly.
Skipping the Bottom Fold
The lower section of the gasket is where water and debris often settle. If you only wipe what you can see at eye level, you are missing the messiest part.
Forgetting to Dry the Seal
Cleaning without drying is like brushing your teeth and then drinking syrup. You did something useful, but you also undid it almost immediately.
Mixing Bleach and Vinegar
Do not do this. Ever. Choose one approved cleaning method at a time and rinse thoroughly before using anything else.
Ignoring the Dispenser Drawer and Filter
If your washer still smells after cleaning the gasket, the detergent drawer and drain pump filter may also need attention. Odors are team players.
How Often Should You Clean a Front-Loading Washer Gasket?
For most households, a quick wipe after laundry day and a deeper cleaning about once a month is a smart schedule. If you wash gym clothes, pet bedding, heavily soiled workwear, or lots of towels, you may need to clean it more often.
A good rule is this:
- After every wash day: Dry the gasket and leave the door ajar
- Weekly: Check for trapped lint, hair, and stray items
- Monthly: Deep-clean the gasket and run the washer’s cleaning cycle
- As needed: Clean immediately if you notice mildew spots or odor
How to Prevent Mold and Odors from Coming Back
Once you have cleaned the gasket, the real trick is not having to wage the same battle every two weeks. Prevention is easier than rescue.
Leave the Door Open Between Loads
Airflow helps the gasket dry faster. If you have small children or pets, keep the laundry room secured rather than leaving the machine accessible.
Dry the Gasket After Washing
A 20-second wipe can save you from a 45-minute deep clean later.
Remove Clean Laundry Promptly
Wet clothes left sitting in the washer raise humidity and encourage sour odors.
Use the Right Detergent
Choose HE detergent and use the amount recommended for your load size and water conditions.
Run the Cleaning Cycle Monthly
Do not wait for the washer to smell bad. Maintenance works best before the machine starts sending out distress signals.
Check the Gasket for Debris Often
If pet hair, sand, tissues, or tiny clothing items collect in the folds, remove them right away before they start trapping moisture.
When the Gasket Needs More Than Cleaning
Sometimes cleaning is not enough. If the gasket is cracked, torn, permanently warped, or deeply stained with mold that will not come off, it may need replacement. Likewise, if water leaks from the door or the seal feels brittle, do not keep scrubbing and hoping for a miracle.
At that point, look up your washer model and order the correct replacement part or call a qualified appliance technician. A damaged gasket cannot do its job properly, no matter how many microfiber cloths you throw at it.
Real-Life Experiences and Lessons from Cleaning Washer Gaskets
Homeowners tend to discover the washer gasket problem in one of three ways. First, the machine starts smelling bad. Second, clothes come out with a weird musty note that no detergent scent can cover. Third, someone finally peels back the rubber fold and reacts with the facial expression usually reserved for horror movies and unexpected plumbing bills.
One common experience is the “I thought my washer was clean because the drum looked clean” mistake. This happens a lot with front-load machines. The shiny stainless steel drum looks perfectly fine, so the owner assumes the machine is in great shape. Then they inspect the rubber seal and find gray slime, detergent residue, and enough lint to knit a small scarf. The lesson is simple: a clean-looking drum does not mean a clean gasket.
Another frequent experience involves families with kids. Tiny socks, bib clips, hair ties, and even small toy pieces can get trapped in the gasket fold. These items hold moisture, block drainage, and become odor magnets. Parents often think the washer is malfunctioning when the real culprit is a toddler sock camping out in the rubber seal like it paid rent.
Pet owners tell a similar story. Dog hair and cat fur cling to damp rubber surprisingly well. If you wash pet blankets, beds, or lint-heavy items, the gasket can collect fur at an impressive rate. Once that hair combines with detergent residue and warm moisture, the smell becomes very specific and very memorable. In many cases, people solve the issue simply by doing a quick seal check after pet loads.
There is also the “I used too much detergent because I wanted extra-clean clothes” experience. It sounds logical, but front-load washers do not reward enthusiasm in this area. Extra detergent often means extra residue, extra suds, and extra buildup around the gasket. People are usually surprised that using less detergent can actually leave both the washer and laundry smelling better.
Many people also learn that timing matters. If they wipe the gasket right after the last load of the day, maintenance feels easy. If they wait until the machine smells musty, the job becomes a whole project involving gloves, brushes, and muttered regrets. Small habits really do win here.
And then there is the deep-clean success story, which is incredibly satisfying. You wipe, scrub, rinse, dry, run a cleaning cycle, and suddenly the washer smells neutral again. Not floral. Not fake-fresh. Just clean. That is actually the goal. A washer should not smell like perfume, mildew, or a chemistry experiment. It should smell like nothing much at all.
The biggest practical takeaway from these real-world experiences is that gasket cleaning works best as a routine, not a rescue mission. Five minutes of prevention beats a dramatic weekend showdown with mold every single time. Once people get into the habit of checking the folds, drying the seal, and leaving the door ajar, the washer usually stays fresher, cleaner, and far less gross.
Final Thoughts
Knowing how to clean a front-loading washing machine gasket is one of those small home-maintenance skills that pays off fast. A clean gasket helps your washer smell better, work better, and stop transferring hidden funk onto freshly washed clothes. The process is simple: inspect the folds, remove debris, wipe with an appropriate cleaner, dry thoroughly, and keep moisture from building up again.
If you remember only one thing, make it this: the gasket is not a “once in a blue moon” chore. It is a regular maintenance zone. Give it a quick wipe often, deep-clean it monthly, and your washer will stop acting like a damp cave with spin cycle privileges.


