Table of Contents >> Show >> Hide
- Why Folding Gauze the Right Way Actually Matters
- Before You Start: What You Need
- How to Fold Gauze for Your Mouth in 12 Steps
- Step 1: Wash your hands first
- Step 2: Pick the right amount of gauze
- Step 3: Lightly dampen it if needed
- Step 4: Fold the gauze into a small thick pad
- Step 5: Match the fold to the area you need to cover
- Step 6: Place it directly over the surgical site
- Step 7: Close your teeth and bite with steady pressure
- Step 8: Leave it alone for the recommended time
- Step 9: Remove it gently and check for light oozing versus active bleeding
- Step 10: Refold a fresh piece if you still need pressure
- Step 11: Stop using gauze once bleeding has slowed enough
- Step 12: Never sleep with gauze in your mouth
- Common Mistakes That Make Mouth Gauze Less Effective
- Helpful Comfort Tips After You Fold and Place the Gauze
- When to Call Your Dentist or Oral Surgeon
- Real-World Experiences and Lessons People Commonly Learn
- Conclusion
If you just had a tooth pulled, a wisdom tooth removed, or another minor dental procedure, you were probably handed gauze and a very short speech that sounded something like, “Bite on this.” Helpful? Sure. Complete? Not exactly. The truth is that knowing how to fold gauze for your mouth can make a real difference in comfort, pressure, and healing.
Done correctly, folded gauze helps apply gentle, steady pressure right where your mouth needs it most. Done poorly, it slides around, feels bulky, gets chewed into a soggy cotton pancake, and makes you wonder whether you are healing or just auditioning for a very low-budget dentist commercial.
This guide explains the simple, practical way to fold gauze for your mouth after a tooth extraction or oral surgery. It is written for real people, not robots in a spotless brochure. You will learn how to make a gauze pad the right size, how to place it over the site, how long to keep it there, and what common mistakes to avoid. One important note: always follow your own dentist or oral surgeon’s instructions first, because they know your procedure, your bleeding pattern, and whether your case needs anything different.
Why Folding Gauze the Right Way Actually Matters
Mouth gauze is not there just to look busy. Its main job is to help control bleeding by putting direct pressure on the extraction site so a blood clot can form and stay put. That clot is your body’s natural protective cover. If the gauze is folded too thin, pressure may be weak. If it is too bulky, it may sit on your teeth instead of the surgical area. If it is crooked, loose, or constantly moved around, it may do more annoying than helping.
The good news is that this is not complicated. You are not making a paper swan. You are simply building a small, clean, slightly cushioned pad that sits directly over the area and stays there while you bite down gently but firmly. Think less “origami masterpiece” and more “smart little pressure pillow.”
Before You Start: What You Need
- Clean sterile gauze pads, usually 2×2 or 4×4
- Clean hands
- A little water to lightly dampen the gauze if your dentist recommended that
- A mirror, if placement is awkward
- A calm attitude, because panicking at pink saliva never helps
If your provider told you to use gauze, use gauze. If they gave you a specific brand, size, or replacement schedule, follow that. And if they told you not to keep using it, do not freestyle your own dental aftercare sequel.
How to Fold Gauze for Your Mouth in 12 Steps
-
Step 1: Wash your hands first
Before touching fresh gauze or the area near your mouth, wash your hands well with soap and water. Your extraction site is healing, and the last thing it needs is extra germs hitchhiking in from your phone, doorknob, keyboard, or snack bag.
-
Step 2: Pick the right amount of gauze
Start with one sterile pad unless your dentist gave different instructions. A small pad is usually enough for one extraction site. If the gauze looks huge in your mouth, it probably is. The goal is pressure over the site, not stuffing your cheek like a chipmunk preparing for winter.
-
Step 3: Lightly dampen it if needed
Some dental instructions recommend lightly moistening the gauze with clean water. This can make it more comfortable and reduce the chance that dry fibers will stick to the clot when you remove it. “Lightly damp” is the key phrase here. You want moist, not dripping like it just finished a swim meet.
-
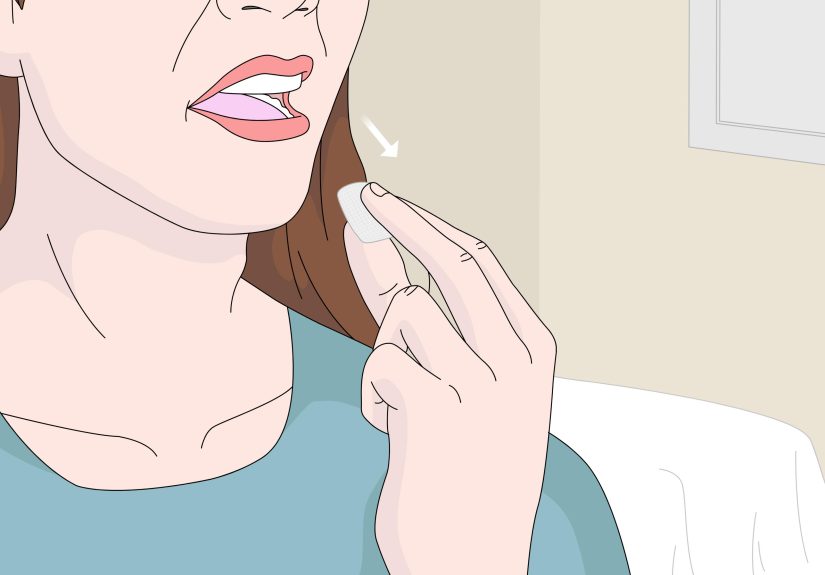
Step 4: Fold the gauze into a small thick pad
Take the square and fold it in half. Then fold it again until you have a compact rectangle or square thick enough to bite on comfortably. If you are using a larger 4×4 pad, you may fold it several times to make a smaller cushion. The finished pad should feel substantial enough to apply pressure, but not so thick that your jaw cannot close naturally.
-
Step 5: Match the fold to the area you need to cover
For a back tooth extraction, a thicker little pad often works best because it can reach the site while still giving you something to bite on. For a front tooth area, a flatter fold may sit better. The trick is simple: shape the gauze so it lands directly over the bleeding site, not somewhere nearby that happens to be more convenient.
-
Step 6: Place it directly over the surgical site
Use clean fingers to position the folded gauze right on top of the extraction site. This part matters more than people think. Gauze off to the side, on the tongue, or floating near the molars is not doing the real job. You want direct contact over the area that is oozing.
-
Step 7: Close your teeth and bite with steady pressure
Once the gauze is in place, close your mouth and bite down gently but firmly. You are aiming for constant pressure, not aggressive chewing. Do not grind it, talk through it nonstop, or keep reopening your mouth every two minutes to inspect your progress like a detective at a crime scene.
-
Step 8: Leave it alone for the recommended time
In many routine cases, dentists recommend keeping the gauze in place for about 30 to 45 minutes before checking it, though some instructions vary. During that time, let the pressure do its work. Peeking too early can interrupt clot formation and restart bleeding that was finally starting to calm down.
-
Step 9: Remove it gently and check for light oozing versus active bleeding
When it is time to remove the gauze, do it slowly. A little blood staining is normal. In fact, gauze often looks dramatic even when bleeding is already improving. What you are watching for is the difference between light pink oozing and active bleeding that still seems fresh, bright, or persistent.
-
Step 10: Refold a fresh piece if you still need pressure
If the site is still bleeding more than lightly, use a new clean piece of gauze. Do not reuse the old one. Fold the fresh pad the same way, place it directly over the site, and bite down again. Most people do best when they repeat the same simple fold instead of making a giant wad that feels impressive but works poorly.
-
Step 11: Stop using gauze once bleeding has slowed enough
Gauze is helpful during the active bleeding stage, but it is not meant to live in your mouth forever. Once the bleeding has slowed to light oozing or mostly pink saliva, you usually do not need to keep changing gauze. Overusing it can irritate the area and tempt you to keep disturbing a clot that would rather be left alone.
-
Step 12: Never sleep with gauze in your mouth
This is the step people remember once they hear it, and they should. Do not nap or sleep with gauze in your mouth. If you are getting sleepy, take it out and follow the instructions your provider gave you. Gauze is for short, awake monitoring periods, not overnight company.
Common Mistakes That Make Mouth Gauze Less Effective
Folding it too thin
A paper-thin layer may absorb blood, but it may not create enough pressure. A slightly thicker folded pad gives you something stable to bite on.
Making it too bulky
If the gauze is so large that your teeth cannot close normally, the pressure may land on your bite instead of the site. Bigger is not always better. Sometimes bigger is just more awkward.
Chewing on the gauze
Gauze is not gum. Chewing moves it away from the wound, frays the fibers, and ruins steady pressure.
Changing it too often
Many people remove gauze too soon because they see blood and assume nothing is working. But early blood staining is expected. Constant switching can keep resetting the clock.
Using gauze when you no longer need it
Once the bleeding is down to light oozing, the better move is often to leave the site alone, rest, and avoid behaviors that disturb the clot.
Helpful Comfort Tips After You Fold and Place the Gauze
- Keep your head elevated when resting.
- Avoid spitting, forceful rinsing, and using a straw right away.
- Stick with soft, cool, or lukewarm foods at first.
- Take medicines exactly as directed by your dentist or surgeon.
- Use ice packs on the outside of the face if recommended.
- Brush carefully and avoid the surgical area until your provider says otherwise.
One more reassuring truth: saliva mixed with even a small amount of blood can look much worse than it really is. A dramatic-looking pink mouth does not always mean dramatic bleeding. Your mirror loves theater. Your extraction site usually does not.
When to Call Your Dentist or Oral Surgeon
Some bleeding and oozing after a tooth extraction are normal. But you should contact your dentist or oral surgeon if bleeding stays heavy, you are soaking pad after pad without improvement, or you have symptoms that seem out of proportion to normal recovery.
Call promptly if you have severe pain that is getting worse instead of better, swelling that keeps increasing after the first couple of days, fever, pus, a bad taste that will not go away, trouble swallowing, or trouble breathing. Those are not “wait and see while scrolling random internet advice” moments.
Real-World Experiences and Lessons People Commonly Learn
One of the most common experiences after a tooth extraction is realizing that the hardest part is not folding the gauze at all. It is leaving it alone. Many people place the gauze correctly, bite down for five minutes, then remove it because they are curious. They see red, assume disaster, and start over with a fresh wad. That repeated checking often creates more stress than the original bleeding. In real life, patience usually matters almost as much as the fold itself.
Another common experience is discovering that comfort changes everything. A dry gauze pad can feel scratchy, especially if the mouth is already irritated. People often notice that a lightly dampened piece feels softer and sits better. The gauze is less likely to tug at the area when removed gently. That tiny change can make someone feel much more in control, which matters when your mouth feels strange and your cheek is half numb.
Many patients also learn that placement matters more than quantity. At first, it is tempting to use a giant stack of gauze because it feels safer. But a giant stack often sits between the teeth instead of pressing right over the extraction site. People usually get better results when they use a smaller, neatly folded pad placed exactly where the bleeding is. It is a good reminder that precision beats drama.
A very relatable experience is mistaking pink saliva for serious bleeding. This happens all the time. Someone takes out the gauze, sees a lot of pink in the sink, and imagines the worst. Later they find out that a small amount of blood mixed with saliva can look like much more than it is. That does not mean you should ignore true heavy bleeding, but it does mean a scary-looking mouth is not automatically an emergency.
People also tend to remember the first time they accidentally talk too much with gauze in place. The pad shifts. The bite pressure changes. Suddenly it feels like the gauze is traveling around the mouth on its own little road trip. The practical lesson is simple: once it is in position, quiet steady pressure works better than constant chatting, laughing, or testing whether you can pronounce difficult words through a cotton square.
Another real-life lesson involves timing. Some people stop using gauze too early and feel annoyed when the bleeding restarts. Others keep changing it for hours even after the site has moved on to normal light oozing. Over time, most learn that the goal is not a completely spotless pad right away. The goal is a clear improvement. Once the bleeding slows significantly, it is usually better to stop fussing and let the clot settle in peace.
Perhaps the biggest experience-related takeaway is confidence. The first time you deal with dental gauze, it can feel weirdly intimidating for something so small. But after one or two careful changes, most people realize the process is manageable. Fold it into a small thick pad, place it directly over the site, bite with steady pressure, and resist the urge to overcomplicate it. Mouth gauze may never be glamorous, but it can absolutely become easy.
Conclusion
If you need to know how to fold gauze for your mouth, the answer is refreshingly simple: keep it clean, fold it into a small thick pad, place it directly over the extraction site, and apply steady pressure for the amount of time your dentist recommends. That is the real secret. Not fancy folds. Not stuffing half the box into your cheek. Just smart placement and patience.
When in doubt, remember the basics: direct pressure, gentle removal, fewer interruptions, and no sleeping with gauze in your mouth. Follow your provider’s instructions, take your aftercare seriously, and give your mouth the quiet healing environment it deserves. Your future self, who would very much like to eat normally again, will appreciate it.