Table of Contents >> Show >> Hide
- Why Spatchcock a Chicken?
- What You Need
- How to Spatchcock a Chicken Step by Step
- Step 1: Remove the giblets and pat the chicken dry
- Step 2: Place the chicken breast-side down
- Step 3: Cut along one side of the backbone
- Step 4: Cut along the other side and remove the backbone
- Step 5: Open the chicken like a book
- Step 6: Flip it over and flatten the breastbone
- Step 7: Tuck the wing tips
- Step 8: Season like you mean it
- Step 9: Optional but smart, let it air-dry or dry-brine
- Step 10: Roast the chicken
- Step 11: Rest before carving
- Step 12: Carve and serve
- Best Oven Tips for Spatchcock Chicken
- How to Spatchcock a Chicken for the Grill
- Common Mistakes to Avoid
- Flavor Ideas for Spatchcock Chicken
- What Spatchcock Chicken Feels Like in Real Life: Kitchen Experiences and Lessons Learned
- Final Thoughts
- SEO Tags
If you have ever pulled a whole roast chicken from the oven only to discover that the breast meat is ready, the thighs are still negotiating with physics, and the skin is giving “lightly moisturized” instead of “crispy,” welcome. Spatchcocking is your new best friend.
Spatchcocking, also called butterflying, means removing the backbone of a whole chicken and flattening the bird before cooking. It sounds slightly dramatic and a little medieval, but it is actually one of the smartest ways to cook chicken at home. The flattened shape helps the bird cook faster and more evenly, exposes more skin to heat, and makes carving easier once dinner is on the table.
In other words, this is the technique that makes you look like you know exactly what you are doing, even if you are still side-eyeing your kitchen shears like they owe you money.
Why Spatchcock a Chicken?
Before we get to the step-by-step method, let’s talk about why this technique is worth learning.
- Faster cooking: A flattened chicken generally roasts more quickly than a whole bird left intact.
- More even results: The breast and legs are exposed to heat in a more balanced way, which helps prevent dry white meat and undercooked dark meat.
- Crispier skin: More surface area gets direct heat, which is excellent news for anyone who values crackly, golden skin.
- Easier seasoning: A flatter bird is simpler to rub with oil, salt, pepper, herbs, or a dry brine.
- Simpler carving: Once cooked, the legs, thighs, wings, and breast sections are easier to separate cleanly.
Basically, spatchcock chicken is the overachiever of weeknight roasting. It is efficient, good-looking, and rarely late.
What You Need
- 1 whole chicken, about 3 1/2 to 4 1/2 pounds
- Sharp kitchen shears or poultry shears
- A sturdy cutting board
- Paper towels
- Olive oil or softened butter
- Kosher salt and black pepper
- Optional seasonings: garlic powder, paprika, lemon zest, thyme, rosemary, chili powder, or your favorite dry rub
- A rimmed baking sheet, roasting pan, or oven-safe skillet
- An instant-read meat thermometer
Pro tip: Good shears make the job dramatically easier. Dull scissors turn this into an upper-body workout nobody asked for.
How to Spatchcock a Chicken Step by Step
Step 1: Remove the giblets and pat the chicken dry
Take the chicken out of the packaging and remove anything tucked inside the cavity, such as the giblets or neck. Then pat the chicken very dry with paper towels, inside and out. Dry skin is the first step toward crispy skin, and crispy skin is the sort of detail people remember.
Step 2: Place the chicken breast-side down
Set the chicken on a cutting board with the breast facing down and the backbone facing up. Position the legs toward you. This gives you better control and makes it easier to see where to cut.
Step 3: Cut along one side of the backbone
Using kitchen shears, cut from the tail end up toward the neck on one side of the backbone. Stay close to the bone so you do not remove too much meat. You may hit a few rib bones along the way, which is normal. Keep going. This is not a time for timid energy.
Step 4: Cut along the other side and remove the backbone
Repeat the cut on the other side of the backbone until it comes free. Lift it out and set it aside. Do not throw it away unless you truly must. The backbone is excellent for stock, broth, or gravy, and future you will be thrilled that present you was so wise.
Step 5: Open the chicken like a book
Spread the chicken open. At this stage, it will already look flatter, but not fully. You are halfway there, and honestly, it is going great.
Step 6: Flip it over and flatten the breastbone
Turn the chicken breast-side up. Press down firmly in the center of the breast with the palms of your hands until you hear or feel a crack. That is the breastbone giving way so the bird can lie flat. Some cooks like to make a small notch near the breastbone first, but firm pressure alone often does the trick.
Step 7: Tuck the wing tips
Tuck the wing tips behind the breasts or under the bird. This helps prevent them from burning and gives the chicken a cleaner, flatter shape for roasting.
Step 8: Season like you mean it
Rub the chicken with a little olive oil or softened butter, then season generously with kosher salt and black pepper. Because the bird is flattened, you can season every nook and cranny more evenly than with a traditional whole roast chicken.
For extra flavor, add one or more of these combinations:
- Classic: garlic powder, thyme, rosemary, and lemon zest
- Smoky: paprika, black pepper, onion powder, and a pinch of cayenne
- Bright and herby: parsley, oregano, garlic, lemon, and olive oil
- BBQ-style: brown sugar, paprika, chili powder, mustard powder, and black pepper
Step 9: Optional but smart, let it air-dry or dry-brine
If you have time, salt the chicken and let it rest uncovered in the refrigerator for a few hours or overnight. This dry-brine step helps the meat stay juicy and improves browning. It is not mandatory, but it is the kind of move that separates “pretty good chicken” from “why is this so ridiculously good?”
Step 10: Roast the chicken
Preheat your oven to 425°F to 450°F. Place the chicken skin-side up on a rimmed baking sheet, roasting pan, or oven-safe skillet. Roast until the skin is deeply golden and the thickest part of the breast and thigh reaches 165°F on an instant-read thermometer.
For a 3 1/2- to 4 1/2-pound chicken, this often takes about 40 to 55 minutes, depending on your oven and pan. Start checking early rather than waiting for smoke signals.
Step 11: Rest before carving
Transfer the chicken to a cutting board and let it rest for 10 to 15 minutes. This helps the juices redistribute so they stay in the meat instead of running across your board like they are escaping the scene.
Step 12: Carve and serve
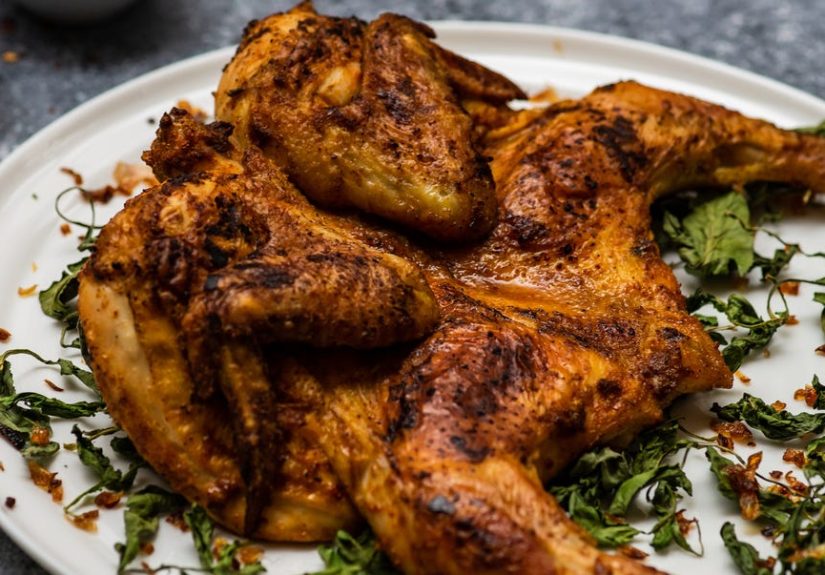
Separate the legs and thighs, remove the wings, and slice the breast meat. Because the bird is already flattened, carving is usually more straightforward than with a traditionally roasted whole chicken.
Best Oven Tips for Spatchcock Chicken
Once you know how to spatchcock a chicken, a few small habits can make your results even better.
Use a hot oven
High heat encourages browning and crisp skin. Many successful recipes land in the 425°F to 450°F range for roasting, especially when the chicken is laid flat.
Do not skip the thermometer
The safest and smartest move is to check the internal temperature. Chicken is done when the thickest parts reach 165°F. Color is not a reliable test. Thermometers exist for a reason, and that reason is peace.
Put vegetables under or around the bird
Potatoes, carrots, onions, fennel, or lemon wedges roast beautifully under a spatchcocked chicken. They catch the drippings, absorb flavor, and quietly become the side dish you pretend was the plan all along.
Save the backbone
Freeze it if you are not making stock right away. One backbone on its own is modest. A small freezer bag of chicken backs, wing tips, and bones is culinary gold.
How to Spatchcock a Chicken for the Grill
This method is not just for the oven. Spatchcock chicken is fantastic on the grill because the flattened bird cooks more evenly over fire.
Here is the quick version:
- Spatchcock and season the chicken as described above.
- Set up a two-zone grill with one cooler side and one hotter side.
- Start the chicken on the cooler side, skin-side up or away from the hottest flames.
- Cook until nearly done, then move it over higher heat to crisp the skin.
- Check for 165°F in the thickest parts before serving.
This approach helps you avoid burnt skin and undercooked meat, which is always a charming combination to skip.
Common Mistakes to Avoid
Using weak scissors
If your shears cannot handle the backbone, the process becomes frustrating fast. Sharp poultry shears are worth it.
Not drying the chicken
Wet skin steams instead of crisps. Pat it dry well before seasoning.
Under-seasoning
A whole chicken needs more salt than many home cooks think. Season confidently.
Forgetting to flatten fully
If the breastbone is not cracked and the bird is still puffed up in the middle, it will not cook as evenly.
Guessing doneness
Do not rely on timing alone. Ovens vary. Chicken sizes vary. Your thermometer is the adult in the room.
Cutting too soon
Resting matters. Give the chicken a few minutes before carving so it stays juicy.
Flavor Ideas for Spatchcock Chicken
One reason this technique is so useful is that it works with almost any flavor profile. Once you know the method, you can keep dinner from getting boring.
- Lemon-herb: olive oil, garlic, lemon zest, rosemary, thyme
- Garlic butter: softened butter, garlic, parsley, black pepper
- Smoky paprika: smoked paprika, cumin, garlic powder, black pepper
- Peruvian-inspired: lime, garlic, cumin, paprika, oregano
- Spicy barbecue: chili powder, brown sugar, paprika, cayenne, mustard powder
You can even ask your butcher to spatchcock the chicken for you if you love the results but do not love the cutting part. There is no shame in outsourcing one step and still taking full credit for dinner.
What Spatchcock Chicken Feels Like in Real Life: Kitchen Experiences and Lessons Learned
The first time many people spatchcock a chicken, there is a brief emotional arc. It usually begins with confidence, dips into mild suspicion when the backbone does not come out instantly, then rebounds into triumph the second the bird lies flat. That little crack of the breastbone? Weirdly satisfying. Slightly alarming. Mostly satisfying.
One of the most common experiences is realizing how much easier it is to season a flattened chicken. Instead of trying to awkwardly dust seasoning over a rounded bird like you are blessing it from a distance, you can actually get into every section. The thighs, the drumsticks, the wings, the skin over the breast, all of it becomes accessible. You stop feeling like you are seasoning a bowling ball and start feeling like you are cooking with intention.
Another real-world surprise is how quickly the bird starts to look beautiful in the oven. Spatchcock chicken tends to brown in a way that feels unfair to other weeknight dinners. The skin blisters and turns glossy, the legs look dramatic, and the whole thing starts giving dinner-party energy even when you are just standing in your kitchen wearing socks that do not match.
There is also the deeply practical joy of even cooking. Anyone who has struggled through a traditional roast chicken knows the old problem: the breast threatens to dry out while the dark meat acts like it still has weekend plans. With a spatchcock bird, that gap narrows. The chicken roasts flatter, steadier, and with fewer surprises. You still need a thermometer, of course, but the odds are much better that everything finishes in the same universe.
Then there is carving, which feels much less like a puzzle. Because the chicken is already opened and flattened, you can see the joints more clearly and separate the pieces with less wrestling. This is especially nice when you are hungry, your guests are hovering, and your patience is one minor inconvenience away from filing a complaint.
Many home cooks also mention that spatchcocking changes how often they buy whole chickens. Once the method clicks, the whole bird starts to feel less intimidating and more economical. You get a great roast, potential leftovers for sandwiches or salads, and a backbone for stock. Suddenly, one chicken is not just dinner. It is meal planning wearing a crispy jacket.
And yes, there is usually one moment of mess. A slippery cutting board. A stubborn rib. A realization that you should have used a larger pan. These are not failures; they are part of the initiation. By the second or third time, the motions become automatic. You dry the bird, cut along the backbone, press it flat, season it well, and slide it into the oven like someone who has done this forever.
That is really the best part of learning how to spatchcock a chicken like a pro. It starts as a technique and quickly becomes a kitchen habit. Not a flashy chef trick. Not a once-a-year project. Just a reliable, confidence-building method that turns a humble whole chicken into something crisp, juicy, and genuinely impressive.
Final Thoughts
If you want a roast chicken that cooks faster, browns better, carves more easily, and tastes like you worked harder than you actually did, spatchcocking is the move. Once you learn the rhythm, remove the backbone, flatten the bird, season well, roast hot, check for 165°F, rest, and carve, the whole process feels refreshingly simple.
So the next time you bring home a whole chicken, skip the complicated theatrics. Grab your shears, flatten that bird, and let your oven do the glamorous part.