
Table of Contents >> Show >> Hide
- Why Reupholster Furniture Instead of Buying New?
- Tools and Materials You May Need
- How to Reupholster Furniture: 10 Steps
- Step 1: Pick the Right Piece for Your First Project
- Step 2: Inspect the Frame and Take Everything Apart Carefully
- Step 3: Remove the Old Fabric Without Destroying It
- Step 4: Clean the Frame and Make Basic Repairs
- Step 5: Replace Worn Foam, Batting, or Padding
- Step 6: Measure and Cut the New Upholstery Fabric
- Step 7: Attach the New Fabric in the Right Order
- Step 8: Fold and Finish the Corners Neatly
- Step 9: Add Trim, Welting, or a Dust Cover if Needed
- Step 10: Reassemble and Style the Piece
- Common Reupholstery Mistakes to Avoid
- When to DIY and When to Call a Pro
- Final Thoughts
- Real-World Experiences and Lessons From Reupholstering Furniture
- SEO Tags
Furniture reupholstery sits in that delightful DIY category where optimism, a staple remover, and a suspicious amount of lint all meet in one room. One day you are staring at a tired chair that looks like it survived three family reunions, two pets, and one juice-box incident. The next day, you are imagining it in fresh fabric, looking like it belongs in a magazine spread instead of a “before” photo.
If you have been wondering how to reupholster furniture without turning your living room into a fabric tornado, you are in the right place. The good news is that many smaller projects are surprisingly manageable, especially dining chairs, benches, ottomans, and simple seat cushions. The not-as-good news is that full sofas, tufted antiques, and heavily detailed armchairs can quickly become advanced-level adventures. In other words, start with confidence, but also with a little humility. Upholstery has a way of humbling the brave.
This guide walks you through 10 practical steps to reupholster furniture, from choosing the right piece to pulling the final staple. Along the way, you will learn how to choose upholstery fabric, when to replace foam and batting, how to get cleaner corners, and what mistakes can make your project look less “custom makeover” and more “fabric wrestled by raccoons.”
Why Reupholster Furniture Instead of Buying New?
Before you break out the staple gun, it helps to know why this project is worth the effort. Reupholstering furniture can save a well-built piece from the landfill, preserve sentimental furniture, and let you customize the look exactly the way you want. It is also a smart move when the frame is solid but the fabric is stained, outdated, faded, or just plain sad.
That said, not every piece deserves a second act. A furniture makeover works best when the frame is sturdy, the joints are still sound, and the piece has a shape you genuinely love. If the wood is cracked, the structure rocks side to side, or the springs are failing in dramatic fashion, the project may need professional help or may not be worth the investment at all.
Tools and Materials You May Need
- Upholstery fabric
- Staple gun and heavy-duty staples
- Staple remover or tack puller
- Needle-nose pliers
- Screwdriver or drill
- Fabric scissors
- Measuring tape
- Foam or cushion replacement, if needed
- Batting
- Chalk or fabric marker
- Dust cover fabric for some pieces
- Hot glue or trim, if your design calls for it
How to Reupholster Furniture: 10 Steps
Step 1: Pick the Right Piece for Your First Project
If you are a beginner, do not start by attacking Grandma’s tufted Victorian loveseat with curved arms, decorative trim, and emotional value. Start small. The best beginner upholstery projects are dining chair seats, ottomans, stools, benches, and chairs with removable cushions.
Look for furniture with a sturdy frame, minimal structural damage, and a shape that does not require a lot of sewing. A simple chair seat can teach you the basics of removing fabric, using old material as a template, cutting new fabric, wrapping corners, and stapling neatly. That is plenty of education for one weekend.
Step 2: Inspect the Frame and Take Everything Apart Carefully
Flip the furniture over and take a good look before you remove a single staple. Check how the fabric is attached, where the seams fall, and whether there is piping, trim, dust covers, buttons, or decorative nails. Take photos from several angles. Then take more photos. Future You will be grateful when Present You can no longer remember which panel came off first.
Remove any screws, legs, seat panels, or cushions. If you are working on a chair with a drop-in seat, unscrew it from the frame. If you are working on a larger upholstered piece, remove the bottom dust cover first and work in reverse order from the way the piece was assembled.
Step 3: Remove the Old Fabric Without Destroying It
This step is part surgery, part archaeology. Use a staple remover, pliers, or tack puller to remove the old staples and fabric. Go slowly. The goal is not just to strip the piece, but to preserve the old fabric panels so you can use them as patterns for the new upholstery fabric.
Label the pieces as you remove them: inside back, outside arm, seat top, side panel, and so on. It may feel a little obsessive, but upholstery rewards organized people. The fabric you save will show you shape, grain direction, seam allowance, fold lines, and the order of assembly. That is basically free tuition.
Step 4: Clean the Frame and Make Basic Repairs
Once the fabric is off, you will finally see what is going on underneath. Vacuum away dust, lint, pet hair, and mysterious debris from past centuries. Tighten screws, reglue loose joints, and sand or refinish any exposed wood if needed. Let repairs dry fully before moving on.
This is also the moment to decide whether the piece is still a DIY candidate. If the springs are broken, webbing has failed, or the frame has major structural issues, you may want to pause and bring in a professional upholsterer. There is no shame in knowing when your “easy weekend update” has quietly turned into furniture engineering.
Step 5: Replace Worn Foam, Batting, or Padding
Fresh fabric can only do so much if the cushioning underneath feels flat, crumbly, or uneven. If the foam has lost its shape, replace it. If the batting is dirty or lumpy, replace that too. New foam gives furniture crisp shape, while batting softens the edges and creates a smoother finished appearance.
Lay the old cushion or seat on the new foam and trace around it. Cut carefully with a sharp blade or foam cutter. Then wrap the foam with batting, pulling it snug but not overly tight. Think of batting as the smoothing filter of upholstery. It helps prevent harsh edges and keeps the finished fabric from looking bumpy.
Step 6: Measure and Cut the New Upholstery Fabric
Choose a durable upholstery fabric that fits the way the furniture will be used. A formal bedroom chair can get away with a more delicate textile, but a living room bench that sees daily traffic needs stronger material. If you have kids, pets, snacks, or all three, durability matters even more.
Lay the old fabric pieces on top of the new fabric and trace around them, leaving enough allowance for wrapping, folding, or stapling. Pay attention to pattern direction, stripes, and repeats. A floral design turned sideways can make even a beautifully stapled chair look like it is wearing its shirt backward.
If you are covering a simple seat, leave a few extra inches on all sides so you have enough room to pull the fabric tight. It is always easier to trim extra fabric later than to invent more fabric out of thin air.
Step 7: Attach the New Fabric in the Right Order
When reupholstering furniture, the assembly order matters. Use your photos and labels to rebuild the piece in reverse order of disassembly. For a simple seat, center the fabric over the padding and begin stapling at the middle of one side. Then staple the opposite side, pulling the fabric taut. Repeat on the remaining two sides.
Working from the center outward helps distribute tension evenly and reduces wrinkles. This is one of the most important reupholstery tips for beginners. If you start in the corners and hope for the best, the fabric usually has other plans.
Pause often to flip the piece over and check the front. The fabric should look smooth, straight, and evenly tensioned. If it starts bunching or drifting off-center, pull out the staples and adjust before continuing. Upholstery is not ruined by redos. It is improved by them.
Step 8: Fold and Finish the Corners Neatly
Corners are where reupholstery projects either look polished or start looking homemade in the wrong way. Fold the excess fabric neatly, keeping the bulk as even as possible. There is more than one correct method, but the goal is always the same: smooth top surface, tidy underside, and no giant lumps.
For chair seats and flat cushions, make small, controlled folds and staple them securely on the underside. For rounded shapes, you may need to ease the fabric gradually. Take your time. Corners are the final exam of beginner upholstery.
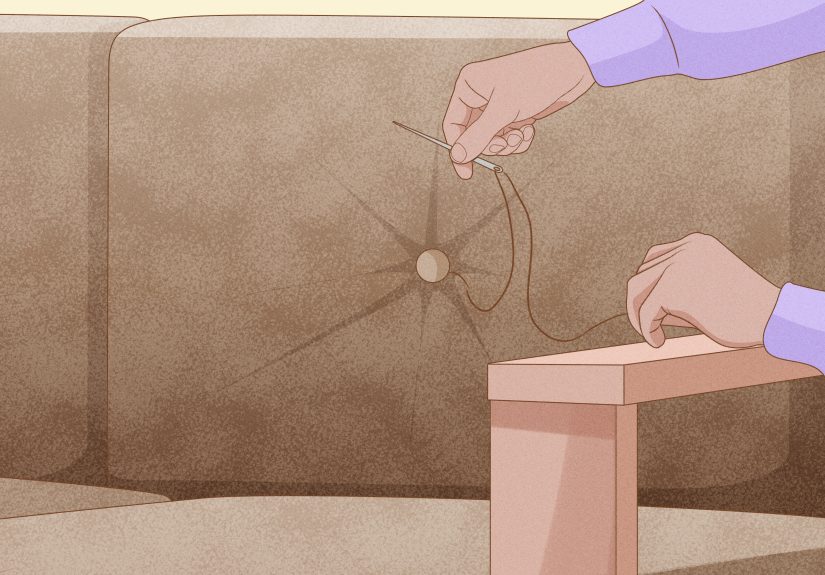
Step 9: Add Trim, Welting, or a Dust Cover if Needed
Depending on the furniture style, you may want to cover visible staples with trim, welting, or decorative nailheads. Welting can give the piece a more tailored look, while trim can hide imperfect staple lines. For larger furniture, reattach or replace the dust cover on the underside to give the project a cleaner, finished appearance.
This step is optional on simple DIY pieces, but it can make a big visual difference. It is the equivalent of tucking in your shirt and putting on real shoes before guests arrive.
Step 10: Reassemble and Style the Piece
Once the fabric is secure and the finish details are done, reattach the seat, screw the frame back together, reinstall the legs, and check for wobbling. Sit on it gently at first. Not because the chair is delicate, but because you deserve a dramatic reveal.
Then place your newly reupholstered furniture where it belongs and admire your work. You just gave an old piece a second life, customized it to your space, and picked up a skill that makes thrift stores feel much more dangerous in the best possible way.
Common Reupholstery Mistakes to Avoid
- Choosing the wrong first project: Start simple, not heroic.
- Skipping photos during disassembly: Memory is less reliable than a camera roll.
- Using weak fabric: Upholstery fabric exists for a reason.
- Ignoring old padding: New fabric over bad foam still feels bad.
- Stapling corners first: Start in the center and work outward.
- Forgetting pattern direction: Stripes and florals do not forgive laziness.
- Pulling too tight: Over-tension can distort the shape.
- Not checking the front often: The underside can lie to you.
When to DIY and When to Call a Pro
DIY reupholstery is excellent for seat pads, dining chairs, ottomans, benches, and simple accent chairs. It becomes much harder when you are dealing with tufting, multiple sewn panels, curved frames, springs, antique construction, leather, or major structural repairs. If the piece is valuable, deeply sentimental, or complicated enough to make you whisper “absolutely not,” a professional upholsterer may be the better choice.
That does not mean you failed. It means you correctly identified the difference between a creative project and a side quest that eats your entire month.
Final Thoughts
Learning how to reupholster furniture is one of those satisfying home projects that combines design, problem-solving, patience, and just enough mild chaos to make the end result feel earned. The first piece may take longer than expected. The second will go faster. By the third, you will be eyeing every worn-out bench on Facebook Marketplace like it is a future success story.
Start with a manageable project, use quality fabric, save the old panels for templates, and do not rush the details. Reupholstery is not magic, though it can feel magical when a tired piece suddenly looks custom, fresh, and completely at home in your space.
Real-World Experiences and Lessons From Reupholstering Furniture
The most useful thing people learn from reupholstery is that the project is rarely as simple as it looks in a sped-up video. A dining chair seat might take an hour once you know the routine, but the first one often takes much longer because you are figuring out staple removal, fabric alignment, and corner folds in real time. That is normal. In fact, many beginners say the hardest part is not using the staple gun. It is removing the old staples without losing patience or inventing new curse words.
One common experience is discovering that the padding matters just as much as the fabric. Many people expect the fabric alone to do the makeover work, only to realize that old foam is flat, brittle, or uneven. Replacing the padding usually creates the biggest improvement in comfort and shape. It is the hidden hero of upholstery. Nobody compliments the foam, but everyone notices when the seat feels better.
Another real-world lesson is that photos save projects. People who skip the documentation step often end up staring at a pile of fabric pieces like they are solving a fabric-based escape room. The ones who take photos during disassembly usually move through reassembly with far less drama. Even a quick snapshot of where staples, folds, trim, and panels sat on the original piece can answer a dozen questions later.
Fabric choice also shapes the whole experience. Smooth, medium-weight upholstery fabric is usually easier for beginners than slippery materials, bold stripes, or large prints that need precise matching. A solid color or subtle pattern is more forgiving. Plenty of DIYers learn this the hard way after falling in love with a dramatic print and realizing halfway through the project that one crooked flower can haunt a whole chair.
There is also a strong emotional payoff with reupholstery that surprises people. A worn bench from a grandparent, a thrifted chair with good bones, or a dated ottoman can become something personal and current without losing its history. That combination of old structure and new style is part of what makes the process addictive. It is not just about saving money or matching a room. It is about making furniture feel like yours again.
Finally, almost everyone who sticks with reupholstery learns the same truth: perfection is less important than progress. The underside may not look glamorous. One corner may be better than the others. The first project may not be flawless. But once the piece is back in the room, styled, used, and admired, those small imperfections fade fast. What remains is a custom furniture makeover you created with your own hands, one staple at a time.


