Table of Contents >> Show >> Hide
- Why Concrete Head Planters Are So Popular
- Supplies You’ll Need for DIY Concrete Head Planters
- Step-by-Step: How to Make a DIY Concrete Head Planter
- Best Plants for Concrete Head Planters
- Care and Maintenance Tips
- Creative Variations and Design Ideas
- Common Mistakes (and How to Avoid Them)
- Real-Life Experiences: What You Learn After Making DIY Concrete Head Planters
- Final Thoughts
If you’ve ever looked at your garden and thought, “This place could really use more personality,” concrete head planters are your sign. These sculptural pots look like ancient statues that decided to moonlight as plant parents. With trailing vines turning into “hair” and succulents as quirky “crowns,” DIY concrete head planters are an easy way to add art, humor, and major curb appeal to your outdoor space.
The best part? You don’t need to be a sculptor or a professional mason to pull this off. By using simple molds like foam mannequin heads, thrifted busts, or plastic nursery pots and a basic concrete or hypertufa mix, you can create a durable, weather-resistant planter that looks like it came from a fancy garden boutiquewithout the boutique price tag.
In this guide, inspired by crafty tutorials and garden projects from DIY creators, home bloggers, and garden experts across the U.S., we’ll walk through everything you need to know to make your own DIY concrete head planters, plus real-life tips from people who have already gotten their hands (and shoes) covered in cement dust.
Why Concrete Head Planters Are So Popular
Concrete and hypertufa planters have become garden staples because they’re durable, customizable, and surprisingly simple to make. Using concrete or hypertufa (a lighter, stone-like mix of cement, peat moss, and perlite), you can create planters that stand up to the weather and age beautifully with a soft patina over time. Garden guides from major retailers and DIY sites highlight concrete and hypertufa as budget-friendly ways to get a high-end stone look at home.
Head-shaped planters take that trend one step further. They’re:
- Whimsical: Plants become wild hair, beards, or leafy crowns.
- Customizable: You can tweak facial features, paint finishes, and plant choices.
- Durable: Cement or hypertufa stands up to sun, rain, and temperature swings when cured properly.
- Conversation starters: Guests will absolutely comment on the pot that’s “staring” at them.
Supplies You’ll Need for DIY Concrete Head Planters
Exact materials vary depending on whether you’re casting solid concrete, sculpting hypertufa, or doing a faux-concrete finish over an existing bust. Here’s a practical, flexible list to get you started.
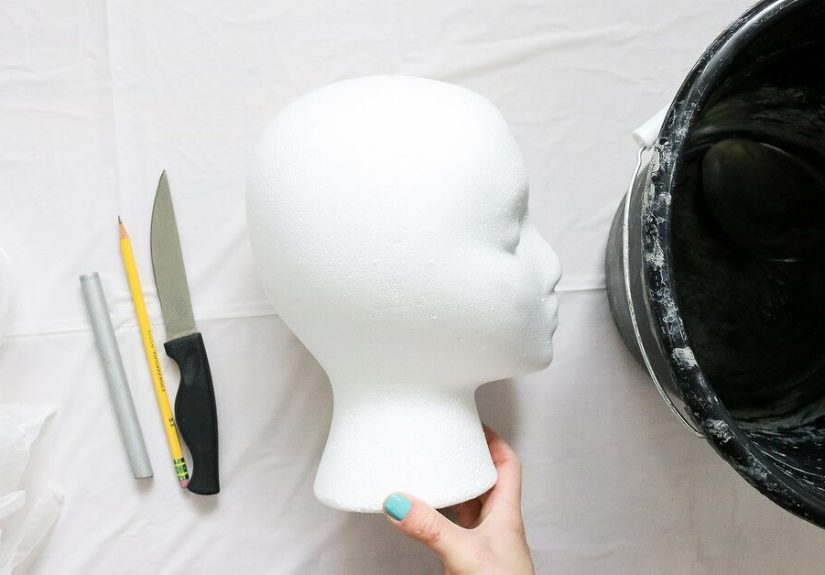
1. A Head Mold
You need something head-shaped to either cast into or cover. Popular options include:
- Styrofoam mannequin heads: Inexpensive, lightweight, and easy to carve. Many head-planter tutorials start with these as a base.
- Plaster or resin busts: Thrift stores and clearance aisles are gold mines for quirky busts that can be transformed into “stone” with concrete or faux-concrete finishes.
- Plastic nursery pots as bases: For hypertufa face pots, gardeners often use basic plastic nursery containers and build hypertufa faces right onto the outside.
2. Concrete or Hypertufa Mix
You have two main routes:
- Concrete: Use a bagged concrete mix or a sand-and-cement mix for strong, dense planters. Many DIY concrete planter guides suggest a mix with fine aggregate for a smoother finish.
- Hypertufa: This is a lighter, more porous mix that looks like weathered stone. A common recipe from garden resources is roughly:
- 1 part Portland cement
- 1–1.5 parts peat moss
- 1–1.5 parts perlite or vermiculite
Just add enough water so a squeezed handful holds its shape with little to no water dripping out.
3. Tools and Extras
- Bucket or tub for mixing
- Trowel or sturdy spoon
- Utility knife or craft knife (for carving Styrofoam)
- Plastic sheeting or garbage bags to protect your surface
- Cooking spray, petroleum jelly, or mold release (if casting into a form)
- Drill with masonry bit (for drainage holes)
- Sandpaper (80–220 grit) for smoothing the surface
- Acrylic or masonry paint, limewash, or outdoor sealer (optional)
4. Safety Gear
Cement and concrete dust can be irritating to skin and lungs. Most professional how-tos recommend:
- Disposable mask or respirator rated for dust
- Rubber or nitrile gloves
- Safety glasses
- Old clothes or an apron you don’t mind ruining
Step-by-Step: How to Make a DIY Concrete Head Planter
Step 1: Prep the Head Mold
If you’re using a foam or plastic head, mark where the “planting area” will be. This is usually the top of the skull, like a hollowed-out crown.
- Draw a circle around the top of the head where you want the plant opening.
- Use a utility knife to carefully carve out the cavity, leaving enough “skull” thickness around the sides so the planter stays strong.
- If the head is hollow, plan where your potting insert will sit or how you’ll reinforce the bottom.
For hypertufa face pots, skip carving a head. Instead, you’ll sculpt a face onto a plastic nursery pot with hypertufa mix later.
Step 2: Mix Your Concrete or Hypertufa
Follow the instructions on your concrete bag or hypertufa recipe, and always add water gradually. You’re aiming for something like thick oatmeal or peanut butter: too runny and it won’t hold detail; too dry and it will crumble.
- Concrete: Mix in a bucket until no dry patches remain. Tap the container to release trapped air bubbles.
- Hypertufa: Combine dry ingredients first (cement, peat moss, perlite), then add water slowly until the mix holds together when squeezed.
Step 3: Coat or Cast the Head
There are two common approaches to creating the head planter shape:
Option A: Coating an Existing Head
If you’re working with a foam or plaster bust, you can apply your cement or hypertufa mix directly on top for a stone-like finish.
- Brush on a layer of PVA or white craft glue if you’re working over Styrofoam; this helps the cement grip.
- Press small handfuls of mix onto the face and head, smoothing with your gloved fingers or a trowel.
- Pay extra attention to facial featuresnose, lips, browsso they stay visible but look organically “stone-like.”
Option B: Casting in a Mold
If you have a hollow head mold or flexible silicone form, you can cast the planter the way pros cast concrete pots:
- Coat the inside of your mold with cooking spray or mold release so the cured concrete will slide out.
- Press or pour the concrete mix into the mold, working it into details and up the sides.
- Press a smaller inner container (for the soil cavity) into the top if you want a perfectly shaped planting pocket.
Step 4: Add Drainage and Planting Space
Plants hate sitting in waterlogged soil, so drainage is non-negotiable:
- For coated busts, drill one or more holes in the bottom once the concrete has set but not fully hardened (usually after 24–48 hours).
- For cast planters, you can set a dowel or narrow cylinder into the base while the mix is still wet, remove it when semi-firm, and then refine with a drill after curing.
Step 5: Cure the Concrete Slowly
Here’s where patience pays off. Concrete doesn’t “dry,” it cures. Many concrete planter tutorials recommend keeping the piece damp and covered so it develops strength and resists cracking.
- Wrap the planter in plastic or a garbage bag after the surface is firm enough to handle.
- Let it cure for several days, lightly misting with water once a day if possible.
- Full strength usually develops over 28 days, but you can gently work on the surface (sanding, drilling) after the first few days.
Step 6: Demold, Sand, and Detail
Once the planter is firm and strong:
- Carefully remove any mold or inner forms.
- Use coarse sandpaper to knock off sharp edges or unwanted lumps.
- Switch to finer grits to smooth cheeks, nose, and forehead for a more “stone sculpture” look.
Don’t worry if it isn’t perfectslight imperfections give it that ancient, weathered charm.
Step 7: Seal, Paint, and Style
You can leave the planter raw for a natural stone look or finish it for extra drama.
- Faux antiquing: Use watered-down acrylic paint in charcoal, mossy green, or earthy browns to create an aged patina in the crevices.
- Modern concrete look: Stick with light gray and seal with a clear matte sealer for a contemporary vibe.
- Weather protection: Outdoor masonry sealers can help prevent staining and limit water absorption.
Best Plants for Concrete Head Planters
Once your planter is fully cured and sealed (if you choose), it’s time to give your concrete head some great hair.
- Trailing plants: Creeping Jenny, ivy, sweet potato vine, and vinca look like flowing hair.
- Succulents: Sedums, hens-and-chicks, and other hardy succulents create textured “crowns.” Hypertufa planters in particular pair beautifully with rock-garden plants.
- Grasses: Small ornamental grasses or carex varieties make fun, spiky hairstyles.
- Herbs: Thyme, oregano, or chives turn your head planter into a functional mini herb garden.
Use a high-quality potting mix, and if your planter is heavy, choose plants that won’t need frequent repotting or moving.
Care and Maintenance Tips
- Drainage first: Check that drainage holes stay clear. If water pools inside, add more holes or a layer of gravel at the bottom.
- Protect from freezing: In cold climates, some gardeners move concrete planters to a sheltered spot to avoid freeze-thaw damage, especially their first winter.
- Clean gently: Use a soft brush and water to remove moss or algae if you don’t like the patina. Many people actually embrace the aged look.
- Reseal periodically: If you used a sealer, refresh it every couple of seasons for best protection.
Creative Variations and Design Ideas
Once you make one DIY concrete head planter, it’s hard to stop. Here are some fun twists:
- Multiple expressions: Sculpt or carve different facial expressionssleepy, smirking, laughingfor a whole cast of characters.
- Wall-mounted faces: Make shallow hypertufa or cement faces to hang on a fence, then place small pots beneath them like floating torsos.
- Mini head planters: Use doll heads, toy figures, or small molds to create tiny planters for succulents on a windowsill.
- Layered finishes: Combine faux concrete paint techniques with carved concrete for extra texture and depth.
Common Mistakes (and How to Avoid Them)
- Mix too wet: Soupy concrete or hypertufa won’t hold detail and may crack as it cures. Aim for thick, moldable consistency.
- Rushing the cure: Demolding or moving the planter too early is a recipe for chips and breaks. Give it at least a couple of days before handling heavily.
- No drainage holes: Even the most beautiful head planter can become a plant graveyard without drainage.
- Skipping safety gear: Cement is alkaline and drying. Gloves and a mask help protect your skin and lungs.
- Overloading the “hair”: Extremely heavy plants in a top-heavy planter can tip or stress the structure. Choose suitable plants or position in a stable spot.
Real-Life Experiences: What You Learn After Making DIY Concrete Head Planters
On paper, a DIY concrete head planter sounds straightforward: mix, mold, cure, plant. In real life, it’s more like a funny, slightly messy science experiment that ends with your garden looking like an outdoor art gallery.
You will underestimate the mess. The first time you mix concrete or hypertufa, there’s a good chance your workspace will look like a cement truck exploded. Dust on your shoes, splatters on your pants, a mysterious smear on your elbowyou name it. The simple fix is to over-prepare: spread plastic sheeting, keep a bucket of water and a rag nearby, and wear clothes you’d never wear to brunch.
Your first head might look… mildly confused. Many DIYers report that their first planter’s “expression” is a bit oddone eyebrow higher than the other, lips slightly crooked, nose a touch too pointy. That’s okay. Imperfections actually make the planter more charming. Over time, as moss grows and plants fill in, those quirky details blend into a cohesive, character-filled look.
Curing is where the magic happens. At first, your planter might look flat, pale, and unimpressive. But as it cures, the color deepens and the surface texture becomes more stone-like. Some makers lightly mist the planter during the first week and keep it wrapped in plastic; the extra patience often pays off with fewer cracks and a more even finish.
You’ll start seeing “future head planters” everywhere. Once you realize that nearly any bust, statue, or foam head can become a concrete planter, your brain turns into a radar for potential projects. That slightly tacky clearance-aisle angel statue? Future mossy garden goddess. The mannequin head from the craft store? Next season’s succulent queen.
Plants transform the personality. A stern-looking concrete face topped with soft trailing vines suddenly feels gentle and serene. A simple bust with spiky blue fescue or ornamental grass looks edgy and modern. Swapping plants seasonallyherbs in spring, colorful annuals in summer, ornamental kale in fallgives you a rotating cast of characters without making new planters every time.
Weather will write its own story on the surface. Over months and years, rain, sun, and humidity slowly change the planter’s appearance. Tiny cracks, subtle discoloration, and patches of moss or lichen show up. Gardeners who have had their head planters for several seasons often say they like them even more as they age, because they look like they’ve always belonged in the landscape.
You’ll want a “family” of heads. One planter is fun; three or five together are spectacular. Group a cluster of head planters along a path or on your porch steps and give each one a different plant style: braids of ivy, curly sedums, spiky grass, delicate flowers. The display feels like a group portrait of your garden’s personality.
Visitors won’t stop talking about them. There’s something unforgettable about walking into a garden and realizing that several stone faces are casually wearing live plants as hairstyles. Friends and neighbors will ask how you made them, what materials you used, and whether you’ll host a “pothead-making” party (yes, that pun shows up a lot in real-life DIY communities).
Most importantly, you’ll learn that DIY concrete head planters are less about perfection and more about play. They’re a hands-on, slightly muddy way to blend creativity, gardening, and craft. Once you’ve made your first one, you’ll understand why so many home and garden makers keep coming back to this projectand why their gardens are never short on character.
Final Thoughts
Making DIY concrete head planters for your garden is one of those projects that looks intimidating at first glance and then quickly becomes a favorite. With simple materials, a bit of patience, and a willingness to get messy, you can create sculptural planters that feel custom, artistic, and totally unforgettable.
Whether you choose a sturdy concrete mix or a lighter hypertufa recipe, focus on good drainage, slow curing, and plants that match the planter’s personality. In no time, you’ll have your own gallery of stone-faced beauties turning your front porch, balcony, or backyard into a garden that quite literally has a faceand a sense of humor.