Table of Contents >> Show >> Hide
- Why a Locked File on Mac Will Not Delete
- Method 1: Unlock the File in Finder and Delete It Normally
- Method 2: Close the App That Is Using the File
- Method 3: Change File Permissions So You Can Delete It
- Method 4: Use Terminal to Remove the Lock and Delete the File
- What to Do If the Locked File Still Will Not Delete
- What You Should Not Delete on a Mac
- Best Method by Situation
- Final Thoughts
- Extended Experience: What It Is Actually Like Deleting Locked Files on a Mac
- SEO Tags
So, you dragged a file to the Trash, fully expecting a tiny moment of victory, and your Mac responded with the digital equivalent of folded arms: “No.” Maybe the file is locked. Maybe it is read-only. Maybe another app is clinging to it like a raccoon holding a sandwich. Either way, you want it gone.
The good news is that deleting a locked file on Mac is usually not a sign of doom, corruption, or a haunted MacBook. In most cases, the problem comes down to one of four things: the file is marked as locked in Finder, another app is still using it, your account lacks the right permissions, or the file has special flags that make macOS extra stubborn.
In this guide, you will learn how to delete a locked file on Mac using four easy methods, from the simplest Finder fix to the more advanced Terminal approach. I’ll also show you what not to delete, what to do if the file still refuses to budge, and a longer real-world section at the end with practical experience and mistakes people make all the time.
Why a Locked File on Mac Will Not Delete
Before jumping into the fixes, it helps to know what “locked” actually means on macOS. Sometimes a file is literally checked as Locked in Finder’s Get Info panel. That is the easy version. Other times, the file is not really “locked” in the everyday sense, but you still cannot remove it because:
- An app is still using the file
- Your user account only has read access, not read-and-write access
- The file sits in a protected location
- The file has special system or user flags attached to it
- A cloud app, backup app, or virtual machine is still hanging onto it
That means the best fix depends on why the file is refusing to leave. Think of it like opening a stuck jar: sometimes you just loosen the lid, and sometimes you need a towel, better grip, and a short speech about your authority in this household.
Method 1: Unlock the File in Finder and Delete It Normally
This is the easiest and safest fix, and it should always be your first move.
How to unlock a file on Mac
- Open Finder and locate the file.
- Right-click the file and choose Get Info.
- In the General section, look for the Locked checkbox.
- If it is checked, uncheck it.
- Close the Info window.
- Now drag the file to the Trash and empty the Trash.
If your problem really is a Finder lock, this method usually solves it in under a minute. It is clean, safe, and involves no mysterious black Terminal window staring into your soul.
When this works best
Use this method when:
- You can open the file’s Info panel
- The file was manually locked before
- You are dealing with a regular document, image, PDF, folder, or desktop item
Small but important note
Some locked items can still be moved to Trash but act weird when you try to empty it. If that happens, do not panic. Move to the next method. The problem is usually that another app is still using the file or that your permissions are too limited.
Method 2: Close the App That Is Using the File
Sometimes the file is not truly locked at all. It is just busy. And macOS is very protective when a file is open in another app. If Preview, Word, Photoshop, a sync service, or even Finder itself is still interacting with that file, deletion can fail.
How to delete a file that is in use on Mac
- Close the app that was editing or previewing the file.
- Try deleting the file again.
- If that does not work, open Activity Monitor.
- Search for the app you think is using the file.
- Select it and choose Quit or Force Quit.
- Return to Finder and try deleting the file again.
If you are not sure which app is the culprit, think about what touched the file recently. Cloud services like OneDrive, Dropbox-like sync tools, virtualization apps, backup tools, and media editors are common troublemakers. They are the digital version of someone saying, “I’m not using it,” while clearly still sitting on the chair.
Signs this is your issue
- You get a message saying the file is in use
- The file was just opened or edited
- The file belongs to a synced folder or virtual machine
- You can move it, but you cannot empty the Trash
Quick tip
If a normal quit does not help, restart your Mac and try again before doing anything more advanced. A restart often clears the invisible “something somewhere still has this open” nonsense that can make deletion fail.
Method 3: Change File Permissions So You Can Delete It
If the file is set to Read only for your account, your Mac may treat it like property owned by a very strict landlord. You can look at it. You can sigh at it. You may not throw it away.
How to change permissions on a file on Mac
- Right-click the file and choose Get Info.
- Scroll down to Sharing & Permissions.
- If the section is locked, click the lock icon and enter your administrator password.
- Find your username.
- Change the permission from Read only to Read & Write.
- Close the window and delete the file.
When this method matters most
This fix is especially useful if the locked file is on:
- An external hard drive
- A USB flash drive
- A shared Mac account
- A migrated backup folder
- A file created by another user account
If you are trying to delete an entire folder full of stubborn items, you can also apply permissions to enclosed items from the action menu in the Info panel. That saves you from manually adjusting a hundred files one by one, which is a task nobody should do unless they are being paid unusually well.
What if the file is in a protected area?
If the file lives in a privacy-protected location and Terminal later says Operation not permitted, macOS may be blocking access rather than rejecting the delete itself. In that case, go to System Settings > Privacy & Security > Full Disk Access and grant access to the app you are using, such as Terminal. Do this only when needed, and turn it off later if you do not want to leave extra access enabled.
Method 4: Use Terminal to Remove the Lock and Delete the File
If Finder refuses to cooperate, Terminal is the grown-up toolbox. It is fast, powerful, and slightly terrifying the first time you use it. That said, if you go carefully, it is one of the best ways to delete a locked file on Mac.
Option A: Remove the locked flag
Open Terminal and type this command, followed by a space:
Then drag the file into the Terminal window so the full path is inserted automatically, and press Return.
If the file is a folder and you want to apply it recursively, use:
Option B: Restore write permission
If permissions are the issue, try:
Again, drag the file into Terminal after the command and press Return.
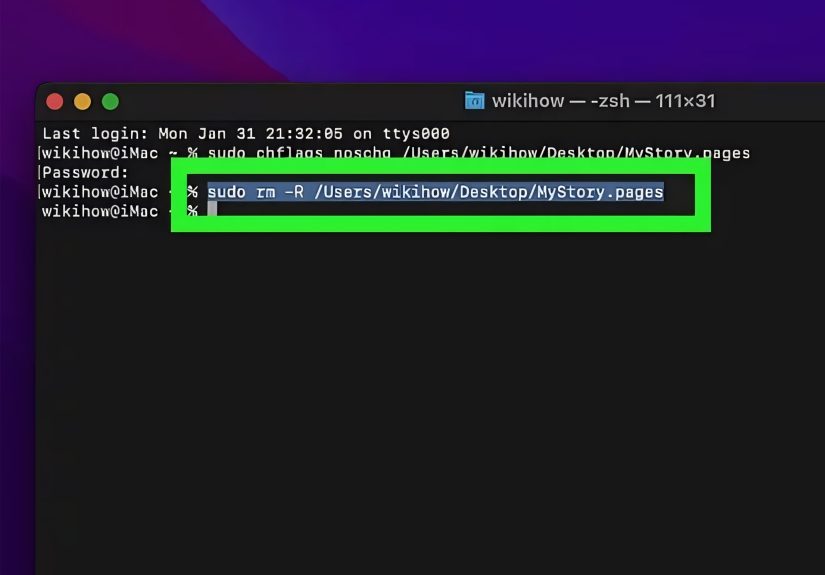
Option C: Delete the file
After unlocking the flag or fixing permissions, delete the file with:
For a folder, use:
Drag the target into the Terminal window and press Return.
Important Terminal warning
Always double-check the file path before pressing Return. Terminal does exactly what you tell it to do, which is wonderful when you are right and deeply character-building when you are not.
Avoid using aggressive commands like sudo rm -rf unless you fully understand what they do. In many everyday locked-file situations, chflags, chmod, and a regular rm are enough.
What to Do If the Locked File Still Will Not Delete
If none of the four main methods work, the issue may be bigger than the file itself. At that point, try these follow-up fixes.
Restart in Safe Mode
Safe Mode loads only essential system components and can help if third-party software is blocking the file. If a sync service, cleanup tool, security app, or extension is interfering, Safe Mode often reveals it.
Boot into Safe Mode, sign in, try deleting the file, then restart normally. It is not glamorous, but it works surprisingly often.
Run Disk Utility First Aid
If the file system has minor errors, Disk Utility’s First Aid can help repair the volume. This is a smart step when the file is on an external drive, after an improper eject, or when lots of files are acting strange at the same time.
Pause Cloud Sync Temporarily
If the file is in iCloud Drive, OneDrive, Dropbox-like sync folders, or another cloud-managed location, pause syncing for a moment and try again. Sync apps can re-open or re-lock a file just when you think you are winning.
What You Should Not Delete on a Mac
Not every stubborn file should be removed. That is the part people tend to learn five minutes too late.
Be careful with:
- System files inside macOS folders you do not recognize
- Library files tied to apps you still use
- Virtual machine files if Parallels or another VM app still references them
- Cloud placeholder files that may reappear or cause sync confusion
- Anything with a vague, alarming name you found while “just cleaning up a little”
If the file belongs to the system, to an app still installed, or to a folder you do not understand, stop and verify first. “Delete now, research later” is not a premium Mac maintenance strategy.
Best Method by Situation
If the file was manually locked
Use Method 1. Open Get Info and uncheck Locked.
If the file says it is in use
Use Method 2. Quit the app, or use Activity Monitor.
If you see read-only access
Use Method 3. Change your permissions to Read & Write.
If Finder keeps failing
Use Method 4. Terminal is usually the final, effective solution for stubborn locked files.
Final Thoughts
Deleting a locked file on Mac sounds dramatic, but it is usually a straightforward permissions or process issue. Start with Finder. Then close any app using the file. Check your permissions. And if macOS still acts like the file is royalty, use Terminal carefully to remove the lock and delete it.
The smartest order is simple: unlock, quit, permission-check, then Terminal. That sequence solves the majority of locked-file problems without making a mess of your Mac.
And remember: a locked file is not always a broken file. Sometimes it is just macOS being cautious, and sometimes it is another app refusing to let go. Either way, one of these four methods should get you back in charge.
Extended Experience: What It Is Actually Like Deleting Locked Files on a Mac
In real life, locked files on Mac rarely show up at a convenient time. They appear when you are cleaning up your Downloads folder before a meeting, trying to remove an old video project to free up storage, or deleting a duplicate folder because your desktop has started to look like a yard sale. That is why this issue feels so annoying. It is not just that the file will not delete. It is that the file will not delete right now, which is exactly when you want it to cooperate.
A very common experience goes like this: you right-click, move the item to Trash, and macOS throws a warning. You open Get Info, uncheck Locked, and expect the problem to be solved. Sometimes it is. Other times, the file still will not leave because the app that created it is quietly running in the background. Preview is a classic example. So are Word, Adobe apps, video editors, and sync tools. You think the file is locked, but the real issue is that the program never fully let it go. That is why quitting the app, or even restarting the Mac, fixes the problem so often. It clears the background clutter and breaks the invisible handshake between the app and the file.
Another experience people run into is with external drives and old backup folders. A file gets copied from another Mac, another user account, or an old hard drive, and suddenly your current Mac sees it almost like borrowed property. You can open it, maybe even duplicate it, but deleting it triggers a permissions fight. This is where users usually get frustrated because the file looks ordinary. It is just a PDF, a ZIP file, a folder, or a random document from three years ago. But under the hood, macOS sees ownership and access rules that do not match your current account. Changing permissions in Sharing & Permissions often fixes the issue in a way that feels weirdly anticlimactic. One tiny dropdown changes from Read only to Read & Write, and suddenly the “impossible” file goes to Trash like it was never a problem.
Then there is the Terminal experience. For many Mac users, Terminal feels like the point where a simple chore becomes a movie montage. But honestly, it is often the cleanest solution when Finder refuses to be helpful. The trick is not to panic, not to rush, and not to type wild commands copied from some dark corner of the internet. Use small, targeted commands. Drag the file path into Terminal instead of typing it manually. Read the line once before you hit Return. That simple habit prevents a lot of regret.
The biggest lesson from real-world use is that a locked file is usually not one single problem. It is a symptom. Sometimes it is a Finder checkbox. Sometimes it is permissions. Sometimes it is an app in the background. Sometimes it is a special file flag. Once you stop treating every locked file like a mysterious disaster and start treating it like a short troubleshooting checklist, the whole thing becomes much less stressful. You are not battling your Mac. You are just figuring out which tiny gate is closed and opening the right one.