Table of Contents >> Show >> Hide
- What Is a Clove Hitch Knot?
- Before You Start: Know the Parts of the Rope
- Method 1: Tie a Clove Hitch Around the End of a Post
- Method 2: Tie a Clove Hitch With Two Loops Over an Open End
- Method 3: Tie a Clove Hitch in the Middle of the Rope
- When to Use a Clove Hitch Knot
- When Not to Use a Clove Hitch
- Common Mistakes When Tying a Clove Hitch Knot
- How to Make a Clove Hitch More Reliable
- Clove Hitch vs. Other Common Knots
- Final Thoughts
- Extra Experience: What I Learned From Actually Using a Clove Hitch Knot
If rope had a social butterfly, it would probably be the clove hitch knot. It shows up in camping, scouting, boating, backyard projects, lashings, and more. It is quick, useful, and wonderfully uncomplicated once your hands understand the pattern. Best of all, it looks impressively “outdoorsy” without requiring wizard-level knot skills or a beard made of pine needles.
In this guide, you will learn 3 ways to tie a clove hitch knot, when to use it, when not to trust it like an overconfident movie sidekick, and how to avoid the most common mistakes. Whether you are securing a rope to a post, starting a lashing, or just trying to look competent at the campsite, this knot deserves a spot in your memory bank.
The clove hitch knot is popular because it is fast to tie and easy to adjust before tightening. It is often used to fasten a rope to a pole, rail, stake, or tree-sized object. It is also common as a starting or finishing hitch for lashings. That said, it is not the superhero of every rope situation. Under shifting loads or slick conditions, a clove hitch can slip, which means smart knot users know both its strengths and its limits.
What Is a Clove Hitch Knot?
A clove hitch is a simple hitch used to attach rope to an object. Think of it as two turns crossing over each other in a neat, practical package. It works best when you need a quick attachment point and plan to keep steady tension on the line. You will often see it used on poles, posts, carabiners, rails, tent lines, and spars.
One reason so many people learn this knot early is that it can be tied in more than one way. You can tie it with the working end around an object, slip it over the end of a post using two loops, or form it in the middle of the rope when access is awkward. That flexibility is exactly why the clove hitch keeps showing up in knot-tying tutorials, scouting manuals, and boating guides.
Why People Like the Clove Hitch
People love this knot because it is:
Fast: You can tie it in seconds once you know the pattern.
Adjustable: Before you cinch it down, it is easy to reposition.
Versatile: It works in camping, boating, pioneering, and general utility tasks.
Compact: It does not create a huge bulky knot that gets in the way.
Where It Works Best
The clove hitch usually performs best on round objects like poles, rails, and posts. It is often more secure when kept under steady tension. If the rope will be jerked, shaken, or repeatedly unloaded and reloaded, you may want to back it up with an extra half hitch or choose a more secure alternative.
Before You Start: Know the Parts of the Rope
To make the instructions easier, here are the three rope terms you need:
Working end: the end you move around to tie the knot.
Standing part: the long section leading away from the knot.
Bight: a bend in the rope that does not use the end.
If those names sound dramatic, do not worry. You do not need to memorize rope vocabulary like it is a final exam. Just keep in mind which end you are using, and the knot will behave.
Method 1: Tie a Clove Hitch Around the End of a Post
This is the classic method for tying a clove hitch when you have access to the working end of the rope and can wrap it around the object. It is one of the easiest ways to learn the knot because you can see the crossing turns clearly.
How to Do It
Step 1: Pass the working end around the post once.
Step 2: Continue around the post a second time, crossing the rope over the first wrap.
Step 3: Slip the working end under the second wrap where the ropes cross.
Step 4: Pull both the standing part and working end to snug the knot tight.
What It Should Look Like
A properly tied clove hitch will look like two wraps around the post with a neat diagonal cross. If it just looks like a messy spiral of regret, untie it and start again. The crossing turn is what gives the hitch its structure.
Best Uses for This Method
This version is great when tying a rope to a fence post, rail, stake, branch, or similar object. It is also handy for quick campsite tasks, temporary tie-downs, and general rope practice.
Method 2: Tie a Clove Hitch With Two Loops Over an Open End
This version is often the fastest when the post or pole has an accessible end. Many people love it because it feels almost like a magic trick: make two loops, stack them the right way, drop them over the pole, and boom, knot accomplished.
How to Do It
Step 1: Make one loop in the rope.
Step 2: Make a second loop in the same direction.
Step 3: Place one loop over the other so they overlap in a crossed pattern.
Step 4: Slip both loops over the open end of the post or pole.
Step 5: Pull the rope ends to tighten.
The Trick That Confuses Beginners
The loops must turn in the same direction before you stack them. If you twist one the opposite way, you will create something that is definitely a knot-adjacent object, but not the clove hitch you were aiming for.
Best Uses for This Method
This is ideal for open-ended poles, tent stakes, table legs, tripod poles, or spars in lashing projects. It is especially useful when you want speed and do not feel like threading the rope around the object multiple times.
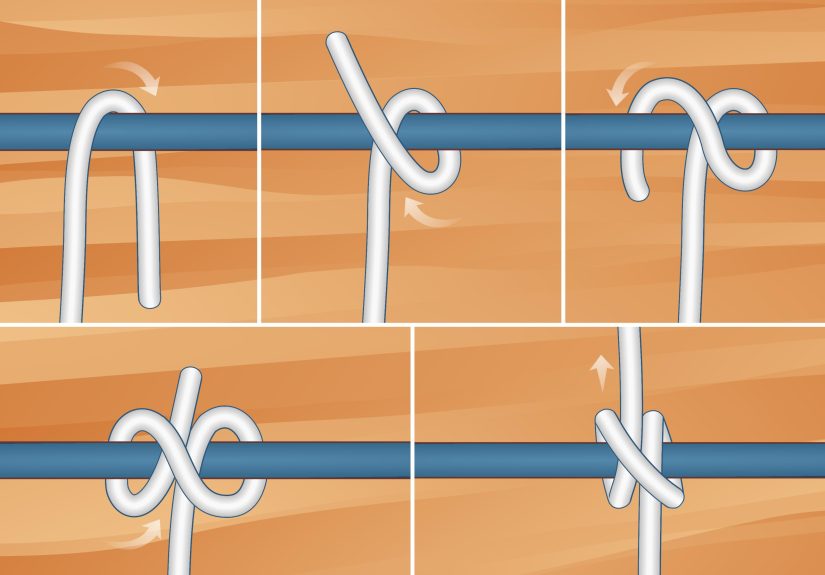
Method 3: Tie a Clove Hitch in the Middle of the Rope
This method is perfect when you need to tie the knot without using the rope’s end. That makes it handy for situations where both ends are busy, attached, or inconvenient. It is also useful when tying around an object you can reach directly, such as a carabiner, branch, or rail.
How to Do It
Step 1: Form one loop in the rope.
Step 2: Form a second loop in the same direction a short distance away.
Step 3: Lay the second loop behind or on top of the first so the loops cross properly.
Step 4: Place the combined loops over the object.
Step 5: Pull both sides of the rope to tighten the clove hitch.
Why This Method Matters
Learning this mid-rope approach makes the clove hitch much more versatile. It means you are not limited to end-of-rope situations. For campers, sailors, scouts, and DIY problem-solvers, that flexibility is gold.
Best Uses for This Method
Use it when tying onto a carabiner, a tree branch, a rail, or a post when the rope ends are not available. It is also helpful in quick rigging situations where you need an attachment point fast.
When to Use a Clove Hitch Knot
The best uses for a clove hitch knot include temporary attachments, lashings, and quick tie-offs where steady tension will hold the knot in place. It is especially useful when you need something fast and adjustable.
Common Practical Uses
Camping: securing gear, stakes, or quick shelter lines.
Boating: temporary mooring or tying fenders and lines to rails.
Scouting and pioneering: starting and finishing lashings on poles.
Backyard projects: bundling, tying, or stabilizing items temporarily.
General utility: attaching a rope to a post, hook, or rung.
If you have ever needed to keep something in place “just for now,” the clove hitch is often a smart option. It is the knot equivalent of a reliable multitool: not perfect for every job, but very handy when you need quick results.
When Not to Use a Clove Hitch
Now for the part that separates useful knot knowledge from rope optimism. A clove hitch is not always the right answer. Because it can loosen or slip under changing loads, it is not the best choice for every heavy-duty or critical application.
Avoid It When
The load will shift constantly: repeated movement can work the knot loose.
The surface is slick: smooth poles and slippery rope reduce grip.
You need maximum security: use a more secure hitch if failure would be a serious problem.
You are dealing with life-safety situations without proper training: do not treat a basic tutorial as a substitute for expert instruction.
If you need more grip, some people add an extra half hitch for backup. In other situations, a different knot may be the wiser move. Good knot tying is not about forcing one knot to do everything. It is about matching the knot to the job.
Common Mistakes When Tying a Clove Hitch Knot
1. Forgetting the Cross
Without the crossing turn, you may end up with two wraps instead of a true clove hitch. It will look close enough to fool the eye for a second and betray you immediately after that.
2. Twisting the Loops in Opposite Directions
When tying with two loops, beginners often make mirror-image loops. The result is not the tidy hitch you want. Keep both loops turning the same way before stacking them.
3. Using It as a Permanent Knot
The clove hitch shines as a quick, practical, often temporary knot. It is not the king of long-term high-stress tie-downs. Know its job description and do not promote it beyond its qualifications.
4. Ignoring Rope Material and Surface
Stiff rope, slick synthetic line, or very smooth surfaces can change how the knot behaves. Always test the knot under the actual conditions you plan to use.
How to Make a Clove Hitch More Reliable
If you want better performance from your clove hitch knot, try these practical habits:
Dress the knot neatly: Make sure the wraps lie flat and the cross is clean.
Tighten it firmly: A sloppy hitch is far more likely to shift.
Use steady tension: The knot behaves best when the load stays consistent.
Add a backup if needed: An extra half hitch can provide more confidence in light utility tasks.
Practice with real rope: Knot illustrations help, but hand memory is what makes you fast.
Clove Hitch vs. Other Common Knots
People often compare the clove hitch to other beginner knots, so here is the quick breakdown:
Clove Hitch vs. Two Half Hitches
A clove hitch is faster and more compact, while two half hitches are often better for a more stable attachment to a fixed object. If your setup may shift, two half hitches can be a safer bet.
Clove Hitch vs. Constrictor Knot
The constrictor knot grips more aggressively, but it can be much harder to untie. The clove hitch is easier to adjust and remove, which is why it is favored for quick utility work.
Clove Hitch vs. Bowline
A bowline creates a fixed loop; a clove hitch attaches rope to an object. They solve different problems. Comparing them directly is a little like comparing a hammer to a spatula. Both useful. Very different lunch plans.
Final Thoughts
Learning how to tie a clove hitch knot is one of those small skills that pays off over and over again. It is fast, practical, and surprisingly versatile. Once you understand the pattern, you can tie it around the end of a post, drop it over an open-ended pole, or make it in the middle of the rope when the ends are unavailable.
The real secret is not just memorizing the steps. It is understanding when the knot makes sense. Use the clove hitch for quick attachments, lashings, and tasks where steady tension helps it hold. Be cautious with shifting loads, slippery surfaces, or situations where failure is not an option. In other words, treat it like a smart tool, not a magic spell.
Practice these three methods a few times, and soon your hands will do the work automatically. Then, the next time someone tosses you a rope and says, “Can you tie this off?” you can smile like a person who absolutely knows what they are doing. Even if, internally, you are still whispering, “Please be the loop version. Please be the loop version.”
Extra Experience: What I Learned From Actually Using a Clove Hitch Knot
There is a funny difference between reading about a knot and actually using it when your hands are cold, your rope is stiff, and somebody nearby is offering very confident but very unhelpful advice. On paper, the clove hitch looks almost too simple. In real life, that simplicity is exactly what makes it memorable.
The first thing many people notice is how quickly the knot starts to make sense once they practice it on a chair leg, broom handle, or porch rail. At first, the rope seems to have a personal grudge against your fingers. You make one loop, then another, and somehow produce something that looks less like a knot and more like a failed pretzel. Then suddenly, one repetition clicks. The crossing turns line up. The hitch slides into place. Your brain says, “Oh, that’s all this is?”
Another common experience is discovering that the clove hitch knot feels different depending on the rope. Soft rope is forgiving. Stiff rope has opinions. Slick synthetic cord can make you respect the warnings about testing the knot before trusting it. This is where beginners learn an important lesson: knot tying is not just theory. Material, tension, and surface texture all matter.
In practical use, the clove hitch shines when speed matters. If you are tying something temporarily to a post, lashing poles together, or securing a line without a lot of ceremony, it feels efficient and elegant. There is something deeply satisfying about finishing a useful task with a knot that took only a few seconds to tie.
But experience also teaches humility. The clove hitch is not the knot to use blindly for every job. Many people learn this after watching a line wiggle loose under repeated movement or after realizing a heavily loaded hitch needs backup. That is not a flaw in learning the knot. It is part of learning rope judgment. Every knot has a personality. The clove hitch is quick, handy, and a little demanding about conditions.
What sticks with most people over time is not just the technique, but the confidence that comes with repetition. Once you can tie a clove hitch three different ways, ropes stop feeling mysterious. You start seeing problems in a more practical way: post, rope, tension, solution. And that is the real value of learning this knot. It is not only about tying one hitch well. It is about becoming the kind of person who can look at a loose line and calmly fix it without creating a decorative disaster.