Table of Contents >> Show >> Hide
- Know Your Tape Measure: The Parts That Affect Accuracy
- How Imperial Tape Markings Work: Inches and Fractions
- Imperial Examples: Reading Real Measurements Without Crying
- Special Imperial Markings: The Red Numbers and Black Diamonds
- How Metric Tape Markings Work: Centimeters and Millimeters
- Imperial vs. Metric: Converting Without Making It Your Whole Personality
- Measuring Like a Pro: Techniques That Prevent “Oops” Cuts
- Practice Drills: Get Fast at Reading Tape Marks
- Choosing the Right Tape Measure for Your Brain
- Common Mistakes (So You Can Avoid the DIY Hall of Fame)
- of Real-World Experience: What People Learn the Hard Way
- Conclusion
A tape measure is basically a tiny, retractable ruler with opinions. It wants you to read it correctly, hold it straight,
and stop letting it snap back into the case like it’s auditioning for an action movie. Learn the markings once, and suddenly
you’re measuring like a prowhether you’re hanging a picture frame, cutting trim, or figuring out if that “perfect” sofa will
actually fit through your doorway without turning into a hallway hostage situation.
This guide breaks down imperial (inches + fractions) and metric (centimeters + millimeters)
markings in plain American English, with practical tricks, examples, and a few “please don’t do this” warnings.
Know Your Tape Measure: The Parts That Affect Accuracy
The hook (aka the “tang”) isn’t loose because it’s broken
That metal hook at the end is designed to wiggle slightly. This “floating” movement compensates for the hook’s thickness so you
can get accurate measurements whether you’re pulling the hook over an edge (outside measurement) or
pushing it against a surface (inside measurement). If someone “fixes” the looseness, your measurements can be off.
The blade, lock, and case
- Blade: The long metal tape with markings.
- Lock: Holds the blade in place so you can read it without needing a third hand.
- Case length: Many tape measures print their case length on the sideuseful for inside measurements.
How Imperial Tape Markings Work: Inches and Fractions
On the imperial side, the big numbers are inches (1, 2, 3, 4…). Between each inch are shorter lines that represent fractions.
The trick is that line length matters: the longer the line, the bigger the fraction.
Step 1: Find the last whole inch
Start by locating the last full inch mark before the edge of the object you’re measuring. That’s your base.
Everything after that is “extra” in fractions of an inch.
Step 2: Identify the fraction by line length
Most common tape measures divide each inch into 16 parts (sixteenths). Some go smaller (like 1/32″), but 1/16″
is the typical “daily driver” for DIY.
- 1/2 inch: The line exactly halfway between two inch marks (usually the longest line after the inch line).
- 1/4 inch and 3/4 inch: The next-longest lines, splitting the inch into quarters.
- 1/8 inch increments: Shorter lines splitting each quarter in half.
- 1/16 inch increments: The shortest common lines, splitting each eighth in half.
A quick visual rule (no math required)
If you can spot the middle line (1/2), you can keep halving:
- Halfway = 1/2
- Half of that space = 1/4 (and 3/4)
- Half again = 1/8 (and 3/8, 5/8, 7/8)
- Half again = 1/16 (and all the odd sixteenths like 7/16, 11/16, etc.)
Alternate method: Count the sixteenths
If your tape has 1/16″ markings, each tiny tick after the inch mark is one sixteenth. Count them until you reach your object edge.
Then write the fraction as (count)/16 and simplify if you want to look fancy.
- 4 ticks = 4/16 = 1/4
- 8 ticks = 8/16 = 1/2
- 12 ticks = 12/16 = 3/4
Imperial Examples: Reading Real Measurements Without Crying
Example 1: 3 7/16 inches
You find the last whole inch: 3. Then the edge lands on the 7th tiny tick after 3.
That’s 3 + 7/16 (since you counted 7 out of 16). Done.
Example 2: 12 3/8 inches
The edge is past 12. It lands on the third 1/8 line after 12 (or the 6th 1/16 tick).
That’s 12 3/8 (or 12 6/16 simplified).
Example 3: When it lands “between lines”
If the edge is between two ticks and you’re cutting material, it’s usually safer to round up to the next line.
You can always sand/trim a hair off, but you can’t un-cut wood. (Well… not without wood glue and creative storytelling.)
Special Imperial Markings: The Red Numbers and Black Diamonds
Besides the standard inch/fraction ticks, many tape measures include “construction shortcuts” printed in color or symbols.
These are optional, but they can save time if you know what they mean.
Red markings every 16 inches
In typical U.S. framing, wall studs are often spaced 16 inches on center. Many tapes highlight 16″, 32″, 48″, etc.
so you can lay out studs without doing extra counting.
Black diamond (or triangle) markings
The black diamonds mark 19 3/16 inches spacingcommonly used for certain truss/joist layouts so that multiple supports
fit evenly under an 8-foot sheet of plywood. If you’re not framing a roof or floor system, you can admire them the way you admire
a blender’s “purée” setting: interesting, but not always today’s mission.
Foot markings
Many tapes make it easy to spot feet with extra-long ticks or a different style at 12 inches, 24 inches, and so on.
This helps when you’re measuring something long and don’t want to mentally convert 84 inches into “7 feet.”
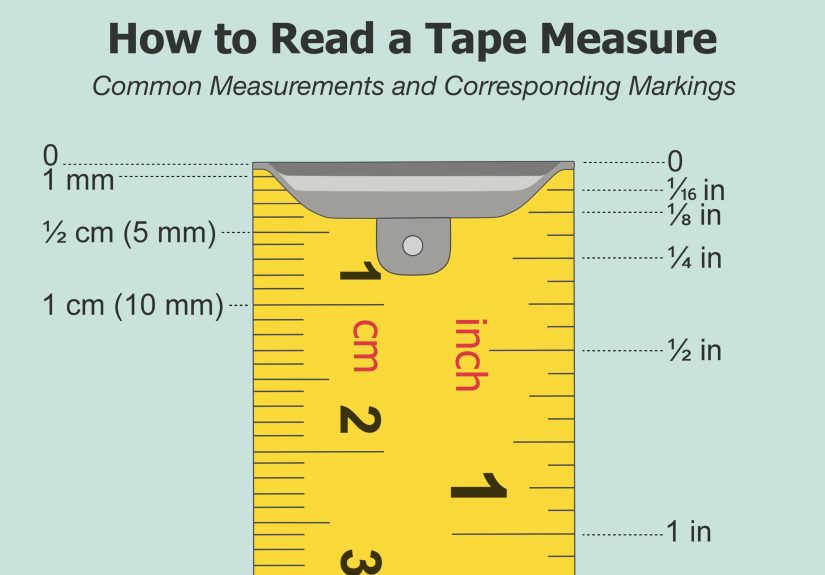
How Metric Tape Markings Work: Centimeters and Millimeters
Metric is the “base-10 best friend” of measuring. Instead of juggling fractions, you’re counting in tens.
Most metric tapes show centimeters (cm) as the numbered units, with millimeters (mm) as the smaller ticks.
The basic metric layout
- Big numbers: centimeters (1, 2, 3…)
- Each centimeter: divided into 10 millimeters
- Smallest ticks: usually millimeters (1 mm each)
Step-by-step: reading a metric measurement
- Find the last full centimeter before the object edge.
- Count the millimeter ticks after that centimeter until you hit the edge.
- Write it as cm + mm (or as a decimal in centimeters).
Metric example: 28.3 cm
The edge is past the 28 cm mark by 3 small ticks. That’s 28 cm + 3 mm, which you can write as 28.3 cm.
Imperial vs. Metric: Converting Without Making It Your Whole Personality
Sometimes you’ll need to convertlike when a tool spec is in millimeters but your plans are in inches.
Here are the conversions worth memorizing:
- 1 inch = 25.4 mm
- 1 cm = 10 mm
- 1 inch = 2.54 cm
Quick shortcut: If you just need a rough estimate, think “1 inch is about 2.5 cm.” For precision work, use the exact value.
Measuring Like a Pro: Techniques That Prevent “Oops” Cuts
1) Keep the tape straight (and supported)
If the blade bows or sags, it can add length you didn’t intend. For long spans, support the tape with your hand or use a helper.
If you work solo a lot, look for a tape with good standout (how far it extends before bending).
2) Use the hook correctly
- Outside measurement: Hook the tang over the edge and pull it snug.
- Inside measurement: Press the tang against the inside surface and push it tight.
3) Inside corners: use the case length
When measuring inside a tight corner (like cabinet width), you can press the tape case into one side, extend the blade to the other side,
read the blade at the case edge, then add the tape’s case length (often printed on the case).
4) Mark with the right side of the line
Pencil lines have thickness. If you’re doing fine work, choose whether you’re marking the left edge, center, or right edge of the tickand stay consistent.
“Close enough” is how shelves become… abstract art.
5) When in doubt, measure twice and cut once
This isn’t a cliché. It’s an apology-prevention system.
Practice Drills: Get Fast at Reading Tape Marks
If you want this to feel automatic, try a few quick drills:
- Fraction spotting: Point to a random tick between inches and name it (1/2, 1/4, 3/8, 5/16, etc.).
- Sixteenth counting: Pick a mark and count it in 1/16s, then simplify (10/16 = 5/8).
- Metric counting: Read a few cm + mm measurements as decimals (34.6 cm, 102.0 cm, etc.).
- Real object test: Measure a book, a phone, a table, and write both imperial and metric values if your tape has both.
Choosing the Right Tape Measure for Your Brain
The “best” tape measure is the one you’ll actually use correctly. A few features can help:
- Clear fractional graphics: Some tapes print fractions to reduce guesswork.
- Dual-scale blades: Imperial on one edge, metric on the other.
- Magnetic hook: Handy for measuring metal surfaces solo.
- Sturdy tang and smooth lock: Better accuracy and less frustration.
- Readable numbers: Big print matters when you’re measuring under cabinets with one eye closed and a flashlight in your mouth.
Common Mistakes (So You Can Avoid the DIY Hall of Fame)
- Ignoring the hook movement: It’s supposed to slidedon’t “repair” it by smashing rivets.
- Reading at an angle: Look straight down to avoid parallax errors.
- Letting the tape snap back: It can damage the hook alignment and shorten tape life (and it’s just rude behavior).
- Mixing units mid-project: Pick imperial or metric for the plan and stick with it unless you’re converting carefully.
- Not accounting for kerf: Saw blades remove material. For tight fits, plan for the cut width.
of Real-World Experience: What People Learn the Hard Way
Most people don’t “learn tape measures” in a calm classroom environment with snacks and perfect lighting. They learn them mid-project, when something
doesn’t fit, and the tape is doing that springy thing where it tries to fold itself into modern art. A common experience is the first time someone cuts
a board to what they swear was “exactly” 24 inches… only to discover it’s mysteriously 23 15/16. That missing sixteenth isn’t magicit’s usually the
hook not being pulled snug, the tape sagging, or the person reading the wrong tick because their brain politely refused to count tiny lines at 9:47 p.m.
under a single garage bulb.
Another classic moment: measuring inside a cabinet or closet opening. The tape bends, the hook won’t stay put, and suddenly everyone is bargaining with
geometry. This is where people discover the case-length trickpress the tape case into one side, extend to the other, then add the case length (often
printed right on the tool). Once someone uses that method successfully, it tends to become a permanent “why didn’t anyone tell me sooner?” memory.
Then there’s the “red numbers” revelation. Folks framing a wall (or just trying to mount shelves) notice those red 16-inch marks and realize the tape
is quietly offering them a shortcut. It’s the tool equivalent of a friend nudging you at a party and whispering, “That’s the exituse it.” Even if
someone isn’t framing an entire room, understanding stud spacing changes how they locate support for heavy items. It’s also a good reminder that tape
measures are designed around real building habits, not just abstract math.
The black diamonds cause a different kind of experience: curiosity mixed with mild suspicion. People see them and assume they’re secret code, a treasure
map, or a message from the Tool Gods. In reality, they’re there for truss/joist layout spacing. The “experience” here is the moment someone stops feeling
confused by the symbol and starts seeing it as a specialized helper. Even if they never build a roof, they gain confidence from knowing the tape isn’t
randomly decoratedit’s intentionally informative.
Finally, a lot of tape-measure confidence comes from tiny wins: reading 7/16 without counting twice, catching a measurement error before cutting, or
writing down numbers in a consistent format (like always using inches and sixteenths, or always using centimeters and millimeters). Over time, people
develop a personal systemmaybe they always round up for safety cuts, or they mark on the “waste side” of a line. Those habits are experience-based
skills, and they’re the difference between “I own tools” and “I can build things without creating a scrap-wood mountain.”
Conclusion
Reading a measuring tape is less about math genius and more about pattern recognition: big marks for big units, smaller marks for smaller units, and
a few special symbols that exist to make building faster. Once you know how inches split into fractions and how centimeters split into millimeters,
you’ll measure with confidenceand your projects will start fitting together like they actually meant to.