
Table of Contents >> Show >> Hide
- Before You Mount Any Trolling Motor: Measure Twice, Regret Never
- Way 1: Bow Mount Trolling Motor
- Way 2: Transom Mount Trolling Motor
- Way 3: Engine Mount Trolling Motor
- Choosing Between Bow, Transom, and Engine Mounts
- Installation Checklist for Any Trolling Motor Mount
- Real-World Experience: Lessons From Mounting Trolling Motors
- Conclusion
- SEO Tags
A trolling motor is one of those upgrades that quietly changes everything about a day on the water. Suddenly, you are not blasting past fish like a marching band in a library. You are easing along weed lines, sliding into coves, holding over structure, and making tiny boat-positioning moves that feel almost unfair. But before your trolling motor becomes your favorite fishing partner, it needs to be mounted correctly.
The good news: mounting a trolling motor is not mysterious. The less-good news: the “right” method depends on your boat, fishing style, motor type, deck layout, batteries, shaft length, and whether you are willing to drill holes in something that floats. No pressure.
This guide explains the three main ways to mount a trolling motor: bow mount, transom mount, and engine mount. Each option has a different personality. A bow mount is the precise, high-control choice for serious anglers. A transom mount is simple, affordable, and great for small boats. An engine-mounted trolling motor is a clean solution when deck space is limited or the boat is too large for a traditional setup. Let’s break down how each one works, when to use it, and what to watch before you pick up a drill.
Before You Mount Any Trolling Motor: Measure Twice, Regret Never
Before choosing a mount location, think about the whole system. A trolling motor is not just a motor; it is a mount, shaft, propeller, batteries, wiring, breaker, plug, and your future patience level. The goal is to install it so the prop stays properly submerged, the motor deploys without hitting the boat, the wiring is protected, and the boat handles naturally.
Match the Motor to the Boat
Start with thrust, voltage, and shaft length. Thrust is the pushing power of a trolling motor, measured in pounds. Small jon boats, dinghies, and lightweight fishing boats can often use lower-thrust 12-volt motors. Larger bass boats, pontoons, bay boats, and windy-water setups may need 24-volt or 36-volt systems with more thrust. A common practical rule is simple: more boat, more wind, more current, more thrust.
Shaft length matters just as much. If the shaft is too short, the prop may suck air and churn the surface, which spooks fish and makes the motor work harder. If it is too long, it can be awkward in shallow water or when stowed. For bow mounts, measure from the bow mounting surface down to the waterline. For transom mounts, measure from the top of the transom to the waterline. The motor’s lower unit should remain well below the surface during normal fishing conditions, especially when waves lift and drop the bow.
Plan the Wiring Before Drilling
Many frustrating trolling motor installs start with a beautiful mount and end with a wiring route that looks like spaghetti having a personal crisis. Before drilling mounting holes, decide where the batteries will sit, where the breaker will go, how the cables will run, and whether you want a quick-disconnect plug. Use marine-rated wiring, protect positive leads with the correct circuit breaker, and follow the motor manufacturer’s wiring diagram for 12V, 24V, or 36V systems.
Also, secure the batteries so they cannot slide around when the boat bounces. A battery that shifts in rough water can damage terminals, strain wires, and turn your neat installation into a very expensive rattle. Use trays, straps, terminal covers, and clean connections. If marine electrical work makes you nervous, that is not weakness; that is wisdom wearing a life jacket. A qualified marine technician can save you from smoky surprises.
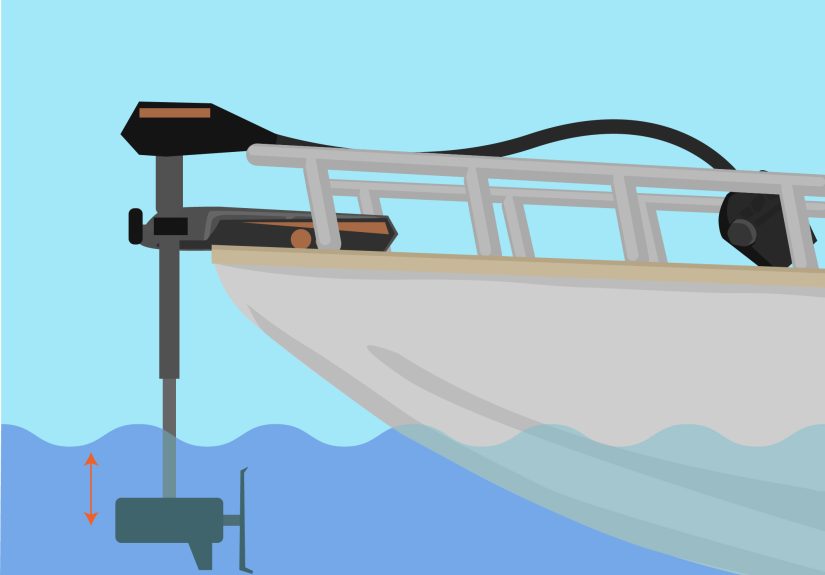
Way 1: Bow Mount Trolling Motor
A bow mount trolling motor is the favorite choice for many bass boats, multi-species fishing boats, flats boats, bay boats, and serious freshwater or inshore setups. Instead of pushing the boat from the back, it pulls from the front. That gives better directional control, especially when fishing slowly along shorelines, docks, grass beds, ledges, and brush piles.
Best For
- Anglers who want precise boat control
- Bass boats, deep-V fishing boats, flats boats, and many bay boats
- Fishing in wind, current, or around structure
- GPS features such as anchor mode, route tracking, and heading lock
- Foot-pedal, remote-control, or electric-steer motors
Why Bow Mounts Work So Well
Pulling a boat is usually easier to control than pushing it. Think of dragging a wagon by the handle versus shoving it from behind. When the motor is at the bow, the boat tends to follow the direction of the motor more naturally. This makes bow mounts excellent for holding a boat against wind or current, sneaking down a bank, or positioning precisely for repeated casts.
Modern bow mount trolling motors often include GPS-controlled features that can hold the boat in one place, follow a contour, or maintain a heading. These features are especially helpful when fishing offshore structure, bridges, reefs, deep brush, or windy points. The motor becomes less of a simple propeller and more of a quiet boat-positioning robot. A polite robot, thankfully.
How to Mount a Bow Mount Trolling Motor
First, place the mount on the bow and test the deployed and stowed positions. Do not guess. Deploy the motor, rotate the shaft, and make sure the head, shaft, and prop clear the bow, rail, cleats, navigation lights, anchor locker, and rub rail. The shaft should sit as close to the boat’s centerline as practical when deployed. If it is too far off-center, the boat may pull awkwardly or require constant correction.
Next, check the underside of the deck. You need room for washers, locknuts, and preferably a backing plate. A trolling motor creates torque, vibration, and leverage every time it starts, stops, hits weeds, or bounces on the trailer. Thin fiberglass or aluminum deck material may need reinforcement. Stainless hardware, large washers, and backing plates help spread the load.
Once the location is confirmed, mark the holes with the mount as a template. Drill pilot holes carefully, then drill to final size. If drilling fiberglass, many installers use masking tape over the hole locations to reduce chipping. Seal holes with marine sealant to keep water out of the deck core. Then bolt the mount securely, attach the motor according to the manufacturer’s instructions, and test deployment before wiring everything permanently.
Bow Mount Installation Tips
- Use a quick-release bracket if you trailer often, store outside, or want to remove the motor for security.
- Make sure the motor does not block dock lines, anchor access, or the bow navigation light.
- Leave enough room for the head of the motor when stowed.
- Use a stabilizer or support arm for long-shaft motors that bounce during trailering.
- Check that the foot pedal, remote, or control cable location feels natural while fishing.
Common Bow Mount Mistakes
The biggest mistake is mounting the motor too far back, too far sideways, or without enough clearance for deployment. Another common problem is using short screws instead of through-bolts. A bow mount needs strength. Screws into a thin deck may hold at first, then loosen after vibration, waves, and trailer miles. If your boat has a bow rail, pulpit, or unusually shaped deck, mock up the full movement before committing.
Bow mounting is the most powerful and precise option, but it requires the most planning. The payoff is huge: better control, quieter presentations, and more confidence when the wind decides to audition for a disaster movie.
Way 2: Transom Mount Trolling Motor
A transom mount trolling motor is the classic clamp-on option. It mounts to the back of the boat, usually with a simple bracket and tightening screws. If bow mounts are the high-tech command center, transom mounts are the dependable pocketknife: simple, useful, and not trying to connect to satellites before breakfast.
Best For
- Jon boats, inflatables, dinghies, canoes, small skiffs, and utility boats
- Budget-friendly trolling motor setups
- Boaters who want easy installation and removal
- Small lakes, ponds, calm rivers, and short fishing trips
- Portable setups where drilling is not ideal
Why Transom Mounts Are Popular
Transom mount motors are easy to install because most small boats already have a flat stern designed to hold a motor. In many cases, installation is as simple as placing the bracket over the transom, tightening the clamps, adjusting the depth, connecting the battery, and going fishing. That simplicity is a major advantage for renters, casual anglers, small-boat owners, and anyone who prefers tools that do not require a prayer circle.
Most transom mount trolling motors use hand tiller steering. The tiller controls direction and speed directly, giving immediate feedback. This is excellent for slow maneuvering, trolling shorelines, or positioning a lightweight boat. Many models also allow the head to tilt or extend so the handle is comfortable from a seated position.
How to Mount a Transom Mount Trolling Motor
Start by inspecting the transom. It should be solid, flat enough for the bracket, and strong enough to handle the motor’s weight and thrust. Avoid clamping over cracked wood, soft fiberglass, loose trim, or flexible plastic. If the transom is thin or delicate, use a reinforcement pad or mounting board designed for marine use.
Place the motor bracket over the transom and center it where it has room to steer. Tighten the clamp screws evenly by hand. Do not use a wrench unless the manufacturer specifically allows it; overtightening can crush softer transoms or damage the bracket pads. Adjust the shaft depth so the prop stays submerged without being unnecessarily deep. Then rotate the motor through its steering range to confirm it does not hit the hull, outboard, swim ladder, rudder, or transducer.
For wiring, many small transom setups connect directly to a deep-cycle marine battery using properly sized leads and a breaker. A quick-connect plug can make removal easier. Keep cables away from feet, sharp edges, fuel lines, and moving parts. If the battery sits forward for weight balance, route the wiring safely and use appropriate wire gauge for the length of the run.
Can You Put a Transom Mount on the Bow?
Sometimes, yes. Some anglers convert or adapt a transom mount motor for bow use on a jon boat or small craft. This may require reversing the motor head so the handle and directional control make sense from the front. However, not every motor is designed for this, and the bracket may need a flat, reinforced mounting surface. Always check the manufacturer’s guidance before modifying anything.
This option can be clever for tiny boats, but it is not the same as a true bow mount. A dedicated bow mount usually deploys, stows, and controls better from the front. A converted transom mount is more of a practical workaround than a luxury suite.
Transom Mount Installation Tips
- Keep the motor vertical when running for best thrust and efficiency.
- Use a safety lanyard or tether if the motor is removable and used in rough conditions.
- Check clamp tightness during the first few trips.
- Balance the boat by placing the battery where it will not make the stern squat too much.
- Remove the motor before trailering if the bracket or transom is not designed for road vibration.
Common Transom Mount Mistakes
The most common mistake is treating a clamp-on motor as if it never needs checking. Clamps can loosen, pads can compress, and vibration can creep in. Another mistake is using a starting battery instead of a deep-cycle battery. Trolling motors draw steady power over time, and deep-cycle batteries are built for that job.
A transom mount is the easiest way to get electric propulsion on a small boat. It may not offer the surgical precision of a bow mount, but for quiet movement, simple trolling, and budget-friendly fishing, it is hard to beat.
Way 3: Engine Mount Trolling Motor
An engine mount trolling motor attaches to the outboard or sterndrive area, typically around the anti-cavitation plate. Instead of taking up space on the bow or clamping to the transom, it hides near the main engine. This setup is less common than bow and transom mounts, but it solves real problems for certain boats.
Best For
- Boats with limited bow deck space
- Boats where a bow mount would interfere with rails, anchors, or seating
- Larger boats that need quiet low-speed control
- Owners who want a cleaner deck layout
- Situations where traditional stern or bow mounting is impractical
Why Choose an Engine Mount?
An engine-mounted trolling motor keeps the deck clear. There is no bow bracket to trip over, no shaft lying across the front deck, and no transom clamp competing with swim platforms or kicker motors. It can be a smart choice for pontoons, runabouts, deck boats, and larger fishing boats where a traditional mount would be awkward.
The tradeoff is control. Because the motor is at the stern, it generally does not provide the same pinpoint boat positioning as a bow mount. It also tends to be more involved to install. You may need to drill the anti-cavitation plate, align the bracket carefully, and confirm compatibility with the outboard or sterndrive. This is not the time to say, “Looks close enough,” while holding a drill over expensive machinery.
How to Mount an Engine Mount Trolling Motor
Begin by confirming that the engine mount model is compatible with your boat, main motor, and waterline. Engine-mounted motors require enough depth for the unit to operate properly when the boat is floating normally. The anti-cavitation plate must also have enough surface area and strength for the bracket.
Position the trolling motor assembly on the anti-cavitation plate according to the installation template. Many engine mount systems use multiple bolts through the plate, along with insulating pads or spacers. Mark the holes carefully, remove the unit, and drill only after checking alignment from every angle. Metal shavings should be controlled and cleaned up immediately.
Install the bracket with stainless hardware and any supplied pads or washers. Tighten evenly and follow torque recommendations if provided. Route wiring up and into the boat so it is protected from the propeller, steering movement, trim movement, heat, and sharp edges. Leave enough slack for the main engine to turn and trim fully without pulling on the cables.
Engine Mount Installation Tips
- Turn the outboard lock-to-lock and trim it up and down before finalizing the wiring route.
- Check that the trolling motor does not interfere with the main propeller or water flow.
- Use chafe protection where wires pass near metal edges or moving parts.
- Confirm that your boat’s steering and trim systems operate freely after installation.
- Consider professional installation if drilling the anti-cavitation plate feels risky.
Common Engine Mount Mistakes
The biggest mistake is skipping the compatibility check. Engine-mounted trolling motors are specific about fit, water depth, and mounting geometry. Another mistake is routing wires too tightly around the outboard. Engines move. They steer, trim, vibrate, and sometimes get bumped. Wiring needs protection and enough slack to survive real-world use.
An engine mount is not the first choice for everyone, but it can be the perfect answer for boats where a bow mount is impossible and a transom mount is inconvenient. It gives quiet electric power without sacrificing valuable deck space.
Choosing Between Bow, Transom, and Engine Mounts
The best trolling motor mount depends on how you fish and what your boat allows. If you cast from the front deck and want the best control, choose a bow mount. If you have a small boat and want fast, affordable installation, choose a transom mount. If your boat lacks usable mounting space and you want a clean setup, consider an engine mount.
Quick Comparison
| Mount Type | Best Strength | Main Drawback | Ideal Boat Type |
|---|---|---|---|
| Bow Mount | Best precision and control | Requires deck space and drilling | Bass boats, bay boats, deep-V fishing boats |
| Transom Mount | Simple and affordable | Less precise steering from the stern | Jon boats, dinghies, small skiffs, inflatables |
| Engine Mount | Clean deck layout | More complex installation and compatibility limits | Pontoons, runabouts, larger boats, space-limited boats |
Installation Checklist for Any Trolling Motor Mount
No matter which mounting method you choose, use this checklist before the first trip:
- Confirm the motor thrust and voltage match the boat size and fishing conditions.
- Choose the correct shaft length for the mounting position and waterline.
- Test the full stow, deploy, steering, and trim movement before drilling or final tightening.
- Use stainless steel hardware and backing support where needed.
- Seal drilled holes with marine sealant.
- Install the proper circuit breaker near the battery on the positive lead.
- Use marine-rated wire sized for voltage, amp draw, and cable length.
- Secure batteries in trays with straps and protect terminals.
- Keep wiring away from sharp edges, moving parts, fuel lines, and heat.
- Test the motor at low speed at the dock before heading out.
Real-World Experience: Lessons From Mounting Trolling Motors
The first thing experience teaches about mounting a trolling motor is that boats are not as symmetrical as they look in photos. A bow may seem flat until you place the mount and discover a cleat, hatch, rail, light, or anchor roller sitting exactly where the motor wants to live. That is why dry-fitting is the best habit you can build. Lay the motor in place, deploy it, stow it, pretend to fish around it, and imagine docking with it. If something feels awkward in the driveway, it will feel ten times more awkward on a windy ramp with an audience.
On bow mounts, the little details matter. A motor mounted one or two inches too far inward may not clear the rub rail when deployed. Too far outward, and it may hang dangerously over the side while trailering. The sweet spot usually comes from patience, not speed. Many experienced installers use cardboard templates, painter’s tape, and repeated test fits before drilling. That may look overly cautious, but the boat owner who has never patched an unnecessary hole is usually a happier boat owner.
Another lesson: backing plates are boring until you need one. A trolling motor can put serious leverage on a deck, especially a long-shaft bow mount bouncing down the highway. If the deck flexes when you lean on the mount, reinforce it. Large fender washers are better than tiny washers, and a proper backing plate is better still. The motor should feel like part of the boat, not like an accessory nervously attached with optimism.
For transom mounts, battery placement often makes or breaks the setup. Put a heavy battery at the stern of a small jon boat, add an angler, fuel tank, cooler, and tackle box, and suddenly the boat squats like it is doing leg day. Moving the battery slightly forward can improve balance, but longer cable runs require correct wire sizing. Do not solve one problem by creating a voltage drop problem. The motor should receive clean power, and the boat should still float level enough to handle safely.
Engine mounts teach a different lesson: clearance is king. The main engine must still steer freely and trim through its normal range. Wires that look safe with the engine centered may become tight when the wheel is hard over. Before calling the job done, turn the steering fully both ways and trim the engine up and down. Watch every cable. If anything stretches, rubs, pinches, or gets close to the propeller, fix it immediately.
Finally, the best trolling motor installation is the one you trust when conditions get messy. Calm-water tests are useful, but real fishing includes boat wakes, wind gusts, weeds, shallow bumps, and trailer vibration. After the first few trips, recheck mounting bolts, clamp pressure, wire connections, plug fit, breaker function, and battery straps. A trolling motor is wonderfully quiet, but loose hardware has a way of becoming loud at the worst possible time.
Conclusion
Mounting a trolling motor is not just about attaching equipment to a boat. It is about choosing how you want the boat to behave. A bow mount gives the best control for anglers who need precision. A transom mount keeps things simple, portable, and affordable. An engine mount offers a clean solution when deck space is limited or traditional mounting locations do not work.
Take your time with measurements, clearances, wiring, and hardware. Match the motor to the boat, keep the prop properly submerged, reinforce the mount where needed, and protect the electrical system with marine-rated components. Do that, and your trolling motor will feel less like an add-on and more like the quiet, obedient fishing assistant every boat deserves.


