Table of Contents >> Show >> Hide
- Why wire splicing matters more than people think
- Before you splice: know your wire
- How to strip wire without wrecking it
- 3 common wire splicing methods
- Which splice should you choose?
- Common wire-splicing mistakes that cause trouble
- Practical examples
- When to stop and call a licensed electrician
- Final thoughts
- Experience and lessons from real-world wire-splicing situations
- SEO Tags
Note: This article is a safety-first educational overview. For household branch-circuit wiring, damaged power cords, aluminum wiring, or any work inside walls that must meet electrical code, hire a licensed electrician. Never work on energized wiring, and never use electrical tape alone as a “repair” for a bad splice.
Wire splicing sounds simple until you’re standing there with a stripper in one hand, a connector in the other, and the sinking feeling that electricity would love to make this a memorable day. The good news is that good splices are not magic. They’re the result of matching the wire, the connector, and the use case. The bad news is that sloppy splices can lead to heat, failure, nuisance outages, and sometimes a very expensive lesson in why “close enough” is not an electrical standard.
This guide breaks down the basics of wire stripping and explains three common splicing methods: connector-based splices for building wire, crimp splices for low-voltage and automotive work, and solder-and-heat-shrink splices for electronics and light-duty signal applications. The goal here is not to turn you into a code book with shoes. It’s to help you understand what a good splice looks like, what a bad one looks like, and when to step away and call a pro.
Why wire splicing matters more than people think
A splice is more than “making two wires touch.” A proper splice creates a secure mechanical connection, maintains electrical continuity, and protects the connection from loosening, corrosion, strain, and accidental contact. A bad splice, on the other hand, may work for five minutes, five months, or just long enough to convince someone it was a brilliant idea. Then it heats up, arcs, loosens, corrodes, or quits right when you need it most.
That is why professionals obsess over the boring stuff: conductor material, wire gauge, connector ratings, insulation type, environment, and enclosure requirements. Indoor dry locations are one thing. Damp spaces, vibration, heat, and buried cable are another universe entirely. A splice that is fine on a workbench may be a terrible choice in an attic, engine bay, or junction box.
The first rule is simple: identify what you’re actually working on. Is it low-voltage speaker wire? Automotive wire? Thermostat cable? Solid copper house wire in a junction box? A damaged extension cord? These are not interchangeable scenarios, and neither are the right repair choices.
Before you splice: know your wire
Solid vs. stranded wire
Solid wire has a single conductor and is common in residential branch-circuit wiring. Stranded wire is made of many small strands and is more flexible, which makes it common in automotive, electronics, appliances, and low-voltage cable. Some connectors are designed for one type, some for both, and some become a headache if you guess wrong.
Wire gauge matters
Wire size affects the stripper setting, the connector choice, and the amount of current the wire can safely carry. A connector rated for one range of conductors may be unreliable with another. Translation: the label on the connector package is not decorative. Read it.
Copper, aluminum, and mixed-metal caution
Most small DIY articles focus on copper conductors, and for good reason. Copper is common, predictable, and supported by a huge range of listed connectors. Aluminum branch-circuit wiring and mixed-metal connections require specific approved methods and are not beginner territory. If you see aluminum conductors, that is your cue to bring in a licensed electrician rather than your confidence and a pair of pliers.
Fixed wiring vs. cords
Permanent building wiring and flexible cords are not the same thing. Damaged extension cords, lamp cords, and appliance cords are often safer to replace than to “fix.” A casual splice wrapped in tape is not a proper long-term remedy. If the cord supplies household power, replacement is usually the smarter move.
How to strip wire without wrecking it
Stripping wire is the part people rush, which is funny because it decides whether the splice starts strong or starts doomed. Your goal is to remove insulation cleanly while leaving the conductor itself undamaged.
Use the right stripper for the gauge
Good wire strippers are marked by gauge, and that matters. When the notch matches the conductor size, the insulation comes off neatly. When it doesn’t, you either fight the tool or carve up the wire like it owes you money. Neither outcome is ideal.
Cut insulation, not copper
If you nick the conductor, you weaken it. On solid wire, a nick becomes a stress point that can snap later. On stranded wire, damaged strands reduce the conductor’s effective cross-section and can create heat at the connection. That is why professionals inspect stripped ends instead of assuming success because insulation came off.
Strip only what the connector requires
Too little exposed conductor and the connector won’t grip properly. Too much and you leave bare metal exposed where it doesn’t belong. The cleanest habit is to follow the strip gauge or manufacturer guidance for the specific connector you’re using rather than relying on folklore, muscle memory, or your cousin’s “I’ve always done it this way.”
Make fresh ends when needed
Old wire that is bent, oxidized, nicked, or previously twisted into a tired bird’s nest often benefits from a fresh cut before stripping. Starting from clean conductor ends improves both the mechanical connection and the final look of the splice. And yes, appearance matters. Neat splices are easier to inspect and usually reflect better habits.
3 common wire splicing methods
There is no universal “best” splice. There is only the right splice for the wire type, application, and environment.
1) Twist-on or lever connectors for residential-style conductors
This category includes twist-on wire connectors and modern lever-style connectors. These are common in dry, accessible electrical boxes for copper conductors when the connector is listed for the wire combination being used. They’re popular because they create a secure mechanical connection without requiring solder or specialized crimp barrels.
Best for: solid copper conductors and certain listed solid/stranded combinations in enclosed, code-compliant electrical boxes.
Why people like them: fast installation, easy inspection, and no open flame or heat source.
Watch-outs: wrong connector size, mixed conductor types the connector doesn’t support, poor strip length, overstuffed boxes, and using them outside an approved enclosure.
In plain English, this is the “house-wiring” family of splices. If you are extending or joining fixed building conductors, this is generally the style people think of first. But even here, you do not freestyle. The connector has to match the conductor count, gauge, and type, and the splice belongs in an appropriate box that remains accessible.
2) Crimp butt connectors for low-voltage, automotive, and vibration-prone use
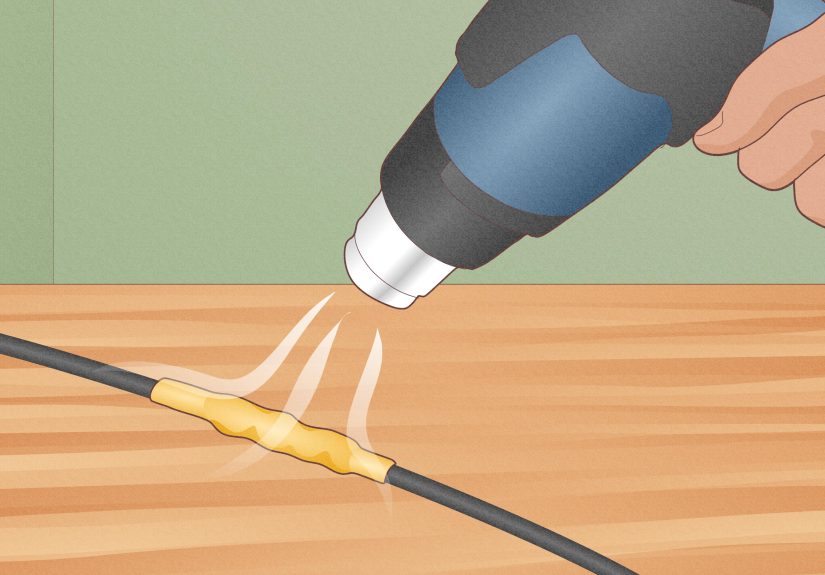
Crimp splices use a metal barrel connector that is compressed with a crimping tool. When properly matched and properly crimped, they provide a strong mechanical bond and reliable electrical continuity. Heat-shrink versions add environmental sealing and strain relief, which is why they are popular for automotive, marine, trailer, and outdoor low-voltage projects.
Best for: stranded wire in low-voltage systems, automotive repairs, equipment leads, and settings where vibration is a real issue.
Why people like them: durable, fast, tidy, and especially good when solder would create an overly rigid spot in a moving wire harness.
Watch-outs: cheap connectors, the wrong crimp tool, poor compression, and using non-sealed connectors where moisture is likely.
If your project lives in a garage, vehicle, boat, or equipment bay, crimp connectors often make more sense than residential-style wire nuts. They are built for motion, flex, and abuse. The catch is that a bad crimp can look finished while still being mechanically weak. That’s why tool quality and connector quality matter so much here.
3) Solder with heat-shrink for electronics and delicate signal work
Soldered splices have a devoted fan club, especially among hobbyists, electronics builders, and people who enjoy saying phrases like “flux residue” at dinner. A properly soldered joint can be compact, conductive, and clean. Paired with heat-shrink tubing, it also gains insulation and some strain protection.
Best for: electronics, signal wire, bench projects, small-gauge conductors, and controlled indoor environments.
Why people like them: compact joints, excellent conductivity, and a polished finish when done well.
Watch-outs: overheating insulation, cold solder joints, poor strain relief, and using solder in applications where wire movement can fatigue the joint over time.
Solder is not a universal upgrade. In some moving or vibrating applications, a rigid soldered section can become a future failure point. That’s why many automotive technicians prefer quality crimps for harness repairs, while electronics work still leans heavily toward solder and heat-shrink. Context is king.
Which splice should you choose?
Here’s the fast decision tree. If you are working with fixed household copper conductors in a proper electrical box, use listed connector methods appropriate for building wire. If you are repairing or extending stranded low-voltage wire in a vehicle or equipment harness, crimp is often the practical favorite. If you are dealing with small-gauge signal wire, electronics, or bench work, solder and heat-shrink may be the cleanest choice.
And if the wire is part of a damaged extension cord, appliance cord, or anything carrying household mains power where the safe repair is uncertain, replacement is usually the better answer. Sometimes the smartest splice is no splice at all.
Common wire-splicing mistakes that cause trouble
Using electrical tape as the whole plan
Electrical tape is useful for insulating, bundling, and finishing certain approved assemblies. It is not a substitute for a real connector. Tape-only “splices” belong in the museum of terrible shortcuts.
Ignoring connector ratings
Connectors are rated for wire range, conductor type, and sometimes environment. If the package says solid only, believe it. If it requires copper conductors, do not improvise with mixed metals and optimism.
Leaving the splice unsupported or exposed
A good electrical connection also needs protection from pull, abrasion, moisture, and accidental contact. That might mean a junction box, a sealed butt connector, heat-shrink tubing, or strain relief, depending on the project.
Nicknamed tools, anonymous connectors, and mystery parts bins
When the tool came from a dollar bin and the connector came from a coffee can labeled “wire stuff,” accuracy suffers. Precision tools reduce nicked wire. Quality connectors grip more consistently. The boring products win this argument every time.
Doing permanent wiring without code awareness
House wiring is not just about making the light turn on. It is about approved methods, accessible boxes, box fill, grounding, conductor compatibility, and local code. If that sentence made your eyelid twitch, it may be time to involve someone licensed and insured.
Practical examples
Example 1: Extending a short copper conductor in a junction box
This is classic residential work. The safe concept is to use a listed connector method matched to the conductor type and gauge, inside an approved box with the circuit fully de-energized and verified. The box remains accessible, the conductors are protected, and the splice is inspectable.
Example 2: Repairing a trailer-light lead
This is where heat-shrink butt connectors shine. The wire is usually stranded, exposed to vibration and weather, and needs a splice that can handle motion better than a stiff bench-style repair. Sealed connectors and proper strain management make a big difference.
Example 3: Joining small speaker or hobby wires on a bench
For low-voltage signal work, solder and heat-shrink can create a compact, tidy result. The key is to avoid turning the wire into a brittle wand by overheating it or skipping strain protection.
When to stop and call a licensed electrician
- Any branch-circuit wiring repair you are not fully qualified to evaluate
- Aluminum conductors or mixed-metal connections
- Burned insulation, melted connectors, or signs of arcing
- Underground cable repairs or wet-location wiring issues
- Repeated breaker trips, flickering, buzzing, or heat at outlets and switches
- Any job that requires opening walls, replacing boxes, or interpreting local code
There is no shame in tapping out. Electricity rewards humility and punishes swagger. Let swagger build a playlist, not a splice.
Final thoughts
Learning how to splice wire starts with one simple realization: the splice is only as good as the preparation. Cleanly stripped conductors, the right connector, and a use-appropriate method matter far more than speed. Twist-on or lever connectors make sense for many building-wire situations. Crimp connectors are often the workhorse for automotive and low-voltage repairs. Solder and heat-shrink are excellent for electronics and delicate signal wiring when flexibility and strain are handled correctly.
If you remember nothing else, remember these three things: never work live, never use the wrong connector just because it is nearby, and never let electrical tape audition as a complete repair strategy. That last one may be the most important public service announcement in this article.
Experience and lessons from real-world wire-splicing situations
People usually do not start learning about splices because they woke up craving a thrilling evening with wire strippers. It usually begins with something annoying: a dead landscape light, a trailer signal that blinks only when it feels emotionally supported, a speaker wire that got yanked behind furniture, or a junction box that reveals somebody’s “creative” repair from years ago.
One of the most common lessons people learn the hard way is that a connection can look finished and still be lousy. A splice may power a circuit today and fail next month because the conductor was nicked during stripping, the wrong connector was used, or the joint had no strain relief. That is why experienced electricians and technicians tend to tug-test, inspect, and think about environment. They know the enemy is not always instant failure. Often it is delayed failure with excellent timing.
Another recurring lesson is that moisture changes everything. A connection that seems perfectly fine indoors can corrode outdoors, under a vehicle, or near a damp crawl space. People who work on trailers, marine wiring, and yard lighting learn quickly that sealed connectors and weather-aware materials are not “extra.” They are the difference between a repair and a comeback.
Then there is the famous overconfidence phase. Almost everyone who has worked with wire has, at some point, assumed the connector they had on hand was “probably close enough.” This is usually followed by either a loose joint, a connector that refuses to seat properly, or a splice that becomes suspiciously warm. That experience tends to convert people into label readers. Nothing matures a DIY mindset faster than discovering that wire gauge, conductor type, and connector listings are not bureaucratic decorations.
Many hobbyists also learn that solder is wonderful right up until it is misused. On a bench, solder can make a beautiful, compact connection. In a wire that gets flexed, slammed, or vibrated, it can create a rigid section that fails later if strain relief was ignored. That is why experienced builders talk less about “which splice is strongest” and more about “which splice fits the job.” The right answer depends on whether the wire lives in a wall, a dashboard, a workbench project, or a wet outdoor run.
Probably the most valuable experience of all is learning when not to repair. Burned wire, brittle insulation, aluminum conductors, damaged cords, overheated outlets, and mystery splices hidden behind drywall are all warning signs. Skilled people know that competence includes restraint. Sometimes the smartest move is replacing the cord, redoing the run, or calling a licensed electrician before a small problem graduates into a smoky one.
In other words, wire splicing is not really about twisting metal together. It is about judgment. The best splices come from patience, correct materials, and respect for the system they belong to. That may not sound glamorous, but it does keep the lights on, the trailer signals blinking, and the house from trying to communicate through the smell of hot plastic. And honestly, that is a pretty solid win.