Table of Contents >> Show >> Hide
- Before You Start: Do These 5 Things First
- Way 1: Wash Out Fresh Water-Based Paint with Soap and Warm Water
- Way 2: Loosen Sticky Paint with Oil, Then Wash It Out
- Way 3: Let Dried or Oil-Based Paint Harden, Then Trim the Fur
- What Not to Do
- When to Call a Vet Right Away
- How to Prevent This Mess from Happening Again
- Experiences Cat Owners Commonly Have with Paint-in-Fur Emergencies
- Final Thoughts
- SEO Tags
If you have ever turned around for three seconds and discovered your cat looking like a tiny abstract painting, welcome to the club nobody wanted to join. Cats are world-class explorers, part-time acrobats, and full-time believers that every fresh paint tray is obviously a luxury spa treatment. The good news is that paint on a cat’s fur is not always a panic-level emergency. The bad news is that the wrong cleanup method can make the situation much worse.
When you need to remove paint from a cat’s fur, the goal is not to “win” against the paint in one dramatic moment. The goal is to keep your cat safe, reduce licking, avoid harsh chemicals, and use the gentlest method that matches the kind of paint involved. In many cases, soap and warm water will do the job. In other cases, a little oil helps loosen sticky residue. And sometimes the safest move is to let the paint dry and trim the fur instead of scrubbing your cat into a furry emotional crisis.
This guide breaks down three safe ways to remove paint from a cat’s coat, plus what not to do, when to call the vet, and how to keep your future home project from becoming your cat’s surprise art debut.
Before You Start: Do These 5 Things First
Before you reach for anything, take a breath. Your cat is probably already offended enough for both of you. A calm approach makes cleanup faster and much safer.
- Move your cat away from the paint area. Put them in a bathroom, laundry room, or carrier so they cannot track paint all over the house or keep grooming it.
- Figure out what kind of paint it is. Water-based latex or acrylic paint is generally easier to remove than oil-based paint, varnish, stain, or anything involving solvents.
- Check where the paint is. Fur on the back or tail is one thing. Paint near the eyes, nose, mouth, paw pads, or genitals is a much bigger deal.
- Prevent licking. If your cat keeps trying to groom the area, wrap them gently in a towel or use an e-collar if you have one.
- Save the paint can or take a photo of the label. If you need to call a vet or poison hotline, that label is pure gold.
If your cat is open-mouth breathing, drooling heavily, vomiting, acting weak, stumbling, or having tremors, skip the DIY plan and call a veterinarian right away. The same goes for paint in the eyes or any suspicion that your cat licked oil-based paint, varnish, or old lead paint.
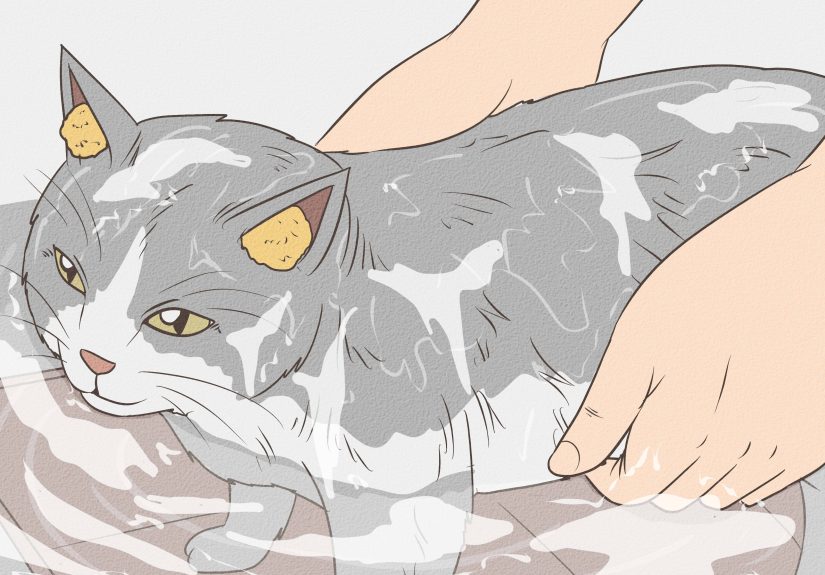
Way 1: Wash Out Fresh Water-Based Paint with Soap and Warm Water
Best for: Wet latex paint, wet acrylic paint, and small fresh splatters
This is the easiest and most successful method when the paint is still wet and labeled water-based. Fresh water-based paint usually has not bonded fully to the fur yet, so you have a solid chance of getting most or all of it out without turning your bathroom into a wrestling arena.
How to do it
- Blot first, do not smear. Use a paper towel or soft cloth to lift away as much wet paint as possible. Dab gently. Rubbing hard just spreads the mess and pushes paint deeper into the coat.
- Use lukewarm water. Wet the painted fur with lukewarm, not hot, water. Hot water can irritate the skin and make the whole experience more stressful.
- Add a small amount of mild liquid dish soap. Work it into the painted fur with your fingers. Use just enough soap to break up the paint. More soap does not equal more genius.
- Massage gently. Separate the fur with your fingers and massage the soap through the paint until it loosens.
- Rinse thoroughly. Rinse until the water runs clear and the fur no longer feels slick or soapy.
- Repeat if needed. A second short wash is better than one aggressive scrub session that leaves your cat furious and your forearms looking like you fought a cactus.
- Dry with a towel. Pat dry. Skip strong fragrances, leave-in products, and random human hair products because your cat does not need a “salon finish” today.
Why this works
Water-based paint is designed to thin and rinse more easily than solvent-based products. When it is still fresh, mild soap and warm water can usually loosen the paint before it hardens around the hair shaft. This approach is also much safer than trying household removers or chemical shortcuts.
What to watch for
If the paint is on a large part of the coat, stuck to the skin, or has already dried into a crunchy patch, stop pushing your luck. The longer you scrub, the more likely your cat becomes stressed, chilled, irritated, or ready to submit your name to a cat-owner complaint board.
Way 2: Loosen Sticky Paint with Oil, Then Wash It Out
Best for: Tacky residue, sticky patches, greasy paint smears, or mixed paint-and-grime messes
Sometimes paint is not fully wet, but not fully dry either. It is just sitting there in the world’s most annoying stage: sticky. In that case, a small amount of edible oil or mineral oil can help loosen the bond between the paint and the fur so you can remove more of it without yanking the coat.
How to do it
- Apply a small amount of oil to the painted fur. Vegetable oil or mineral oil works best. Use only enough to coat the affected area lightly.
- Let it sit for 5 to 10 minutes. This gives the oil time to soften the sticky residue.
- Work the paint loose gently. Use your fingers or a soft cloth. For longer fur, you can carefully tease apart the strands rather than combing aggressively.
- Wash the area with mild dish soap. Oil helps loosen the paint, but you still need soap and warm water to remove the oily film afterward.
- Rinse very well. Leftover oil can attract dirt and encourage licking, which defeats the whole mission.
When this method shines
This approach is useful for sticky spots on the tail, hindquarters, or legs, especially when the fur is long enough to trap paint but the skin underneath is not badly irritated. It is also a good middle-ground method when plain soap and water barely made a dent.
When not to use it
Do not pour oil all over a large area of fur and hope for the best. That creates a whole new greasy cat problem. Also avoid this method if the paint is near the eyes, inside the ears, or directly around the mouth. Those situations belong in “call the vet” territory, not “let’s improvise next to the sink” territory.
Way 3: Let Dried or Oil-Based Paint Harden, Then Trim the Fur
Best for: Dried paint, oil-based paint, varnish, stain, or paint that will not wash out safely
This is the method many cat owners resist at first because it feels less dramatic. People want the paint gone now. But with oil-based paint or dried clumps, trimming the affected fur is often the safest option. Scrubbing harder does not magically become veterinary science. It usually just makes the cat miserable.
How to do it
- Keep your cat from licking the area. Use an e-collar, a recovery collar, or supervision while the paint dries.
- Wait until the paint is dry. Wet oil-based paint tends to smear. Once it dries, it is easier to remove with the fur.
- Use pet clippers if you have them. Clippers are safer than scissors because they reduce the risk of nicking the skin.
- Clip only the affected fur. Go slowly and work in good light. If the paint is stuck close to the skin, do not force it.
- Call a groomer or veterinarian if needed. Professional help is the right move for short-haired cats, wiggly cats, senior cats, or paint stuck very close to the skin.
Why trimming is sometimes better than “removing”
Paint solvents and removers can irritate the skin, damage mucus membranes, and become dangerous if your cat grooms them off the coat. That is why trimming a small patch of fur can be far safer than trying to dissolve the paint. In some cases, leaving a tiny amount on the hair temporarily is better than causing a chemical burn or cutting the skin.
A note about scissors
Scissors and cat skin are a terrible romantic comedy: everybody sees the disaster coming. Cat skin is thin, stretchy, and easy to cut by mistake. If you do not have clippers or the paint is stuck close to the skin, book the groomer or call your vet instead of playing barber with panic hands.
What Not to Do
- Do not use paint thinner, mineral spirits, turpentine, gasoline, or harsh paint removers.
- Do not induce vomiting unless a veterinarian or poison expert specifically tells you to.
- Do not scrub aggressively. You can irritate the skin and create mats.
- Do not use scissors near tight paint clumps.
- Do not ignore possible lead paint. If the paint came from an older home or renovation dust, treat that as urgent.
- Do not assume “non-toxic” means “lickable.” Even less-toxic paint can still upset the stomach or cause trouble if enough is ingested.
When to Call a Vet Right Away
Here is the simple rule: if the problem is just on the fur, you may be able to manage it at home. If the problem might also be in your cat, that is veterinary territory.
- Paint is in the eyes, nose, mouth, or on the paw pads
- Your cat licked or swallowed paint, varnish, stain, or solvent
- The paint may be lead-based, especially in an older home
- Your cat is vomiting, drooling, panting, coughing, trembling, weak, or acting strangely
- The skin looks red, burned, painful, or raw
- A large part of the coat is covered
- Your cat is too stressed, aggressive, or frightened for safe home cleanup
When you call, have the paint label, your cat’s weight, and a rough idea of how much exposure happened. That information helps the veterinary team tell you whether you are dealing with a cleanup problem, a poisoning concern, or both.
How to Prevent This Mess from Happening Again
Once you have lived through paint-cat chaos one time, your safety standards improve fast. Suddenly you are the CEO of shutting doors and checking lids.
- Keep cats completely out of painting and renovation areas
- Clean spills immediately
- Store paint, brushes, trays, and rags in closed containers
- Do not leave drying projects at cat height
- Check for chips, flakes, or dust after home repairs
- Give your cat a safe, quiet room during projects
Your cat does not need to supervise your painting project. They will disagree, but they are not on the insurance policy.
Experiences Cat Owners Commonly Have with Paint-in-Fur Emergencies
One reason this problem feels so overwhelming is that it usually happens fast, and it rarely happens in a convenient way. Most owners do not calmly notice “a light coating of paint on the left flank.” They notice paw prints on the hallway floor, a guilty-looking cat under the dining table, and a tail that suddenly looks like it lost a fight with a paint roller. The emotional part of the experience matters because panic is often what leads people to grab the wrong product.
A very common experience is the “I only looked away for a minute” scenario. Someone is touching up baseboards, repainting a door, or working on a craft project. The paint tray is on the floor for a short time. The cat, who has ignored everything else in the house for six months, becomes deeply interested in this one item. Owners often say the same thing afterward: they were shocked by how quickly the mess spread from one paw to furniture, bedding, or several rooms. That experience teaches an important lesson. With cats, prevention is not about long projects only. It is about the tiny unsupervised moments.
Another common experience is realizing that the fur cleanup is only half the problem. Many owners start by staring at the painted coat, but the bigger question is whether the cat has licked any of it. That is why experienced pet owners often focus on restraint and observation first, not instant scrubbing. They wrap the cat in a towel, move them to a sink or bathroom, and stop the grooming before they even begin removing paint. It feels slower in the moment, but it is actually smarter and safer.
Long-haired cat owners often describe a second challenge: mats. Paint tangles the coat, especially around the legs, tail, belly, and feathering. Even when the paint itself is not severe, the cleanup can leave sticky knots that are miserable to comb. People who have been through this once usually say they learned not to keep brushing and pulling when the coat resists. They either soften the mess first with a safe method or switch to clipping and professional grooming. In other words, they stop trying to win an argument with fur.
Owners of nervous or spicy cats also tend to remember the stress more than the paint. Some cats freeze, but others twist, yowl, claw, or try Olympic-level escapes from the sink. That experience often teaches people to keep sessions short. A five-minute safe cleanup, followed by a reset and a second attempt, is often more effective than one long, chaotic struggle. Plenty of cat owners come away saying the real breakthrough was not a miracle product. It was towels, patience, good lighting, and accepting that the cat was not going to become emotionally cooperative.
There is also the renovation version of this experience, which is the most serious one. During sanding, scraping, or repainting in older homes, owners sometimes discover paint dust or chips rather than fresh wet paint. That situation feels different because it raises questions about lead and broader toxin exposure. People who have dealt with it often say they wish they had blocked off the area sooner and cleaned more aggressively during the project itself. Their takeaway is simple: if your cat can reach the work zone, your cat will eventually inspect the work zone.
The silver lining is that most owners who handle the situation calmly do fine, and so do their cats. The experience usually turns them into much more careful project managers. Lids stay closed. Doors stay shut. Paint trays get moved higher. And the cat, somehow, remains convinced they were the victim in all of this.
Final Thoughts
If you need to remove paint from a cat’s fur, match the cleanup method to the kind of paint and the stage it is in. Fresh water-based paint usually responds to mild dish soap and warm water. Sticky residue may loosen with a small amount of oil followed by a good wash. Dried or oil-based paint is often safest to clip off rather than dissolve. Through it all, the biggest rule is simple: protect the cat first, clean second, and never use harsh solvents on the coat. Your cat may not thank you, but they can continue their important work of judging your home improvement skills from a sunny windowsill.