Table of Contents >> Show >> Hide
- What Is an Automatic Print Ejector?
- Why Automatic Print Ejection Matters
- How Automatic Print Ejectors Work
- The Famous “Punching Machine” Idea
- Can One Automatic Print Ejector Fit All 3D Printers?
- Key Components of a Reliable Auto-Ejection Setup
- Best Print Types for Automatic Ejection
- Safety Considerations Before You Automate
- How to Plan an Automatic Print Ejector Setup
- Common Problems and Practical Fixes
- Automatic Print Ejector vs. Manual Removal
- Experience Notes: What It Feels Like to Use an Automatic Print Ejector
- Conclusion: The Future Is Not Fully Hands-Free, But It Is Getting Closer
There is a special kind of suspense that happens at the end of a 3D print. The nozzle parks, the fans slow down, the bed cools, and the finished part sits there like a tiny plastic trophy waiting for human applause. Then reality arrives: someone has to remove it. For hobbyists, that may mean a quick flex of a build plate. For a print farm, school lab, Etsy shop, or prototyping studio, it can mean dozens of tiny interruptions every day. That is where the idea of an automatic print ejector for all 3D printers becomes wonderfully tempting.
An automatic print ejector is any system that removes a finished 3D print from the build surface without a person standing there with a scraper, spatula, or “please come off nicely” facial expression. Some ejectors use the printer’s own toolhead to push the part away. Some rely on cooling, flexible beds, tilted frames, conveyor belts, magnetic plates, G-code scripts, or dedicated hardware. One famous early project even used a tiny boxing glove, because apparently 3D printing needed more slapstick comedy.
But here is the honest answer: no single ejector works perfectly for every 3D printer, every material, and every model shape. The “for all 3D printers” part is best understood as a design goal, not a magic wand. The good news is that most FDM printers can be adapted for automatic print removal if you understand bed adhesion, cooling behavior, motion clearance, firmware commands, and safety limits.
What Is an Automatic Print Ejector?
An automatic print ejector is a mechanical or software-assisted setup that clears a finished print from the build plate so the printer can move on to the next job. In simple setups, the print head or gantry gently pushes the finished object off the bed after the bed cools. In more advanced systems, the printer may use a special build surface that releases parts when cold, a sliding collection bin, a tilted frame, or print farm software that queues the next job automatically.
The concept is closely tied to continuous 3D printing. Instead of printing one object, waiting for a person to remove it, and then starting another file, the printer can complete a job, eject the part, and begin the next print. For makers producing brackets, cosplay parts, replacement components, educational models, or small product batches, this can turn a single desktop printer into something closer to a tiny factory. A very slow factory, yes, but still a factoryand one that smells faintly like PLA.
Why Automatic Print Ejection Matters
It Reduces Downtime
The biggest advantage is simple: less idle time. A printer that finishes at 2:00 a.m. usually waits until morning before the next job begins. With reliable auto-ejection and a print queue, that same machine can keep producing parts while the user sleeps, studies, designs, packs orders, or pretends not to check the print camera every seven minutes.
It Helps Print Farms Scale
In a print farm, the problem is not always print speed. It is human attention. Clearing ten, twenty, or fifty beds manually can become repetitive and expensive. Automatic bed clearing lets operators spend more time on quality control, packaging, maintenance, and customer work instead of running from printer to printer like a caffeinated squirrel.
It Protects Parts and Build Surfaces
Manual removal can damage delicate prints, gouge build plates, or bend thin features. A well-tuned ejector uses predictable motion and proper cooling to release the object with less force. That said, a poorly tuned ejector can do the opposite. If the system pushes too early or too hard, it may drag the print, damage the nozzle, knock the bed out of alignment, or launch a small Benchy into the unknown.
How Automatic Print Ejectors Work
1. Cool-Down Release
Many materials grip the bed strongly while warm and release more easily as the bed cools. PLA on glass is the classic example: once the glass cools, the print may loosen with a gentle tap. Auto-ejection systems often take advantage of this by adding a waiting period after printing. The bed temperature drops, adhesion weakens, and the printer can safely push the part off the surface.
2. Toolhead Pushing
One of the simplest methods uses the print head, X-axis gantry, or another moving part to push the finished print. This requires custom end G-code or a print queue plugin. The printer may move to a safe height, wait for cooling, then sweep forward or sideways to clear the model. This method is popular because it does not require a robot arm, conveyor belt, or expensive add-on.
3. Flexible Build Plates
Flexible magnetic plates make manual removal much easier, but they can also support semi-automated workflows. In some systems, the plate is swapped by a human or robot. In others, a specialty surface releases parts after cooling, allowing the printer’s motion system to push prints away with minimal force.
4. Tilted Beds and Gravity
Gravity is the oldest automation tool in the universe, and it still works for 3D printing. Some systems tilt the printer or build surface so that once a part is pushed loose, it slides into a collection bin. This is common in auto-ejection kits for bedslinger-style printers. The printer does the push; gravity handles the dramatic exit.
5. Conveyor Belt Printers
Conveyor belt 3D printers solve the ejection problem in a different way. Instead of a stationary bed, the belt moves forward after printing, carrying the completed part off the build area. These printers are useful for long parts and continuous production, although they are not a drop-in upgrade for every desktop machine.
The Famous “Punching Machine” Idea
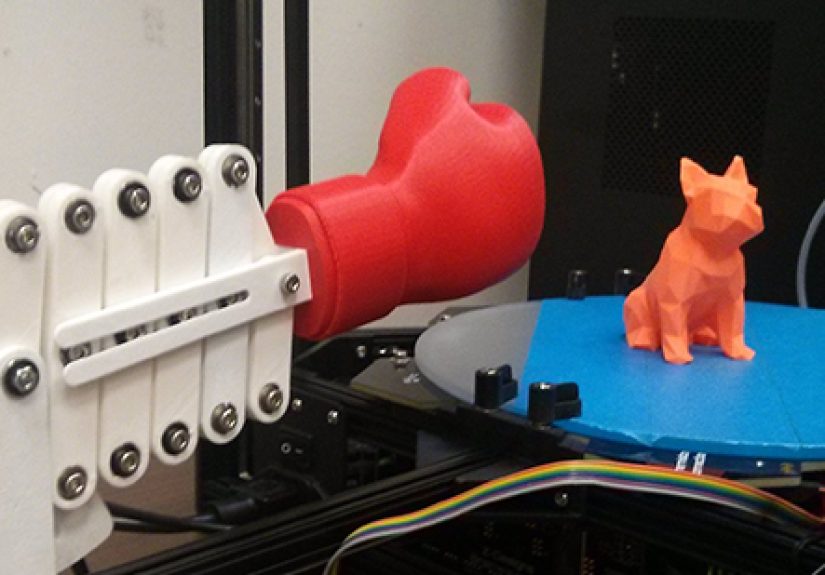
One of the most memorable automatic print ejector concepts came from MatterHackers: a 3D printed mechanism that used a little boxing glove to knock completed prints from the bed. Technically, it was a print ejector. Emotionally, it was a tiny plastic bouncer saying, “Your reservation has ended.”
The project became popular because it made an important engineering idea easy to understand. Finished print? Apply controlled force. Clear bed? Start next job. It also showed the maker community’s personality: practical, experimental, slightly ridiculous, and absolutely willing to solve a manufacturing problem with a miniature boxing glove.
Modern ejector systems are usually more refined, but the core principle remains the same. A printer needs three things to eject parts reliably: predictable release, safe movement, and a repeatable workflow.
Can One Automatic Print Ejector Fit All 3D Printers?
Not literally. A universal automatic print ejector faces several challenges. Printers vary in bed size, frame style, firmware, nozzle clearance, build surface, enclosure design, homing behavior, and motion limits. A G-code sweep that works beautifully on an Ender-style bedslinger may be completely wrong for a CoreXY printer. A tilted bed may help with PLA but cause problems with tall, fragile PETG parts. An enclosed printer may need an automatic door opener before any part can be pushed out.
The closest practical approach is a universal strategy, not a universal object. That strategy includes: choose a release-friendly surface, tune first-layer adhesion, add cooling time, create safe ejection G-code, test with simple shapes, add a collection area, and use queue software only after the physical process is dependable.
Key Components of a Reliable Auto-Ejection Setup
A Release-Friendly Build Surface
The bed surface is the heart of the system. If the part sticks too hard, the ejector must use too much force. If it sticks too weakly, the print may fail before it finishes. Smooth PEI, textured PEI, glass, Garolite, coated spring steel, and specialty surfaces all behave differently. PLA, PETG, ABS, ASA, TPU, and nylon also have different adhesion personalities. PETG, for example, can cling with the emotional intensity of a toddler holding a cookie.
Cooling Time
Cooling is not wasted time. It is part of the release process. Many successful auto-ejection workflows wait until the bed reaches a lower temperature before pushing the part. Firmware commands such as bed-temperature waiting commands can help coordinate this step, but the right temperature depends on the surface, filament, object footprint, and room conditions.
Safe Ejection G-Code
G-code is the script that tells the printer what to do. For auto-ejection, it may include commands to lift the nozzle, turn off heaters, wait for cooling, move to a safe location, push the object, and return to a ready position. The important word is “safe.” A bed-clearing script should avoid binder clips, purge lines, tall prints, bed probes, camera mounts, and anything else that could become an expensive crunching sound.
Print Queue Software
Software such as OctoPrint plugins, Klipper-based macros, cloud print farm managers, and printer-specific automation tools can queue jobs and run bed-clearing scripts between prints. These systems are powerful because they connect ejection with production planning. The printer does not just remove a part; it knows what to print next.
A Collection Bin
Once the print leaves the bed, it needs somewhere to go. A simple padded bin, ramp, tray, or chute can prevent parts from bouncing onto the floor. For small parts, a box works well. For delicate parts, add foam, cloth, or a shallow drop. For tall parts, test carefully so they do not tip, crack, or snag.
Best Print Types for Automatic Ejection
Auto-ejection works best with models that have a moderate footprint, low-to-medium height, strong geometry, and no delicate features near the base. Examples include small brackets, spacers, knobs, calibration objects, simple housings, organizer bins, keychains, clips, and repeated production parts.
It is less ideal for extremely tall prints, thin figurines, flexible TPU parts, objects with wide brims, models with fragile surface details, or prints that require supports stuck firmly to the plate. A dragon miniature with wings, horns, and a heroic attitude may not enjoy being shoved across a build plate.
Safety Considerations Before You Automate
Automatic printing sounds convenient, but it should not be treated as permission to ignore safety. 3D printers include heated beds, hotends, moving axes, electrical components, and sometimes enclosures. Any automation workflow should include thermal runaway protection, firmware limits, proper wiring, smoke awareness, ventilation, and a clean area around the printer. Avoid placing flammable materials near the machine.
Remote monitoring is also wise. A camera, smart plug, printer status dashboard, or local supervision routine can help catch failures early. Auto-ejection should be tested in short, controlled sessions before being trusted for long queues. Automation is excellent when it removes boring labor. It is not excellent when it creates a tiny unsupervised chaos machine.
How to Plan an Automatic Print Ejector Setup
Step 1: Start With One Printer
Do not automate the entire farm on day one. Choose one reliable printer with consistent first layers, clean motion, and a known build surface. If the printer already fails randomly, auto-ejection will not fix it. It will simply fail with more confidence.
Step 2: Test Bed Release
Print a simple cube or bracket. Let the bed cool fully. Try pushing the part gently by hand. If it pops free easily, the printer is a good candidate. If you need a metal scraper, prayer, and upper-body strength, adjust adhesion before adding automation.
Step 3: Create a Gentle Motion Path
The ejector motion should be slow, deliberate, and clear of obstacles. Raise the nozzle enough to avoid the part, then use a gantry or toolhead movement that contacts the object at a sturdy point. The goal is not to punch the print into another zip code. The goal is to nudge it off the bed consistently.
Step 4: Add Cooling and Confirmation
Wait until the bed reaches a release-friendly temperature. Some users add pauses, cooling fans, or temperature checks. More advanced setups may include sensors or camera-based verification, but many simple systems begin with a conservative cooling delay.
Step 5: Queue the Next Print Carefully
Only after ejection is reliable should you add continuous printing. Start with two or three small jobs. Watch the full sequence: print, cool, eject, reset, restart. If anything looks sketchy, stop and adjust. The printer should behave like a disciplined assistant, not a shopping cart with stepper motors.
Common Problems and Practical Fixes
The Print Sticks Too Strongly
Reduce bed temperature after printing, clean the surface, check first-layer squish, avoid excessive glue, and test a different build plate. Over-adhesion is the number one enemy of automatic ejection.
The Print Releases During Printing
Increase first-layer reliability. Clean the bed, adjust Z offset, slow the first layer, raise first-layer temperature slightly, or use a brim when automation is not required. For automated jobs, avoid brims unless the ejection motion can handle them.
The Toolhead Hits the Model
Raise Z before any sweep. Make sure the ejection path contacts the print intentionally and does not crash into taller geometry. Use test shapes before production parts.
Parts Fall Out of the Bin
Add walls, padding, a ramp, or a deeper tray. Small parts can bounce surprisingly far. The laws of physics become very enthusiastic when plastic meets tile floor.
The Next Print Starts on a Dirty Bed
Automation depends on consistency. Stringing, blobs, leftover brim material, or dust can ruin the next first layer. Design parts to eject cleanly and schedule regular bed maintenance.
Automatic Print Ejector vs. Manual Removal
Manual removal is still better for one-off art pieces, complex prototypes, resin prints, delicate models, and materials that need special handling. Automatic ejection shines when the job is repetitive, the geometry is durable, and the printer is already dialed in.
Think of it this way: if you print one beautiful vase, remove it by hand. If you print 200 cable clips, let automation do the boring part. Your wrists will send a thank-you card.
Experience Notes: What It Feels Like to Use an Automatic Print Ejector
The first time you watch a printer eject its own part, it feels a little magical. The machine finishes, pauses, cools, moves with suspicious confidence, and then the print slides into a bin. It is like watching a toaster invent ambition. After years of babysitting prints, that small moment can feel like a huge upgrade.
In real use, the best experience comes from patience. The temptation is to automate everything immediately, but the reliable path is slower. Start with easy parts. A flat cable clip, a washer, a small bracket, or a square test block teaches you more than a complicated model. You learn how much cooling time the bed needs, where the toolhead should push, how fast the sweep should move, and whether the part lands safely.
The most surprising lesson is that ejection is not only about force. In fact, force is usually the thing you want less of. The secret is release. When the bed surface, filament, temperature, and first layer are balanced, the finished object almost wants to leave. The ejector simply gives it a polite invitation. When adhesion is wrong, even the strongest mechanism feels clumsy.
Another experience many users discover quickly: part design matters. A model with a clean, flat side is easier to push than a delicate shape with tiny legs. Rounded bases may roll. Tall parts may tip. Brims may act like little anchors. Supports may catch. Once you begin designing for auto-ejection, you start thinking like a production engineer. You ask: Will this part release cleanly? Where will the ejector contact it? Will it survive the drop? Can I print five in a row without cleaning the bed?
There is also a psychological benefit. Continuous printing changes how you plan work. Instead of thinking, “I need to remember to start the next print,” you think in batches. You prepare a queue, choose parts with similar material and bed requirements, and let the printer handle the rhythm. This is especially useful for small businesses, classroom labs, and makers who sell repeated parts. Even if the printer saves only a few minutes per cycle, the reduced interruption can make the whole workflow feel smoother.
Still, automation teaches humility. A part may eject perfectly ten times and then stick on the eleventh because the room is colder, the bed is dusty, or the filament brand changed. That is why experienced users keep the process boring on purpose. They use consistent materials, conservative speeds, proven bed surfaces, and simple motion paths. Boring is good. Boring means the printer is making parts instead of making drama.
The best automatic print ejector is not necessarily the flashiest. A tiny boxing glove is hilarious, and a robotic arm is impressive, but a simple cooled bed plus a careful G-code sweep may be more dependable. The real goal is not to show off. The goal is to remove a finished part safely, reset the printer, and begin again with minimal fuss.
In daily use, the experience feels like upgrading from “machine operator” to “workflow manager.” You still maintain the printer. You still inspect parts. You still clean the bed and check quality. But you spend less time performing the same tiny chore over and over. That is the quiet power of automatic print ejection: it does not make 3D printing effortless, but it removes one of the most repetitive bottlenecks.
Conclusion: The Future Is Not Fully Hands-Free, But It Is Getting Closer
An automatic print ejector for all 3D printers is less about one universal gadget and more about a practical automation mindset. The best systems combine good bed adhesion, predictable cooling, safe G-code, reliable hardware, and smart print queue management. For hobbyists, it can make overnight batches more productive. For print farms, it can reduce labor and increase machine utilization. For everyone else, it is simply satisfying to watch a printer finish a job and politely kick the part out of the nest.
The future of desktop 3D printing will likely include more built-in automation: smarter surfaces, better sensors, printer-aware queues, automatic door systems, and safer remote monitoring. Until then, makers can build surprisingly effective auto-ejection workflows with careful testing and realistic expectations. The dream is simple: print, cool, eject, repeat. The challenge is making that dream boringly reliablewhich, in manufacturing, is the highest compliment possible.