Table of Contents >> Show >> Hide
- What You’re Actually Hanging (And Why It Matters)
- Tools and Materials Checklist
- Before You Start: Two Non-Negotiables
- Easy Ways to Hang Speakers from the Ceiling: 15 Steps
- Step 1: Decide the “Why” (Surround, Whole-Home, or Just Cleaner Space)
- Step 2: Confirm Your Ceiling Type
- Step 3: Pick the Mounting Method That Matches Your Speaker
- Step 4: Check Weight, Shape, and “Awkwardness”
- Step 5: Plan Speaker Placement Like a Normal Person, Not a Ceiling Gremlin
- Step 6: Locate the Ceiling Joists (Accurately)
- Step 7: Mock It Up on the Floor First
- Step 8: Mark Mounting Holes (Then Re-Check Everything)
- Step 9: Drill the Right Pilot Holes (If Mounting Into Wood)
- Step 10: Install the Ceiling Plate Into the Joist (Not Just the Drywall)
- Step 11: Add a Safety Cable (Your “Gravity Insurance”)
- Step 12: Mount the Speaker to the Bracket (With Help)
- Step 13: Aim the Speaker (Then Test Before You “Finalize”)
- Step 14: Route and Secure the Wire Neatly
- Step 15: Do a Final Safety Check (And a Sound Check)
- Special Situations (Because Houses Love Plot Twists)
- Common Mistakes to Avoid
- FAQ
- Conclusion
- Experience-Based Tips (Real-World Lessons That Don’t Fit on a Bracket Box)
Hanging speakers from the ceiling is one of those upgrades that feels a little “pro” the first time you do itlike you secretly
moonlight as the audio person at a small concert venue (minus the black t-shirt uniform). Done right, ceiling-mounted speakers
can clean up clutter, improve surround sound placement, and keep expensive gear out of reach of pets, toddlers, and that one
friend who thinks “volume knob” means “challenge accepted.”
Done wrong… well, gravity has a flawless attendance record. The goal of this guide is simple: help you mount speakers safely,
neatly, and in a way that sounds great. You’ll get a practical, beginner-friendly method that works for most homesplus options
for different ceiling types (drywall with joists, drop ceilings, exposed beams, and concrete). If you’re under 18, it’s smart to
have an adult help with ladders, drilling, and lifting.
What You’re Actually Hanging (And Why It Matters)
“Speakers” can mean a few different things, and the mounting approach changes a lot depending on what you have:
- Small satellite speakers (home theater rears/heights): usually easiestoften made to work with brackets.
- Bookshelf speakers: heavier, deeper, and more awkwardneeds a strong mount and a safety plan.
- PA speakers: typically too heavy for casual DIY ceiling hanging unless the system is designed for it.
- Pendant speakers (designed to hang): easiest “hang-from-ceiling” style because mounting is the product’s job.
- In-ceiling speakers: not “hung” but installed into drywall or ceiling tilesclean look, different process.
Tools and Materials Checklist
You don’t need a workshop the size of an airport hangar. You just need the right basics:
- Stud finder (or another method to locate joists)
- Painter’s tape, pencil, and a measuring tape
- Drill/driver and drill bits (including a pilot bit for wood)
- Ceiling-rated speaker mounts or brackets (rated above your speaker’s weight)
- Fasteners: typically lag screws/structural screws into joists, or appropriate anchors for concrete
- Washers (helps distribute load on brackets)
- Safety cable/tether (highly recommended for overhead gear)
- Speaker wire (consider CL2/CL3 rated if running inside walls/ceilings)
- Cable management: raceway, clips, Velcro ties
- Step ladder and a helper (strongly recommended)
Before You Start: Two Non-Negotiables
1) Mount to Structure, Not Just Drywall
A drywall ceiling is not a trustworthy “weight-bearing friend.” If you can mount into a ceiling joist or beam, do it.
If you absolutely can’t, use anchors specifically rated for ceiling use and keep loads lightbut the best practice is structural attachment.
2) Use Hardware That’s Rated for the Load
Look for brackets that state a weight rating. Give yourself marginif a speaker weighs 10 pounds, don’t shop like 10 pounds is the goal.
Shop like 10 pounds is the beginning of a safety buffer.
Easy Ways to Hang Speakers from the Ceiling: 15 Steps
-
Step 1: Decide the “Why” (Surround, Whole-Home, or Just Cleaner Space)
If you’re building a home theater, ceiling speakers are often used for height channels or Atmos effects.
If it’s whole-home audio, you may be aiming for wide coverage rather than pinpoint imaging.
Your goal determines placement, angle, and how many speakers you truly need. -
Step 2: Confirm Your Ceiling Type
Identify what you’re working with:
- Drywall ceiling with wood joists (most common)
- Drywall on metal framing (common in some condos/apartments)
- Drop/suspended ceiling (tiles on a grid)
- Concrete ceiling (needs masonry anchors/fasteners)
- Exposed beams/joists (often the easiest structurally)
Each one has different fasteners and safety considerations.
-
Step 3: Pick the Mounting Method That Matches Your Speaker
The easiest “ceiling hang” is to use a mount made for your speaker category:
- Ball-and-socket mounts for small satellites (easy aiming)
- Universal clamp/platform mounts for bookshelf speakers (heavier-duty)
- Pendant suspension kits for pendant speakers
- In-ceiling speaker install if you want a flush look with grilles
If your speaker has threaded inserts or a dedicated bracket system, use itmanufacturers design those points to carry load.
-
Step 4: Check Weight, Shape, and “Awkwardness”
Weight is obvious. The less obvious factor is “awkwardness”: a 12-pound speaker that sticks out far creates more leverage
than a compact 12-pound speaker. That leverage can stress mounts and fasteners over time. -
Step 5: Plan Speaker Placement Like a Normal Person, Not a Ceiling Gremlin
For home theater height channels, you usually want speakers roughly above or slightly in front of the seating area, angled toward listeners.
For general music coverage, spacing and symmetry matter more than “perfect angles.”Quick example: In a living room, two ceiling-mounted speakers placed left/right of the seating area and aimed down toward ear level
often feel clearer than speakers mounted far behind you blasting the back of your head. (Your ears have trust issues.) -
Step 6: Locate the Ceiling Joists (Accurately)
Use a stud finder designed to scan through drywall. Move slowly, mark both edges of the joist, and mark the centerline.
If readings are inconsistent, try scanning from multiple directions and use painter’s tape so you can adjust without turning your ceiling into a doodle.Pro tip: ceilings sometimes hide surpriseswiring, pipes, or old repairsso never drill “just to see what happens.”
-
Step 7: Mock It Up on the Floor First
Assemble the bracket, confirm it fits your speaker, and test the range of motion for aiming.
This is the moment you discover the bracket blocks the speaker terminalsbefore you’re on a ladder wishing you’d discovered it earlier. -
Step 8: Mark Mounting Holes (Then Re-Check Everything)
Hold the ceiling plate in place and mark hole locations. Step back and confirm alignment.
If you’re doing two speakers, measure from reference points (like a wall corner) so they match. -
Step 9: Drill the Right Pilot Holes (If Mounting Into Wood)
For wood joists, pilot holes help prevent splitting and make screws bite correctly.
Match the pilot bit size to your fastener and the wood type (softwood vs hardwood).
If you’re not sure, consult the fastener manufacturer’s guidance or a reliable pilot-hole chart. -
Step 10: Install the Ceiling Plate Into the Joist (Not Just the Drywall)
Use appropriate structural fasteners (often lag screws or structural screws) and washers if needed.
Tighten until secure, but don’t crush the drywall or overtighten to the point of stripping wood.
The plate should feel rock-solidno wiggle, no drama. -
Step 11: Add a Safety Cable (Your “Gravity Insurance”)
A safety tether is smart for anything overhead. Attach one end to a structural point (joist/beam/appropriate anchor),
and the other to the speaker or bracket in a way that would catch the load if the primary mount fails.
Keep it slightly slack so it doesn’t carry the load during normal use, but not so long that the speaker could fall far. -
Step 12: Mount the Speaker to the Bracket (With Help)
This is the part where a second person is worth their weight in snacks.
One person supports the speaker; the other aligns bolts/screws and secures the bracket.
Follow the bracket instructions closelyespecially torque recommendations and locking mechanisms. -
Step 13: Aim the Speaker (Then Test Before You “Finalize”)
Angle speakers toward the listening area. For surround/height speakers, small changes in angle can noticeably improve clarity.
Before tightening everything permanently, play test audio at moderate volume and confirm the sound “lands” where you want it. -
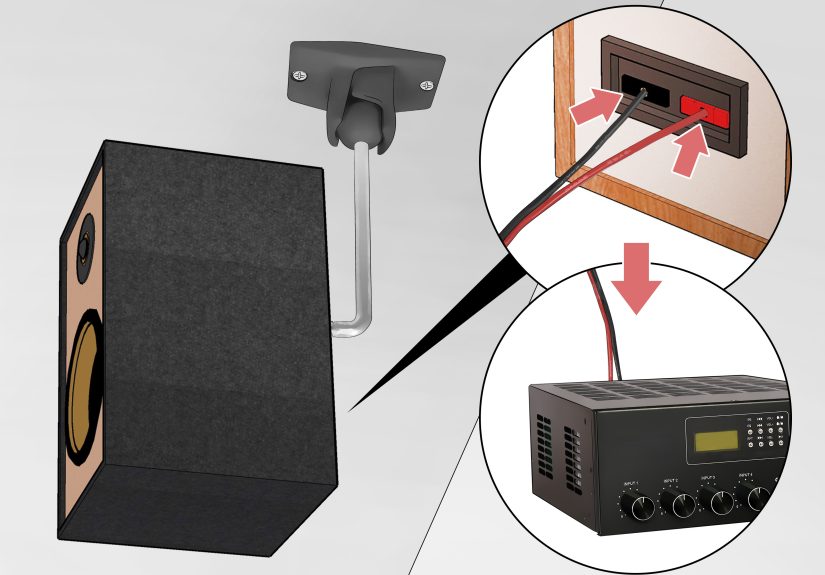
Step 14: Route and Secure the Wire Neatly
If you’re running wire through walls/ceilings, use wire that’s appropriate for in-wall use (commonly CL2/CL3 rated in the U.S.).
If you’re keeping wire external, use paintable raceways or ceiling cable clips to avoid the “dangling spaghetti” look.Leave a small service loop near the speaker so you can reposition or disconnect later without yanking on the terminals.
-
Step 15: Do a Final Safety Check (And a Sound Check)
Confirm:
- All fasteners are tight and seated properly
- Bracket locking knobs are fully secured
- Safety cable is attached to structure and properly clipped/locked
- Wire is strain-relieved (not pulling on the speaker terminals)
- Speakers are aimed consistently and don’t drift when lightly nudged
Then run a sound testmusic, dialogue, and something with bassto make sure nothing rattles.
If you hear buzzing, it’s usually a loose grille, vibrating mount joint, or wire tapping the ceiling.
Special Situations (Because Houses Love Plot Twists)
Drop/Suspended Ceilings
Ceiling tiles aren’t meant to hold heavy loads by themselves. If you’re installing in-ceiling speakers in a drop ceiling,
use proper supports like tile bridges/support brackets that transfer weight to the grid or structure above.
For hanging speakers in a drop ceiling area, you generally need to anchor into the building structure above the grid,
not just the tile.
Concrete Ceilings
Concrete requires masonry-rated fasteners and the correct drill bit (usually a hammer drill). If you’re not confident,
this is a good moment to call a proincorrect anchors in overhead concrete can fail in ways that are impressively un-fun.
Heavy Speakers (Large Bookshelf or PA)
If the speaker is heavy enough that you feel nervous lifting it overhead, treat that feeling as valuable data.
Use mounts designed for that exact kind of speaker, consider professional installation, and always add secondary safety support.
Common Mistakes to Avoid
- Mounting into drywall only when a joist is available (or when the speaker is heavier than “very light”).
- Ignoring the mount’s weight rating (or assuming “metal = strong enough”).
- Skipping the pilot hole and splitting the joist or stripping the screw.
- No safety tether for overhead gear.
- Messy wiring that tugs on terminals, creates noise, or looks like a vine trying to escape.
FAQ
Can I use toggle bolts in a drywall ceiling?
Some anchors are rated for ceiling use, but ceilings put anchors in a “pull-out” stress direction that’s less forgiving than walls.
Best practice is mounting to joists whenever possibleespecially for speakers that aren’t feather-light.
Do I need special speaker wire?
For exposed runs, standard speaker wire is common. For in-wall or in-ceiling runs in the U.S., many installers use CL2 or CL3 rated wire
to align with typical building code expectations for low-voltage cabling. If you’re unsure, check local requirements or ask an installer.
How do I stop rattles?
Tighten mount joints, ensure the speaker is secured properly, and keep wires from tapping the ceiling. Small foam pads or rubber washers
in the right spot can also helpbut don’t use “squishy fixes” to compensate for a mount that isn’t structurally solid.
Conclusion
Ceiling-mounted speakers can be a clean, high-impact upgrade: better positioning, less clutter, and a more immersive listening experience.
The winning formula is always the samemount into structure, use rated hardware, aim carefully, and treat the safety cable like a seat belt:
you hope you never need it, but you’ll be very glad it’s there.
Experience-Based Tips (Real-World Lessons That Don’t Fit on a Bracket Box)
The most common “I wish someone told me” moment usually happens after the speaker is already in the air: the angle isn’t right,
the wire is too short, or the bracket blocks access to the terminals. That’s why experienced installers tend to do a full dry runassemble
the bracket, connect the wire, and confirm you can still reach what you need to reachbefore anything touches the ceiling. It feels slow,
but it’s actually faster than climbing up and down the ladder like you’re training for a stair marathon.
Another frequent lesson: ceilings reveal how “not square” rooms really are. Two speakers can be perfectly measured from one wall and still
look slightly off because the room itself isn’t perfectly symmetrical. People who get consistently clean results typically pick two reference
points (for example, the TV wall and a side wall corner), then double-check the visual alignment from the seating position. The goal isn’t
geometric perfectionit’s “looks intentional.” If it looks intentional, your brain relaxes and stops trying to solve the mystery of why one
speaker feels like it’s judging you.
You’ll also notice that “tight enough” is a skill. Beginners sometimes under-tighten adjustable joints because they’re afraid of stripping
something, and the speaker slowly droops over a week like a sad sunflower. More experienced DIYers tighten, test, and then tighten again
after a day of useespecially with ball-and-socket mounts. A good approach is: aim the speaker, snug the joint, gently apply hand pressure
in the direction gravity would pull, and see if it shifts. If it shifts, it wasn’t actually tightjust politely pretending.
Wiring is where experienced setups quietly outperform rushed ones. People who’ve done this a few times almost always leave a small service
loop near the speaker and secure the wire to the ceiling before it reaches the terminals. That way, if someone bumps the speaker (or you
need to re-aim it), the wire doesn’t yank on the connection. The same folks tend to label wires at the amplifier end, too. It’s a tiny step
that feels unnecessary until you’re troubleshooting later and realize you’ve created a surprise guessing game called “Which channel is this?”
Finally, there’s a pattern with safety cables: anyone who has ever had a mount loosen over time becomes a lifelong safety-cable person.
The cable isn’t about expecting failureit’s about acknowledging that screws can back out, vibrations exist, and “overhead” is a special
category where caution is simply good manners to everyone living below it. The best experience-based rule is: if you’d be upset if the speaker
fell (financially, emotionally, or because it would scare somebody), add a tether. It’s a small extra step that buys a lot of peace of mind.