
Table of Contents >> Show >> Hide
- When You Should Bandage Your Hand
- What to Grab Before You Start
- Step 1: Stop the Bleeding First
- Step 2: Clean the Wound (Yes, Really Clean It)
- Step 3: Decide: Ointment, Petroleum Jelly, or Nothing?
- Step 4: Bandage It the Right Way (By Location)
- Aftercare: How Often to Change a Hand Bandage
- When You Need to Bandage Your Handand Then Get Medical Care
- Common Bandaging Mistakes (And How to Avoid Them)
- Quick Cheat Sheet: The 90-Second Hand Bandage Routine
- Real-World Experiences: What People Learn After Bandaging Their Hands (500+ Words)
- 1) The Kitchen Slice That Looked Small… Until You Tried to Wash It
- 2) The Knuckle Crack That Turned Every Hand Wash Into a Reset Button
- 3) The Palm Scrape From DIY (a.k.a. “I Didn’t Know Wood Could Be That Personal”)
- 4) The Blister That Started as “No Big Deal” and Ended as “Why Do I Walk Like This Now?”
- 5) The Minor Burn That Needed Cooling First, Bandaging Second
- Conclusion
Hands are overachievers. They cook, type, lift, clean, high-five, and occasionally (with zero warning)
meet a cheese grater at full speed. When your hand gets hurt, a good bandage isn’t just “a sticker for grown-ups”
it’s a tiny, practical tool that can help stop bleeding, keep germs out, reduce irritation, and give the skin a calm,
protected place to heal.
This guide walks you through when to bandage your hand, how to do it (step-by-step),
and when you should skip the DIY and get medical care. It’s written for everyday cuts, scrapes, blisters,
minor burns, and mild sprainsaka the greatest hits of hand mishaps.
Quick note: This is general first-aid information, not a substitute for care from a clinicianespecially if the wound is deep, contaminated, or getting worse.
When You Should Bandage Your Hand
Bandaging isn’t always required, but it’s often smart. You generally want to bandage your hand when the wound is:
- Bleeding (even lightly) and needs protection after the bleeding stops
- On a high-friction spot (knuckles, fingertips, palm) that keeps reopening
- Likely to get dirty (cooking, gardening, cleaning, gym equipment, childcareaka life)
- Oozing clear fluid or still tender and easily irritated
- At risk of infection (small skin tears, hangnails that got ambitious, scrapes from outdoor surfaces)
When You Might Not Need a Bandage
If it’s a tiny, superficial scratch in a low-friction area that’s not bleeding and won’t get dirty,
you may be able to leave it uncovered after cleaning. But on hands, “won’t get dirty” is a rare unicorn. If you’re unsure,
covering it for the first day can prevent irritation and help it heal more comfortably.
What to Grab Before You Start
Think of this as your hand’s “spa day” kit (minus the cucumber water):
- Clean running water (and mild soap)
- Clean gauze pads or a nonstick pad
- Adhesive bandages (regular, knuckle, fingertip/hourglass)
- Medical tape (paper tape is gentle; cloth tape holds like it means it)
- Rolled gauze or cohesive wrap (sticks to itself)
- Petroleum jelly or a thin layer of antibiotic ointment (optional)
- Clean scissors (for trimming tape/wrap)
- Alcohol wipes (for cleaning tweezers or your hands when soap isn’t available)
Step 1: Stop the Bleeding First
Before you worry about the “perfect bandage technique,” you need the bleeding under control.
- Apply direct pressure with clean gauze or a clean cloth.
- Hold steady pressure for several minutes. (Peek-checking every 12 seconds slows clotting.)
- If possible, raise the hand above heart level.
-
If blood soaks through, add more gauze on top and keep pressure. Don’t rip off the first layer if it’s stuck
that can restart bleeding.
Go get urgent help if bleeding won’t stop
If you can’t control bleeding with firm direct pressure, or the wound is spurting, gaping, or you feel faint,
seek emergency care right away.
Step 2: Clean the Wound (Yes, Really Clean It)
Cleaning is where healing begins. The goal is to lower infection risk by removing dirt and debris.
- Wash your hands first (or sanitize if you must).
- Rinse the wound with clean running water. Let the water do the work.
- Wash around the wound with mild soap. Try not to get soap deep into the wound.
- Remove visible debris with tweezers cleaned with alcohol. If debris won’t come out easily, get medical help.
- Pat dry with clean gauze or a clean towel.
Skip the “it stings so it must be working” stuff
For many everyday wounds, harsh antiseptics (like hydrogen peroxide or iodine solutions) can irritate tissue and may slow
healing. Soap, clean water, and gentle care are usually enough for minor injuries.
Step 3: Decide: Ointment, Petroleum Jelly, or Nothing?
After cleaning, you have two common options to protect the wound surface:
- Petroleum jelly: helps keep the wound surface from drying out and cracking, which can reduce irritation and help the area heal.
-
Antibiotic ointment: some people use a thin layer to reduce infection risk, but it can cause irritation or rash in some cases.
If you notice itching, redness, or a rash, stop using it.
The main rule: use a thin layer. Your wound should be protected, not marinating.
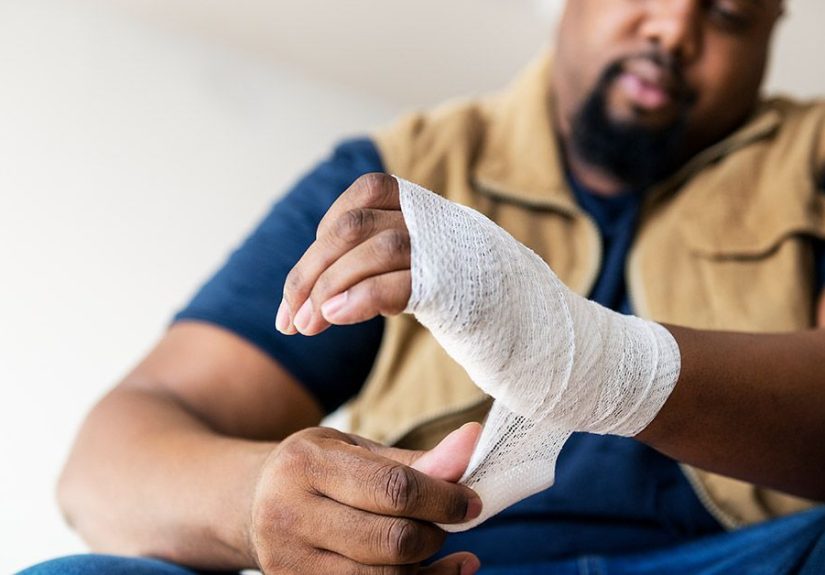
Step 4: Bandage It the Right Way (By Location)
Hands are tricky because they move constantly. A great hand bandage does three things:
covers, stays put, and doesn’t cut off circulation.
A. How to Bandage a Finger Cut
- After cleaning, place a small nonstick pad or the pad of an adhesive bandage over the cut.
- Wrap with the adhesive ends or use thin strips of medical tape to secure the pad without wrapping too tight.
- Check circulation: your fingertip should remain warm, pink-ish (or normal for your skin tone), and not numb or tingly.
Pro tip: For fingertip cuts, use a fingertip/hourglass bandage so the pad stays centered while the “wings” anchor around the finger.
B. How to Bandage a Knuckle (The Most Dramatic Spot on Your Hand)
Knuckles bend. Regular bandages don’t. This is why knuckle cuts love reopening at the worst timelike when you’re washing dishes
or showing someone “just one quick thing” on your phone.
- Use a knuckle bandage if you have one.
- If not, place a small pad over the cut and use tape in an “X” pattern around the knuckle so it can bend.
- Keep the finger slightly bent while you tape so the bandage doesn’t pop off the moment you move.
C. How to Bandage the Palm (Where Bandages Go to Quit)
The palm is high-friction and sweaty (fun!). Use a layered approach.
- Place a nonstick pad over the wound.
-
Secure it with rolled gauze using a gentle figure-eight pattern:
wrap once around the hand, then around the wrist, then back across the palm. - Finish with tape or cohesive wrap. It should feel supportivenot like your hand is being vacuum-sealed.
D. How to Bandage a Minor Burn on the Hand
For a minor burn, the first step isn’t bandagingit’s cooling the burn with cool running water (not ice).
Once cooled and gently cleaned:
- Apply a thin layer of petroleum jelly (or an appropriate burn gel if recommended by a clinician).
- Cover with a nonstick dressing.
- Secure loosely with gauzeburned skin hates pressure.
Don’t break blisters. If a burn is large, deep, chemical/electrical, on a joint, or worsening, seek medical care.
E. Wrapping a Wrist/Hand Sprain (Compression Without the “Tourniquet Vibes”)
If you’ve got swelling from a mild sprain or strain, a compression wrap can help support the area as part of
rest/ice/compression/elevation.
- Start wrapping at the hand and move toward the wrist, overlapping each layer by about half.
- Keep pressure snug, not tight.
- Stop immediately if you get numbness, tingling, increasing pain, or color/temperature changes in the fingers.
Aftercare: How Often to Change a Hand Bandage
Hand bandages get wet and dirty fast. Change the bandage:
- At least daily
- Anytime it becomes wet, dirty, or loose
- After heavy sweating, dishwashing, cleaning, or cooking
Each time you change it: wash hands, gently clean the area if needed, reapply a thin protective layer (if using),
and re-cover with a clean dressing.
Watch for Infection (Your Hand Will Tell on You)
Seek medical advice if you notice:
- Increasing pain, swelling, or warmth
- Redness spreading outward (or darker discoloration spreading)
- Pus or foul-smelling drainage
- Red streaks traveling up the hand/arm
- Fever or feeling unwell
When You Need to Bandage Your Handand Then Get Medical Care
Some hand injuries look small but aren’t. Hands contain tendons, nerves, joints, and blood vessels close to the skin.
Get urgent care if any of these apply:
Get urgent care for the wound itself if:
- Bleeding won’t stop after steady direct pressure
- The cut is deep, gaping, or the edges won’t stay together
- You can see fat, muscle, tendon, or bone
- You have numbness, tingling, weakness, or trouble moving a finger
- There’s a puncture wound (especially from dirty objects) or something is stuck in the wound
- The injury is from an animal or human bite
- You suspect a fracture (significant swelling, deformity, severe pain, loss of function)
Tetanus: the “When Was Your Last Shot?” Question
Tetanus protection depends on your vaccine history and the type of wound. As a general rule,
boosters are often recommended based on how long it’s been since your last tetanus shotespecially for
dirty or major wounds. If you’re unsure, call a clinician or urgent care and ask.
Higher-risk situations (don’t tough it out)
Get medical guidance sooner if you have diabetes, circulation problems, a weakened immune system,
or if the wound is not improving day by day.
Common Bandaging Mistakes (And How to Avoid Them)
-
Wrapping too tight: If your fingers go numb, pale/cool, or throb intensely, loosen it.
“Supportive” is the goal“python hug” is not. - Leaving a wet bandage on: Moisture + warmth + skin = a party for germs. Change it.
- Using fluffy cotton directly on a wound: Fibers can stick and irritate. Use gauze or a nonstick pad.
- Forgetting jewelry: Remove rings early if there’s swellinghands can puff up fast.
- Assuming “airing it out” is always best: Many minor wounds heal better when protected and not repeatedly dried out and cracked.
Quick Cheat Sheet: The 90-Second Hand Bandage Routine
- Wash hands
- Stop bleeding with direct pressure
- Rinse with running water; wash around with mild soap
- Pat dry; remove debris if easily removable
- Thin layer of petroleum jelly (or ointment if appropriate)
- Cover with clean pad + secure (not too tight)
- Change daily or when wet/dirty; watch for infection
Real-World Experiences: What People Learn After Bandaging Their Hands (500+ Words)
Because hand injuries love showing up in ordinary moments, the best lessons often come from very normal days.
Here are common real-life scenarios people run intoand what they tend to learn after the initial “Ow!” fades.
1) The Kitchen Slice That Looked Small… Until You Tried to Wash It
A classic: you nick your finger while chopping. It barely looks like anything, so you rinse it quickly and keep moving.
Then you touch lemon juice, dish soap, or sanitizer and suddenly your finger feels like it has filed a formal complaint.
The lesson here is that tiny cuts can be deep enough to sting and reopenespecially on fingertips.
People often find that a fingertip bandage (the hourglass kind) stays on better than a standard strip, and that taking
one extra minute to apply a small nonstick pad prevents the bandage from gluing itself to the wound later.
Also: “I’ll just cook through it” is how you end up seasoning dinner with frustration.
2) The Knuckle Crack That Turned Every Hand Wash Into a Reset Button
Knuckle wounds are stubborn because the skin stretches every time you make a fist, grab a steering wheel, or wrestle
with a jar lid that has chosen violence. Many people discover the hard way that a regular bandage pops off the moment
the knuckle bends. The “aha” moment is learning an X-shaped tape anchor (or using a knuckle bandage)
and applying it while the finger is slightly bent. That small technique change can mean the difference between healing
in a few days versus re-opening the wound ten times a day like it’s stuck in a time loop.
3) The Palm Scrape From DIY (a.k.a. “I Didn’t Know Wood Could Be That Personal”)
Palm wounds are where bandages go to die. People who do DIY projects, move furniture, lift weights, or do yard work
often find that the palm gets sweaty, the bandage slides, and the wound rubs against everything. A common upgrade is a
layered approach: nonstick pad + gauze wrap + a little tape, sometimes anchored around the wrist in a
figure-eight pattern. The big lesson is that the palm needs both cushioning and grip-friendly coverage. Many also learn
that “tight” doesn’t mean “secure”it just means “my fingers are going numb,” which is not the vibe.
4) The Blister That Started as “No Big Deal” and Ended as “Why Do I Walk Like This Now?”
Whether it’s a blister from a tool handle, a new tennis racket, or an ambitious day of cleaning, blisters on hands
can be surprisingly painful. People often learn that the best bandage isn’t always the thinnest oneit’s the one that
reduces friction. Cushion-style blister bandages or a padded dressing secured with tape can protect the
area so the skin can settle down. The practical takeaway: if you don’t protect it, you’ll keep re-irritating itand your
hand will remain furious at you during every single task you try to do.
5) The Minor Burn That Needed Cooling First, Bandaging Second
Oven racks, curling irons, hot panshand burns often come with a split-second of regret and a longer-term need for
proper care. A common “wish I knew” is that the first helpful move is cool running water, not ice.
After that, people often do best with a nonstick dressing and a light wrap that protects without pressing.
Another lesson: popping burn blisters is tempting, but it can raise the risk of infection and prolong healing.
Many people also learn to remove rings early after a burn because swelling can sneak up fast.
Across all these scenarios, the theme is consistent: good bandaging is less about “perfect” technique and more about
smart basicsclean the wound, protect it, keep it from getting rubbed or dirty, and watch for signs it needs professional care.
And yes, your hands will go right back to doing everything… which is exactly why they deserve a bandage that actually stays on.
Conclusion
If your hand is injured, the best bandage is the one that matches the problem: pressure to stop bleeding, gentle cleaning,
a protective dressing, and a secure wrap that doesn’t cut off circulation. Change it when it’s wet or dirty, keep an eye out
for infection, and don’t ignore warning signs like numbness, worsening pain, or bleeding that won’t stop.
When in doubtespecially with deep cuts, bites, punctures, burns on joints, or suspected tendon/nerve issuesget medical care.
Your hands do a lot for you. Returning the favor is kind of the deal.


