Table of Contents >> Show >> Hide
- What Water Hardness Actually Means (and Why You Should Care)
- Quick Cheat Sheet: How Hard Is “Hard”?
- Method 1: Check Your Water Quality Report (CCR) or Utility Data
- Method 2: Use Water Hardness Test Strips
- Method 3: Use a Drop-Count Titration Kit (EDTA)
- Method 4: Get a Professional Lab Test (or a Technician’s On-Site Test)
- How to Choose the Right Hardness Testing Method
- What to Do With Your Hardness Number
- FAQs About Measuring Water Hardness
- Real-World Experiences: From the Hard-Water Trenches
- Conclusion
Water hardness is one of those “invisible” home issues that only announces itself once it’s already
annoyingspotty glasses, crusty showerheads, itchy skin, and a water heater that’s quietly aging in dog years.
The good news: measuring water hardness isn’t mysterious, and you don’t need a chemistry degree (or a cape).
In this guide, you’ll learn four practical ways to measure water hardnessranging from “free and already
published” to “lab-grade accurate”plus how to interpret your results and what to do next.
What Water Hardness Actually Means (and Why You Should Care)
“Hard” water doesn’t mean it’s tough like a bodybuilder. It means the water contains higher levels of
dissolved mineralsmainly calcium and magnesium. These minerals aren’t usually a health concern for most
people, but they can be a home maintenance concern.
Common signs your water might be hard
- White, chalky scale on faucets, showerheads, and inside kettles
- Soap that refuses to lather like it’s on strike
- Glasses and dishes that dry with cloudy spots
- Stiff laundry, faded colors, or towels that feel like sandpaper with feelings
- Water heater efficiency dropping over time due to scale buildup
The units you’ll see: mg/L (ppm) as CaCO3 and grains per gallon (gpg)
Hardness is commonly reported as milligrams per liter (mg/L) or parts per million (ppm)
as calcium carbonate (CaCO3). In many U.S. home and water-softener conversations, you’ll also see
grains per gallon (gpg).
Handy conversion: gpg ≈ (mg/L as CaCO3) ÷ 17.1. If your hardness is 171 mg/L, that’s about 10 gpg.
Quick Cheat Sheet: How Hard Is “Hard”?
Here’s a widely used classification scale for total hardness (reported as mg/L as CaCO3):
| Category | mg/L (ppm) as CaCO3 | Approx. gpg |
|---|---|---|
| Soft | 0–60 | 0–3.5 |
| Moderately hard | 61–120 | 3.6–7.0 |
| Hard | 121–180 | 7.1–10.5 |
| Very hard | > 180 | > 10.5 |
One important note: “hardness” is not the same thing as pH, alkalinity, chlorine, or “total dissolved solids.”
Those are separate measurements that can be usefulbut they aren’t hardness.
Method 1: Check Your Water Quality Report (CCR) or Utility Data
If you get water from a public utility, you may already have a solid answer without buying anything.
Many utilities publish an annual Consumer Confidence Report (CCR) or a water quality report that lists
hardness (often as “Total Hardness as CaCO3”).
How to use this method
- Locate your utility’s water quality report or CCR (often on their website or mailed annually).
- Search within the report for “hardness,” “total hardness,” or “CaCO3.”
- Note the unit (mg/L, ppm, or gpg). Convert if needed using ÷ 17.1.
- Compare the result to the hardness scale above.
Why this is useful (and when it isn’t)
- Pros: Free, easy, and typically measured with standardized methods.
- Pros: Gives contextmany reports include ranges and seasonal notes.
- Cons: Your home’s plumbing, neighborhood lines, and blending of sources can shift results slightly.
- Cons: If you’re on a private well, you won’t have a CCRskip to Methods 3 or 4.
Best for: getting a reliable baseline quicklyespecially if you’re deciding whether a water softener even makes sense.
Method 2: Use Water Hardness Test Strips
Test strips are the “fast food” of hardness testing: quick, inexpensive, and good enough for most day-to-day decisions.
They’re especially handy for tracking changes over time (like after installing a softener or replacing a filter).
How test strips work
Most hardness strips contain reagent pads that change color based on the level of calcium and magnesium ions in your sample.
You dip the strip, wait a short time, then match the color to a chart.
Step-by-step (so you get results you can trust)
- Run cold water for 30–60 seconds to clear standing water from the line.
- Dip the strip for the time listed on the package (usually just a second or two).
- Hold the strip level (don’t rinse unless instructions say to).
- Wait the required time for color developmentset a timer if you’re easily distracted by… literally anything.
- Compare the pad color to the chart under good lighting.
Common mistakes that sabotage strip testing
- Using hot water (heat can change reaction timing and skew color)
- Reading too early or too late
- Comparing colors under yellow bathroom lighting (a.k.a. the “everything looks beige” trap)
- Touching the reagent pad with wet fingers
Accuracy: what to expect
Strips are usually semi-quantitative, meaning they give you a range or band rather than a precise number.
For many households, that’s perfectly fine: you mostly need to know if you’re in the “soft,” “hard,” or “very hard” zone.
Best for: quick checks, routine monitoring, and confirming if your hard-water hunch is legit.
Method 3: Use a Drop-Count Titration Kit (EDTA)
If you want a more accurate at-home result, titration is the classic approach. Many home kits use
EDTA titration (a common chemistry method) where you count drops until the sample changes color.
That drop count corresponds to hardness.
Why titration is the “sweet spot” for many homeowners
- More precise than test strips
- Still affordable and DIY-friendly
- Excellent for sizing and calibrating water softeners
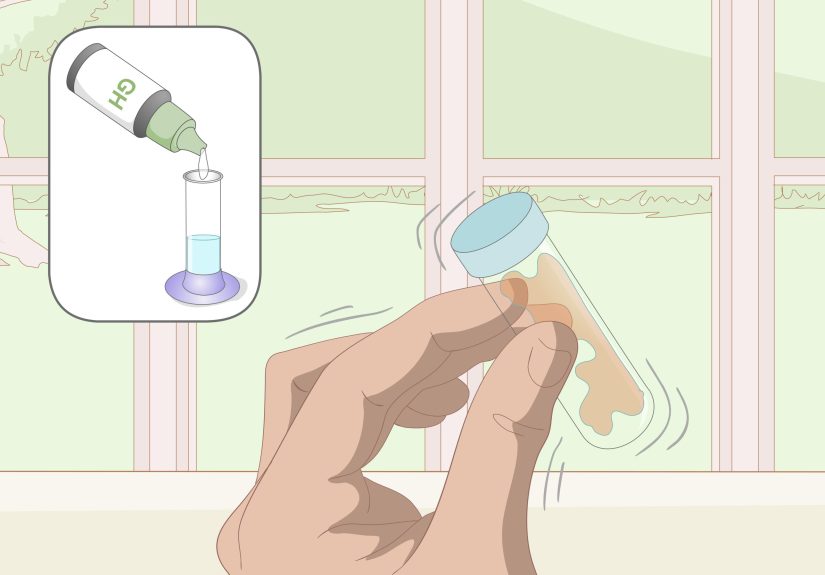
Step-by-step (general process)
- Fill the included vial to the marked line (sample volume matters).
- Add the indicator solution (your water will turn a starting color).
- Add titrant drops one at a time, swirling gently between drops.
- Stop when the color changes to the endpoint color described in the kit instructions.
- Use the kit’s chart to convert drops into hardness (mg/L or gpg).
Example calculation (what it looks like in real life)
Let’s say your kit indicates each drop equals 1 gpg, and you reached the endpoint at 12 drops.
Your hardness is 12 gpg. Convert to mg/L as CaCO3:
12 × 17.1 ≈ 205 mg/L. That’s firmly in “very hard” territory.
Pro tips for cleaner results
- Swirl consistentlydon’t shake like you’re making a cocktail unless the directions say so.
- Run the test twice and average the result if you want extra confidence.
- If your water is treated/softened already, test both “before” and “after” the softener to verify performance.
Best for: homeowners who want a dependable number without paying for lab testing.
Method 4: Get a Professional Lab Test (or a Technician’s On-Site Test)
When you need the highest confidenceespecially with private wells or unusual water behaviorprofessional testing wins.
Labs can measure total hardness (as CaCO3), and often break it down into calcium hardness and magnesium hardness.
When a lab test is worth it
- You’re on a private well (conditions can change seasonally)
- You’re buying or selling a home and want documented water quality data
- You suspect multiple water issues (like iron, manganese, sulfates, or corrosion) alongside hardness
- You want a full picture before investing in treatment equipment
What to request
- Total hardness (reported as mg/L or ppm as CaCO3)
- Calcium and magnesium (optional but helpful)
- Optional companion tests: pH, alkalinity, iron, manganese, TDS, sulfate, chloride
What about digital meters?
You’ll see plenty of “digital water testers” online. Some are true hardness meters designed to estimate hardness as CaCO3.
But many cheap pens measure TDS (total dissolved solids), which is not the same as hardness.
TDS can move independently of hardness depending on what’s dissolved in your water.
If you go digital, make sure the device is intended to measure hardness (or has a hardness mode), not just TDS.
For mission-critical accuracy, lab testing remains the gold standard.
Best for: wells, complex water issues, or any time you want results you can document and rely on.
How to Choose the Right Hardness Testing Method
Here’s a simple way to decide without overthinking it:
If you want the fastest answer
- Start with Method 1 (CCR/utility report) if you’re on municipal water.
- If you’re on a well, start with Method 2 (test strips) as a quick screen.
If you want a number you can use for equipment decisions
- Use Method 3 (drop-count titration) for a strong DIY number.
- Use Method 4 (lab test) if you want maximum accuracy or broader water analysis.
If you’re troubleshooting weird stuff
If you see staining, rotten-egg smells, metallic taste, or sudden changes, hardness may be only one piece of the puzzle.
A lab test (Method 4) can help you avoid treating the wrong problem.
What to Do With Your Hardness Number
Measuring is step one. Using the information is where your home starts winning again.
1) Decide whether you need a water softener (or just a strategy)
- Soft to moderately hard: You may not need a whole-house softener. Descaling routines might be enough.
- Hard to very hard: A softener can protect plumbing and appliances and improve cleaning performance.
2) Adjust soaps and detergents
Hard water can make soaps less effective. If you’re in the hard/very hard range, you may need:
slightly more detergent, a formulation designed for hard water, or an occasional rinse aid for dishwashers.
3) Protect fixtures and appliances
- Use a descaler for showerheads and faucets as needed.
- Flush water heaters based on manufacturer guidance if scale is a known issue in your area.
- Keep an eye on humidifiers, coffee machines, and kettlesscale loves small heating elements.
4) If you already have a softener, test before and after
A quick “raw vs. softened” comparison can tell you if your system is regenerating properly, if settings need adjustment,
or if it’s time for maintenance.
FAQs About Measuring Water Hardness
Is hard water unsafe to drink?
Hardness minerals (calcium and magnesium) are generally not considered harmful for most people.
The main issues are scaling, cleaning performance, and appliance wearnot safety.
Can hardness change during the year?
Yes. Utilities may blend sources seasonally, and wells can shift with rainfall and groundwater conditions.
If you’re noticing changes, periodic testing is smart.
Why does my TDS meter say one thing but my hardness test says another?
Because TDS measures the total amount of dissolved substances, not specifically calcium and magnesium.
You can have high hardness with moderate TDS, or higher TDS due to other dissolved ions without extreme hardness.
What’s the most accurate DIY method?
A drop-count titration kit is typically the most accurate DIY approach for total hardness.
For the highest confidence overall, professional lab testing is the top choice.
Real-World Experiences: From the Hard-Water Trenches
The first time most people “meet” hard water, it’s not through a test kitit’s through vibes. You notice your shower door
looks like it’s been lightly dusted with chalk. You scrub it. It comes back. You scrub harder. It comes back faster,
like it’s training for a comeback tour. That’s usually the moment people start Googling “water hardness test” with the intensity
of someone solving a mystery novel.
One very common experience: you switch to a new shampoo or body wash, and suddenly your hair feels heavy or your skin feels
squeaky-dry. It’s tempting to blame the product, but hard water can make soaps behave weirdlyless lather, more residue, more
“why does my towel feel like a cracker?” Testing with strips often gives that first “Ohhh, it’s not me, it’s the minerals” moment.
Even a rough band result (hard vs. very hard) can explain a lot.
Another classic: the dishwasher drama. You can have the world’s fanciest detergent pods, a rinse aid that costs more than coffee,
and a dishwasher that sings a little song when it’s doneyet your glasses still look cloudy. People often assume the machine is failing.
But when you measure hardness, you realize the dishwasher is doing its best in a mineral-heavy environment. A titration kit can be a
turning point here because it gives a real number you can use to adjust rinse aid settings or decide whether softening makes sense.
If you’re on a private well, the experience is often more “seasonal plot twist.” Things seem fine, then late summer hits and scale
buildup acceleratesor your fixtures start showing spots faster than usual. Lab testing is especially reassuring in these situations.
It doesn’t just confirm hardness; it helps you see whether other water characteristics are teaming up with hardness to cause problems.
And then there’s the water-softener reality check. Plenty of homeowners install a softener and assume everything is magically handled.
But the most satisfying (and honestly empowering) experience is testing before and after. When the “after” number drops dramatically,
you know the system is working. If it doesn’t, you’ve caught an issue earlymaybe settings need adjustment, salt bridging is happening,
or regeneration isn’t completing. Measuring hardness becomes less of a one-time chore and more like a simple household diagnostic tool,
like checking tire pressure before a road tripexcept with fewer gas station snacks.
Conclusion
Measuring water hardness doesn’t have to be complicated. Start with what’s easiest: your water quality report if you have one,
or a quick test strip if you don’t. If you need a more precise numberespecially for equipment decisionsuse a drop-count titration kit.
And when accuracy and a full water picture matter most (hello, private well life), professional lab testing is your best friend.
Once you know your hardness level, you can stop guessing and start making smart, cost-effective choiceswhether that’s adjusting
cleaning products, protecting appliances, or choosing the right treatment approach.