Table of Contents >> Show >> Hide
- Why the Galaxy S22 Can Still Surprise You
- The Two Upgrades That Make Photos Better (Without Buying a New Phone)
- Start Here: The 5 Settings That Improve Photos Immediately
- Low-Light Photos: How to Get the “Nightography” Look Without the Smear
- Portraits: Make People Look Human (Not Like Sticker Cutouts)
- Action Shots: Kids, Pets, Sports, and the Art of Not Crying
- Zoom: The Sweet Spot Is 3x (And Your S22 Knows It)
- Editing: The 3-Minute Routine That Makes Photos Pop
- Troubleshooting: Quick Fixes for Common S22 Photo Problems
- Conclusion: Your S22 Is Not “Done”It’s Just Getting Started
- Extra: Real-World Experiences That Make the S22 Feel Like a “New” Camera (About )
Quick confession: the Samsung Galaxy S22 has always had a solid camera. But “solid” isn’t why you bought a phone that can casually record 8K video while you’re trying to keep a coffee from spilling on your shoes. You bought it for those wow shotsthe ones that make friends ask, “Wait… you took that on a phone?”
Here’s the good news: even if you’ve owned your Galaxy S22 for a while, better photos are still on the table. Not because the lenses magically upgraded overnight (sadly), but because Samsung’s software toolsespecially Expert RAW and Camera Assistantunlock more control, smarter processing, and creative options that the default camera experience doesn’t always highlight.
This guide walks you through exactly how to get sharper detail, cleaner low-light shots, more natural portraits, and fewer “why is my subject a blurry ghost?” momentswithout turning your photo hobby into a second job.
Why the Galaxy S22 Can Still Surprise You
The Galaxy S22’s camera system is built for versatility. The standard S22 (and S22+) uses a triple rear setup: a 50MP main camera, a 12MP ultrawide, and a 10MP telephoto with 3x optical zoom, plus a 10MP selfie camera. That combination matters because it gives you three different “looks” without forcing you to crop everything and pray.
But the bigger story is that Samsung’s imaging is heavily software-driven. That means your results can improve over time as Samsung refines processing, adds controls, and releases companion apps that give you more say over what the camera is doing behind the scenes.
The Two Upgrades That Make Photos Better (Without Buying a New Phone)
1) Expert RAW: DSLR-ish control, straight from your phone
Expert RAW is Samsung’s “take the training wheels off” camera app. Instead of the phone deciding everything, you get hands-on control of settings like ISO, shutter speed, and white balanceplus extra data in RAW files for more flexible editing later.
It’s especially useful when:
- Lighting is tricky (bright windows, sunsets, stage lighting, neon signs).
- You want cleaner edits (recover highlights, lift shadows, adjust color without the image falling apart).
- You want creative modes like astrophotography or layered exposures.
Pro tip: RAW isn’t automatically “better.” Think of it as more editable. If you want a fast, ready-to-post photo, the standard camera is still great. If you want a photo you can sculpt, Expert RAW is your playground.
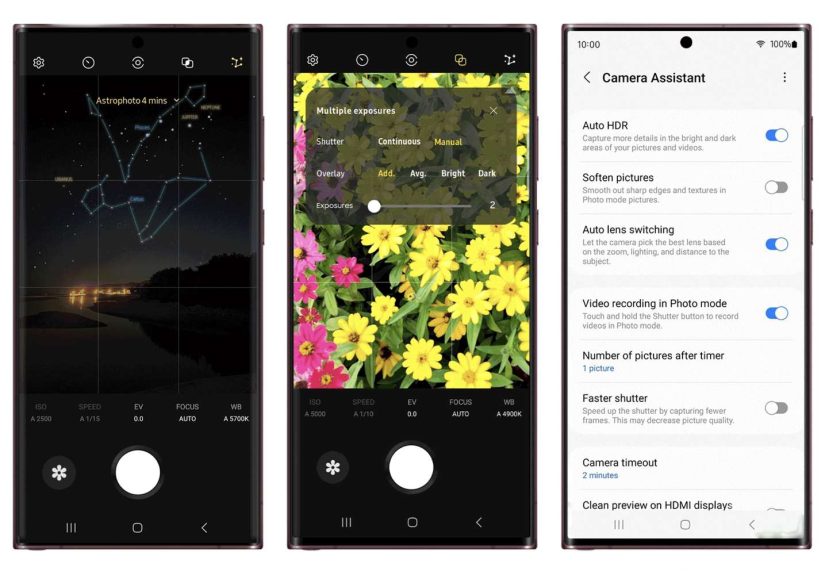
2) Camera Assistant: the “Stop messing with my shot” settings panel
Camera Assistant (available through Samsung’s Galaxy Store/Good Lock ecosystem) is all about customization. It lets you tweak how the stock camera behavesthings like Auto HDR, lens switching behavior, shutter response, softening, and timer/burst options.
This matters because a lot of “bad camera days” aren’t hardware problems. They’re behavior problems:
- The phone switches lenses when you didn’t want it to.
- HDR kicks in and makes the scene look a little too “painted.”
- The shutter feels slow, so moving subjects come out smeared.
Camera Assistant helps you tune those behaviors to match how you actually shoot.
Start Here: The 5 Settings That Improve Photos Immediately
1) Use the right resolution at the right time
Your S22 can shoot at 50MP on the main camera, but the default mode often uses lower resolution with pixel-binning (commonly 12MP output) to improve brightness and reduce noise. Here’s the simple rule:
- Use the default photo mode for most shotsespecially indoors, at night, or with moving subjects.
- Switch to 50MP in bright light when you want crisp details (architecture, landscapes, travel shots, product photos).
If you’ve ever shot 50MP indoors and wondered why things look soft, it’s not your imagination. Higher resolution can demand steadier hands and more light.
2) Turn on the grid (and suddenly your photos look “intentional”)
Enable the grid lines in the Camera settings. It’s the easiest way to improve composition fast. Use it to:
- Keep horizons straight (goodbye, leaning ocean).
- Place faces along the rule-of-thirds intersections.
- Center symmetry shots (hallways, bridges, tall buildings) without guessing.
3) Don’t let Auto HDR bully you
HDR can be a lifesaver in harsh lightinglike a person standing in front of a bright window. But sometimes it flattens contrast and gives skin tones a “polished” look. If Camera Assistant lets you toggle Auto HDR, experiment:
- HDR ON: high-contrast scenes, sunny days, backlit portraits.
- HDR OFF: moody indoor lighting, concerts, scenes where you want shadows to stay shadows.
4) Choose the lens on purpose (especially for portraits)
The S22’s 3x telephoto lens is your secret weapon for portraits. It tends to produce more flattering perspective than the wide lens, which can subtly exaggerate facial features when you’re too close.
Try this:
- Step back a little.
- Use 3x zoom.
- Tap to focus on the eyes.
- Lower blur intensity slightly for a more natural look.
5) Clean the lens like you mean it
This sounds too simple, which is exactly why people skip it. Your pocket is basically a lint-based ecosystem. A quick wipe can instantly improve sharpness and reduce weird “foggy glow,” especially in night photos with streetlights.
Low-Light Photos: How to Get the “Nightography” Look Without the Smear
Use Night mode when the scene is calm
Night mode brightens scenes by capturing multiple frames and merging them. That’s greatunless your subject is moving. If you’re photographing a friend who talks with their hands like they’re conducting an orchestra, Night mode may turn those hands into abstract art.
For best results:
- Ask subjects to hold still for a second.
- Brace your elbows against your body.
- Use the timer (2 seconds is enough) to avoid shake from tapping the shutter.
Try Expert RAW for tricky lighting (restaurants, neon, stage lights)
Indoor low light often includes mixed colorswarm bulbs, cool screens, colored signage. Expert RAW gives you control over white balance so skin doesn’t turn orange, green, or “why do we look like aliens?”
A quick starting point:
- Lower ISO to reduce noise.
- Slow shutter slightly if the subject is still.
- Adjust white balance until whites look white (napkins are a handy reference).
Astrophoto: yes, your S22 can shoot the night sky
If Expert RAW on your S22 includes Astrophoto, you can capture starry skies with AI-assisted processing. But there’s a catch: the phone can’t fight physics alone.
For real results:
- Use a tripod or stable surface (a rock counts if it’s not wobbly).
- Get away from bright city lights if possible.
- Use a timer so you don’t shake the phone at the start.
- Expect the best results when the sky is clear and dark.
Portraits: Make People Look Human (Not Like Sticker Cutouts)
Portrait mode is fun, but it can overdo edge detectionespecially around hair, glasses, and hands. Here’s how to keep it looking natural:
Back up and use 3x
As mentioned, the telephoto lens helps with flattering perspective. It also makes background blur look more “real camera” and less “digital fog generator.”
Lower the blur intensity
Maximum blur is tempting, but it can make the subject look pasted onto a fake background. Drop it a notch or two for a more believable depth-of-field look.
Give your subject space from the background
If your friend is standing right against a wall, blur has nowhere to go. Pull them 4–8 feet forward if possible. The separation instantly looks more professional.
Action Shots: Kids, Pets, Sports, and the Art of Not Crying
The fastest way to ruin an action photo is a slow shutter response. If Camera Assistant offers a faster shutter behavior, it’s worth tryingespecially for moving subjects.
Use burst behavior strategically
If Camera Assistant lets you control timer bursts (like snapping 3, 5, or 7 photos), you can capture a mini-sequence and pick the best frameperfect for:
- Jump shots
- Blowing out birthday candles
- Pets doing the “I will not sit still” routine
Brighten your environment when possible
Phones love light. If you can move toward a window, turn on another lamp, or step under better lighting, you’ll get faster shutter speeds and sharper results with less noise.
Zoom: The Sweet Spot Is 3x (And Your S22 Knows It)
Optical zoom is your friend. Digital zoom is… your friend who means well but gives questionable advice.
For best quality:
- Use 0.6x for dramatic wide scenes (but keep faces away from the edges to avoid distortion).
- Use 1x for everyday shots.
- Use 3x for portraits, details, and cleaner distance shots.
- Avoid going way past 3x unless you’re okay with softer detail.
Editing: The 3-Minute Routine That Makes Photos Pop
You don’t need to edit every photo like you’re prepping a museum exhibit. But a quick, consistent workflow can turn “nice” into “share-worthy.”
A simple edit checklist (works in Samsung Gallery or Google Photos)
- Crop + straighten (your future self loves a level horizon).
- Lower highlights (recover bright skies, reduce forehead glare).
- Lift shadows slightly (bring back detail without flattening the scene).
- Add a touch of warmth if skin looks too cool, or cool it down if everything looks orange.
- Sharpen lightly (too much turns eyelashes into needles).
If you shoot with Expert RAW, you can also bring the file into a dedicated editor (like Lightroom Mobile) for more precise controlespecially for color and noise reduction.
Troubleshooting: Quick Fixes for Common S22 Photo Problems
“My photos look too processed.”
Try reducing scene optimization behavior, turning off Auto HDR in certain situations, or adjusting any “softening/sharpening” controls available in Camera Assistant. Also test Expert RAW for a more natural, editable base image.
“My photos are blurry even though I’m not moving much.”
Low light forces slower shutter speeds. Add light, use Night mode carefully, stabilize the phone, and consider using the timer to prevent shake.
“Indoor colors look weird.”
Mixed lighting confuses auto white balance. Use Expert RAW (or Pro mode) and set white balance manually, especially in restaurants and events.
Conclusion: Your S22 Is Not “Done”It’s Just Getting Started
The Samsung Galaxy S22 can still deliver genuinely impressive photographyespecially when you pair its hardware with smarter software tools. If you do nothing else, try this winning combo: use 3x for portraits, Night mode for calm low-light scenes, Expert RAW when lighting gets complicated, and Camera Assistant to tame the camera’s habits.
That’s how you turn a great phone camera into a camera that feels like it’s finally listening to you.
Extra: Real-World Experiences That Make the S22 Feel Like a “New” Camera (About )
Once people start using Expert RAW and Camera Assistant together, the most common reaction is something like: “Oh… this is what my camera was capable of.” Not because the default camera is bad (it isn’t), but because the S22’s biggest leaps often happen in the situations where phones usually strugglenight scenes, motion, mixed lighting, and portraits that need to look natural.
For example, think about taking photos at a restaurant. The lighting is dim, warm, and usually coming from multiple directions (overhead bulbs, candles, a neon sign in the window, someone’s phone screen lighting up their face like a tiny flashlight). In normal auto mode, skin tones can swing too orange, highlights can blow out on shiny plates, and shadows can get crunchy. The “better experience” here is switching to Expert RAW for a couple of hero shotsmaybe the dessert, maybe a portrait across the tableand adjusting white balance just enough that the napkin looks neutral. The result tends to look calmer, more realistic, and less like the phone tried to “fix” your meal into a postcard.
Then there are event photosbirthday parties, school plays, holiday gatheringswhere the real enemy is motion. People don’t pose; they move, laugh, turn, and wave. If your shutter response is slow, you get soft faces and blurred hands. Camera Assistant’s faster shutter behavior (when available) can make those moments feel more “capturable.” Add in burst options (snapping multiple frames with a timer), and suddenly you’re not relying on a single perfectly-timed tap. You’re giving yourself choices, which is basically the secret behind every good action photo ever taken.
Outdoor travel shots are another place the S22 quietly shines. In bright daylight, switching to 50MP for landscapes or architecture can give you crisp texturesbrick patterns, street details, signs, distant building linesthat hold up better when you crop. That’s especially satisfying when you get home and realize your favorite photo isn’t the wide scene; it’s the tiny detail inside it that you can now zoom into without the image turning into pixel soup.
And yes, the night sky. The first time someone tries Astrophoto the right wayphone stabilized, timer on, away from harsh lightsit can feel a little ridiculous (you’re basically babysitting a phone while it stares at space). But the payoff is a photo that looks like you did something intentional instead of accidental. It’s not about replacing a dedicated camera; it’s about turning a casual moment into a “wait, you actually got stars?” moment.
The overall experience is simple: the Galaxy S22 becomes less of a point-and-shoot and more of a choose-your-own-adventure camera. Auto mode is still there for everyday life. But when you want that extra step upcleaner portraits, calmer night scenes, sharper details, more control over coloryour S22 has tools that make “even better photos” feel completely realistic.