Table of Contents >> Show >> Hide
- Why this skillet pretzel works (and why it tastes like a pretzel)
- Ingredients (with smart substitutions)
- Step-by-step: Pull-Apart Pretzel Skillet
- Step 1: Wake up the yeast
- Step 2: Make a soft, slightly tacky dough
- Step 3: Portion into “pull-apart” bites
- Step 4: Prep the skillet (and decide if you’re doing dip-in-the-middle)
- Step 5: The baking soda bath (the pretzel “glow up”)
- Step 6: Assemble the skillet
- Step 7: Bake until deep golden
- Optional: Make the no-beer cheddar dip while it bakes
- Variations that make you look like a snack genius
- Troubleshooting (because pretzels like to test your character)
- Make-ahead, storage, and reheating
- Serving ideas (aka how to build a snack table people remember)
- FAQ
- My Pull-Apart Pretzel Skillet experiences (500-word real-life snack science)
- Final thoughts
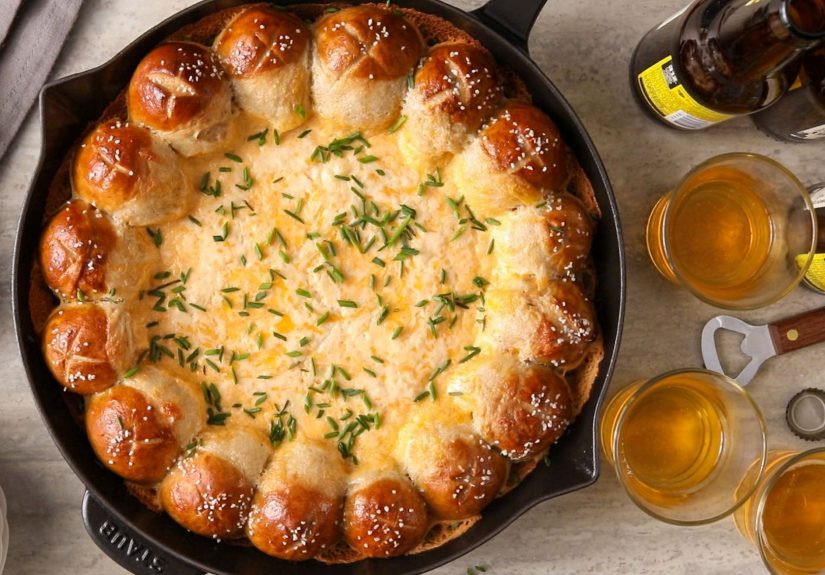
If you’ve ever watched someone tear into a basket of soft pretzels like it’s a competitive sport, this one’s for you.
A Pull-Apart Pretzel Skillet is basically the cozy, shareable upgrade of pretzel bites: warm doughy nuggets
baked shoulder-to-shoulder in a hot skillet so you can pull, dip, and “accidentally” eat six pieces before anyone notices.
(Don’t worry. The skillet is the alibi. “It was just sitting there… looking snackable.”)
This version gives you that classic pretzel vibedeep golden color, chewy outside, fluffy insidewithout making you
twist perfect pretzel shapes. We’ll lean on two simple tricks: a quick alkaline step (the famous baking soda moment) and a
screaming-hot oven. The result is a tear-and-share appetizer that feels a little fancy, but behaves like a weeknight.
Why this skillet pretzel works (and why it tastes like a pretzel)
1) The “pretzel” flavor isn’t magicit’s chemistry
Soft pretzels get their signature color and chew from briefly exposing the dough’s surface to an alkaline solution.
In home kitchens, that usually means a baking soda bath (or a baking soda wash). It raises the surface pH,
which helps the exterior set and brown more aggressively in the oven. Translation: you get that unmistakable pretzel crust
instead of “cute little bread rolls pretending to be pretzels.”
2) A skillet turns individual bites into pull-apart perfection
In a cast iron skillet, the dough balls sit close together, so they puff up and fuse into one pull-apart cluster.
The skillet also holds heat like a champion, helping the bottoms brown while the tops get glossy from egg wash.
Bonus: serving it in the skillet makes it look like you planned a whole gathering… even if it’s just you and your favorite show.
Ingredients (with smart substitutions)
This recipe is written for a 10–12 inch cast iron skillet. If you don’t have one, use any oven-safe skillet or
a similarly sized baking dishjust grease it well.
For the pretzel dough
- 1 1/2 cups warm water (about 105–110°F; warm like bathwater, not lava)
- 1 packet active dry yeast (2 1/4 teaspoons)
- 2 tablespoons brown sugar (or granulated sugar)
- 4 cups all-purpose flour, plus more for dusting
- 1 1/2 teaspoons kosher salt
- 3 tablespoons melted unsalted butter (plus more for finishing)
For the baking soda step + topping
- 8 cups water
- 1/2 cup baking soda
- 1 egg + 1 tablespoon water (egg wash)
- Pretzel salt or coarse kosher salt
Optional: No-beer “pub-style” cheddar dip (kid-friendly)
Lots of pub dips use beer for flavor. This one keeps the same vibetangy, mustardy, super-dunkablewithout alcohol.
- 4 ounces cream cheese, softened
- 1 tablespoon butter
- 1 teaspoon Dijon mustard
- 1/2 teaspoon garlic powder
- 1/4 teaspoon smoked paprika (optional but highly recommended for “pub energy”)
- 1 cup milk (start with 3/4 cup; add more as needed)
- 2 cups shredded sharp cheddar (shred it yourself if you canmelts smoother)
- Salt + black pepper, to taste
Step-by-step: Pull-Apart Pretzel Skillet
Step 1: Wake up the yeast
-
In a large bowl, whisk the warm water, yeast, and brown sugar. Let it sit for 5 minutes, until foamy.
(If it doesn’t foam, your yeast may be expired or your water was too hot/cold. Yeast is dramatic like that.)
Step 2: Make a soft, slightly tacky dough
-
Add the flour, salt, and melted butter. Stir until a shaggy dough forms, then knead 7–10 minutes
(by hand or mixer) until smooth and elastic. The dough should be soft, not dryslightly tacky is perfect.
If it’s sticky like glue, add flour 1 tablespoon at a time. -
Place dough in a lightly oiled bowl, cover, and let rise in a warm spot for 45–60 minutes,
until doubled.
Step 3: Portion into “pull-apart” bites
-
Punch down the dough and turn it onto a lightly floured surface. Divide into 24–30 pieces.
(More pieces = smaller bites = more opportunities to “just taste one more.”) - Roll each piece into a ball by tucking the edges underneath and pinching. Place them on a parchment-lined sheet while you finish rolling.
Step 4: Prep the skillet (and decide if you’re doing dip-in-the-middle)
- Preheat oven to 425°F. Grease a 10–12 inch cast iron skillet generously with butter.
-
If you want dip in the center, plan to arrange dough balls in a ring around the edges, leaving a space in the middle.
If you want “all pretzel, no interruptions,” fill the entire skillet with dough balls.
Step 5: The baking soda bath (the pretzel “glow up”)
-
Bring 8 cups of water to a boil in a wide pot. Carefully add baking soda (it will bubble upthis is normal, not haunted).
Reduce heat to a steady simmer. -
Working in small batches, lower 8–10 dough balls into the water. Let them simmer for 10–20 seconds,
then lift out with a slotted spoon and let excess water drip off. - Place the treated dough balls back on your parchment-lined sheet while you finish the remaining batches.
Step 6: Assemble the skillet
-
Arrange the dough balls tightly in the greased skillet. If you’re leaving a center gap, build a neat ring.
The closer they are, the better the pull-apart effect. -
Brush the tops with egg wash. Sprinkle generously with pretzel salt or coarse kosher salt.
(If you’ve ever wondered where pretzels get their confidence, it’s the salt.)
Step 7: Bake until deep golden
- Bake for 18–24 minutes, until deeply golden brown. If your oven runs hot, start checking at 18 minutes.
- Optional but recommended: brush with melted butter as soon as it comes out. This is the “wow” finish.
Optional: Make the no-beer cheddar dip while it bakes
- In a small saucepan over low heat, melt butter. Add cream cheese and whisk until mostly smooth.
- Whisk in Dijon, garlic powder, smoked paprika, and 3/4 cup milk. Warm gentlydon’t boil.
-
Add shredded cheddar by the handful, whisking until melted. Add more milk if you want it thinner.
Season with salt and pepper.
Variations that make you look like a snack genius
Garlic-Parmesan Pretzel Skillet
Skip the pretzel salt (or use less). After baking, brush with melted butter mixed with garlic powder,
then sprinkle with grated Parmesan and chopped parsley.
Everything-Bagel Pretzel Bites
Use everything seasoning instead of pretzel salt. Add a pinch of flaky salt on top if your seasoning blend is low-salt.
Serve with cream cheese dip for maximum “brunch-but-make-it-snack” energy.
Cinnamon-Sugar Dessert Skillet
Leave off the salt. After baking, brush with butter and toss (or shower) with cinnamon sugar.
Serve with a vanilla glaze or cream cheese frosting for a “cinnamon roll met a pretzel at the mall” moment.
Stuffed “surprise center” bites
Hide a small cube of mozzarella inside each dough ball before rolling smooth. When baked, you get cheese pulls
that make people gasp like they just saw fireworks.
Troubleshooting (because pretzels like to test your character)
My dough didn’t rise
Most likely: yeast issues or temperature. Try a warmer spot (near, not on, the oven) and make sure your water was warmnot hot.
My pretzels taste… weirdly metallic
That can happen if the baking soda step goes too long. Keep the dip brief (think seconds, not minutes) and drain well.
They’re pale, not pretzel-brown
Make sure you did the alkaline step and the egg wash. Also, let the oven fully preheatpretzels like commitment.
Bottoms are getting too dark
Cast iron holds heat hard. If your skillet runs extra toasty, place it on a baking sheet to buffer the bottom heat,
or move the rack one level higher.
My cheese dip turned grainy
Heat was too high. Keep it low and gentle, and add cheese gradually. Shredding your own cheddar also helps it melt smoother.
Make-ahead, storage, and reheating
- Make-ahead dough: After kneading, let it rise briefly, then refrigerate overnight. Bring to room temp before shaping.
- Store leftovers: Airtight container at room temp for a day, or refrigerate up to 3 days.
- Reheat best: 350°F oven for 7–10 minutes to re-crisp. Microwave works in a pinch, but the crust will soften.
- Freeze: Bake, cool, freeze. Reheat from frozen at 350°F until warmed through.
Serving ideas (aka how to build a snack table people remember)
- Classic: mustard + cheddar dip
- Pizza-night twist: warm marinara + mozzarella-stuffed bites
- Game day: buffalo dip (mild) or ranch dip with veggie sticks on the side
- Soup buddy: tomato soup or chilipretzel bites are basically edible spoons with better PR
FAQ
Do I have to use a cast iron skillet?
Nope. Any oven-safe skillet or baking dish works. Cast iron just gives you that sizzling, rustic, restaurant-app vibe.
Can I skip the baking soda step?
You can, but then you’re making pull-apart rolls (still delicious) rather than true pretzel-style bites.
If you’re short on time, a brushed-on baking soda wash is a faster compromise, but the quick dip gives the best “pretzel” payoff.
How do I keep them soft?
Don’t overbake, and brush with butter while hot. Also: serve soon after baking. Pretzels are happiest fresh, like puppies and punchlines.
My Pull-Apart Pretzel Skillet experiences (500-word real-life snack science)
The first time I made a pull-apart pretzel skillet, I was feeling extremely confident for someone who had never tried to
“pretzel” anything in their life. The plan: bake a beautiful, golden, shareable skillet that would make everyone cheer.
The reality: I created a bread-themed lesson in humilitystill tasty, but definitely educational.
Here’s what happened: I treated the baking soda bath like a spa day. I thought, “More time equals more pretzel flavor!”
So I let my dough balls lounge in the simmering water like they were sipping cucumber water. The tops browned, sure…
but the flavor had a faint “penny” vibe. Not the end of the world, but also not the taste of victory. That’s when I learned:
this step is a quick dip, not a long soak. Seconds matter. Pretzels are impatient.
Attempt #2 went betterbut I made a new mistake: I under-salted because I was worried about overdoing it.
Turns out, pretzels without enough salt are like popcorn without enough salt: technically edible, emotionally confusing.
Now I sprinkle with coarse salt like I’m blessing the dough for good luck. (If you’re salt-sensitive, use lessbut don’t skip it entirely.)
The skillet itself taught me the biggest “hosting hack.” When you bake the bites close together, people don’t need plates.
They gather around the skillet, pull a piece, dip, and keep talking. It creates that casual, cozy energy where nobody’s counting servings,
and everyone’s “just having a little snack.” Spoiler: they’re having a lot of snack.
I’ve also tested the dip situation in real life. If you put dip in the middle, it looks amazingbut timing matters.
A thick cheese dip can over-brown if it sits in the oven the whole time, and a thin dip can bubble like a tiny cheddar volcano.
My favorite compromise: bake the pretzel bites first, then add warm dip right before serving. You still get the dramatic center dip moment,
but you control the texture. Plus, nobody burns their tongue on molten cheese. That’s the kind of hospitality that earns you legend status.
Finally, I learned the “butter brush” is non-negotiable. I tried skipping it once, thinking I’d be healthy and responsible.
The skillet came out looking nice, but it didn’t have that glossy, craveable finish. Butter is basically the pretzel’s best friend.
Brush it on while everything’s hot, and suddenly the whole kitchen smells like a snack stand at the happiest place on earth.
So if you’re new to this recipe: dip quickly, salt confidently, butter proudly, and serve it warm.
The skillet will disappear fast. And if it doesn’t? Congratulationsyou’ve discovered the rarest thing in the universe:
leftover pretzels.
Final thoughts
A Pull-Apart Pretzel Skillet is the kind of recipe that feels like a party even on a random Tuesday.
You get the comfort of warm bread, the fun of pull-apart sharing, and the pretzel magic of that chewy, golden crust
without the stress of shaping perfect twists. Make it once, and you’ll start inventing reasons to bake it again.
(Game night. Movie night. “I successfully answered emails today” night. All valid.)