Table of Contents >> Show >> Hide
- Why DIY Home Decor Works (Even If You’re “Not Crafty”)
- Start Smart: A Tiny Plan That Saves Time, Money, and Regret
- The DIY Decor Toolkit That Covers 90% of Projects
- 9 DIY Home Decor Projects That Look Expensive (But Aren’t)
- 1) Peel-and-Stick Wallpaper Accent (Instant “Designer Moment”)
- 2) The “Thrifted Frame” Gallery Wall (Big Personality, Small Budget)
- 3) DIY Floating Shelves (Function + Style in One Move)
- 4) Thrift Flip Furniture Makeover (Paint + Prep = New Piece)
- 5) Swap Hardware (The “Five-Minute Renovation”)
- 6) Jar Lighting and Lantern Decor (Whimsical Without Trying Too Hard)
- 7) Textiles That Change Everything (No Sewing Fame Required)
- 8) Paint Tricks That Look Custom (But Cost Paint Money)
- 9) Entryway Command Center (Because Life Comes With Paperwork)
- Pro-Level Results: Prep, Paint, and Mount Like You Mean It
- Make DIY Look “Designed”: Simple Styling Rules That Work
- Common DIY Home Decor Mistakes (And the Fixes)
- DIY Home Decor “Experience” Notes: What Usually Happens in Real Life (and Why It’s Normal)
- Final Touch: DIY Decor That Feels Like Home
DIY home decor is the magical middle ground between “I want my home to feel like me”
and “I would also like to keep eating food this month.” It’s also the fastest way to turn an
empty wall into a vibe, a thrift-store nightstand into a conversation piece, and a plain room
into something that feels intentionally styled (even if you assembled half of it in pajamas).
In this guide, we’ll go beyond random craft chaos. You’ll get a smart, flexible approach to
DIY decorating, plus specific project ideasfrom renter-friendly upgrades to weekend builds
and the pro techniques that make your finished work look polished instead of “I tried.”
Why DIY Home Decor Works (Even If You’re “Not Crafty”)
DIY decorating isn’t about being an artist. It’s about controlling the details that make a
space feel good: color, texture, lighting, storage, and personal touches. A few well-chosen
projects can do what expensive décor often fails to dotell your story.
- It’s budget-friendly: You can get high-impact results with paint, hardware swaps, and clever styling.
- It’s customizable: Your home shouldn’t look like a showroom that forgot you live there.
- It’s sustainable: Upcycling and thrift flips keep great materials out of landfills and in your home.
- It builds confidence: Once you hang one shelf without disaster, you’ll feel unstoppable (and slightly invincible).
Start Smart: A Tiny Plan That Saves Time, Money, and Regret
The “Three-Question” Style Filter
Before you buy supplies or commit to a trendy project, answer these:
- What problem am I solving? (Blank wall, clutter, bad lighting, no personality?)
- What do I want this space to feel like? (Cozy, airy, calm, bold, playful, grown-up?)
- What must stay? (Sofa color, flooring tone, landlord rules, your partner’s “don’t touch that” list.)
Create a Mini Mood Board (No Art Degree Required)
Pick 8–12 images you genuinely love (not what you think you “should” love). Look for repeats:
the same wood tones, similar colors, certain patterns, or a specific vibe (vintage warmth,
modern minimal, coastal, farmhouse, eclectic). Those repeats are your stylecongratulations,
you’ve discovered your design instincts without lighting any candles or buying a beret.
The DIY Decor Toolkit That Covers 90% of Projects
You don’t need a garage full of tools. Start with the basics and add as your projects grow.
- Measuring & layout: tape measure, level, pencil, painter’s tape
- Hanging & mounting: stud finder, drill/driver, assorted anchors, picture hangers
- Finishing: sandpaper or sanding block, microfiber cloth, primer, paint, quality brush/roller
- Safety: eye protection, dust mask for sanding, gloves for adhesives/chemicals, ventilation
Pro tip: if you’re doing wall projects, keep a small container labeled “wall stuff” with anchors,
screws, hangers, and a pencil. Future-you will treat present-you like a legend.
9 DIY Home Decor Projects That Look Expensive (But Aren’t)
1) Peel-and-Stick Wallpaper Accent (Instant “Designer Moment”)
Peel-and-stick wallpaper is one of the best DIY home decor upgrades because it gives high visual
impact with relatively low commitment. Use it behind open shelving, on a small accent wall, in a
powder room, or even on furniture panels for a custom look.
- Prep matters: clean the wall and let it dry fully so the adhesive grips.
- Make it easier: reverse-roll the wallpaper to flatten it before hanging.
- Cut with intention: give yourself a little extra length (overhang) so you can trim cleanly.
- Smooth as you go: use a smoothing tool or a credit card to push out bubbles.
Style idea: wallpaper one wall behind a bed, then keep bedding and artwork simpler so the pattern
reads as “statement,” not “I got excited.”
2) The “Thrifted Frame” Gallery Wall (Big Personality, Small Budget)
Gallery walls can look expensive when they’re cohesive. Thrift stores are full of frames with
solid bonesespecially wood frames that are just begging for a new finish. Mix sizes, but keep a
unifying element: all black frames, all warm wood, or a shared mat color.
Want a clever upgrade? Line the inside mat area with peel-and-stick wallpaper or decorative paper
for texture, then pop in prints, photos, or even pages from an old book (yes, your English teacher
just gasped, but the wall looks fantastic).
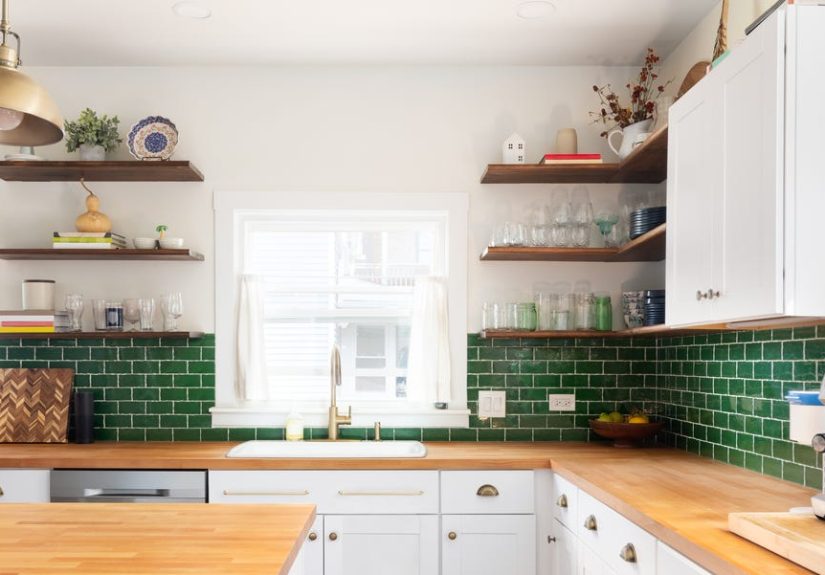
3) DIY Floating Shelves (Function + Style in One Move)
Floating shelves add storage and styling space without taking up floor area. They’re great for
kitchens (everyday dishes), living rooms (books + décor), bathrooms (towels + baskets), and awkward
nooks that don’t deserve to be sad empty corners.
The “secret” is secure support. Find studs when possible, and use appropriate anchors when you
can’t. If you’re building your own shelves, focus on clean cuts and strong mountingpretty is good,
but pretty that stays on the wall is better.
Styling tip: aim for a mix of tall + medium + small items, and leave some breathing room. Shelves
shouldn’t look like they’re holding their breath.
4) Thrift Flip Furniture Makeover (Paint + Prep = New Piece)
Thrift flips are DIY home decor gold. Look for sturdy construction: real wood, solid joints, drawers
that still glide. Cosmetic issues are okayugly finish, scratched top, dated hardware. Structural
issues (wobble, rot, water damage) are usually not worth the heartbreak.
- Repair first: fill chips, tighten screws, patch dents.
- Prep properly: clean, lightly sand or degloss, and prime when needed for adhesion.
- Upgrade hardware: new knobs/pulls can make a piece look custom.
- Finish strong: protect tops with a durable clear coat if it’s a high-use surface.
Example: turn a dated dresser into a modern entry console. Paint it a deep, moody color, swap in
simple pulls, and add a tray for keys. Suddenly your “where are my keys?” problem becomes a
“welcome home” moment.
5) Swap Hardware (The “Five-Minute Renovation”)
If you want maximum change with minimal effort, hardware is your best friend. Cabinet pulls, drawer
knobs, curtain rods, even switch platessmall changes add up fast. Choose finishes that match your
vibe: warm brass for cozy, matte black for modern, brushed nickel for classic, mixed metals for
confident eclectic.
A simple rule: repeat your chosen finish at least 2–3 times in the room so it looks intentional.
6) Jar Lighting and Lantern Decor (Whimsical Without Trying Too Hard)
Old jars can become decor that looks charming and expensive, especially with soft lighting. Fill
clear jars with battery-powered twinkle lights for an instant cozy glow on shelves, patios, or
tablescapes. For a seasonal twist, add dried botanicals or pressed flowers and use LED lights
(skip real flames for safety unless you’re using a proper candle holder).
This project is especially great when you want decor that feels “styled” without buying more
objects that need homes of their own.
7) Textiles That Change Everything (No Sewing Fame Required)
Textiles are the cheat code of DIY home decor: they add color, pattern, and softness immediately.
Try these easy upgrades:
- No-sew pillow covers: use fabric + iron-on hem tape for a clean edge.
- Layered curtains: sheer plus heavier panels = depth and a finished look.
- Throw blanket styling: fold, drape, or basket-storetexture reads as “luxury.”
- Rug layering: place a smaller patterned rug over a larger neutral for dimension.
If your room feels “flat,” it probably needs texture. Fabric is faster than repainting an entire wall,
and it doesn’t require moving furniture like a tired superhero.
8) Paint Tricks That Look Custom (But Cost Paint Money)
Paint is powerful because it changes perception: height, width, mood, and brightness. If you’re not
ready for full walls, try “micro-commitment” paint projects:
- Paint an arch behind a desk or bed to create a focal point.
- Color-block a corner to define a reading nook.
- Paint interior doors a bold neutral for contrast.
- Refresh trim for a clean, new-build feel.
The key is clean linesuse painter’s tape carefully, and remove it at the right time (when paint is
slightly tacky) to reduce peeling.
9) Entryway Command Center (Because Life Comes With Paperwork)
A practical DIY decor project that also makes your home feel more “together”: create a small
command zone. Add hooks for keys, a mail sorter, a small shelf, and a catch-all tray. If you want
extra points, add a small whiteboard or chalkboard for reminders.
It’s home decor that actually improves your dayarguably the highest form of decorating.
Pro-Level Results: Prep, Paint, and Mount Like You Mean It
Paint Like a Pro (Without the Pro Invoice)
Smooth paint isn’t luckit’s process. Patch holes, sand rough spots, wipe dust, then prime when
needed (especially on repaired areas or slick surfaces). When rolling walls, work in manageable
sections, and spread paint evenly instead of trying to win a speed contest.
A classic technique is rolling in a “W” pattern to distribute paint and then filling it in smoothly.
It helps reduce streaks and heavy lines. Also: don’t press too hard on the roller like you’re
trying to extract secrets from the drywall.
The Truth About Sanding (Yes, It’s Boring. Yes, It Matters.)
Many paints claim you can skip sanding. Sometimes you can. Often you shouldn’t. Light sanding (or
deglossing) helps paint and primer bond, especially on glossy furniture finishes. That bond is the
difference between “fresh makeover” and “peeling tragedy.”
Hang Decor Safely: Studs, Anchors, and Weight Ratings
Wall decor looks best when it stays on the wall. Use a stud finder when possible, especially for
heavy items (mirrors, large frames, shelves). When studs aren’t where you need them, use the right
drywall anchorsand don’t guess on weight ratings.
- Light items: picture hooks or small anchors can work.
- Heavy items: choose hardware rated above the item’s weight (extra margin = peace of mind).
- Toggle anchors: useful when you need stronger support in hollow walls.
If you’re in a rental, removable hanging systems can be helpfuljust follow product guidelines for
surface type and weight limits, and don’t use them for anything that could cause real damage (or
bruises) if it falls.
Make DIY Look “Designed”: Simple Styling Rules That Work
Even budget-friendly DIY home decor can look elevated if you style intentionally. Here are
designer-ish habits you can steal immediately:
- Repeat materials: if you introduce wood, repeat it somewhere else (frames, bowls, shelves).
- Mix textures: smooth (glass/metal) + soft (fabric) + natural (wood/stone) = depth.
- Use the rule of threes: group items in odd numbers for a more natural look.
- Anchor with one “real” element: a plant, a vintage piece, a textured basketsomething with character.
- Let nostalgia be intentional: meaningful items feel elevated when they’re curated, not cluttered.
Common DIY Home Decor Mistakes (And the Fixes)
-
Mistake: Buying supplies before measuring.
Fix: Measure first. Then measure again. Then label your measurements like you’re protecting national secrets. -
Mistake: Skipping surface prep.
Fix: Clean, scuff, prime. Your paint will stop acting like a flaky ex. -
Mistake: Hanging everything at random heights.
Fix: Use consistent spacing. For art, a common guideline is centering around eye level, then adjusting for furniture below. -
Mistake: Over-decorating shelves.
Fix: Leave negative space. Your objects need room to be charming. -
Mistake: Starting with the hardest project first.
Fix: Win with small projects. Confidence is the best tool you own.
DIY Home Decor “Experience” Notes: What Usually Happens in Real Life (and Why It’s Normal)
The internet loves a perfect before-and-after. Real DIY home decor is more like a cooking show:
you start with optimism, briefly question your life choices, and end up proud while pretending the
messy middle never happened. If you want the results without the emotional whiplash, here are
common experiences DIYers run intoplus how to handle them without spiraling.
Experience #1: The “I measured… sort of” moment. You plan floating shelves, cut the wood,
and then realize your “36 inches” was actually “36-ish.” It happens. The fix is boring but powerful:
measure walls in multiple places (older homes are charming and also not square), mark stud locations
before cutting, and do a quick mock-up with painter’s tape. Tape is cheap; re-cutting hardwood is not.
Experience #2: Paint looks wrong… until it dries. Fresh paint can look streaky, darker,
or oddly shiny while wet. Cue panic. Most finishes settle as they dry and cure. Use proper lighting,
apply thin coats, and resist the urge to keep rolling the same spot after it starts dryingthat’s
how you get texture. If you’re unsure about color, test a sample on multiple walls and check it in
morning, afternoon, and evening light. Your lamp is basically a mood influencer.
Experience #3: Wallpaper bubbles appear like tiny, smug villains. Peel-and-stick wallpaper
is forgiving, but it still demands patience. Bubbles usually come from uneven pressure or dusty walls.
Work top to bottom, smooth as you go, and lift/reposition early rather than pushing problems downward
like they’ll resolve themselves. (They won’t. They’ll just move.) A smoothing tool or an old credit card
helps, and small bubbles can often be pushed out toward the edge.
Experience #4: The thrift flip reveals “layers.” You sand a table and discover old stain,
mystery varnish, and a possibly historic glue situation. Don’t give up. Clean thoroughly, scuff-sand or
degloss, and use a primer suited to slick surfaces when needed. If the piece is uneven, paint can hide a
lotchoose a finish that matches your life (satin is forgiving; high-gloss is honest to a fault).
Also: new hardware is the ultimate “don’t look too close” trick.
Experience #5: Hanging décor becomes a physics exam. You hold a frame up, step back,
move it an inch, repeat 14 times. This is not failure. This is the process. Use painter’s tape to mark
top corners and test placement before making holes. For heavy pieces, pick hardware with a higher weight
rating than you think you need, and use studs or appropriate anchors. A little extra caution beats the
sound of a midnight crash that convinces you your house is haunted.
Experience #6: You finishand suddenly everything else looks outdated. This is the most
common “side effect” of DIY home decor. One upgraded corner makes the rest of the room feel left behind.
The cure is a simple rotation plan: do one small project a month, repeat your materials/colors, and let
the room evolve. Homes that feel good are rarely completed in a weekend; they’re curated over time.
Final Touch: DIY Decor That Feels Like Home
The best DIY home decor doesn’t just look niceit makes your space work better and feel more personal.
Start with one project that solves a real problem, use solid prep and safe hanging methods, and style
with intention. Your home isn’t competing with anyone else’s highlight reel. It’s building a vibe that
supports your real life (and your real laundry pile).