Table of Contents >> Show >> Hide
- What Is a French Cleat Tool Storage Wall?
- Planning Your French Cleat Wall
- Materials and Tools You’ll Need
- Step-by-Step: How to Build a French Cleat Tool Storage Wall
- Safety, Load Capacity, and Common Mistakes
- Design Ideas to Customize Your French Cleat Wall
- Real-World Experiences and Extra Tips from the Shop
If your workbench looks like a tool tornado just hit it, a French cleat tool storage wall might be your new favorite DIY project. This simple system uses angled wooden strips to hang shelves, bins, and custom tool holders anywhere along your wallno more random screws, no more “Where did I put that chisel?” panic.
The best part? A French cleat wall is strong, modular, and surprisingly easy to build with basic tools. Once the cleats are up, you can rearrange your workshop in minutes without drilling new holes every time your tool collection grows (and let’s be honest, it will).
What Is a French Cleat Tool Storage Wall?
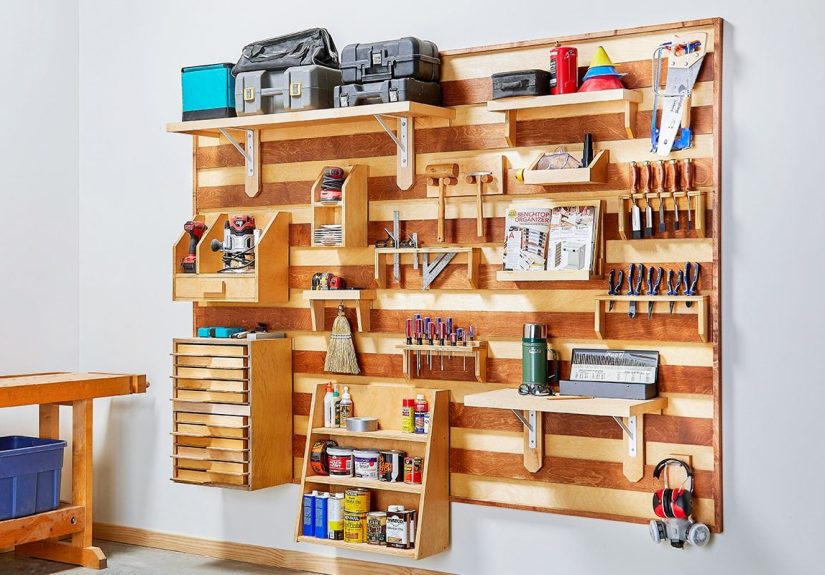
A French cleat is simply a strip of wood with a 45-degree beveled edge. One piece mounts to the wall with the bevel facing up and out, and the matching piece mounts to the back of a cabinet, shelf, or tool holder with the bevel facing down and in. The two pieces interlock and the weight of the load pulls them together, making the joint stronger as you add weight.
A full French cleat tool storage wall is just a grid of these cleats running horizontally across a section of your wall. You then hang custom holders for drills, clamps, hand tools, sanders, and whatever else you want off the floor and out of the way. Compared with pegboard, French cleats offer:
- Higher load capacity when properly fastened into studs
- Infinite modularitymove holders left, right, higher, lower in seconds
- Cleaner look with plywood panels and matching holders
- Less wall damageyou screw the cleats or backer up once, then customize endlessly
Planning Your French Cleat Wall
Before you rip a single board, spend a few minutes planning. This is where you decide how big the wall should be, what tools you’ll store, and how much weight it needs to support.
Choose the Wall Area and Height
Pick a section of your garage or workshop wall that is:
- Close to where you actually use your tools (near the workbench is ideal)
- Relatively unobstructedno random windows, electrical panels, or low outlets in the way
- Comfortable to reach without a step stool for your most-used tools
A common layout is to run cleats from about 30–36 inches off the floor up to about 72–80 inches. That gives you room for heavy items at chest height and lighter items above.
Decide on a Backer Panel (Optional)
You can mount cleats directly into studs through drywall, or screw them onto a full sheet of 1/2- or 3/4-inch plywood that’s first attached to the wall. A backer panel:
- Spreads the load over more fasteners
- Protects drywall from wear as you rearrange tool holders
- Makes it easier to remove the whole system if you move
If your wall is wavy, or you’re worried about constantly bumping the drywall, a plywood backer is a smart upgrade.
Think About Weight and Tool Zones
Group tools by type and weight as you plan:
- Heavy zone: benchtop tools, clamp racks, nailers (use double cleats and hit studs)
- Everyday zone: screwdrivers, pliers, tape measures at eye or chest height
- Light zone: sanding blocks, small organizers, extra accessories higher up
Sketch a rough layout on paper. You don’t have to stick to it forever, but it’ll guide where you focus your cleats and how many holders you’ll need.
Materials and Tools You’ll Need
Recommended Materials
- 1 sheet of 3/4″ plywood for cleats (construction grade is fine)
- Optional: 1 sheet of 1/2″ or 3/4″ plywood for a backer panel
- 2 1/2″ to 3″ wood screws or structural screws for studs
- 1 1/4″ trim-head or wood screws to attach cleats to the backer
- Wood glue for tool holders
- Sandpaper and finish (paint, clear coat, or just leave it raw)
Tools
- Table saw or circular saw with a guide
- Drill/driver and drill bits
- Stud finder
- Level (4-foot level or laser level works great)
- Tape measure and pencil
- Safety gear: eye and hearing protection, dust mask
Step-by-Step: How to Build a French Cleat Tool Storage Wall
Step 1: Break Down the Plywood
Start by ripping your plywood into long strips. A typical cleat height is 3–4 inches. Many DIYers rip strips to about 5–6 inches wide, then cut them in half on a 45-degree angle, giving you two matching cleats from each strip.
If you’re using a table saw:
- Keep the blade at 90 degrees for this first cut.
- Use a rip fence and push stick for safety.
- Work with manageable piecescut the 4×8 sheet into halves or thirds first if needed.
Step 2: Cut the 45-Degree Bevel
Now tilt your table saw blade to 45 degrees and run each wide strip through again to create the French cleats.
- Keep the narrow side of the strip against the fence so the angled cut ends in a clean point.
- Consistency matters: if all your cleats share the same angle, holders will fit anywhere on the wall.
- Label one half of each strip “wall” and the other “holder” so you don’t mix them up later.
When you’re done, you’ll have a pile of long, beveled stripsthese are the backbone of your French cleat system.
Step 3: Install the Backer Panel (If Using One)
If you’re going with a plywood backer, cut it to the size of the area you planned earlier. Use a stud finder to mark stud locations across the wall.
- Hold the panel in place (you may need a helper or a temporary support cleat).
- Drive 2 1/2″–3″ screws into each stud, about every 16 inches vertically.
- Check for level as you gothis is your reference surface for everything that follows.
No backer? No problem. Just mark the studs on the drywall and you’ll mount the cleats directly to them.
Step 4: Lay Out and Mount the Wall Cleats
Decide how far apart you want each cleat. A common spacing is 6–8 inches between cleats. Closer spacing gives you more flexibility for smaller tool holders.
- Mark a level line for your bottom cleat.
- Use a spacer block (for example, a scrap 2×4 or plywood offcut) to keep the spacing consistent as you work upward.
- Place the first cleat with the bevel facing up and away from the wall.
- Drive two screws into each stud or into the backer at every 16 inches or so.
Repeat until you’ve filled the height of your planned tool wall. Step back and admire the clean, organized grid. It looks a little bare now, but that’s about to change.
Step 5: Build Simple French Cleat Tool Holders
This is where the fun starts. For each holder, you’ll attach a “holder” cleat to the back of a small plywood box, shelf, or custom bracket.
Basic holder recipe:
- Cut a back panel of 1/2″ or 3/4″ plywood.
- Screw or glue a matching cleat near the top back, bevel facing down toward the wall.
- Add shelves, dividers, or dowels depending on what you’re storing.
Starter ideas:
- Drill dock: A small shelf with cut-outs or dividers for battery drills and chargers.
- Screwdriver rack: A simple board with drilled holes or routed slots.
- Clamp rack: Heavy-duty brackets using two cleats instead of one for extra support.
- Bin rail: A long holder with hooks or ledges for plastic bins of screws and hardware.
Step 6: Hang and Adjust
Hook each holder over a wall cleat and gently pull down so the bevels lock together. Adjust spacing until everything feels natural: most-used tools front and center, specialty items off to the side.
Don’t worry about getting it perfect on day one. The magic of this system is that you can rearrange things whenever your workflow changesor when you buy a new tool and need to make space (again).
Safety, Load Capacity, and Common Mistakes
How Much Weight Can a French Cleat Hold?
When built from 3/4″ plywood and screwed solidly into studs, a French cleat system can handle very heavy loads. Many real-world tests show individual cleats easily supporting over 100 pounds when properly installed. In practice, a wall of cleats will spread the load across multiple fasteners, making it more than strong enough for common workshop tools.
To keep things safe:
- Always hit studs when mounting cleats or backer panels.
- Use quality screws, not random leftovers from a mystery coffee can.
- For very heavy items, use wider cleats, thicker plywood, or double cleats.
Common Mistakes to Avoid
- Skipping the level: If your cleats aren’t level, your holders will lean, slide, or just feel “off.” Always use a level or laser.
- Undersized material: Avoid thin, flimsy boards. Stick with 3/4″ for cleats for solid holding power.
- Too few screws: Don’t rely on one screw at each end. Use multiple fasteners per stud or per cleat.
- Overloading a single cleat: For long clamp racks or heavy cabinets, spread the weight over more cleats or add a second cleat on the holder.
- Sharp edges: Ease the edges with sandpaper to avoid splinters and make the wall more pleasant to work around.
Design Ideas to Customize Your French Cleat Wall
Once the basic grid is up, you can make your French cleat wall as simple or as fancy as you like.
- Color-coding: Paint holders by categoryred for cutting tools, blue for measuring, green for sanding, and so on.
- Labels: Add labels or stenciled outlines so tools have a clear “home” and you know when something is missing.
- Non-tool storage: Use cleats in the home office or craft room for bins, picture shelves, or small plants.
- Expandable layout: Leave room on either side of your initial wall to extend the system in the future.
The more you live with the wall, the more ideas you’ll get. That’s the beauty of a system that can be changed in minutes.
Real-World Experiences and Extra Tips from the Shop
Building a French cleat tool storage wall isn’t just about cutting boards and driving screwsit’s about how the wall actually works once you start using it. Here are some experience-based tips you only really learn after living with a cleat wall for a while.
Start Small, Then Expand
It’s tempting to cover a whole wall with cleats right away, but you don’t have to. Many DIYers start with a single 4×4-foot section over the workbench and see how it feels. That first section will teach you a lot about your habitswhat tools you reach for constantly, which ones can live higher up, and which holders you want more of.
Once you’ve used the system for a month or two, you’ll have a much better sense of where to expand. At that point, you can add more cleats to the sides or even start a second wall near other work areas, like the miter saw station.
Expect to Rebuild a Few Holders
No matter how carefully you plan, a few of your first holders will be “Version 1.0.” Maybe the drill cubby is too tight for that chunky new impact driver, or your clamp rack doesn’t leave enough room for your fingers to grab the handles.
That’s normal. The French cleat system makes it painless to rebuild and improve holders. Keep some offcut plywood handy and treat the first few months as a prototype phase. When a holder annoys you more than twice, that’s your cue to redesign it.
Use Double Cleats for Heavy or Awkward Items
For big clamp racks, tall cabinets, or sanders with dust collection, a single cleat might technically hold the weight, but a double-cleat setup will feel more secure. That means running two matching cleats on the back of the holder, spaced several inches apart, and hanging them on two wall cleats.
This spreads the load and keeps the holder from rocking or tilting when you grab something quickly. It’s a small upgrade that makes a big difference in daily use.
Plan for Dust and Cords
It’s easy to fall in love with the visual organization and forget about the dusty, corded reality of a workshop. If you’re hanging sanders, grinders, or other power tools on the cleat wall, think about where the cords and hoses will go.
- Leave space between holders for cords to hang naturally.
- Add small hooks or dowels specifically for wrapping cords.
- Keep dust collection accessories together in a dedicated holder so you’re not chasing adapters around the shop.
A little cord planning up front keeps your “organized” wall from becoming a spaghetti factory of cables.
Make It Look GoodYou’ll Use It More
Function comes first, but looks matter more than most DIYers admit. A neatly finished French cleat wall makes your shop feel like a place where good work happens. You’re more likely to put tools back where they go when the wall looks intentional, not thrown together.
Simple aesthetic upgrades:
- Round over or chamfer the front edges of cleats and holders.
- Apply a light clear coat to bring out the grain and make surfaces easier to wipe down.
- Keep the design language consistentsame thickness plywood, similar hardware, repeating shapes.
Think of it as a “shop feature wall.” It’s the backdrop for a lot of future projects, so it’s worth a little extra care.
Leave Space for the Future You
Right now, you might be organizing a modest set of hand tools and a couple of cordless drills. But woodworking and DIY hobbies tend to escalate. Your future self may have a planer, more clamps than you thought possible, and a borderline embarrassing number of specialty jigs.
When you lay out your cleat wall, don’t pack every square inch on day one. Leave empty space and even a few unused cleats. That breathing room will let you add new holders later without tearing everything apart.
The Payoff: A Bench That Stays Clear
The biggest “experience” win of a French cleat tool storage wall is psychological. Once your most-used tools live at arm’s reach on the wall, your workbench stops being a permanent parking lot. You can clear the surface in minutes simply by hanging everything back up.
That makes it easier to start new projects, easier to stay safe (fewer tripping hazards and buried blades), and honestly, it just feels good. You built a smart, flexible system that works with you instead of against youand you did it with some plywood, a saw, and a free weekend.
If you’re tired of hunting for tools and stepping over clutter, building a French cleat tool storage wall is one of the most satisfying DIY projects you can tackle. Once you start hanging cleats, you may find yourself eyeing every blank wall in the house and thinking, “You know… I could put a system there too.”