
Table of Contents >> Show >> Hide
Swapping out a wall sconce is one of those home improvement projects that looks intimidatingbut really isn’t. If you can use a screwdriver and follow directions (and maybe resist the urge to flip the breaker back on too early), you’re already halfway there. Whether you’re upgrading a dated brass fixture from the early 2000s or installing a sleek modern sconce for better lighting, this guide will walk you through the process safely, clearly, and with minimal stress.
Based on best practices commonly shared by U.S.-based home improvement experts, electricians, and DIY authorities, this step-by-step tutorial explains how to replace a wall-mounted light fixture the right waywithout sparks, shocks, or mystery parts left over.
Before You Begin: What You’ll Need
Tools and Supplies
- Flathead screwdriver and Phillips screwdriver
- Voltage tester (non-contact is best)
- Wire strippers
- Needle-nose pliers
- Electrical tape
- Wire connectors (usually included with the fixture)
- New wall sconce
- Light bulbs (correct wattage and type)
Safety First (Seriously)
Turn off the power at the circuit breakernot just the wall switch. This is non-negotiable. Once the breaker is off, use a voltage tester to confirm there’s no current flowing to the wires.
If you ever feel unsure, uncomfortable, or discover damaged wiring, stop and call a licensed electrician. There’s no shame in knowing your limitsonly expensive mistakes if you ignore them.
Step-by-Step: How to Replace a Wall-Mounted Light Fixture
Step 1: Remove the Old Sconce
With the power off, remove the light bulbs and any decorative covers or shades. Most wall sconces are secured to the electrical box with two mounting screws.
Support the fixture with one hand as you loosen the screws. Once free, gently pull the fixture away from the wall to expose the wiring.
Step 2: Disconnect the Wiring
You’ll usually see three types of wires:
- Black (hot)
- White (neutral)
- Bare copper or green (ground)
Take a quick photo before disconnecting anythingit’s a lifesaver during reassembly. Unscrew the wire connectors and separate the wires. Set the old fixture aside.
Step 3: Inspect the Electrical Box
Check that the box is securely attached to the wall and rated for light fixtures. Look for brittle insulation, scorch marks, or loose wires. If everything looks solid, you’re good to proceed.
This is also a good moment to clean the area or patch small imperfections before installing the new sconce.
Step 4: Attach the Mounting Bracket
Most new sconces include a mounting bracket that attaches to the electrical box. Secure it firmly using the provided screws. The bracket should sit flush against the wallno wobbling allowed.
Correct alignment now saves frustration later when you’re trying to straighten a crooked fixture.
Step 5: Connect the Wires
Match the wires by color:
- Black to black (hot)
- White to white (neutral)
- Ground to ground (bare or green)
Twist the wires together clockwise, secure them with wire connectors, and wrap lightly with electrical tape for extra security.
Step 6: Mount the New Sconce
Tuck the wires carefully into the electrical box. Position the sconce over the mounting bracket and fasten it using the provided screws.
Take a step back and check alignment before fully tightening everything. A level can help, but your eyes work too.
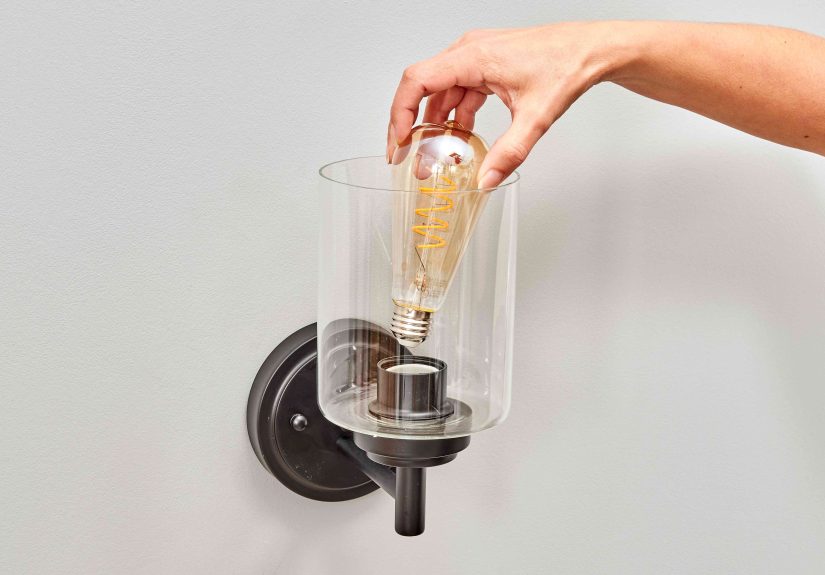
Step 7: Install Bulbs and Restore Power
Install the recommended bulbs, turn the breaker back on, and test the light. If it doesn’t turn on immediately, don’t paniccheck the switch, the bulbs, and wire connections.
Common Mistakes to Avoid
- Forgetting to turn off the breaker (the classic DIY error)
- Mixing up hot and neutral wires
- Over-tightening screws and cracking the fixture
- Using bulbs with wattage higher than recommended
A calm approach beats rushingespecially when electricity is involved.
Choosing the Right Wall Sconce
Style and Function
Wall-mounted light fixtures are both decorative and practical. Decide if your sconce is meant for ambient light, task lighting, or accent lighting.
Placement Tips
- Hallways: about 60–66 inches from the floor
- Bathroom sconces: at eye level beside mirrors
- Bedrooms: reading height above nightstands
Good placement can dramatically change how a room feels.
When to Call a Professional
If the wiring colors don’t match, the electrical box is damaged, or the circuit trips immediately after installation, stop. These are signs of underlying issues that require a licensed electrician.
DIY is about confidencenot recklessness.
Real-Life Experiences Replacing Wall Sconces (Lessons Learned)
Over the years, replacing wall-mounted light fixtures has become one of the most common “weekend win” projects for homeownersand for good reason. Many people report that their first sconce replacement took longer than expected, but subsequent installations felt almost easy by comparison.
A common experience involves underestimating how much old fixtures can weigh. Supporting the fixture while disconnecting wires is crucial. Several DIYers mention learning this lesson the hard way, juggling a heavy metal sconce while trying to remember which wire went where.
Another frequently shared experience is discovering non-standard wiring in older homes. Homes built before the 1980s may lack grounding wires or use faded insulation colors. In these cases, homeowners often paused, researched safe grounding solutions, or consulted professionalsturning a potential problem into a learning moment.
Many people also mention that replacing a wall sconce gave them confidence to try other electrical projects, like updating switches or installing dimmers. The psychological boost of flipping a switch and seeing your handiwork light up a room is real.
On the design side, countless homeowners say new sconces made rooms feel larger, warmer, and more intentional. Swapping outdated fixtures for modern designs often had more visual impact than repainting walls.
There’s also the humor factor. Dropped screws, upside-down mounting brackets, and bulbs installed before realizing the power was still off are practically rites of passage. These stories highlight an important truth: mistakes are part of the DIY experience, and nearly all of them are fixable.
Finally, many seasoned DIYers agree on one takeaway: patience matters more than speed. Taking time to check wiring, align fixtures, and follow instructions closely almost always leads to better resultsand fewer trips back to the hardware store.
Conclusion
Replacing a wall-mounted light fixture doesn’t require special trainingjust preparation, caution, and a bit of confidence. When done correctly, it’s a fast, affordable upgrade that can transform how your home looks and feels. Follow the steps carefully, respect electricity, and enjoy the satisfaction of a job well done.


