
Table of Contents >> Show >> Hide
- What Is Methi Paratha?
- Why Methi Paratha Is Good for You
- Ingredients for Methi Paratha (Fenugreek Paratha)
- How to Make Methi Paratha Step by Step
- Serving Suggestions
- Storage, Meal Prep, and Freezing
- Variations You Can Try
- Expert Tips for Perfect Methi Paratha
- FAQ: Methi Paratha (Fenugreek Paratha) Recipe
- Real-Life Experiences with Methi Paratha
If “comfort food” had a leafy green mascot, it would absolutely be
Methi Paratha. These soft, golden-brown Indian flatbreads are made with
whole wheat flour and fresh fenugreek leaves, then cooked on a hot pan with a drizzle of ghee
or oil. The result? A warm, earthy, slightly bitter-but-in-a-good-way flavor that makes you
feel like you’re being hugged by an Indian grandma, even if you don’t have one.
In this in-depth guide, you’ll learn exactly how to make Methi Paratha (Fenugreek Paratha)
at home, how to keep it soft, how to tweak it for health goals, and what to serve it with so
it becomes a complete, balanced meal. Whether you’re in India or shopping at an Indian grocery
store in the United States, this recipe is designed to be practical, reliable, and delicious.
What Is Methi Paratha?
Methi Paratha is a North Indian flatbread made with atta (whole wheat flour) and
fresh fenugreek leaves (methi). The leaves are finely chopped and mixed directly into the dough
along with spices, salt, and a bit of oil or yogurt for softness. The dough is rolled into circles and
cooked on a hot tawa (griddle) with a light brushing of ghee or oil until speckled with brown spots.
Unlike plain paratha or roti, methi paratha brings in the distinctive, slightly bitter flavor of fenugreek,
which pairs beautifully with tangy yogurt, spicy pickles, or a simple potato curry. It’s popular as:
- A hearty breakfast with yogurt and pickle
- A lunchbox staple for kids and adults
- A travel-friendly meal (it stays soft and tasty for hours)
- A lighter dinner when you’re tired of heavy curries and rice
Why Methi Paratha Is Good for You
Methi paratha isn’t just tasty; it’s secretly a health win. Fenugreek leaves are rich in
antioxidants, vitamin A, vitamin C, iron, and fiber, while whole wheat flour adds complex carbs
and more fiber for steady energy. Together, they support digestion, immunity, and overall health.
On average, one methi paratha made with moderate oil contains roughly
around 120–130 calories, with a mix of carbs, a bit of protein, and some fat from oil or ghee.
The whole wheat and fenugreek combo adds about 2–3 grams of fiber per paratha, contributing to better
digestion and satiety.
In short: this is the kind of “comfort carb” your body can actually appreciate when enjoyed in reasonable
portions and paired with protein-rich sides like yogurt, lentils, or paneer.
Ingredients for Methi Paratha (Fenugreek Paratha)
Core Ingredients
- 2 cups whole wheat flour (atta)
- 1½–2 cups fresh fenugreek leaves (methi), finely chopped, tightly packed
- 2–3 tablespoons plain yogurt (optional but helps keep parathas soft)
- 1–2 tablespoons oil for the dough (any neutral oil, or melted ghee)
- ½–¾ teaspoon salt, or to taste
- Water, as needed, to knead a soft dough (about ½–¾ cup, depending on flour and leaves)
Spices (Adjust to Taste)
- ½ teaspoon turmeric powder
- ½–1 teaspoon red chili powder or cayenne
- ½ teaspoon cumin seeds or ajwain (carom seeds)
- ¼–½ teaspoon garam masala (optional, for extra warmth)
- 1 teaspoon grated ginger (optional but recommended)
- 1–2 finely chopped green chilies (optional for heat)
For Cooking
- 2–3 tablespoons oil or ghee, for frying the parathas
If You Don’t Have Fresh Methi
Fresh fenugreek leaves are best, but if you’re in the U.S. and only have dried fenugreek
(kasuri methi), you can still make a delicious version:
- Use 2–3 tablespoons crushed kasuri methi for every 2 cups of flour.
- Soak it briefly in warm water, then squeeze out excess moisture before adding to the dough.
How to Make Methi Paratha Step by Step
Step 1: Prep the Methi Leaves
- Pluck methi leaves from the stems. Discard tough stems.
- Rinse the leaves very well in a bowl of water, changing the water until it runs clear.
- Drain completely and pat dry using a clean kitchen towel or paper towels.
- Chop the leaves finely. This helps them blend into the dough and makes rolling easier.
Tip: If your methi is very bitter, sprinkle the chopped leaves with a little salt,
toss, and let them sit for 10–15 minutes. Then rinse and squeeze gently. This reduces bitterness
while keeping flavor.
Step 2: Make the Dough
-
In a large mixing bowl, add:
- Whole wheat flour
- Chopped methi leaves
- Salt
- Turmeric, chili powder, cumin or ajwain, garam masala
- Grated ginger and green chilies (if using)
- Yogurt and oil
- Use your fingers to rub everything together. The methi will start releasing a bit of moisture and color.
-
Begin adding water little by little, mixing and kneading until you get a
soft, smooth dough. It should be slightly softer than chapati dough but not sticky. -
Once the dough is smooth, drizzle a few drops of oil over it, rub, and cover with a damp kitchen towel.
Let it rest for 15–20 minutes. This resting time helps the gluten relax and makes rolling easier.
Step 3: Shape the Parathas
- After resting, knead the dough briefly again.
- Divide into equal-sized balls (about golf-ball size). You’ll get roughly 8 parathas.
-
Dust a rolling surface with a little flour. Take one dough ball, flatten it slightly, and roll into
a small disc (about 4 inches). -
For extra softness, you can:
- Brush the small disc lightly with oil, fold into a semi-circle, brush again, then fold into a triangle and roll out.
- Or simply roll into an 8–9 inch circle directly, like a standard paratha.
Step 4: Cook the Parathas
- Heat a tawa or nonstick skillet on medium-high heat until hot.
- Place the rolled paratha on the hot pan. Cook for 30–40 seconds, or until small bubbles appear.
- Flip the paratha. Brush or drizzle a little oil or ghee around the edges and on top.
- Press gently with a spatula as it cooks. You should see brown spots forming.
- Flip again and cook the other side, adding a bit more oil or ghee if needed.
-
Once both sides have golden brown spots and the paratha looks cooked through, remove and keep in a
covered container lined with a clean cloth to stay warm and soft. - Repeat with the remaining dough balls.
You now have a stack of fragrant, homemade methi parathas ready to devour.
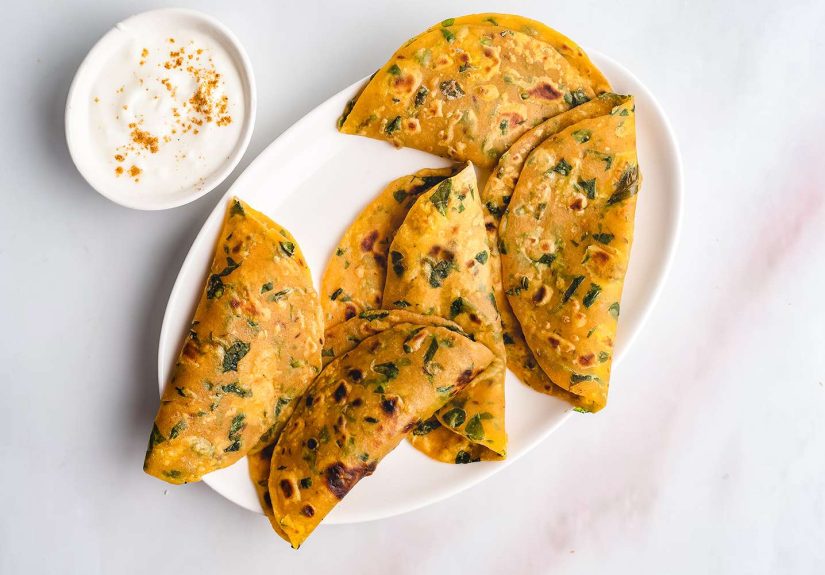
Serving Suggestions
One of the best things about methi paratha is how versatile it is. You can keep it simple or build a full
feast around it. Try serving it with:
- Plain or flavored yogurt (like boondi raita or cucumber raita)
- Indian pickles (achar) – mango, mixed pickle, or chili pickle
- Simple curries such as aloo sabzi (potatoes), chana masala, or paneer bhurji
- Butter or ghee on top for extra richness (highly recommended if you’re not counting calories)
- Masala chai for a cozy breakfast or brunch plate
For a lighter meal, pair methi paratha with a bowl of soup, dal, or a crunchy salad. The earthy methi flavor
works surprisingly well with fresh greens and tangy dressings.
Storage, Meal Prep, and Freezing
Short-Term Storage
- Cooked methi parathas stay good at room temperature for 6–8 hours, making them perfect for lunchboxes.
-
For the fridge, cool them completely, stack with parchment or foil between each paratha, and store in an
airtight container for up to 2–3 days. - Reheat on a tawa or dry skillet until warm and slightly crisp again.
Freezing Tips
- Par-cook the parathas (lightly cook both sides without much browning).
- Cool completely, stack with parchment between parathas, and place in a freezer-safe bag or box.
- Freeze for up to 1–2 months.
- When needed, cook directly from frozen on a hot tawa with a little oil or ghee until fully done.
Variations You Can Try
-
Extra-Protein Methi Paratha: Add 2–3 tablespoons of chickpea flour (besan) to the dough for
extra protein and a slightly nutty flavor. -
Methi Aloo Paratha: Mix in leftover mashed potatoes or boiled grated potatoes with the dough
to make a heartier paratha. -
Spicy Methi Paratha: Increase green chilies and red chili powder, and add crushed black pepper
for more heat. -
Methi Thepla Style: Add a little more yogurt and a touch of sugar for a Gujarat-inspired flavor
that’s great for travel.
Expert Tips for Perfect Methi Paratha
- Wash the leaves thoroughly. Fenugreek can be sandy or gritty. Always wash multiple times and drain well.
- Don’t skip resting the dough. Even 15 minutes makes the parathas easier to roll and softer after cooking.
-
Keep the dough soft, not stiff. A tight dough leads to dry, tough parathas. If rolling is difficult,
your dough is probably too dry. -
Roll evenly. Thick patches won’t cook properly; overly thin spots may burn. Aim for an even thickness
all around. -
Control the heat. Too low and parathas turn dry and hard; too high and they burn outside while staying
undercooked inside. Medium to medium-high heat is usually ideal.
FAQ: Methi Paratha (Fenugreek Paratha) Recipe
Is methi paratha good for weight loss?
It can be, especially if you go easy on the oil or ghee and pair it with light sides like low-fat yogurt,
vegetable sabzi, or lentils. Fenugreek leaves and whole wheat provide fiber to keep you full longer. Just
watch your portion sizetwo medium parathas with healthy sides make a sensible meal for most adults.
Can I use frozen methi?
Yes. Thaw completely, squeeze out extra water, and then measure and chop if needed. Frozen methi is a handy
option in the U.S. where fresh fenugreek is sometimes seasonal or only found in Indian grocery stores.
How do I keep methi paratha soft for lunchboxes?
Add a spoonful of yogurt or a bit of oil to the dough, cook on medium heat so they don’t dry out, and stack
them in an insulated container lined with a clean cloth. Avoid overcooking; slightly softer parathas stay
tender longer.
Can I make this recipe vegan?
Absolutely. Skip the yogurt or use a plant-based yogurt, and replace ghee with any neutral oil or vegan butter.
The parathas will still be flavorful and soft if the dough is well-rested and properly hydrated.
Real-Life Experiences with Methi Paratha
Beyond measurements and timing, every home cook has a personal methi paratha story. This is the kind of recipe
that quietly becomes part of your routineespecially if you’re cooking for a family or trying to balance
comfort with healthier choices.
One of the most common “aha” moments people have with methi paratha is realizing how travel-friendly it is.
If you grew up in an Indian household, there’s a good chance someone packed a stack of parathas for a long
train or car ride. They don’t leak, they don’t fall apart easily, and they taste just as good a few hours
later with nothing more than a little pickle or even plain yogurt. Many families still pack methi paratha
for road trips, kids’ picnics, or hectic workdays because it’s filling, portable, and doesn’t require a lot
of reheating drama.
In the United States, methi paratha has also become a quiet hero for busy weekdays. Fresh fenugreek leaves
suddenly show up in Indian markets or specialty stores, and home cooks grab a big bunch without always knowing
what to do with it all. Methi paratha is often the firstand most reliableanswer. Chop, mix, knead, roll,
cook, and you’ve transformed a slightly intimidating leafy green into something even picky eaters will accept.
A lot of people discover that kids who refuse “green stuff” in curries will happily eat it in paratha form.
The trick is simple: chop the leaves finely, keep the spices balanced (not too spicy), and serve the parathas
with a small bowl of yogurt or a mild potato curry. Suddenly, the plate is clean, and the “I don’t like
vegetables” child has eaten a decent serving of greens without a meltdown. Sneaky? Yes. Effective? Also yes.
Another experience that comes up often is the shift from buying frozen parathas to making them fresh at home.
Frozen parathas are convenient, but once you knead a dough with fresh methi, feel the aroma as the parathas
puff slightly on the tawa, and bite into that just-cooked texture, it’s hard to go back. Many home cooks
report that they start making a bigger batch on weekends, then refrigerate or freeze extras so they still
get that “freshly made” taste with weeknight-level effort.
There’s also a seasonal side to methi paratha. In cooler months, when fenugreek leaves are at their best,
kitchens smell differently. A stack of warm methi parathas, a bowl of dal or curry, and a cup of chai can
easily turn a regular weeknight into something cozy and quietly celebratory. It doesn’t feel like an elaborate,
time-consuming feast, but it also doesn’t feel like you just “made do” with whatever was in the fridge.
Finally, methi paratha tends to become a “signature dish” for many people who are just getting into Indian
cooking. It’s less intimidating than layered, stuffed parathas and more forgiving than complex curries. Once
you nail the basic dough and rolling technique, you can play: add grated carrots, switch up spices, experiment
with different oils, or pair it with everything from spicy pickles to leftover stir-fry. It’s one of those
recipes that grows with you, adjusts to your pantry, and quietly anchors many of your meals.
Whether you’re cooking for yourself, your family, or a friend who has never tried Indian flatbreads before,
methi paratha is a recipe that rarely disappoints. It’s humble, wholesome, and flexibleexactly the kind of
thing you’ll want in your regular cooking rotation.
SEO JSON Meta Block


