Table of Contents >> Show >> Hide
- What “Indoor Composting” Really Means (and Why It’s Worth It)
- Choose Your Indoor Composting Method
- The Indoor Composting “Ingredient List” (What to Add and What to Avoid)
- How to Start a Worm Bin (Vermicomposting) Step by Step
- How to Start Bokashi Indoors (Ferment First, Compost Later)
- Odor-Free Indoor Composting: The Not-So-Secret Secrets
- Harvesting Your Compost (and Actually Using It Without Harming Plants)
- Beginner-Friendly Indoor Composting Workflow (So It Doesn’t Take Over Your Life)
- Indoor Composting Starter Kit: What to Buy (and What to DIY)
- What Real-Life Indoor Composting Feels Like ( of “Experience” You Can Expect)
Indoor composting is the rare home project that’s equal parts: (1) eco-friendly, (2) budget-friendly, and (3) mildly magical.
You take what looks like “trash” (banana peels, coffee grounds, wilted lettuce) andwithout needing a backyard, a pitchfork,
or a PhD in Microbe Managementturn it into something your plants will absolutely brag about.
If you’ve ever looked at your kitchen scraps and thought, “Surely there’s a better fate than landfill,” you’re right.
The trick is choosing an indoor composting method that fits your space, your schedule, and your tolerance for learning new
household rhythms (like keeping shredded paper next to your onions… on purpose).
This guide breaks down the main indoor composting options, how to set them up, what to put in (and what to keep out),
and the small-but-mighty habits that keep your compost from smelling like a science fair gone rogue.
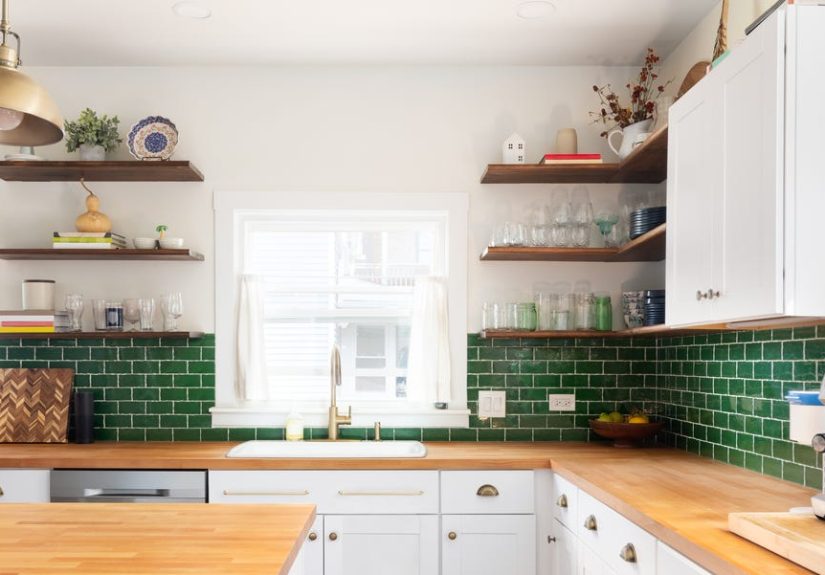
What “Indoor Composting” Really Means (and Why It’s Worth It)
Composting is the controlled breakdown of organic materials into a dark, crumbly soil amendment. Indoors, you’re typically
working with smaller systems that prioritize cleanliness, odor control, and convenience. The goals are the same as outdoor
composting: reduce waste and create “black gold” for plants. The difference is that indoors, you want a process that plays
nicely with modern lifethink cabinets, closets, basements, and busy weeks.
Indoor composting wins when you:
- Live in an apartment or have limited outdoor space
- Want year-round composting without winter slowdowns
- Prefer fewer pests, less mess, and more control over moisture and smell
- Love houseplants (or container gardening) and want a steady supply of compost
The biggest mindset shift is this: indoor composting isn’t one “thing.” It’s a category. Your job is to choose the method
that matches your lifestylebecause the best compost system is the one you’ll actually keep using after the novelty wears off.
Choose Your Indoor Composting Method
There are three practical paths for indoor composting beginners: a small aerobic bin (microbe-based), vermicomposting (worms),
and bokashi (fermentation). There’s also a fourth “almost” category: electric countertop machineshelpful, but not exactly
composting in the traditional sense.
1) Aerobic indoor composting (microbes + air)
Aerobic composting uses oxygen-loving microbes to break down scraps. Indoors, this is usually a compact bin system where you
mix “greens” (nitrogen-rich food scraps) with “browns” (carbon-rich dry material like shredded paper). The big advantage is that
it produces compost that’s closer to what you’d get outdoorsjust slower and smaller scale.
The big challenge: odor control. Indoor aerobic composting only stays pleasant when you maintain airflow, moisture balance,
and a browns-to-greens ratio that keeps scraps from going slimy.
2) Vermicomposting (worms = tiny coworkers who never call in sick)
Vermicomposting uses composting worms (commonly red wigglers) plus microbes to convert food scraps into worm castings and
finished vermicompost. A well-maintained worm bin can be remarkably low-odormore “forest floor” than “leftover casserole.”
This method shines for households with steady produce scraps, coffee grounds, and paper products. It also tends to be very
forgiving once you learn two rules: don’t overfeed, and always bury food under bedding.
3) Bokashi (fermentation first, compost later)
Bokashi is an anaerobic (oxygen-free) fermentation method. You collect scraps in an airtight bucket, sprinkle bokashi bran
(microbe-inoculated material), compress, seal, and let it “pickle.” After fermenting, the material is typically buried in soil
or added to a compost system to finish breaking down.
Why people love it indoors: it’s compact, sealed, and can handle a wider range of food waste than many other methods
(including cooked foods and, in many guides, even small amounts of meat and dairy).
4) Electric countertop “composters” (aka food recyclers)
These machines usually heat, dehydrate, and grind food scraps into a dry output that can be added to soil or composted further.
The catch: the output often isn’t “finished compost” because it hasn’t undergone the full microbial decomposition that creates
the living, stable material gardeners think of as compost.
Think of it as a volume-reduction and pre-processing tool. It can make scraps easier to store and later incorporate into soil
or an outdoor compost process. If you go this route, treat the output as a feedstock or soil additive that may still need
time to mellow before plants will love it.
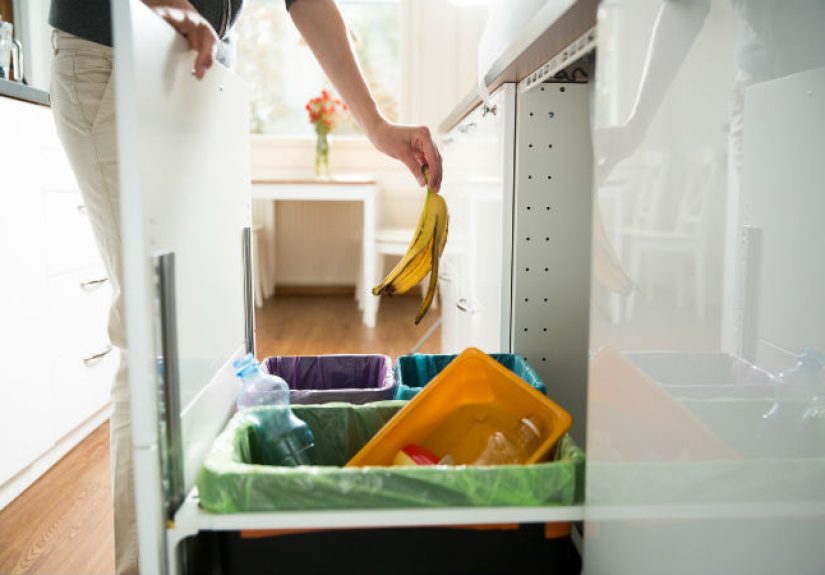
The Indoor Composting “Ingredient List” (What to Add and What to Avoid)
Indoor composting is successful when you compost the right materials for your methodand skip what causes odors, pests, or
contamination. Here are practical guidelines that work for most beginners.
Common “yes” items (great starters)
- Fruit and vegetable scraps (peels, cores, wilted greens)
- Coffee grounds and paper filters
- Tea (check labelssome tea bags contain plastic; loose tea is easiest)
- Crushed eggshells (especially good in worm bins as grit)
- Shredded cardboard or newspaper (excellent “browns” and worm bedding)
- Paper towels/napkins (only if not soaked in harsh cleaners or grease)
Usually “no” for beginner indoor aerobic composting (odor/pest magnets)
- Meat, fish, bones
- Dairy products
- Grease, oils, fatty foods
- Pet waste/litter (pathogen riskskip indoors)
- Diseased plants or weeds loaded with seeds (risk of spreading problems)
- Charcoal ash or chemically treated materials
Note: Bokashi guides often allow meat and dairy because fermentation in a sealed container reduces many of the odor and pest
issues typical of aerobic composting. Even then, most people do best starting small, draining liquids regularly, and finishing
the process in soil or another compost system.
A quick rule that prevents 80% of indoor compost drama
If you’re composting aerobically or with worms, keep a steady supply of “browns” (dry, carbon-rich material) and use them like
a deodorizing blanket. Every time you add wet scraps, cover or bury them with browns. This reduces odor, helps balance moisture,
and discourages fruit flies.
How to Start a Worm Bin (Vermicomposting) Step by Step
If you want the most “apartment-friendly” composting method with a surprisingly low stink potential, worms are a strong choice.
Here’s a beginner setup that’s simple, inexpensive, and easy to maintain.
Step 1: Pick a bin and location
- Bin: An opaque plastic tote with a lid works well (think 10–18 gallons for many households).
- Ventilation: Add small holes in the lid and/or sides (and consider a tray underneath for any liquid).
- Location: A closet, laundry area, pantry corner, basement, or under-sink cabinet can work.
- Temperature: Aim for a comfortable indoor rangeworms do best when it’s not freezing or roasting.
Step 2: Make bedding (worms need a “sofa,” not a swamp)
Bedding is your worm bin’s foundation. Use shredded newspaper, corrugated cardboard, or a mix. Moisten it so it feels like a
wrung-out sponge: damp, but not dripping. Fluffy bedding improves airflow and prevents the “wet compost brick” problem.
Step 3: Add worms (the right species matters)
You want composting wormsoften red wigglersnot garden earthworms from your yard. Composting worms thrive in shallow,
decaying organic matter and handle the bin environment much better.
Step 4: Feed lightly at first
This is where beginners get overexcited and accidentally host the world’s worst buffet.
Start with small amounts of scraps (think: a couple handfuls), chopped into smaller pieces to speed processing.
Bury food under bedding in different spots, and wait until the previous food is mostly gone before adding a lot more.
Step 5: Maintain your bin with simple weekly habits
- Always bury food. This helps prevent fruit flies and smells.
- Keep bedding fluffy. Add dry shredded paper if it looks soggy.
- Don’t overfeed. If you see uneaten scraps piling up, pause feeding for a few days.
- Go easy on strong foods. Large amounts of onion, garlic, and citrus can stress the system.
Common worm-bin problems (and quick fixes)
- Fruit flies: Bury scraps deeper, add more bedding, and consider freezing scraps before adding them.
- Bad smell: Usually overfeeding or too much moistureremove rotting food, add dry bedding, and pause feeding.
- Too wet: Add dry cardboard/newspaper and gently fluff contents for airflow.
- Too dry: Mist bedding lightly with water until it’s sponge-damp again.
How to Start Bokashi Indoors (Ferment First, Compost Later)
Bokashi is a great option if your household produces a lot of cooked food scrapsor if you want a sealed system that’s tidy and
compact. Just remember: bokashi is the “pre-game.” The fermented material typically needs a finishing step in soil or compost.
What you need
- An airtight bokashi bucket (often with a spigot)
- Bokashi bran (microbe-inoculated)
- A way to finish the material (buried in soil, a “soil factory” tub, or added to compost)
Basic bokashi routine
- Add scraps to the bucket (chop larger pieces for faster fermentation).
- Sprinkle bokashi bran over the layer.
- Press down to remove air pockets, then seal tightly.
- Drain liquid regularly (every few days, depending on your system).
- When full, let the bucket sit sealed for about two weeks to ferment.
- Finish by burying in soil or mixing into a soil tub until it fully breaks down.
The smell should be more “pickled” than “rotting.” If it smells foul, that can indicate too much air or not enough bran.
A note on bokashi liquid (“tea”)
Many bokashi guides suggest diluting the drained liquid heavily and using it as a fertilizer. However, because the liquid can be
acidic and strong, the safest beginner approach is to dilute generously, test on a small area or a hardy plant, and avoid using
it full-strength. When in doubt, dispose of it responsibly (for example, down a drain with plenty of water) and focus on the
finished soil amendment as the main win.
Odor-Free Indoor Composting: The Not-So-Secret Secrets
Compost shouldn’t smell like garbage. Healthy compost smells earthy, like a damp forest after a light rain.
If your indoor setup stinks, it’s not “normal”it’s feedback.
Use the “browns first” mindset
Browns (shredded paper, cardboard, dried leaves) absorb moisture and help prevent anaerobic pockets that lead to rotten odors.
A practical beginner goal is roughly 3 parts browns to 1 part greens by volume.
Keep scraps covered
In worm bins: bury scraps under bedding. In aerobic bins: cover scraps with browns. In bokashi: keep the lid sealed except when
adding scraps.
Manage moisture like you’re babysitting a sponge
Too wet leads to stink. Too dry leads to a stalled system. Aim for “damp, not drippy.” If you’re unsure, add a handful of
shredded cardboardnature’s paper towel.
Harvesting Your Compost (and Actually Using It Without Harming Plants)
Compost is powerful. That’s the whole point. But when people go wrong, it’s usually because they treat fresh compost like
plain potting mix and then wonder why a delicate plant looks personally offended.
Worm castings: when and how to harvest
Many home worm bins produce harvestable material in a few months. You’ll know it’s ready when much of the bedding looks like a
dark, crumbly mix and you see fewer recognizable food scraps.
A simple method: push finished material to one side, add fresh bedding and food to the other side, and let worms migrate over
a couple of weeks. Then harvest the finished side.
How to use compost indoors
- Top-dress houseplants: Add a thin layer and gently water in.
- Boost potting mixes: Mix compost into potting soil (often 10–20% compost is plenty for containers).
- Start seeds carefully: Use a light mixseedlings can be sensitive to rich compost.
If you’re using output from an electric countertop machine, let it mellow by mixing it with soil or adding it to a compost
system first. Freshly processed, nutrient-concentrated material can be too intense for plants if used immediately.
Beginner-Friendly Indoor Composting Workflow (So It Doesn’t Take Over Your Life)
The best indoor composters don’t “work harder.” They set up a workflow that feels automatic.
Here’s a low-friction routine that fits most households:
Daily
- Collect scraps in a small, lidded kitchen container (and empty it regularly).
- Keep a “browns” jar or bag nearby: shredded paper, torn cardboard, or paper egg cartons.
2–3 times per week
- Feed worms or add to your indoor aerobic bin (always bury/cover with browns).
- Check moisture: add dry bedding if things look glossy or soggy.
Weekly
- Quick smell test (your nose is an excellent compost meter).
- Fluff or gently stir (for aerobic bins) to maintain airflow.
- Wipe the lid and rim areas if you notice buildup.
Indoor Composting Starter Kit: What to Buy (and What to DIY)
For worms
- Opaque bin with lid
- Shredded paper/cardboard (free!)
- Composting worms (red wigglers)
- Small kitchen scrap collector with lid
- Optional: tray underneath for any leachate
For bokashi
- Airtight bokashi bucket with spigot (or a tight-lidded system)
- Bokashi bran
- A finishing plan: outdoor soil, raised bed, or an indoor “soil factory” tub
For aerobic indoor composting
- Small bin designed for airflow (or a DIY container with ventilation)
- A steady supply of browns
- Optional: a bit of finished compost or garden soil to inoculate microbes
What Real-Life Indoor Composting Feels Like ( of “Experience” You Can Expect)
Let’s talk about the part most guides politely skip: indoor composting is less like “set it and forget it” and more like
adopting a tiny, quiet hobby that lives in your home. The good news is that it’s a friendly hobbyonce you learn its language.
In the beginning, most people experience a short “scrap identity crisis.” You’ll be cooking dinner, holding a handful of onion
skins, and thinking, “Wait… am I throwing this away, feeding worms, or pickling it?” For a week or two, you may feel like you’ve
added a new household job called Managing the Banana Peel Supply Chain. Then something clicks: you put the kitchen scrap
container where it’s convenient, keep a bag of shredded cardboard nearby, and suddenly it’s just… part of how your kitchen works.
Worm bins often come with an initial moment of dramatic suspicionespecially if you’ve never purchased worms intentionally.
The first time you lift the bedding and see them wriggling, it’s normal to think, “I have made a choice.” Then the practical
side takes over. You notice that, when you bury scraps properly, the smell is minimal. You stop worrying about “worms escaping”
and start noticing patterns: too many wet scraps at once leads to funk; adding dry bedding fixes it fast. Many beginners also
discover that worms are picky in a very reasonable waysmall pieces break down faster, and big piles of strong foods (like lots
of citrus or onion) can make the bin sluggish. It becomes less “gross” and more “tiny ecosystem management,” like keeping a
low-maintenance fish tankexcept it produces fertilizer instead of requiring you to name a goldfish.
Bokashi has its own personality. People often describe the process as oddly satisfying because it’s neat and sealed. You add
scraps, sprinkle bran, press down, close the liddone. The “experience” part shows up when you drain liquid: it’s a reminder
that something real is happening. The smell is typically more tangy than rotten, but the first time you open the bucket after
a few days, you might do the cautious “one nostril test.” If it smells foul, the system is telling you to tighten your seal,
add more bran, or drain more frequently. When it smells like pickles or sourdough starter, you’re winning.
Another common experience: you become weirdly good at collecting browns. Cardboard packaging stops being packagingit becomes
“future compost infrastructure.” Paper egg cartons become “premium bedding.” And you’ll probably develop a favorite trick:
freezing scraps. Many indoor composters freeze fruit peels and veggie trimmings so the kitchen stays tidy and fruit flies don’t
get invited to the party. Then they add scraps in a controlled batch a couple of times per week.
The best partalmost everyone reports thisis the first time you use your finished compost on a plant and see a real difference.
Your pothos looks greener. Your balcony herbs perk up. Your container tomatoes act like they just got a promotion. That’s when
indoor composting stops feeling like “another task” and starts feeling like a clever home loop: you cook, you save scraps, you
build soil, your plants thank you, and the trash can gets noticeably less gross. That’s not just sustainabilityit’s a small
daily win you can smell (in a good way).