Table of Contents >> Show >> Hide
- What “budget” really means for a robotic arm
- Pick your build path: three affordable approaches
- Start with a realistic target spec (so your budget stays a budget)
- The math that saves you money: torque, not vibes
- Budget mechanics: stiff beats strong (most of the time)
- Actuators on a budget: what to buy (and where to splurge)
- Electronics that won’t sabotage your build
- Power: the #1 reason budget robot arms “mysteriously” fail
- Control: from “it moves!” to “it moves on purpose”
- A sample budget build plan (with realistic cost buckets)
- Calibration and reliability: cheap improvements that feel expensive
- Safety (because fingers are not replaceable parts)
- Conclusion: build smart, not pricey
- Experiences From Budget Robot Arm Builds (What Makers Commonly Learn the Hard Way)
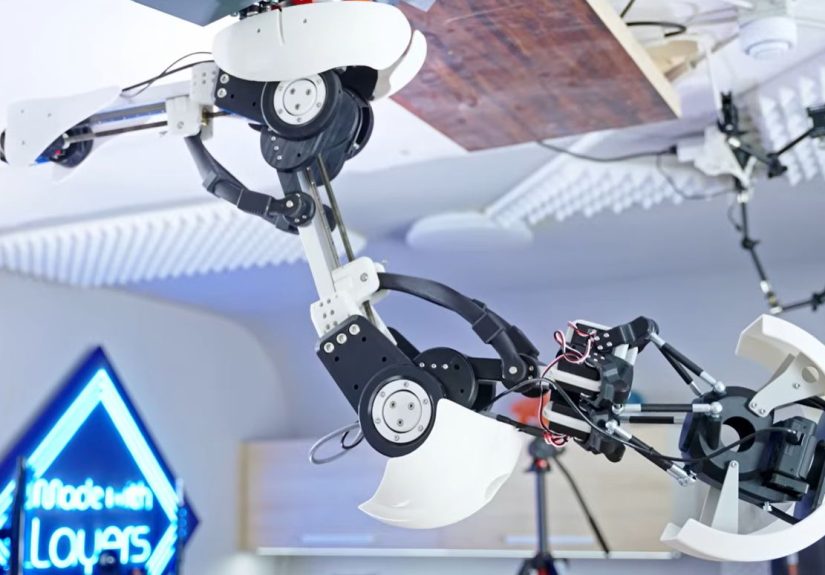
A robotic arm is basically a fancy, polite way to say “I want a machine that can pick things up so I don’t have to.”
The good news: you don’t need a lab budget, a machining center, or a mysterious billionaire mentor named “Giga-Chad Robotics.”
With smart design choices, you can build a capable DIY robotic arm that’s fun to learn on, useful for tinkering, and
surprisingly affordable.
This guide focuses on how to make the biggest impact with the smallest spend: choosing the right motion system,
sizing motors with basic torque math (so you don’t buy the wrong stuff twice), keeping the frame stiff without
going full aerospace, and wiring power in a way that doesn’t turn your project into a “why does it smell like toast?”
moment.
What “budget” really means for a robotic arm
“Cheap” is a trap word in robotics. “Affordable” is the healthier goal. A budget robotic arm usually means you’re optimizing
for one (or more) of these:
- Learning value per dollar: You want to understand mechanics, electronics, and controlwithout buying a commercial arm.
- Light payloads: Think markers, small parts, a lightweight grippernot bowling balls.
- Reasonable accuracy: Great for pick-and-place demos, sorting, drawing, and experimentation.
- Upgradability: You can start simple (3–4 DOF) and add joints, sensors, and stronger actuators later.
The biggest money-saver is picking the right “class” of arm for what you actually need. If your goal is learning and
small-object manipulation, a servo-based arm is often the best bang-for-buck. If your goal is smoother motion, repeatability,
or bigger reach, you might move toward steppers or geared DC motors (often with more cost and complexity).
Pick your build path: three affordable approaches
1) Servo-based arm (best beginner value)
Most low-cost DIY robot arms use hobby servos because they combine motor + gearbox + position control in one tidy package.
That reduces the number of parts (and headaches). Servo arms are ideal for 4–6 degrees of freedom (DOF) with light payloads.
They’re also forgiving: you can get useful results without writing a physics dissertation.
The trade-off: hobby servos can struggle with heavy loads, long arms, or fast moves. They can also “buzz” under load and
develop backlash (wiggle) over time. But for budget builds, they’re still the MVP.
2) Stepper-based arm (smoother motion, more setup)
Steppers plus belt/gear reductions can give smoother motion and better holding torque for the moneyespecially if you’re
comfortable with drivers, current limits, and calibration. You’ll typically need:
- Stepper motors + drivers
- A stable power supply sized for your current needs
- Mechanical reductions (belts/gears) to increase torque
- Endstops/limit switches for homing (recommended)
Steppers can be a great “Phase 2” upgrade once you’ve built a smaller servo arm and know what you want to improve.
3) Salvage-and-build (cheapest parts, most creativity required)
If you love scrounging, you can build linkages from plywood, aluminum flat bar, or 3D-printed brackets, and source motors
from old printers, scanners, or hobby gearmotors. This can be the lowest costbut also the highest effort. You’re trading
money for time, tools, and iterative problem-solving.
Start with a realistic target spec (so your budget stays a budget)
Before you buy anything, define a simple “spec sheet.” It prevents scope creepthe silent killer of DIY budgets.
- Payload: 100–300 g for a first arm is a sweet spot.
- Reach: 20–35 cm is manageable without demanding monster torque.
- DOF: 4 DOF is enough to do useful work; 5–6 DOF is more flexible but costs more.
- Use case: Pick-and-place, drawing, sorting, camera positioning, or “learn robotics basics.”
A smart beginner spec is: 5 DOF servo arm, ~25 cm reach, 200 g payload, controlled by an Arduino-class board
with a dedicated servo driver and a proper external power supply.
The math that saves you money: torque, not vibes
People often choose motors by reading a product title like “HIGH TORQUE MEGA POWER SERVO” and trusting the caps lock.
That’s how you end up with an arm that can confidently lift… its own disappointment.
Torque in one sentence
Torque = force × distance (specifically, the perpendicular distance from the joint to the load’s line of action).
For a robot arm, the worst case is often when the arm is held roughly horizontal, because gravity gets a long lever arm.
A simple sizing example (with friendly numbers)
Let’s say your arm has a forearm segment and a gripper. You want to lift a 200 g (0.2 kg) object at the end,
20 cm (0.2 m) from the elbow joint.
- Force from payload: 0.2 kg × 9.81 m/s² = 1.962 N
- Torque from payload: 1.962 N × 0.2 m = 0.3924 N·m
- Convert to kg·cm (common servo unit): 1 kg·cm ≈ 0.0981 N·m → 0.3924 / 0.0981 ≈ 4.0 kg·cm
That’s only the payload. Now add the weight of the forearm itself. Suppose the forearm weighs 150 g (0.15 kg),
and its center of mass is about 10 cm (0.1 m) from the elbow:
- Forearm force: 0.15 × 9.81 = 1.4715 N
- Forearm torque: 1.4715 × 0.1 = 0.1472 N·m ≈ 1.5 kg·cm
Total elbow torque (static, horizontal-ish): about 5.5 kg·cm. Now add a safety factor.
A common practical approach is multiplying by 1.5–2× to cover friction, acceleration, imperfect balance,
and “real life is messy.” That gives you roughly 8–11 kg·cm. At that point, choosing a servo in the
15–20 kg·cm range for the elbow becomes a sensible, budget-friendly decision.
You’ll repeat this calculation for each joint, remembering an annoying truth: base and shoulder joints carry everything beyond them,
so they need the most torque. Wrist joints can often be smaller and cheaper.
Budget mechanics: stiff beats strong (most of the time)
In DIY arms, the enemy is often not “breaking.” It’s bending. Flex and wobble make your arm feel sloppy,
reduce repeatability, and cause joints to fight each other.
Low-cost ways to increase stiffness
- Shorten the reach: Every extra centimeter is a torque tax.
- Use boxy shapes: A simple “C” channel or box-section is stiffer than a flat strip.
- Add bearings or bushings: Reduce friction and side-load stress on servo shafts.
- Triangulate: Braces (even small ones) can dramatically reduce flex.
- Counterbalance: Rubber bands, springs, or small counterweights can reduce required motor torque.
If you’re 3D printing, choose a design that uses printed parts for structure but relies on metal shafts/screws/bearings
for alignment. Plastic can be great, but plastic pretending to be a precision bearing is… optimistic.
Actuators on a budget: what to buy (and where to splurge)
Hobby servos: the best cost-to-function ratio
For most budget builds, servos are the right starting point. When comparing servos, pay attention to:
- Torque rating: Often listed in kg·cm or oz·in.
- Gear material: Metal gears tend to last longer under load than plastic gears.
- Voltage: Many hobby servos are rated around 4.8–6 V; specs change with voltage.
- Stall current: This matters for power supply sizing (more on that soon).
Budget tip: don’t overspend on every joint. Put stronger servos at the base/shoulder/elbow, and smaller servos at the wrist/gripper.
That single decision can save real money while improving performance.
Steppers and DC gearmotors: upgrade paths
If your arm needs smoother motion or more holding strength, consider steppers with belt reduction or brushed DC gearmotors with
a controller. The cost can still be reasonable, but complexity rises: drivers, current limits, tuning, and often encoders if you
need precise closed-loop positioning.
Electronics that won’t sabotage your build
Microcontroller: keep it simple
An Arduino-class board is more than enough for a first robotic armespecially for servo control, reading potentiometers,
running simple inverse kinematics, and responding to joystick inputs.
Servo driver: buy stability with a small add-on
Driving multiple servos directly from a microcontroller can work, but it can also introduce timing jitter and wiring clutter.
A dedicated PWM servo driver board can make multi-servo control cleaner and more consistent.
Power: the #1 reason budget robot arms “mysteriously” fail
Servos are hungry. Under load, they draw more current; at stall, they draw the most. The practical rule is:
your power supply must handle peak demand, not just “average.”
What not to do
- Don’t power multiple servos from the Arduino’s 5V pin and hope for the best.
- Don’t mix noisy motor power with logic power without a plan.
- Don’t skip a common ground between controller and servo power.
What works (and stays affordable)
- Use a dedicated 5–6V supply for servos with enough current capacity.
- Size current based on stall current (or at least a conservative estimate).
- Add bulk capacitance near the servo power rail to reduce brownouts (a common maker trick).
- Keep wiring short and thick for the servo power rail.
A practical budgeting approach: if you have 5 servos, assume the big joints might pull ~1–2A each at peak, and smaller joints less.
You don’t always hit total stall at once, but designing for headroom prevents resets, jitter, and random glitches that waste time.
Control: from “it moves!” to “it moves on purpose”
Manual control (fastest path to fun)
If you want quick wins, start with manual control:
- Potentiometers for each joint (“robot puppet mode”)
- A joystick for base + shoulder
- Buttons for gripper open/close
You’ll learn wiring, mapping inputs to angles, and setting joint limits without drowning in math on day one.
Inverse kinematics (IK): the brain upgrade
IK is how you tell the arm, “Put the gripper there,” and the software figures out the joint angles. Even basic IK teaches
you why robotics is equal parts geometry and humility.
Practical IK notes for budget builders:
- Start planar: A 2-link arm in a plane is the easiest to solve and test.
- Expect multiple solutions: “Elbow up” vs “elbow down” is a classic case.
- More DOF adds flexibility and complexity: Extra joints can mean redundant solutions.
- Numerical methods are fine: Many real systems use iterative approaches for general arms.
A sample budget build plan (with realistic cost buckets)
Budget Tier 1: “Starter Arm” ($70–$150)
- 3–5 hobby servos (mix of standard + higher-torque for main joints)
- Arduino-compatible board
- External 5–6V power supply (with enough current headroom)
- Laser-cut plywood or 3D-printed links + bolts
- Simple gripper (printed or off-the-shelf)
Best for: learning, demos, small objects, drawing/plotting attachments.
Budget Tier 2: “Serious Hobby Arm” ($150–$350)
- 5–6 DOF with stronger servos on base/shoulder/elbow
- Bearing-supported joints and metal shafts
- Dedicated servo driver board
- Better frame stiffness (aluminum brackets or reinforced printed parts)
Best for: smoother motion, repeatability improvements, light pick-and-place tasks.
Budget Tier 3: “Maker Lab Arm” ($350–$800)
- Upgraded actuation (steppers + reductions or stronger servos)
- Limit switches for homing
- Higher-quality mechanical components
- Improved calibration and possibly basic sensors
Best for: more ambitious projects, heavier payloads (still within reason), and longer reach.
Calibration and reliability: cheap improvements that feel expensive
You can dramatically improve how your arm “feels” without major spending:
- Set joint limits in software: Prevent collisions and self-destruction.
- Home positions: Define a consistent “zero” at startup.
- Measure and tune: Even small offsets in joint angles can cause big endpoint errors.
- Reduce slop: Tighten fasteners, add washers, and eliminate flexy joints.
- Cable management: A cable snag can ruin your day and your servo gears.
Safety (because fingers are not replaceable parts)
- Keep loads small while testing.
- Power down when adjusting mechanics.
- Don’t let the arm swing freely at full speed near your face. Robotics is fun; dentistry is expensive.
- Use stable mounting so the base doesn’t tip when the arm extends.
Conclusion: build smart, not pricey
Building a robotic arm on a budget is less about finding a magical cheap part and more about making a series of smart,
boring choices that pay off. Use torque math to size your actuators, keep your structure stiff, power servos properly,
and start with simple control before graduating to inverse kinematics. You’ll learn faster, waste fewer parts, and end
up with an arm that does more than tremble dramatically like it’s auditioning for a robot soap opera.
Experiences From Budget Robot Arm Builds (What Makers Commonly Learn the Hard Way)
If you hang around makers long enough, you’ll notice a pattern: most “budget robotic arm” stories sound like a sitcom pilot.
The arm works perfectly in the imagination, mostly works on the bench, and then becomes an interpretive dance troupe the moment
it tries to lift something real. The good news is that these lessons are predictableand that means you can plan for them.
One of the most common early surprises is that the first arm design is almost always too long. On paper, longer reach
feels more useful. In reality, every extra inch increases torque demands and magnifies flex. Builders often shorten links after
the first test run and suddenly the same motors feel twice as strong. This is the cheapest “upgrade” you’ll ever make: remove
length, gain performance, and keep the same budget.
Another classic moment is discovering that servo ratings and real-world lifting aren’t the same thing. A servo might be
advertised with an impressive stall torque at 6V, but your arm will rarely live in a perfect static world. Friction in joints,
slightly misaligned brackets, a gripper that’s heavier than expected, and quick movements all add load. That’s why many builders
end up swapping only two or three “critical joint” servos (base/shoulder/elbow) for higher-torque models while keeping smaller,
cheaper servos for the wrist and gripper. It’s a targeted spend that makes the whole arm feel more confident.
Power is the other big “ah-ha.” Many builders start by powering everything from a convenient port, see a little motion, and think,
“We’re good.” Then the arm tries to lift, the current spikes, the controller resets, and the robot does a dramatic reboot mid-move.
The experienced takeaway is simple: separate, properly sized servo power isn’t optionalit’s the foundation of stability.
Once power is solid, jitter often disappears, movements look smoother, and debugging becomes way less chaotic.
People also learn that mechanical slop feels like software bugs. If the end effector “misses” a target by an inch, it’s
tempting to tweak code forever. But often the real culprit is flex in the frame, backlash in gears, or a joint that side-loads a
shaft. The most satisfying fixes can be tiny: adding a bearing, tightening a bracket, reinforcing a link, or simply routing cables
so they don’t tug on the wrist. Those changes don’t cost much, but they improve repeatability like you just bought a fancier robot.
Finally, builders often discover that the most fun feature isn’t a bigger motorit’s better control. Even a modest arm
becomes “wow” when you add a simple teach-and-repeat mode, smooth acceleration (instead of instant jumps), or basic inverse kinematics
so you can move the gripper in a straight line. That’s the budget builder’s secret weapon: when money is tight, you upgrade the brain.
And when your arm successfully picks up the same object three times in a row, you’ll feel like you’re running a tiny factorywithout
paying factory prices.