Table of Contents >> Show >> Hide
- First: Know What You’re Cleaning (Because “Silver” Is a Big Family)
- The Goldilocks Rule: Start Gentle, Escalate Only If You Must
- Method 1: Gentle Washing (Best for Routine Cleaning)
- Method 2: Silver Polishing Cloth (The “Low Drama” Shine)
- Method 3: Cream or Liquid Silver Polish (For Heavy Tarnish)
- Method 4: The Baking Soda + Aluminum Foil Bath (Fast, But Not for Everything)
- What to Avoid (Especially for Heirlooms)
- How to Keep Silver from Tarnishing So Fast
- When to Call a Professional Conservator
- Frequently Asked Questions
- Real-World Cleaning Experiences (What People Learn the Hard Way)
Silver heirlooms have a special talent: they can look like a million bucks and also like they’ve been living in a pirate ship’s basementsometimes in the same week.
That gray-black film (tarnish) is normal, fixable, andcruciallysomething you don’t want to “rage scrub” off like you’re mad at the universe.
With heirloom silver, the goal isn’t just shiny. It’s clean, protected, and still crispso engravings stay sharp, plating stays put,
and the piece keeps the character that made someone save it for you in the first place.
This guide walks you through a conservator-minded approach: identify what you have, choose the gentlest effective method,
avoid the common “viral hacks” that can backfire, and store silver so you’re not polishing it like it’s your part-time job.
First: Know What You’re Cleaning (Because “Silver” Is a Big Family)
Sterling silver vs. silver plate
Many heirlooms are either sterling silver (a solid silver alloy, often marked “925,” “Sterling,” or with hallmarks)
or silver-plated (a thin layer of silver over another metal, sometimes marked “EP,” “EPNS,” or “Silverplate”).
This matters because plated pieces can lose their silver layer if they’re polished too aggressively or too often.
Patina vs. tarnish: not the same thing
Tarnish is the dark reaction layer that builds up from sulfur compounds in the air.
Patina is the softer, aged look that collectors often consider part of an antique’s charmespecially in crevices and ornate detail.
If you strip every dark area until it’s blindingly bright, you can erase visual depth and the “antique” look.
Check for “complications”
- Hollow handles (flatware, serving pieces): liquids can seep in and be hard to rinse/dry fully.
- Knife blades: many are stainless steel attached to silver handlesdon’t soak the whole knife.
- Gemstones, enamel, pearls, glued parts: use extra-gentle methods and minimal moisture.
- Lacquered silver: some decorative pieces were coated to slow tarnish. Polishing can remove that coating unevenly.
The Goldilocks Rule: Start Gentle, Escalate Only If You Must
Your basic toolkit
- Soft cotton or microfiber cloths (multiple, clean)
- Mild dish soap + warm water (not hot enough to cook your hands)
- Soft brush (baby toothbrush or soft detailing brush)
- Silver polishing cloth (treated cloth for final shine)
- Quality silver polish (cream/liquid) for heavier tarnish
- Nitrile gloves (optional, but great for reducing fingerprints)
Quick decision map
- Dusty but not tarnished? Wipe with a clean, dry cloth.
- Grimy (fingerprints/food residue)? Wash gently with mild soap and water, rinse, dry completely.
- Light tarnish? Use a silver polishing cloth or a mild polish.
- Heavy tarnish? Use a reputable cream/liquid polish, or an electrochemical method only when appropriate.
- Valuable, antique, fragile, or plated? Avoid harsh shortcuts and consider professional help.
Method 1: Gentle Washing (Best for Routine Cleaning)
If your heirloom silver is used (holiday meals, special occasions), it often needs a wash more than a “polish.”
Food acids, salt, and moisture are not silver’s friendsespecially if you let them hang around like uninvited houseguests.
Steps
- Fill a basin with warm water and a few drops of mild dish soap.
- Wash with a soft cloth or soft brush, focusing on crevices.
- Rinse thoroughly with clean water.
- Dry immediately with a soft towel. Don’t air-dry and hope for the best.
Heirloom-friendly tips
- For hollow-handled pieces or anything with seams: use minimal water and dry extra carefully.
- For knives with silver handles: clean the handle gently; keep the blade/handle seam from soaking.
- If the piece has gemstones: avoid scrubbing stones; rinse in a bowl or glass so you don’t lose anything down the drain.
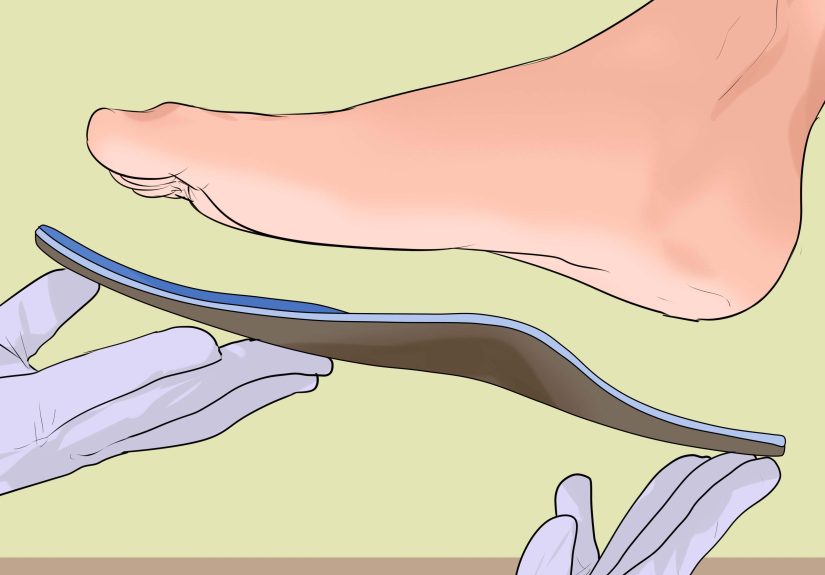
Method 2: Silver Polishing Cloth (The “Low Drama” Shine)
A treated silver cloth is one of the safest ways to brighten lightly tarnished heirlooms without getting aggressive.
It’s also the easiest method to do while binge-watching somethingsilver care meets self-care.
How to use it
- Rub gently in straight lines, not tight circles (circles can make swirl marks).
- Use a lighter touch on plated items.
- Don’t wash the treated cloth unless the product instructions say you canmany are designed to be used “as is.”
Method 3: Cream or Liquid Silver Polish (For Heavy Tarnish)
When tarnish is thick or blotchy, a quality cream or liquid polish is often the most controllable option.
“Controllable” is the key word: you can focus on the tarnished areas instead of dunking an heirloom into mystery chemistry.
Steps (works for most creams/liquids)
- Read the label. Yes, really. Silver polish is not a “choose your own adventure” novel.
- Apply a small amount to a soft cloth or sponge.
- Polish gently, working in sections. Use cotton swabs for detailed grooves.
- Rinse if the product instructs you to rinse; otherwise buff thoroughly as directed.
- Dry completely and finish with a clean cloth for shine.
What to choose
- Creams are great for deeper tarnish and controlled application.
- Liquids can get into ornate details but can be messier.
- Wipes are excellent for quick touch-ups and flatware.
If your heirloom is silver-plated, polish gently and less often. Over-polishing can thin or remove plating,
especially on raised edges and frequently handled areas.
Method 4: The Baking Soda + Aluminum Foil Bath (Fast, But Not for Everything)
This method works by a chemical/electrochemical reaction that can transfer tarnish away from silver.
It can be impressively quicklike a magic trick where the magician also gives you a safety lecture.
When it can be useful
- Large batches of simple-shaped silver flatware with heavy tarnish
- Pieces without delicate applied decoration, fragile patina goals, or sensitive materials attached
When to skip it
- Antique pieces where preserving patina matters
- Silver with intentional oxidized finishes (common in some jewelry styles)
- Pieces with hollow handles, seams, glued elements, pearls, porous stones, or mixed materials
- Anything you’d cry about if it changed color or texture unexpectedly
Safer approach (if you use it)
- Line a non-reactive pan with foil.
- Add hot water and baking soda (some methods also add salt).
- Briefly dip/soak the silver, then remove, rinse thoroughly, and dry completely.
- Finish with gentle hand-buffing using a soft cloth.
Important: this approach can remove tarnish uniformly, which is exactly why it can be a bad fit for antiques with ornate detail and desirable patina.
If the goal is “preserve history,” fast methods aren’t always your friend.
What to Avoid (Especially for Heirlooms)
Abrasive “hacks” that can scratch or dull detail
- Toothpaste (even if it’s “white paste”): it can be mildly abrasive and may scratch silver or alter finishes.
- Baking soda paste on delicate antiques: it can be abrasive if rubbed hard.
- Rough cloths/paper towels: they can leave fine scratches that make tarnish return faster.
Chemicals and risky shortcuts
- Bleach: don’t use it on silver. Ever. No heroic stories start with “So I grabbed the bleach…”
- Harsh dips for frequent use: they can be too aggressive and are hard to control.
- Soaking hollow or composite pieces: trapped moisture can lead to corrosion or staining.
Over-polishing (the sneaky damage)
Polishing removes a tiny amount of metal each time. Do it enough and crisp edges soften, engravings lose definition,
and plated pieces can wear through. The best heirloom strategy is to polish as little as necessary and prevent tarnish instead.
How to Keep Silver from Tarnishing So Fast
Tarnish happens because silver reacts with sulfur-containing compounds in the air. You can’t eliminate sulfur from planet Earth,
but you can make your silver’s environment a lot less “tarnish-friendly.”
Storage that actually works
- Keep it dry: moisture speeds tarnish. Always store silver fully dry.
- Use anti-tarnish materials: tarnish-resistant cloth bags, flannel-lined storage, or anti-tarnish strips (not touching the metal).
- Avoid sulfur sources: rubber bands, some felt, wool, and certain papers/woods can off-gas and contribute to tarnish.
- Add moisture control: silica gel packets (kept dry and replaced as needed) can help in humid climates.
- The chalk trick: a piece of plain white chalk stored near silver can help reduce moisture in enclosed storage.
Handling habits that help
- Wear cotton/nitrile gloves when possible (fingerprints can etch over time).
- After using silver for food: wash, rinse, and dry promptly.
- Don’t store silver touching stainless steel in damp conditions (mixed metals + moisture is a bad combo).
When to Call a Professional Conservator
Some pieces should not be DIY projectsat least not beyond gentle washing. Consider professional help if:
- The piece is museum-level valuable or historically significant
- It has fragile solder joints, loose parts, or structural damage
- It’s silver-plated and you see coppery or yellowish base metal showing through
- It has a specialty finish (intentional oxidation, lacquer coating, mixed materials)
- You suspect previous “creative cleaning” left residue or uneven color
Frequently Asked Questions
How often should I polish silver heirlooms?
Less than you think. Polish only when tarnish is noticeable and you need the appearance improved.
If you prevent tarnish with good storage and gentle washing, you’ll polish far less oftenand your heirlooms will age better.
Is it okay to clean silver the day before a holiday dinner?
Absolutely. In fact, that’s when most silver gets cleaned: right before it has to look good in front of witnesses.
Just avoid new, untested methods the night before guests arrive unless you enjoy stress as a hobby.
Why does my silver tarnish so quickly?
Common culprits: humidity, nearby rubber/latex materials, wool/felt storage, air pollution, and simply time.
Storage changes usually make the biggest difference.
Real-World Cleaning Experiences (What People Learn the Hard Way)
If you’ve ever inherited silver, you probably also inherited a mysterious mix of emotions: gratitude, nostalgia, and the sudden realization
that tarnish can appear overnight like it pays rent. Many people start with the same instinct“I’m going to make it sparkle like the movies!”and
then discover that heirloom care is more like gentle parenting than power-washing a driveway.
A common first-time scenario is the holiday panic polish. The table is set, the candles are ready, and then someone opens the flatware chest
to find the forks looking… moody. The good news: most of that darkness is superficial tarnish, and a polishing cloth or a reputable cream will handle it.
The surprise lesson is how much time polishing takes when you’re doing it carefullyespecially if the pattern has deep grooves that love to hold onto tarnish.
People often realize they’d rather prevent tarnish all year than polish it all in one night.
Another classic experience is learning the difference between cleaning and polishing. Someone washes a serving spoon, dries it,
and expects it to look bright againthen feels disappointed when it’s still slightly gray. That’s not failure; it’s chemistry.
Washing removes grime and food residue, while polishing removes tarnish. Once people separate those two jobs, silver care gets simpler:
wash after use, polish only when tarnish is visible, and store in a way that makes tarnish show up less often.
Then there’s the “oops, it’s plated” moment. A lot of heirloom pieces are silver plate, and they can look spectacularuntil someone scrubs the edges hard
and the base metal starts to peek through like an unwanted plot twist. The takeaway most people share is to use a lighter touch, polish less frequently,
and focus on prevention (anti-tarnish storage, dryness, and careful handling). Plated heirlooms can stay gorgeous for decades, but they don’t respond well
to aggressive “make it perfect” energy.
People also learn that patina is not the enemy. On ornate antiques, a little darkness in recessed areas adds contrast and depth.
Some folks polish everything to a mirror finish and later notice the piece looks flatter, less detailed, and oddly “new” in a way that doesn’t match its history.
The best approach many end up preferring is selective polishing: brighten the high points and the areas you touch or see first, while letting gentle patina remain
in the deeper details.
Finally, there’s the satisfaction momentthe one that keeps heirloom care from feeling like chores forever. After a careful clean and a good buff,
silver doesn’t just shine; it looks alive. Engraved initials pop, decorative borders catch the light, and suddenly the piece feels connected to the people
who used it before you. That’s the real win: not “perfectly shiny,” but “well cared for, still itself, and ready for the next story.”