Table of Contents >> Show >> Hide
- Why Dogs Love Fire Hydrants (And Why You’ll Love a DIY One)
- Choose the Right Spot (Before You Build Anything)
- The Cheapest, Easiest Build: PVC Faux Fire Hydrant
- Step-by-Step: Build Your DIY Dog Fire Hydrant
- Step 1: Pick a hydrant height that matches your dog
- Step 2: Cut and dry-fit your PVC parts
- Step 3: Add the side nozzles (easy hydrant illusion)
- Step 4: Assemble (and choose your bonding style)
- Step 5: Sand, clean, and prep for paint
- Step 6: Paint it like a classic hydrant (without making it toxic)
- Step 7: Anchor it so it doesn’t tip over mid-mark
- Training Your Dog to Use the DIY Hydrant
- Maintenance: Keep It Clean Without Making It Weird
- Common Mistakes (So You Don’t Build a Very Expensive Yard Ornament)
- Budget Upgrades (If You Want to Get Fancy Without Getting Broke)
- Conclusion: A Little DIY Hydrant, A Lot Less Stress
- Experiences & Real-World Lessons People Learn After Making a Doggy Hydrant
- 1) The first location you pick is rarely the final location
- 2) Dogs care more about the ground than the hydrant
- 3) “He’ll use it because it’s a hydrant” is not a plan
- 4) Splash is real (and it travels)
- 5) Paint choice matters most for durability, not for dog approval
- 6) The best “upgrade” is not decorit’s consistency
Yes, you can give your dog their very own “hydrant” without stealing city property or explaining yourself to your HOA. A DIY dog fire hydrant (aka a dog pee post) is a simple backyard project that encourages your pup to aim for one spothelpful for house-training, lawn protection, and keeping your patio from becoming… a lightly seasoned splash zone.
This guide walks you through a budget-friendly build that’s sturdy, weather-resistant, and easy to clean. You’ll also get training tips (so your dog actually uses it), safety notes (because glue fumes and curious noses don’t mix), and realistic lessons learned from people who’ve tried it.
Why Dogs Love Fire Hydrants (And Why You’ll Love a DIY One)
Dogsespecially many malesoften prefer to mark on vertical objects. It’s normal canine communication: small amounts, multiple spots, and a clear message to the neighborhood bulletin board. When you provide a dedicated vertical target, you’re working with your dog’s instincts instead of arguing with them like they owe you rent.
Benefits of a DIY fire hydrant for dogs
- Creates a consistent potty spot: Helps reinforce “go here” habits in your yard.
- Protects grass and landscaping: Concentrates urine away from prized plants and lawn patches.
- Improves cleanup: Easier to rinse one area than play “Where did you go this time?”
- Adds backyard charm: It’s functional yard decorlike a garden gnome, but with purpose.
Choose the Right Spot (Before You Build Anything)
The best DIY hydrant in the world won’t help if it’s placed in the dog equivalent of a haunted house corner. Pick a location that’s:
- Easy to access (especially at night or in bad weather)
- Far from doors, patios, and walkways (your guests will appreciate this… silently)
- Not right next to delicate plants (urine can burn foliage and grass)
- Low-traffic and low-distraction (privacy matterseven for someone who licks their own feet)
Pro tip: build the “potty zone,” not just the hydrant
Many owners get better results by setting up a small designated area around the hydrantthink pea gravel, mulch, or a simple stone border. This visually tells your dog, “This is the bathroom,” and tells your lawn, “You’re safe. For now.”
The Cheapest, Easiest Build: PVC Faux Fire Hydrant
If you want “cheap, easy, and weatherproof,” PVC is the sweet spot. It’s lightweight, doesn’t rot, and is easy to shape into something hydrant-ish. Plus, it’s available at basically every U.S. home improvement store.
Materials (budget-friendly shopping list)
Core parts:
- 1 length of PVC pipe (commonly 3" or 4" diameter; about 18–30" long depending on dog size)
- 1 PVC end cap (fits your pipe diameter)
- 1 PVC coupling or “bell” adapter (optional, for a wider base look)
- 2–3 PVC fittings for “side nozzles” (small couplers/caps work)
Fasteners & assembly:
- PVC primer and PVC cement (if you want permanent bonds)
- OR exterior-rated screws + outdoor construction adhesive (if you prefer less chemical odor)
- Sandpaper (medium grit) or a sanding sponge
Anchoring options (pick one):
- Ground stake method: rebar stake or metal rod + clamps/zip ties
- Concrete base: small bag of quick-set concrete + a bucket/mold
- Planter base: heavy planter + gravel + paver stone (renter-friendly)
Finishing:
- Outdoor primer suitable for plastic (optional but helps paint stick)
- Exterior paint (spray paint works well for smooth PVC)
- Clear outdoor topcoat (optional for durability)
Approximate cost: Often $20–$60 depending on what you already have and how fancy you get with paint and fittings. The “I used leftovers from the garage” version can be very cheap.
Tools you’ll need
- Measuring tape
- Marker
- Hand saw or PVC cutter
- Drill (if using screws)
- Gloves and eye protection
Step-by-Step: Build Your DIY Dog Fire Hydrant
Step 1: Pick a hydrant height that matches your dog
A good rule: the “marking target” should be around your dog’s comfortable aiming height. For small dogs, 12–18" can work. For medium to large dogs, 18–30" is typical. If you’re not sure, go slightly tallerdogs can mark lower, but a too-short post can be ignored by enthusiastic leg-lifters.
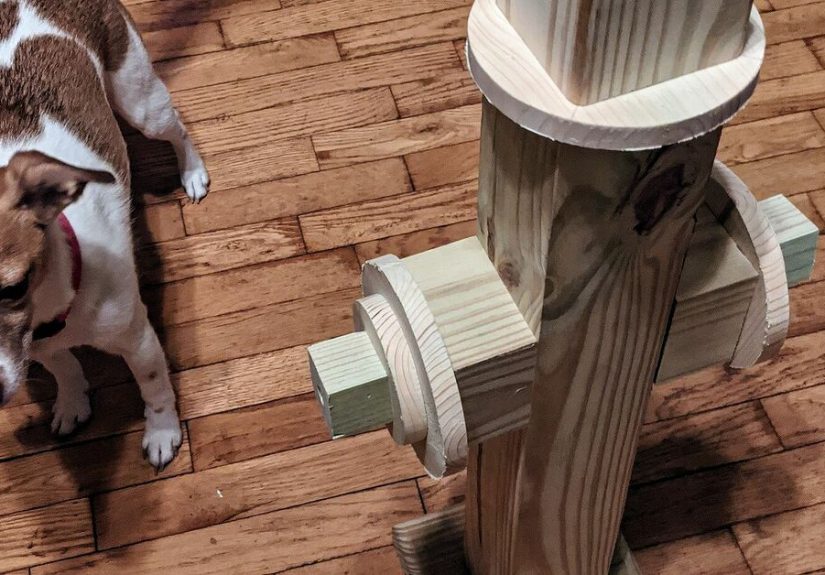
Step 2: Cut and dry-fit your PVC parts
Cut the main PVC pipe to length. Then arrange the pieces without glue first (dry-fit): top cap, optional base adapter, and side “nozzle” fittings. Step back and check the silhouette.
Design note: Hydrants look “right” when the base is a bit wider than the body and the top cap is slightly domed or capped.
Step 3: Add the side nozzles (easy hydrant illusion)
Mark where you want the side piecesusually 1/3 down from the top. You can attach nozzles in a few ways:
- Simple method (no cutting holes): attach small fittings to the outside using outdoor construction adhesive + screws (or adhesive alone if light).
- More realistic method: cut holes and insert short PVC segments, then cement in place (stronger but more work).
If you go with the “cut holes” method, measure carefully and keep the openings snug to avoid wobble. If you go with the “attach outside” method, rough up both surfaces with sandpaper so adhesive grips better.
Step 4: Assemble (and choose your bonding style)
Option A: PVC primer + cement (most permanent)
This creates a strong bond by softening and fusing PVC surfaces. Work outdoors or in a very well-ventilated area, and keep your dog away while you’re using it and while it cures.
Option B: Screws + outdoor adhesive (lower odor, easier to redo)
Great if you don’t want solvent fumes. Use exterior-rated screws (stainless is ideal) and a small amount of outdoor construction adhesive for stability.
Either way: make sure everything is aligned before it sets. A crooked hydrant is still functional, but it will look like it had a rough night.
Step 5: Sand, clean, and prep for paint
PVC is smooth, and paint sticks better when it has a little “tooth.” Lightly sand the surface, wipe dust away, and let it dry. If you’re using spray paint, follow the instructions for priming and drying times for best durability.
Step 6: Paint it like a classic hydrant (without making it toxic)
For the iconic look, many people choose red or yellow. Use paints intended for outdoor use, and let everything fully dry and cure before your dog interacts with it. Pets can get sick from chewing or licking wet paint or being around strong fumes, so be extra cautious with curious pups.
Safety-first painting rules:
- Paint outdoors and avoid windy days (overspray travels like gossip).
- Let it dry longer than you think you needespecially between coats.
- Keep dogs away until there’s no odor and the finish is fully cured.
- If your dog is a known chewer, skip glossy topcoats and focus on placing the hydrant where chewing is less likely.
Step 7: Anchor it so it doesn’t tip over mid-mark
Your dog will test the laws of physics with one casual lean. Pick an anchoring method that fits your yard and commitment level:
Anchoring method 1: Ground stake (fast and cheap)
- Drive a rebar stake or metal rod into the ground where the hydrant will sit.
- Slide the hydrant over it (or clamp it alongside with exterior clamps/zip ties).
- Check stability and adjust.
Anchoring method 2: Concrete base (most stable)
- Use a bucket or sturdy mold as your base form.
- Pour quick-set concrete, position the hydrant centered, and hold it steady until it sets.
- Once cured, place the base in your potty zone.
Anchoring method 3: Heavy planter base (renter-friendly)
- Fill a large planter with gravel and a paver stone for weight.
- Secure the hydrant upright inside using clamps or adhesive.
- Place it where you wantno digging required.
Training Your Dog to Use the DIY Hydrant
Here’s the honest truth: the hydrant is the stage; training is the show. Dogs learn fastest with consistency, rewards, and a clear “this is the potty spot” routine.
Step-by-step training routine
- Leash your dog and walk them directly to the hydrant area.
- Use a cue (like “go potty” or “bathroom”) and wait quietly.
- Reward immediately after they go in the correct area (treat + praise).
- Repeat on a schedule: after waking up, after meals, after play, and before bed.
How to make the spot more “interesting” (without grossness)
Dogs are drawn to scent cues. If you’re training a puppy or re-directing a habitual “wrong spot” marker, you can use odor cues to your advantage. For example, moving a small amount of soiled paper towel (from cleanup) to the potty zone can help signal “this is the place.” Remove the cue once the habit is established.
If your dog ignores it
- Move it: some dogs prefer quieter corners or a different surface underfoot.
- Adjust height: too short or too tall can be a deal-breaker.
- Change the base surface: gravel/mulch is often more appealing than concrete.
- Be patient: some dogs need repetition over days or weeks.
Maintenance: Keep It Clean Without Making It Weird
A dog pee post is low maintenance, but not “no maintenance.” Quick care prevents odor buildup and keeps the area from turning into a muddy mess.
Easy upkeep checklist
- Rinse weekly with a hose (more often in hot weather).
- Refresh the potty zone (add gravel/mulch as needed).
- Avoid harsh cleaners that could irritate paws or nosesplain water is often enough.
- Watch for chewing if your dog gets bored; relocate if needed.
Common Mistakes (So You Don’t Build a Very Expensive Yard Ornament)
Mistake 1: Putting it too close to your patio
Even “aimed” pee has splash math. Give it distance, and consider a gravel zone to reduce runoff.
Mistake 2: Not anchoring it
A wobbly hydrant can scare a timid dogor become a toy for a bold one. Stable = usable.
Mistake 3: Painting and immediately letting your dog investigate
Dry-to-touch is not the same as fully cured. If you can smell it, your dog can smell it, and that’s not a good invitation.
Mistake 4: Expecting the hydrant to do the training for you
The hydrant is a helpful target, but the real success comes from routine, rewards, and consistency.
Budget Upgrades (If You Want to Get Fancy Without Getting Broke)
- Add reflective tape: helps you find it during nighttime potty breaks.
- Make it seasonal: switch colors or add a small “badge” platejust keep attachments safe and non-chewable.
- Create a bordered potty pad: a simple edging around gravel keeps things tidy.
- Use a removable base: makes cleaning and relocation easier.
Conclusion: A Little DIY Hydrant, A Lot Less Stress
A DIY fire hydrant for your dog is one of those rare projects that’s inexpensive, practical, and weirdly charming. Build it from PVC for a quick win, anchor it well, and pair it with consistent potty training. With a little patience, you can guide your dog toward one dedicated spotsaving your lawn, your sanity, and your guests’ shoes.
Experiences & Real-World Lessons People Learn After Making a Doggy Hydrant
Once the paint dries and the hydrant looks adorable in the yard, reality shows upusually with a dog who has opinions. Here are the most common real-world experiences dog owners share after setting up a DIY dog pee post, plus what tends to work best.
1) The first location you pick is rarely the final location
Many people place the hydrant where it looks cutestnear the garden, next to the fence, or somewhere that “just makes sense.” Then the dog votes “no” by ignoring it completely. A common experience is realizing the best potty spot is about function, not aesthetics. Dogs often prefer a quieter, low-traffic area, and they may avoid spots near loud gates, sprinklers, or busy walkways. The easiest fix is simple: move it. If you built it light enough to relocate (or used a planter base), you’ll be glad you did.
2) Dogs care more about the ground than the hydrant
A surprisingly frequent lesson: the surface under the hydrant matters as much as the hydrant itself. Some dogs hesitate on slick concrete or dislike stepping onto sharp gravel. Others love pea gravel because it drains well and doesn’t get muddy. If a dog doesn’t “get it,” owners often report that switching the base surfaceadding mulch, leveling the ground, or creating a small gravel padsuddenly makes the hydrant “click.” The hydrant is the target, but the ground is the bathroom floor, and dogs can be picky about flooring.
3) “He’ll use it because it’s a hydrant” is not a plan
Another common experience is expecting instant results. Some dogs immediately investigate and mark it. Others act like it’s modern art they don’t understand. Owners who have the most success tend to treat the hydrant like a training tool: they walk the dog to it on leash, wait calmly, reward the correct behavior, and repeat. In practice, the hydrant works best when it’s part of a routinenot a magic object that changes habits overnight.
4) Splash is real (and it travels)
People often learn this the hard way: even with a dedicated potty spot, splash happens. If the hydrant is too close to a wall, a stepping stone path, patio furniture, or decorative edging, you may end up with “collateral seasoning.” The most common solution is distance plus a rinsable zone. A gravel pad with a border is popular because it keeps the mess contained and makes hose-rinsing fast. It also reduces muddy paw prints, which is basically the currency of chaos in many homes.
5) Paint choice matters most for durability, not for dog approval
Dogs rarely care what color it is. Humans do. Owners who paint PVC often notice that prep makes or breaks the finish. When the surface is lightly sanded and properly primed, paint holds up better to sun, rain, and repeated rinsing. When prep is skipped, paint can chip and look rough quickly. The practical experience here is to keep the dog away during painting and curing, then plan on minor touch-ups over timeespecially if the hydrant is in full sun.
6) The best “upgrade” is not decorit’s consistency
The most repeated lesson is also the least exciting: consistency wins. The hydrant helps create a clear target, but the real long-term payoff comes from sticking to a schedule, rewarding the right behavior, and preventing repeat “wrong spot” habits. Owners who treat the hydrant spot like the default bathroomespecially after meals, naps, and playtend to see the biggest change. And once your dog reliably uses it, you get the best kind of DIY success: a project that quietly makes daily life easier.