Table of Contents >> Show >> Hide
- What You’ll Learn
- Why a DIY Ornament Wreath Is the MVP of Holiday Decor
- Supplies for a DIY Ornament Wreath
- Plan Your Ornament Wreath Like a Pro
- How to Make a DIY Ornament Wreath (Foam Form Method)
- Step 1: Prep the base and hanger
- Step 2: Sort ornaments by size (30 seconds that saves you 30 minutes)
- Step 3: Place large ornaments first (your wreath’s skeleton)
- Step 4: Fill with medium ornaments (build the body)
- Step 5: Use small ornaments to erase gaps (the “photoshoot filter” step)
- Step 6: Add optional accents (ribbon, picks, greenery)
- Step 7: Let it cure before you hang it
- Alternative: DIY Ornament Wreath on a Wire Frame
- DIY Ornament Wreath Design Variations (So Yours Doesn’t Look Like Everyone Else’s)
- Hanging and Safety Tips (Because Wreaths Shouldn’t Be a Hazard)
- How to Store an Ornament Wreath So It Stays Fresh (and Not Flattened)
- Troubleshooting Your DIY Ornament Wreath
- Conclusion: Your Door, But Make It Sparkle
- Maker Experiences: What People Learn After Making an Ornament Wreath (About )
You know what’s wild? A pile of mismatched Christmas ornaments can look like clutter in a cardboard box… or like a
“wow, did you buy that?” wreath on your front door. A DIY ornament wreath is basically the holiday version of
turning leftovers into a five-star meal: same ingredients, way better presentation.
In this guide, you’ll learn how to make an ornament wreath that looks full, stays put, and survives the season
(and the storage bin) with minimal drama. We’ll cover wreath bases, ornament choices, adhesive strategies, design
tricks that make it look expensive, and practical tips for hanging and storing it safely.
Why a DIY Ornament Wreath Is the MVP of Holiday Decor
A Christmas ornament wreath is festive in the most efficient way possible: it’s colorful, reflective, and reads as
“holiday” from the curb without requiring you to cover your house in inflatable characters the size of a small SUV.
Ornaments naturally create texture and sparkle, which means your wreath can be simple in structure but still look
detailed (and therefore impressive).
Ornament wreaths are also customizable to an almost silly degree. Want classic red-and-green? Done. Glam gold? Done.
“My entire personality is icy silver and minimalism”? Absolutely. You can match your tree, your wrapping paper, or
your dog’s holiday sweater (no judgment; we all cope differently in December).
Supplies for a DIY Ornament Wreath
Base options
- Foam wreath form (lightweight, easy to cover, great for a dense “bauble” look)
- Wire wreath frame (sturdy, lighter glue needs, ornaments can be wired on)
- Grapevine wreath (rustic, great if you want greenery + ornaments, less “full-sphere” bauble look)
Ornaments
- Shatter-resistant ornaments for durability, especially if kids or pets are in the mix
- A mix of sizes (more on this belowsize variety is the secret sauce)
- Optional fillers: mini ornaments, picks, faux berries, tiny pinecones, ribbon tails
Tools and adhesives
- Hot glue gun + extra glue sticks (ask an adult for help if you’re not used to hot glue)
- Floral wire or pipe cleaners (especially helpful for wire-frame method)
- Wire cutters/scissors
- Ribbon for a hanger/bow
- Optional: silicone finger caps, craft mat, small bowl of cool water nearby (hot glue is spicy)
Smart swap: If you’re worried about heat damaging ornaments, use a low-temp glue gun where possible,
and reserve hotter glue for the base-to-base connection points (foam-to-foam or ribbon-to-frame).
Plan Your Ornament Wreath Like a Pro
Pick a color strategy (so it looks intentional)
The easiest way to make a DIY ornament wreath look “designed” is to limit your palette:
- Classic: red + green + gold accents
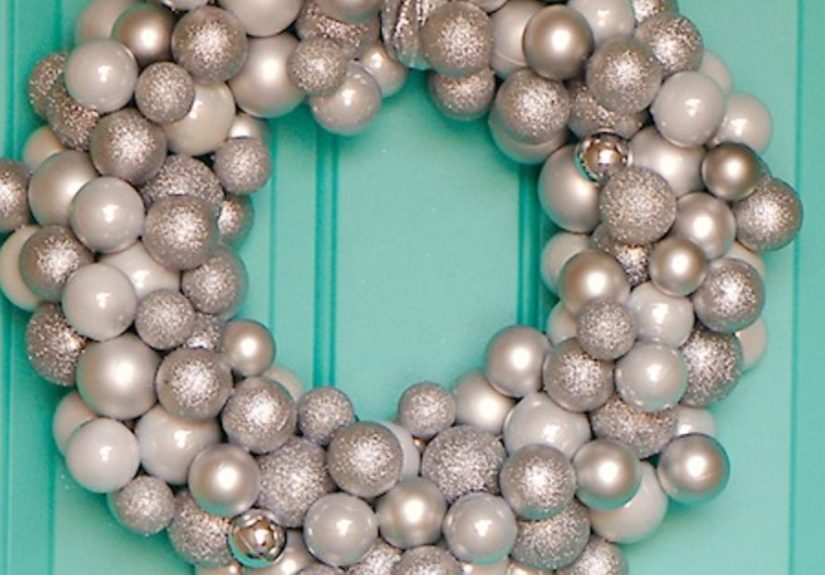
- Modern: monochrome (all white, all gold, all silver, all red)
- Playful: bright multi-color (great for “tacky Christmas” or retro vibes)
- Coastal/winter: icy blue + silver + white
Mix finishes for depth
Choose 2–3 finishes (matte, shiny, glitter) in the same color family. Glitter ornaments are basically the confetti
of wreath-making: a little makes it fun; too much and you’ll find sparkle in your socks until April.
How many ornaments do you need?
The exact number depends on how dense you want the wreath and how many sizes you mix. As a practical starting point:
- 12-inch foam form: plan for ~60–90 ornaments (mix of small/medium, a few large)
- 14–16-inch foam form: plan for ~90–140 ornaments
- Wire frame (14–16-inch): ~80–130 ornaments, depending on spacing and layering
If you’re unsure, buy a little extrabecause the ornament gremlins will inevitably claim a few, and also because
“oops I need 12 more” is the least festive errand imaginable.
How to Make a DIY Ornament Wreath (Foam Form Method)
This is the classic “bauble wreath” look: dense, glossy, and very “holiday card photo shoot.”
Work on a table covered with kraft paper or an old sheet (glitter has a talent for permanent relocation).
Step 1: Prep the base and hanger
-
Decide how you’ll hang the wreath. A wide ribbon loop glued and pinned to the back works well on foam.
(You can also wrap ribbon around a section of the form and knot it tightly.) -
If your wreath will be heavy, consider running the ribbon fully around the form to distribute weightfoam can
tear if all the stress sits in one small spot.
Step 2: Sort ornaments by size (30 seconds that saves you 30 minutes)
Separate into large, medium, and small. Keep any “special”
ornaments (stars, stripes, unusual shapes) in a separate pile so you can place them intentionally.
Step 3: Place large ornaments first (your wreath’s skeleton)
-
Start around the outer edge. Glue large ornaments first, spacing them evenly like the numbers on a clock.
This prevents one side from becoming “all big ornaments” while the other side looks like it forgot to eat lunch. -
Angle ornament tops inward or downward so caps are less visible. The goal is “lush and seamless,” not “hardware
store display rack.”
Step 4: Fill with medium ornaments (build the body)
-
Add medium ornaments between the large ones, slightly overlapping. Glue not only to the foam but also
ornament-to-ornament where they touchthis creates a stronger structure. - Rotate colors and finishes as you go. If you notice clumps (all shiny gold in one spot), break them up now.
Step 5: Use small ornaments to erase gaps (the “photoshoot filter” step)
Small ornaments hide foam peeking through and smooth out weird negative space. Tuck them into little valleys.
If an ornament won’t sit nicely, try a smaller size or change the angle.
Step 6: Add optional accents (ribbon, picks, greenery)
- Bow: A wired ribbon bow makes any wreath look instantly finished.
- Greenery: A few faux evergreen sprigs add softness and break up all the shine.
- Lights: Battery fairy lights can work, but keep them on the outer layer so you can access the switch.
Step 7: Let it cure before you hang it
Give the glue time to fully set before you lift the wreath by the hanger. This is how you avoid the classic
crafting tragedy: “It looked amazing… and then gravity reviewed my work.”
Alternative: DIY Ornament Wreath on a Wire Frame
A wire-frame ornament wreath is great if you want a sturdy base and prefer wiring ornaments on rather than relying
on lots of glue. It also tends to be lighter than a fully glued foam wreath, depending on how densely you pack it.
How it works
- Cut short lengths of floral wire or use pipe cleaners.
- Thread the wire through the ornament cap loop (or around the top) and twist it onto the wire frame.
- Build in layers: large ornaments first, then medium, then small to fill gaps.
- Add a ribbon hanger by tying it to the frame securely (double-knot and trim ends neatly).
Pro tip: Even with the wire method, a tiny dot of glue in a few strategic spots can prevent
ornaments from shifting if your door gets slammed by enthusiastic relatives.
DIY Ornament Wreath Design Variations (So Yours Doesn’t Look Like Everyone Else’s)
1) Monochrome “Designer” Wreath
Choose one color (all white or all gold is a classic), then mix finishes. Add a luxurious ribbon (velvet or satin)
and keep accents minimal. This style photographs beautifully and works well with modern decor.
2) Traditional Red + Green With a Twist
Use red ornaments as the dominant color, green as the supporting color, and add small gold ornaments for highlights.
A plaid ribbon bow makes it feel classic without looking like a store display.
3) Retro Bright “Tinsel Era” Wreath
Go bold with multi-color ornaments and tuck in short strands of tinsel garland between ornaments to add volume and
sparkle. This is joyful chaosin the best way.
4) Kid-Friendly (and Pet-Safer) Wreath
Use shatter-resistant ornaments only, avoid sharp picks, and choose a hanging spot where curious paws can’t reach.
Bonus: it’s also “vacuum-friendly,” which is a real holiday blessing.
5) Ornament + Greenery Hybrid
Start with a grapevine base, tuck in faux evergreen stems, then add ornaments as focal points rather than full
coverage. This gives you a softer, more natural look and can be faster than fully covering foam.
Hanging and Safety Tips (Because Wreaths Shouldn’t Be a Hazard)
Hanging without door drama
-
Use a sturdy wreath hanger or a wall/door hook rated for the wreath’s weight.
Ornament wreaths can be heavier than they look. - If the wreath bumps the door when it closes, add felt pads to the back or adjust the hanger length.
- For outdoor placement, aim for a sheltered spot to protect it from wind and harsh weather.
Lights and general holiday safety
If you add lights, choose battery-powered strands designed for decor, and turn them off when you go to bed or leave
the house. Also keep cords (if any) tidy and avoid overloading outlets or extension cords.
Hot glue safety
Hot glue guns can burn skin quickly. If you’re not experienced, ask an adult to help, use a craft mat, and keep
your fingers away from fresh glue. Your wreath should sparkle, not your bandages.
How to Store an Ornament Wreath So It Stays Fresh (and Not Flattened)
A DIY ornament wreath is basically a 3D sculpture made of shiny spheres. Treat it like one.
The goal is to avoid crushing, extreme heat, and moisture.
Before you store it
- Gently remove dust (a soft brush or cool hair dryer setting works well).
- Make sure it’s completely dry.
- Remove batteries from any lights.
- Check for loose ornaments and re-glue as needed.
Storage options that work
- Hard-sided wreath container: Best protection, especially for delicate or heavily decorated wreaths.
- Structured wreath bag: Easier to store than bulky bins, but still gives shape support.
-
Hanging storage: If space allows, hang it upright (closet rod or wall hook) and cover loosely
to keep dust off.
Where to store: Choose a climate-controlled area when possible. Heat can soften glue over time and
humidity can cause materials to warp or degrade. Label the container so “wreath” doesn’t become a mysterious holiday
surprise in November.
Troubleshooting Your DIY Ornament Wreath
“My wreath has bald spots.”
Use smaller ornaments to fill gaps and angle them into valleys. If foam is showing, that’s a sign you need more
mini ornamentsor a little ribbon/greenery to cover the area.
“It looks lumpy, not lush.”
This usually happens when ornaments are all the same size. Add variety: a few larger ornaments create structure,
and smaller ones smooth everything out.
“Ornaments keep popping off.”
Make sure you’re gluing in two places: ornament-to-base and ornament-to-neighbor. Also let sections cure before
handling. If the wreath is stored in a hot area, consider relocating itheat can weaken adhesives.
“It’s way heavier than I expected.”
This is normal. Use a stronger hanger, distribute weight with ribbon wrapped around the base, and avoid hanging it
on anything “maybe sturdy.” Holiday decor is not the time for suspense.
Conclusion: Your Door, But Make It Sparkle
A DIY ornament wreath is one of the fastest ways to get a high-impact holiday look without committing to a full
weekend of decorating. Pick a base that matches your style (foam for dense baubles, wire for sturdy structure,
grapevine for rustic charm), choose a simple color plan, build from large to small, and treat storage like the
grand finale that keeps your wreath beautiful for next year.
And remember: perfection is not the goal. The goal is a wreath that makes people smile before they even ring the
doorbellpreferably while you’re inside pretending you didn’t hear it yet.
Maker Experiences: What People Learn After Making an Ornament Wreath (About )
People who make their first DIY ornament wreath often start with the same optimistic thought: “This will be quick.”
Then they open a box of ornaments and realize they’ve accidentally adopted 120 tiny, slippery, highly reflective
roommates. The most common experience? Underestimating how much difference size variety makes. Crafters who
use only one size usually report a wreath that looks “flat” or oddly patterned, like it’s wearing a polka-dot shirt
it didn’t choose. The moment you add a few larger ornaments for structure and a handful of mini ornaments to fill
gaps, the wreath suddenly looks full and professionallike it got a holiday makeover and a good night’s sleep.
Another frequent “aha” moment is realizing that ornament wreaths are more like building a lightweight sculpture
than simply sticking decorations onto a ring. Makers often learn to glue strategically: not just ornament-to-base,
but also ornament-to-ornament where pieces touch. This creates a network that holds together when you lift the
wreath, hang it, or store it. People also discover that patience is a real crafting supply. Letting glue set before
moving on prevents the dreaded chain reaction where one ornament shifts, knocks another, and suddenly you’re in a
slow-motion holiday avalanche.
Many makers say their best design decision was limiting the color palette. Even those who love bold, playful decor
often report that choosing two main colors plus one accent (like gold) makes the wreath look intentional instead of
chaotic. And for anyone who wants the “expensive store” look, the consensus is clear: mix finishes. Matte ornaments
add sophistication, shiny ones bounce light, and glitter pieces act like highlights. The balance keeps the wreath
interesting from a distance and up close.
Practical experiences show up, tooespecially around weight and hanging. New wreath makers regularly discover that
ornaments add up fast: a wreath can feel surprisingly heavy once it’s fully covered. The lesson learned is to use a
hanger or hook rated for the job and to distribute stress on the back of the wreath (a ribbon wrapped around the
form works better than a tiny glued loop). People with windy porches mention that sheltered placement matters; a
protected spot helps the wreath stay aligned and reduces the chance of ornaments shifting.
Finally, there’s the storage reality. Makers who toss a wreath into a random bin often report the same outcome next
season: flattened ornaments, crushed sparkle, and “Why does this look tired?” The better experience comes from
giving the wreath its own spacehard-sided container, structured bag, or upright hanging storageplus a quick check
for loose pieces before putting it away. The big takeaway is that an ornament wreath can be a one-season craft or a
multi-year tradition, and the difference is usually just a little planning and a lot less squishing.