
Table of Contents >> Show >> Hide
- Before You Crack Open the Can: A 10-Minute Setup That Saves Hours
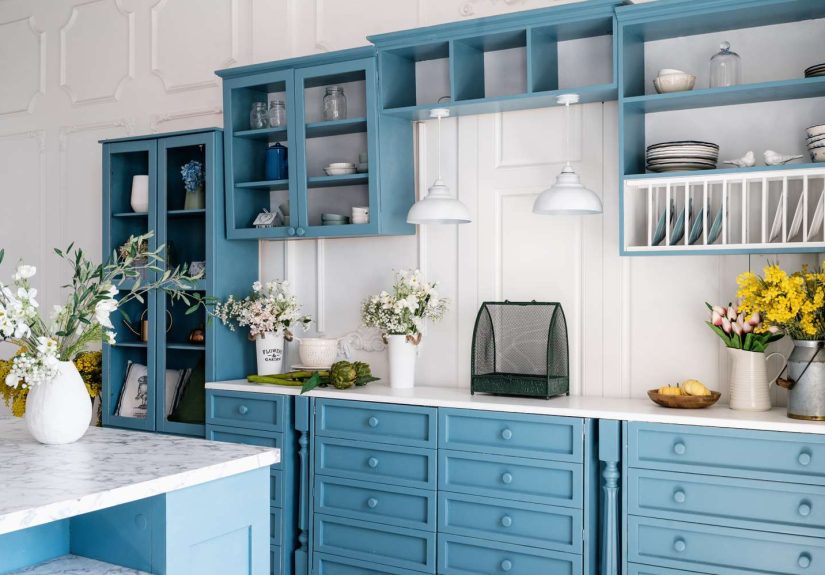
- Project 1: Refresh Kitchen (or Bathroom) CabinetsWithout a Full Renovation
- Project 2: Paint Trim and Moldings (Yes, It’s Worth the Knee Pain)
- Project 3: Upgrade One Wood Furniture Piece (The “New Room” Cheat Code)
- Project 4: Paint a Mantel (or Fireplace Surround) for a Built-In Focal Point
- Project 5: Paint Beams (or Faux Beams) to Add Architectural Swagger
- Project 6: Paint the Ceiling (a.k.a. the “Fifth Wall” Glow-Up)
- Project 7: Paint the Back of a Bookshelf (or a Niche) for Instant Depth
- Small Paint Projects That Look Expensive: The “Designer” Finishing Touches
- Conclusion: Pick One Project and Let Paint Do the Heavy Lifting
- Real-World Experience: What These Small Paint Projects Feel Like (and What People Usually Learn)
Want your room to look “new” without buying a new couch, a new rug, and a new personality? Paint is your fastest
shortcut. The trick is choosing small paint projects that deliver big visual payoffso you’re not stuck
repainting the entire living room while eating takeout off a toolbox for two weeks.
Below are seven high-impact, low-commitment DIY paint ideas that can make any space feel upgraded (often in a
weekend). We’ll cover what to paint, why it works, the best sheen to use, and the little prep steps that make
it look like you hired a proeven if your “crew” is just you and a playlist.
Before You Crack Open the Can: A 10-Minute Setup That Saves Hours
Most paint “fails” aren’t about the color. They’re about skipping prep. The good news: for these small paint
projects, prep is short and simplejust don’t skip it.
Your quick prep checklist
- Clean first: Dust, oils, and cooking residue block adhesion. Use mild soap and water; for cabinets, use a degreaser.
- Scuff sand: A light sanding (often 120–220 grit) helps primer and paint grip instead of sliding around like it’s on ice skates.
- Vacuum + wipe: Dust is paint’s sworn enemy. Vacuum, then wipe with a damp cloth or tack cloth.
- Protect surfaces: Drop cloths beat “I’ll be careful” every time.
- Ventilate: Open windows, run fans. Your lungs will send a thank-you note.
Fast sheen cheat sheet (because shine matters)
Sheen is how reflective the paint is. Higher sheen = tougher and easier to clean, but it also shows more surface
imperfections. Lower sheen hides flaws but can scuff more easily.
- Walls: Eggshell or satin (easy to wipe, still forgiving)
- Trim + doors: Satin or semi-gloss (durable and cleanable)
- Ceilings: Flat/matte (hides texture and roller marks)
- Cabinets + high-touch furniture: Cabinet/trim enamel in satin or semi-gloss (built to take abuse)
One important safety note for older homes
If you’re working in a U.S. home built before 1978, assume lead-based paint may be present. Avoid dry sanding and
create as little dust as possible. If you’re unsure, use a lead test approach or consult a qualified pro.
Project 1: Refresh Kitchen (or Bathroom) CabinetsWithout a Full Renovation
Painting cabinets is the makeover that makes guests go, “Wait… did you remodel?” But here’s the secret:
you don’t have to paint every cabinet. If you want maximum impact with minimum chaos, choose one:
the island, the lower cabinets, or a bathroom vanity.
Why it transforms a room instantly
Cabinets take up a huge amount of visual space. Changing their color shifts the whole mood of the kitchen or bath
even if everything else stays the same.
Best places to try it
- Kitchen island (a classic “big change, small footprint” move)
- Bathroom vanity (tiny room, huge payoff)
- Lower cabinets only (grounds the room and hides scuffs better than uppers)
Tools and materials
- Degreaser or strong cleaner
- 120–220 grit sandpaper or sanding sponge
- Bonding primer (especially if the surface is slick)
- Cabinet/trim enamel paint (satin or semi-gloss)
- High-density foam roller + angled brush
- Painter’s tape, drop cloths, labeled bags for hardware
Step-by-step (the “no heartbreak later” method)
- Remove doors and hardware. Label everything. Future-you deserves kindness.
- Clean thoroughly. Cabinets collect oils that paint won’t stick to.
- Scuff sand. You’re not removing the finish, just dulling the shine.
- Prime. Especially important if switching from a glossy surface or changing colors dramatically.
- Paint in thin coats. Two thin coats beat one thick coat (and avoid drips).
- Let it cure. Dry-to-touch is not the same as “ready for life.” Be gentle for a couple weeks.
Pro tips
- Don’t rush the cure: Paint can feel dry fast but still be soft underneath. Treat surfaces gently at first.
- Foam roller = smoother finish: Great for flat panels and reducing brush marks.
- Upgrade the “jewelry”: New pulls can make painted cabinets look even more custom.
Time: 1–2 weekends (mostly drying). Instant impact level: 10/10.
Project 2: Paint Trim and Moldings (Yes, It’s Worth the Knee Pain)
Trim is the outline of your room. When it’s fresh, everything looks cleaner and more intentional. When it’s dingy,
the whole place feels tiredeven if your walls are perfect.
Two great directions
- Classic contrast: White (or off-white) trim against colored walls for crisp definition.
- Modern blend: Trim painted to match the wall color for a “custom, architectural” vibe.
What you’ll need
- Angled sash brush (the MVP of clean lines)
- Satin or semi-gloss trim paint
- Light spackle + sandpaper for dents
- Paintable caulk (for gaps where trim meets wall)
Steps that make trim look professional
- Clean and patch. Fill dents, then sand smooth.
- Caulk gaps. Smooth with a damp finger for a seamless edge.
- Paint in long strokes. Follow the trim length; don’t “scrub” paint on.
- Feather your edges. Lightly smooth overlaps so you don’t build ridges.
Pro tips
- Satin is forgiving: It’s durable but doesn’t spotlight imperfections like high gloss can.
- Skip tape if you can: A steady hand and a good brush often beat tape (which can bleed).
- Paint trim last: If you’re also painting walls, do walls first and trim second for crisp edges.
Time: 4–8 hours per average room. Instant impact level: 9/10.
Project 3: Upgrade One Wood Furniture Piece (The “New Room” Cheat Code)
If painting feels intimidating, start with a single piece: a nightstand, a thrifted chair, a console table,
or that dresser that’s been “temporary” since 2019.
Why this works
A painted furniture piece acts like a bold accessorylike earrings for your room. It can echo a wall color,
add contrast, or introduce a fun pop without committing to a full-room repaint.
Best beginner picks
- Nightstands (small, manageable, forgiving)
- Simple chairs (huge style payoff, low paint use)
- Side tables (fast wins that build confidence)
Furniture painting steps that prevent chipping
- Clean well. Oils and polish residue will ruin adhesion.
- Scuff sand. Especially important for glossy finishes.
- Prime if needed. For slick surfaces, a bonding primer is your best friend.
- Paint in thin coats. Let coats dry before recoating.
- Protect high-use surfaces. Consider a durable topcoat if it’ll get heavy daily wear.
Style ideas
- Two-tone: Paint the base one color and the drawer fronts another.
- Quiet luxury: Deep navy or olive with brass hardware.
- Playful modern: Warm terracotta or buttery yellow on a single accent chair.
Time: 2–6 hours (plus drying). Instant impact level: 8.5/10.
Project 4: Paint a Mantel (or Fireplace Surround) for a Built-In Focal Point
A mantel is basically your room’s stage. If it looks dated, the whole room feels dated. Paint it and suddenly
your living room looks like it has opinions.
Where it shines
- Living rooms with a traditional fireplace that needs modernizing
- Bedrooms with a decorative mantel (yes, those exist and they’re charming)
- Any space with a mantel that’s “builder beige” or scuffed beyond respect
How to choose a color
- Go dark for drama: Charcoal, deep green, or black makes artwork and decor pop.
- Go light for calm: Soft white or greige brightens and feels classic.
- Match the trim: Keeps it seamless and architectural.
Simple steps
- Clean + sand. Mantels collect dust and soot residue (even when rarely used).
- Prime stains if needed. Stain-blocking primer helps prevent bleed-through.
- Paint with a smooth finish. Satin is a sweet spot for durability and elegance.
Safety note: If your fireplace is functional, make sure your paint choice and placement are
appropriate for heat exposure. When in doubt, follow manufacturer guidance or consult a professional.
Time: 2–5 hours. Instant impact level: 9/10.
Project 5: Paint Beams (or Faux Beams) to Add Architectural Swagger
Beams are like eyebrows: when they’re done right, the whole facesorry, roomlooks better.
Painting beams can either highlight them for contrast or blend them into the ceiling for a calmer look.
Two high-impact approaches
- Contrast beams: Dark beams against a lighter ceiling create depth and a designer feel.
- Blend beams: Painting beams the ceiling color makes the space feel taller and less busy.
What you’ll need
- Extension pole + roller (save your shoulders)
- Angled brush for edges and seams
- Primer if the beam is stained or knotty (prevents bleed)
Steps
- Dust thoroughly. Ceiling elements collect a shocking amount of dust.
- Spot prime stains. Especially on wood knots and old water marks.
- Paint in the direction of the beam. Long strokes look cleaner.
Time: 2–6 hours depending on height and number of beams. Instant impact level: 8/10.
Project 6: Paint the Ceiling (a.k.a. the “Fifth Wall” Glow-Up)
Most people ignore ceilings until there’s a leak. But painting the ceiling is one of the quickest ways to make a
room feel finished and intentionallike you hired someone who uses words like “cohesion” without irony.
Three ceiling ideas that feel designer (not chaotic)
- Soft color wash: A pale blue, warm white, or whispery green adds atmosphere without shrinking the room.
- Color-drench light: Walls and ceiling in the same color (or very close) for a cozy, cocooned look.
- Subtle shape: Paint a circle, arch, or rectangle above a bed, dining table, or reading nook.
Best practices for ceilings
- Use flat/matte: It hides bumps, seams, and roller texture better than shiny finishes.
- Cut in first, then roll: Work in sections so edges stay wet and blend smoothly.
- Keep coats thin: Thick ceiling paint = drips. Drips = sadness.
Time: 2–5 hours for most rooms. Instant impact level: 9/10.
Project 7: Paint the Back of a Bookshelf (or a Niche) for Instant Depth
Want a custom built-in look without… you know… custom built-in money? Paint the back panel of shelves, a recessed
niche, or the interior of a cabinet. It adds depth, contrast, and a “this home is styled” vibe.
Where it works best
- Built-in bookshelves
- Open shelving in kitchens
- Bathroom niches or linen shelves
- Entryway cubbies and mudroom storage
Color ideas that always look good
- Matte black: Makes decor pop and hides visual clutter.
- Deep jewel tones: Navy, emerald, burgundy for richness and drama.
- Soft tonal match: A shade darker than the wall color for subtle sophistication.
Steps
- Empty shelves completely. (Yes, even the “I’ll paint around it” items.)
- Light sand + wipe. Dust and slick finishes are the enemy.
- Cut edges, then roll the back. A small roller keeps it smooth and fast.
- Let it dry, then restyle. This is the fun partlike a tiny home makeover montage.
Time: 1–3 hours plus drying. Instant impact level: 8.5/10.
Small Paint Projects That Look Expensive: The “Designer” Finishing Touches
These quick paint updates go from “DIY” to “wow” when you pay attention to a few small details.
1) Sample smarter, not harder
Paint looks different in morning vs. night, and under warm vs. cool bulbs. Test your color on a poster board and
move it around the room before committing. (Your walls shouldn’t be a surprise party.)
2) Match undertones
If your floors are warm (orangey oak), a cool gray might look icy. If your room is north-facing and cool, very
stark whites can feel gloomy. Choose shades that play nicely with what you can’t easily change.
3) Respect cure time
Paint can feel dry fast, but curing takes longer. If you start scrubbing, stacking, and slamming doors too soon,
you’ll get dents, chips, and sticky surfaces. Be gentle early onfuture durability depends on it.
Conclusion: Pick One Project and Let Paint Do the Heavy Lifting
If you only do one thing this month, don’t repaint the whole house. Pick one high-impact paint project:
cabinets, trim, a ceiling, a bookshelf back, a furniture piece, a mantel, or beams. You’ll get that “new space”
feeling with far less mess, money, and regret.
Paint isn’t just colorit’s contrast, depth, and finish. Use the right sheen, do the tiny bit of prep, and
you’ll get results that look intentional, not accidental.
Real-World Experience: What These Small Paint Projects Feel Like (and What People Usually Learn)
The internet makes painting look like a 20-minute hobby you can do between brunch and a nap. In real homes, the
“small” projects are absolutely doablebut they come with a few predictable moments that almost everyone
experiences. Knowing them ahead of time is basically a cheat code.
First, most people discover that paint is 30% brushing and 70% moving things out of the way. Clearing shelves,
removing cabinet doors, and sliding furniture into the center of the room feels like the least glamorous workout
imaginable. The upside: once the space is prepped, the actual painting often goes quicklyand that speed is
satisfying in a “look at me, being functional” kind of way.
Second, people almost always underestimate cleaning. Cabinets in particular can look “fine” until you wipe them
and your cloth turns an alarming shade of “kitchen history.” Degreasing is boring, but it’s the difference
between a finish that lasts and one that chips when you look at it too aggressively.
Third, there’s the classic “the first coat looks terrible” phase. This is normal. Fresh paint can look streaky,
patchy, or weirdly uneven until the second coat levels everything out. A lot of DIYers panic too early and start
overworking the paint (which adds texture and roller marks). The most experienced move is also the simplest:
apply thin coats, walk away, let it dry, then come back.
Fourth, most people learn that shine is a personality trait. Semi-gloss on trim looks crisp and wipes clean, but
it will also highlight dents, brush strokes, and any “creative” caulk work. Satin is a forgiving compromise that
still looks polished. On ceilings, a flatter finish feels calmer and hides moreespecially in rooms where the
ceiling has texture or imperfect seams. In other words: sheen is not just a technical choice; it’s part of the
design.
Fifth, there’s always one surprise: a weird stain that bleeds through, a spot that won’t sand smooth, or a patch
that flashes under certain lighting. This is why primer is such a hero. Many homeowners who’ve done a few projects
develop a “prime first, stress less” philosophyespecially on wood knots, older trim, or previously glossy surfaces.
Sixth, the “dry vs. cured” lesson hits hardusually the first time someone rehanges cabinet doors too soon and the
fresh finish sticks to a bumper or pulls slightly at the edge. Paint may be dry to the touch quickly, but it takes
longer to harden fully. People who get the best long-term results treat freshly painted surfaces gently at first:
light use, soft cleaning, no aggressive scrubbing, and no slamming doors like they’re trying to win an argument.
Finally, the best part: restyling. A painted bookshelf back makes your books and decor look more intentional.
A freshly painted mantel becomes a focal point without buying anything new. Painted cabinets can make old counters
feel upgraded. That’s why these projects are so satisfyingbecause they change how the room feels, not just how it
looks. And once you’ve seen how far a little paint can go, it’s very hard to stop at just one project. Consider
yourself warned.


