Table of Contents >> Show >> Hide
- Quick Prep That Makes Your Stencil Look Expensive
- Idea #1: Faux Inlay (Bone-Inlay Look Without Bone-Inlay Money)
- Idea #2: The “Painted Table Runner” (A Pattern Strip That Tricks the Eye)
- Idea #3: Ombré Tile Fade (A Stenciled Gradient That Looks Like Art)
- Idea #4: Terrazzo Remix (Stencil Chips + Metallic “Inclusions”)
- Sealing Your Stenciled Table Top (So It Survives Real Life)
- Conclusion: Pick One Idea, Then Make It Yours
- Extra: Real-World “Been There” Experiences DIYers Learn (500+ Words)
A table top is basically a stage. Every mug ring, pizza box, homework sheet, and “temporary” pile of mail performs on it daily.
So when your table starts looking tired, scratched, or just… emotionally drained, you don’t need a brand-new one.
You need a stencil, some paint, and the confidence of a person who has watched three DIY videos in a row.
Stenciling a table top is one of the highest-impact, lowest-regret upgrades in the DIY universe. It’s cheaper than replacing furniture,
easier than refinishing hardwood the “real” way, and it lets you get a custom look that screams “designer” while whispering
“I did this in my driveway.”
In this guide, you’ll get four truly out-of-the-box stenciled table top ideas (not the same old damask-on-gray situation).
You’ll also get practical technique tipsbecause stencils don’t fail, paint overload does.
Quick Prep That Makes Your Stencil Look Expensive
Before we jump into the fun patterns, here’s the truth: the difference between “wow” and “why does it look fuzzy?”
is mostly prep and paint control. The good news? You don’t need fancy toolsjust a little patience and a refusal to rush drying time.
Materials (a realistic list, not a fantasy list)
- Cleaner/degreaser (dish soap works for light grime; use a degreaser if it’s kitchen-table sticky)
- Sandpaper (120–220 grit) or a sanding sponge
- Primer (especially if the surface is glossy, stained, or previously sealed)
- Base paint (furniture paint, cabinet paint, or a durable acrylic/latexchoose something meant to be wiped)
- Stencil (mylar stencils are common; adhesive vinyl stencils also work)
- Stencil brush, dense foam roller, or makeup sponge (yes, makeup spongewelcome to modern DIY)
- Painter’s tape + measuring tape + level (for alignment and sanity)
- Repositionable spray adhesive (optional, but helpful for crisp edges)
- Topcoat (water-based polyurethane/polycrylic for most indoor tables)
Prep steps (don’t skip these unless you love redoing things)
- Clean the table top thoroughly. Oils and residue cause paint to fisheye or peel.
- Lightly sand to dull the shine and smooth flaws. You’re not carving a canoejust scuffing for adhesion.
- Prime if needed (especially on laminate, glossy finishes, or stained wood).
- Paint your base coat and let it cure fully. Dry-to-touch is not the same as ready-for-stenciling.
Stencil technique that prevents bleeding
- Less paint is more. Offload paint onto a paper towel before touching the stencil.
- Use a pounce/dab motion with a stencil brush or sponge; use a dry roller approach with a foam roller.
- Work in thin layers rather than one heavy pass.
- Peel the stencil while paint is still slightly wet for cleaner edges (move slowly, like you’re defusing a glitter bomb).
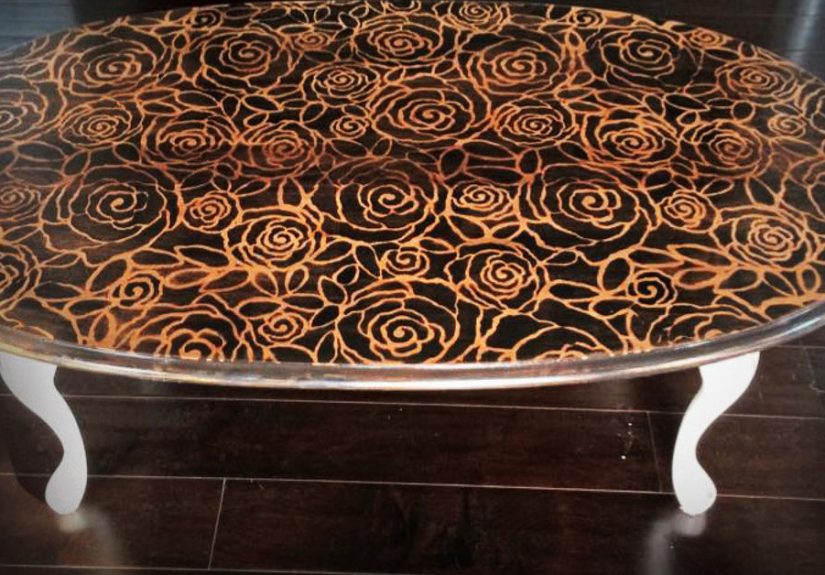
Idea #1: Faux Inlay (Bone-Inlay Look Without Bone-Inlay Money)
Real bone-inlay or marquetry tables are gorgeous and also priced like they come with a tiny butler.
The stencil version gives you that high-contrast, artisan patternwithout taking out a second mortgage on your coffee table.
Best for
- Side tables, coffee tables, entry tables
- Modern, boho, global, or transitional spaces
- People who want “statement piece” energy in one weekend
How to do it
- Choose a geometric stencil that repeats cleanly (trellis, starburst, Moroccan tile, lattice).
- Paint the base coat in a deep color (charcoal, navy, black, forest green).
- Center your stencil and tape it in place. Use a level if the pattern has straight lines.
- Apply the pattern color (classic: crisp white; bold: warm ivory; glam: metallic gold over deep navy).
- Reposition carefully using registration marks or by aligning to the previous shapes.
- Optional upgrade: add a soft glaze over the pattern for an “antique inlay” vibe.
Pro tips to make it look custom
- Use two whites: a bright white for the main pattern and a softer off-white for accents. Subtle depth reads expensive.
- Frame the top with a painted border (1–2 inches) to hide any tiny alignment sins at the edges.
- Keep the sheen consistent. Your topcoat will unify it, but starting with similar finishes helps.
Common mistake (and the fix)
Mistake: loading too much paint and getting fuzzy edges.
Fix: offload paint aggressively, use a drier tool, and build color in two to three light passes.
Idea #2: The “Painted Table Runner” (A Pattern Strip That Tricks the Eye)
This one is delightfully unexpected: instead of covering the entire table, you stencil a “runner” down the center
like fabric, but permanently. It looks curated, it highlights the length of the table, and it’s forgiving because you’re working
in a defined zone. Also: no one has to iron it. Ever.
Best for
- Dining tables, console tables, long desks
- Homes with kids (because you can still wipe it down)
- Anyone who wants a statement without visual overload
Design options that feel “out-of-the-box”
- Scandi supersized motif: big, simplified shapes in two tones
- Faux textile: block print-style pattern in faded indigo or warm clay
- Modern organic: abstract arches or soft-edged geometry in layered neutrals
How to do it
- Measure and mark a centered runner area (typically 12–18 inches wide, depending on table size).
- Tape the runner edges for crisp boundaries (remove tape before paint fully cures to avoid peeling).
- Stencil inside the runner from the center outward so the pattern looks intentional, not “I started on one end and panicked.”
- Soft-distress the runner (optional): lightly sand a few areas once dry for a worn, vintage textile feel.
- Topcoat the entire table to make the sheen uniform and protect the design.
Why it works (the design logic)
A centered motif creates a focal path, the same way a rug anchors a seating area. Your eye reads it as styling,
not paint. Plus, leaving the outer edges solid makes the table look slimmer and more tailored.
Idea #3: Ombré Tile Fade (A Stenciled Gradient That Looks Like Art)
If you’ve ever looked at a tiled café table and thought, “I want that, but also I want it to be a little weird,”
welcome. This idea uses a repeating tile stencil, but instead of one color, you create a gradual fade across the table top.
It’s part pattern, part painting, part “how is this even a stencil?”
Best for
- Coffee tables and patio-style side tables (indoor use is easiest; outdoor requires a truly weatherproof finish)
- Homes that like color but don’t want chaos
- People who enjoy a little controlled artistry
How to plan the gradient
Choose 3–5 shades in the same family (for example: cream → sand → terracotta → rust),
or go cool (pale gray → slate → deep charcoal). The secret is small steps between colors.
How to do it
- Paint the base coat in the lightest color (or a neutral that matches the palette).
- Divide the table top into zones with light pencil marks (left-to-right fade, or center-out fade).
- Stencil the first zone using color #1.
- Blend at the borders by alternating two colors in the transition zone (light, thin layers).
- Continue across, gradually shifting the color mix as you move through zones.
- Optional “handmade upgrade”: add tiny touch-ups with a small brush so it doesn’t feel too perfect.
Pro tips for a clean fade
- Mix transitional paints (e.g., 50/50 of two neighboring shades) for smoother shifts.
- Keep your stencil placement consistenta drifted pattern will fight the gradient.
- Use a dense foam roller for large, repeating designs and a stencil brush for tight details.
Idea #4: Terrazzo Remix (Stencil Chips + Metallic “Inclusions”)
Terrazzo is having a moment, and for good reason: it’s playful, modern, and weirdly timeless.
The out-of-the-box twist here is doing terrazzo with stencils, not random splatter.
You’ll create “chips” in intentional shapes (think: rounded rectangles, shards, blobs, mini arches),
and then add a tiny hit of metallic like you’re sprinkling design confetti.
Best for
- Small tables, nightstands, kids’ craft tables (yes, make the chaos table look intentionally chaotic)
- Mid-century modern, contemporary, playful eclectic rooms
- People who want color without committing to a full mural
Palette ideas that look current
- Neutral terrazzo: warm white base + taupe + charcoal + muted clay
- Pastel terrazzo: pale gray base + sage + dusty blue + blush
- Bold terrazzo: black base + cream + mustard + teal, with tiny gold accents
How to do it
- Paint the base coat (this is the “cement” color).
- Create or buy a terrazzo chip stencil (or make one from stencil plastic with a craft knife).
- Stencil chips in layers:
- Start with the largest chips in the lightest accent color.
- Add medium chips in your mid-tone.
- Finish with small chips in the darkest accent color.
- Add metallic micro-chips sparingly (a little goes a long waythis is jewelry, not tinsel).
- Topcoat carefully with thin coats to avoid reactivating or smearing metallic paint.
Why this looks “designed” instead of “accidental”
True terrazzo has rhythm: variation in size, spacing, and color balance. Stenciling lets you control that rhythm.
If a cluster starts looking too busy, you can simply… not add more chips there. Revolutionary.
Sealing Your Stenciled Table Top (So It Survives Real Life)
A stenciled table top without a protective finish is like a white shirt at spaghetti night: optimistic, but doomed.
If the table will see daily use, add a durable clear topcoat.
Topcoat tips for a smooth finish
- Use thin coats (thick coats can cloud, drip, or drag pigment).
- Sand lightly between coats with very fine grit (like 320+) once fully dry.
- Apply 3–5 coats for high-use surfaces (dining tables need more protection than a decorative side table).
- Let it cure before heavy use. Dry isn’t curedcured is “I can actually live on this table now.”
Quick troubleshooting
- Stencil bleed: touch up with a small artist brush and your base color.
- Misalignment: frame it with a border or add a deliberate “break” like a center medallion.
- Raised paint texture: gently sand once fully dry, then topcoat to smooth it out.
Conclusion: Pick One Idea, Then Make It Yours
The best stenciled table tops don’t look factory-perfectthey look intentional. Whether you go for faux inlay drama,
a painted runner that feels like a styling trick, an ombré tile fade with artsy depth, or terrazzo chips that make your table
look like it belongs in a boutique hotel lobby, you’re building a custom surface that can handle actual life.
Start small if you’re nervous: practice on cardboard, a tray, or the underside of the table top.
Then commit. Your future self (and your sad, scratched-up table) will thank you.
Extra: Real-World “Been There” Experiences DIYers Learn (500+ Words)
Let’s talk about the part nobody puts on the inspirational before-and-after photos: the very human experience of stenciling a table top.
It’s not hard, but it has a personality. And like any relationship, you learn its boundaries quickly.
The first lesson most DIYers learn is that paint is a liar. It looks dry. It feels dry. It whispers,
“Go ahead, tape your stencil on me.” Then you lift the stencil and discover the paint was only pretending to be ready.
That’s why letting your base coat cure (not just dry-to-touch) feels like overkill right up until it saves your entire weekend.
The second universal experience: the moment you realize your stencil tool is loaded with too much paint.
It starts innocentlyone quick roll, one confident daband suddenly the edge looks slightly fuzzy. Then you do the thing
everyone does: you press harder (because obviously pressure solves everything). Spoiler: pressure does not solve bleeding.
The “aha” moment is learning to offload paint like you’re trying to remove evidence. A drier brush or sponge feels slow,
but it produces those crisp lines that make the project look like it came from a fancy catalog with a fancy price tag.
Another common milestone is stencil alignment anxiety. You line up the first placement perfectly. You step back and admire it.
You think, “Wow, I’m basically a professional.” Then you move the stencil to the next repeat and realize your table top is not a
perfect mathematical plane of happiness. Sometimes the wood grain pulls your tape slightly. Sometimes you’re off by a millimeter.
Here’s the secret experienced DIYers eventually accept: tiny imperfections disappear once the pattern repeats,
especially after a unifying topcoat. And if you’re doing the “painted runner” idea, the runner edges act like bumpers in a bowling lane
they keep everything visually contained.
DIYers also tend to discover their personal “pattern tolerance.” Some people love all-over stencils until they see the entire surface covered
and think, “Is my table yelling?” If you’ve ever regretted bold wallpaper (or a haircut with bangs), the runner design or a framed center panel
is the low-risk path. It gives you impact without turning every meal into a graphic design event.
Then there’s the emotional roller coaster of topcoating. The first coat of clear finish can make the paint look slightly differentsometimes deeper,
sometimes a touch warmer. That can cause a moment of panic. But most people find that after the second and third thin coat, everything evens out
and starts looking more professional. The bigger lesson is patience: rushing a topcoat leads to brush marks, bubbles, or a finish that feels tacky
longer than your last awkward conversation.
Finally, there’s the best part: living with it. DIYers often report a weird, proud joy the first time someone sets a drink down and says,
“Where did you get this table?” And you get to respond with the most satisfying phrase in home improvement:
“Oh, I made it.” Even if you made it with a stencil, a foam roller, and a playlist that did most of the emotional heavy lifting.