Table of Contents >> Show >> Hide
- What Makes This a “One-Board” Planter?
- Before You Start
- Materials
- Tools
- The Hexagon “Math” (Don’t Panic)
- Pick Your Size
- Step-by-Step: Build the One Board 2×8 Hexagon Planter
- Step 1: Choose the Right Board
- Step 2: Crosscut the Board into Six Equal Blanks
- Step 3: Create the 30° Bevel Edges (The Magic Part)
- Step 4: Dry Fit the Hexagon
- Step 5: Assemble: Glue + Clamp + Fasten
- Step 6: Optional: Add a Top Rim/Cap (Using the Scrap)
- Step 7: Sand for Comfort (and Splinter Avoidance)
- Make It Planter-Ready: Drainage and Lining
- Finishing: Keep the Wood Looking Good Outdoors
- Pressure-Treated Wood: Should You Use It?
- Troubleshooting: When Your Hexagon Gets… Opinionated
- Upgrades and Variations
- Maintenance: Keep It Nice for More Than One Season
- Build Experiences and Lessons Learned (Extra-Long, Real-World Edition)
- Conclusion
A one board 2×8 hexagon planter is the kind of project that makes your patio look like you “definitely have your life together”
even if you built it in sweatpants and celebrated with a snack break every 12 minutes. It’s modern, sturdy, and surprisingly simple because the
design is basically six identical pieces that lock into a clean geometric shape (hello, honeycomb vibes).
In this guide, you’ll learn how to plan the size, get the cuts right, assemble the hexagon without a wrestling match, and set it up for real-world
outdoor use (drainage, liners, rot resistance, and finishes). I’ll also include practical troubleshooting and a long “lessons learned” section at the end
so you can avoid the classic DIY plot twists.
What Makes This a “One-Board” Planter?
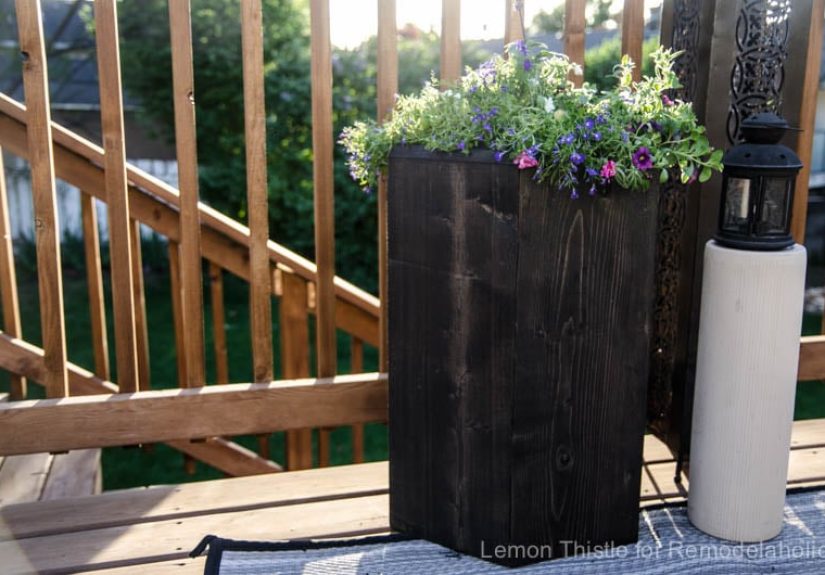
The signature version uses one 12-foot 2×8 to create a single hexagon “ring” planter. You can use it in two popular ways:
- Planter sleeve: Set a round nursery pot inside the hexagon for an easy, removable planting setup.
- Soil-ready planter: Line the inside with breathable landscape fabric so you can fill it with potting mix directly.
Want a deeper planter? You can build a second ring and stack it (that uses a second boardstill one-board-per-ring).
Before You Start
If you’re a teen or new to power tools: this project is totally doable, but have a responsible adult handle the cutting steps (especially table saw
bevel rips) and follow the tool manufacturer’s safety instructions. The build is fun. Emergency rooms are not.
Materials
- One 12-foot 2×8 (cedar/hemlock/redwood recommended for outdoor durability)
- Exterior-grade wood glue (water-resistant)
- Exterior fasteners (coated or stainless screws; brad nails optional)
- Landscape fabric (optional but highly recommended for soil-ready planting)
- Planter feet (scrap wood blocks, rubber feet, or pot risers)
- Exterior finish (semi-transparent outdoor stain or exterior-rated sealer)
Tools
- Measuring tape, pencil, speed square
- Clamps (at least two; four is even better)
- Drill/driver + bits
- Sander (or sanding block) + sandpaper
- Cutting tools: ideally a miter saw for crosscuts and a table saw for bevel rips (or have a shop cut for you)
The Hexagon “Math” (Don’t Panic)
A regular hexagon has six equal sides. To make the corners meet cleanly, the edge angles matter. The friendly takeaway:
hexagon joints are built around 30° cuts. You’ll see 30° show up whether you’re bevel-ripping edges (stave-style build)
or mitering ends (frame-style build).
For the one-board 2×8 planter method in this article, the most common approach is:
cut six equal-length blanks, then bevel the long edges so the pieces “fold” into a hexagon.
Pick Your Size
The easiest sizing is to use the board length and keep all six pieces identical.
With a 12-foot board (144 inches), you’ll crosscut it into six chunks.
Cut-Length Example
- Total length: 144″
- Six pieces: 144″ ÷ 6 = 24″ each (before accounting for saw kerf)
In real life, every cut removes a little material (the saw blade “kerf”). If you want to be extra accurate, aim slightly under 24″ so all six
are identical. A super practical number is 23-7/8″. If you get them cut at the store, ask for six pieces the same length.
Step-by-Step: Build the One Board 2×8 Hexagon Planter
Step 1: Choose the Right Board
Sight down the board at the store like you’re lining up a pool shot. Pick the straightest 2×8 you can findfewer twists means less fighting
during assembly. For outdoor longevity (and especially for edible plants), many gardeners prefer naturally rot-resistant woods like
cedar or hemlock.
Step 2: Crosscut the Board into Six Equal Blanks
- Measure and mark six equal segments (example: 23-7/8″ each).
- Cut them all to the same length.
- Stack the blanks and check that the ends line up. If one is off, trim it so all match.
Pro move: Use a stop block (or ask the store to cut all pieces the same) to keep every blank identical. Consistency is what makes the
hexagon close cleanly instead of turning into a “hexagon-ish” situation.
Step 3: Create the 30° Bevel Edges (The Magic Part)
This is where the hexagon happens. Each blank needs its long edges beveled so neighboring pieces meet neatly at the corners.
The classic method is to bevel-rip along each long edge at 30°.
- Bevel one long edge.
- Flip the piece and bevel the other long edge to mirror the first.
- Repeat for all six blanks.
When you’re done, each piece will look like a “stave” with angled edgesso when you line up six pieces, they naturally form a ring.
If you’re not set up for bevel ripping safely, ask an experienced woodworker for help with this step.
Step 4: Dry Fit the Hexagon
Before glue enters the chat, do a dry fit:
- Arrange the six pieces on a flat surface in a hexagon shape.
- Push the joints together by hand and check for gaps.
- If you have gaps, identify whether one piece is flipped the wrong way or if a bevel is inconsistent.
Small gaps can usually be pulled tight with clamps during glue-up. Big gaps mean something’s mismatchedfix it now, not after glue.
Step 5: Assemble: Glue + Clamp + Fasten
You have a few assembly styles. Here are two solid options:
Option A: Glue + Screws (Strong + DIY-Friendly)
- Apply exterior wood glue along each beveled edge.
- Clamp two pieces together at a time and add screws from the outside into the neighboring piece.
- Predrill to reduce splitting (especially with cedar).
- Work around the ring until the final joint closes.
Option B: Construction Adhesive + Brad Nails (Fast + Clean)
- Apply a strong exterior-rated adhesive along the beveled edges.
- Hold joints tight and tack with brad nails to keep everything aligned while the adhesive cures.
If you’re aiming for a “looks like it came from a boutique garden store” finish, keep fasteners neat and consistent, then fill holes with exterior
wood filler before sanding.
Step 6: Optional: Add a Top Rim/Cap (Using the Scrap)
The bevel rips create long triangular scraps. You can miter those scraps and attach them around the top edge as a decorative rim.
Totally optionalbut it adds a finished look and gives you a slightly wider lip.
Step 7: Sand for Comfort (and Splinter Avoidance)
- Sand outside faces and especially the top edgeyour hands will thank you later.
- Break sharp corners with a quick pass of sandpaper.
- Wipe off dust before finishing.
Make It Planter-Ready: Drainage and Lining
A wooden planter needs two things to survive outdoors: drainage and breathability. Wet soil pressed against wood 24/7 is basically a
slow-motion rot subscription.
Option 1: Use It as a Pot Sleeve (Easiest)
Drop a plastic nursery pot inside the hexagon. You get built-in drainage, and you can swap plants seasonally without hauling soil.
If the pot is a little smaller, add a few wood blocks inside as spacers so it sits centered.
Option 2: Line It and Fill with Soil (Still Easy, Just Messier)
- Cut porous landscape fabric to fit the inside.
- Staple or tack it near the top interior edge.
- Make sure water can escapedon’t seal the bottom with plastic unless you’re intentionally building a “contained” liner system with drainage paths.
Landscape fabric helps keep soil from directly contacting the wood while still letting water drain, which can extend the planter’s life.
Don’t Do the “Rocks Fix Drainage” Myth
Tossing a layer of rocks at the bottom is one of those gardening tips that refuses to die. In many containers, it can actually create a saturated zone
rather than improving drainage. If you need better drainage, the best fix is real drainage holes or a pot-within-a-pot setup.
Finishing: Keep the Wood Looking Good Outdoors
You have three realistic finish paths:
- Leave it unfinished: Cedar will weather to a silvery gray. (Some people love this.)
- Use a penetrating exterior stain: Helps protect against sun and moisture while still showing wood grain.
- Use an exterior-rated sealer: Adds water resistance, but check recoat schedules.
If you plan to grow herbs or veggies directly in the planter, consider finishing only the outside and top edge, or use a liner to keep soil off the wood.
Pressure-Treated Wood: Should You Use It?
For this project, many DIYers prefer naturally rot-resistant lumber (cedar/hemlock/redwood) to keep things simple. Pressure-treated lumber is widely used
outdoors, but gardeners sometimes worry about preservatives near food crops. If you choose treated lumber, common strategies include sealing the wood and/or
using a barrier liner between soil and wood (while still allowing drainage).
Troubleshooting: When Your Hexagon Gets… Opinionated
Problem: The last joint won’t close
- Check that all six blanks are exactly the same length.
- Confirm each piece’s bevel orientation matches the others (a flipped stave can ruin the ring).
- Use clamps gradually around the shape instead of forcing one corner.
Problem: Gaps at joints
- Minor gaps: clamp during glue-up and sand/fill after.
- Bigger gaps: re-check bevel angle consistency; one outlier piece can throw everything off.
Problem: It rocks or wobbles on the patio
- Sand the bottom edges lightly on a flat surface.
- Add feet and shim if neededoutdoor surfaces are rarely perfectly level.
Upgrades and Variations
Stacked Hexagon Planter (Taller Version)
Build a second identical ring and stack it. Align the joints so they don’t all sit on top of each other (staggering looks cleaner and can feel sturdier).
Built-In Bottom
A true soil-holding planter can be made by adding a bottom panel and drainage holes. That typically requires extra material beyond the one-board ring,
but it turns the project into a fully contained container garden.
Modern “Legs”
Add simple block feet or a small stand so the planter sits slightly above the ground. Better airflow, better drainage, less rotplus it looks more “designed.”
Maintenance: Keep It Nice for More Than One Season
- Recoat stain/sealer as recommended by the product label (often annually for harsh sun/rain exposure).
- Elevate the planter so water doesn’t sit underneath it.
- Empty and refresh soil periodically, especially if you notice poor drainage or salt buildup.
Build Experiences and Lessons Learned (Extra-Long, Real-World Edition)
If you’ve ever watched a “quick DIY” video and thought, “Wow, that person has never met a warped board,” this section is for you. Here are the
most common experiences builders run into with a one board 2×8 hexagon planterand what tends to work best.
1) The board you pick matters more than your confidence.
People often assume they can “force it square” later. Hexagons don’t negotiate. If the 2×8 has twist or a serious bow, the dry fit will reveal gaps that
mysteriously teleport around the ring. Builders who start with a straighter board usually spend their time assembling, not arguing with geometry.
The best habit is the simplest: sight down the board at the store, reject the worst offenders, and accept that you are not being pickyyou are being
future-you’s hero.
2) Consistency beats perfection.
A perfectly accurate angle is great, but six identical pieces are even better. If every stave is cut the same way, the ring will close more cleanlyeven
if the angle is off by a hair. That’s why stop blocks and “repeatable setups” are mentioned so often in woodworking. Builders who try to measure each
piece separately tend to end up with five pieces that match and one “special snowflake” that refuses to cooperate.
3) Dry fitting feels optional… until it saves your whole project.
Nearly everyone who skips the dry fit learns the same lesson: glue has comedic timing. The dry fit is where you catch a flipped piece, a slightly different
length, or bevels that aren’t mirrored. It also teaches you how the ring wants to come togetherlike a rehearsal before opening night, except the audience
is your patio and the critics are your neighbors.
4) Clamping strategy is a thing (and yes, it matters).
A common experience is trying to clamp one joint tight while the opposite side pops open like it’s playing whack-a-mole. What usually works better is a
“walk it in” approach: snug clamps around multiple joints gradually, working in a circle. If you only attack the last joint, you’re basically asking the
ring to bend reality. Builders also find that painter’s tape can act like a temporary “third hand” during glue-upespecially for keeping pieces aligned
while you add clamps.
5) Drainage and airflow aren’t glamorous, but they’re the difference between “planter” and “wet wooden sponge.”
A lot of first-time planter builds fail because the bottom stays damp or soil sits directly against the wood. Builders who add feet (even simple scrap
blocks) and use a breathable liner tend to get longer life from the project. The goal is to let water leave quickly and let the wood dry between waterings.
That one change often matters more than fancy joinery.
6) The finish is a vibeand a maintenance schedule.
Many people love the look of raw cedar and plan to leave it unfinished. Then the sun does what the sun does, and the wood turns silvery gray. That’s not a
failure; it’s a design choice you didn’t realize you made. Builders who want color consistency usually prefer a penetrating stain because it’s easier to
refresh later than a film finish that can peel. The “experience lesson” here is simple: decide whether you want weathered charm or a preserved tone, then
pick a finish that matches that reality.
7) The biggest win is how customizable it is.
Once people build one, they start “seeing” variations everywhere: stacking rings for height, adding a rim cap for polish, using it as a sleeve around a pot,
or building a set of three in different sizes for a modern patio grouping. A hexagon planter is basically LEGO for grown-upsexcept you can grow basil in it.
Conclusion
Building a DIY hexagon planter box from a single 2×8 is one of those projects that hits the sweet spot: simple concept, high-end look, and a
result you’ll actually use. Focus on consistent cuts, do a dry fit, clamp smart, and treat drainage like it’s part of the design (because it is).
Do that, and your one-board 2×8 hexagon planter won’t just look good on day oneit’ll keep showing up season after season.