Table of Contents >> Show >> Hide
- Microgreens 101: What They Are (and What They Aren’t)
- Why Microgreens Are Basically the “Instant Noodles” of Gardening (In a Good Way)
- Indoor Setup That Actually Works (Without Turning Your Home Into a Science Lab)
- How We Picked the Best Microgreens to Grow Indoors
- Quick Comparison: 10 Best Indoor Microgreens at a Glance
- 1) Radish Microgreens (Fast, Spicy, and Basically Impossible to Ignore)
- 2) Broccoli Microgreens (Mild, Versatile, and “Goes With Everything”)
- 3) Pea Shoot Microgreens (Sweet Crunch With Big “Kitchen Flex” Energy)
- 4) Sunflower Microgreens (Nutty, Filling, and the “I Could Eat a Bowl of This” One)
- 5) Arugula Microgreens (Peppery Gourmet Vibes, Minimal Effort)
- 6) Mustard Microgreens (For When You Want “Spicy,” Not “Sort of Spicy”)
- 7) Kale Microgreens (Mild, Easy, and the “Daily Driver” Green)
- 8) Red Cabbage Microgreens (Color That Makes Food Look Expensive)
- 9) Beet Microgreens (Earthy Flavor + Red Stems = Instant Drama)
- 10) Basil Microgreens (Worth ItBut Yes, It’s a Little Extra)
- Important “Don’t Do This” Note: Skip Nightshade Microgreens
- Common Indoor Microgreens Problems (and How to Fix Them)
- Food Safety: The Not-So-Fun Part You Still Need
- How to Harvest, Store, and Actually Eat Your Microgreens
- Conclusion: Your “Fresh Greens Indoors” Game Plan
- Real-World Indoor Microgreens Experiences (What You’ll Notice After a Few Trays)
If you’ve ever looked at a tiny tray of microgreens at the store and thought, “Why is this salad garnish priced like a concert ticket?”
good news: you can grow the same vibrant, crunchy, flavor-bomb greens indoors with a tray, some seed, and about the same level of daily effort as
remembering to water a houseplant (so… let’s set ourselves up for success).
This guide breaks down the 10 best microgreens to grow indoorsthe ones that tend to sprout reliably, taste amazing, and won’t punish you for
being a beginner. You’ll also get a simple indoor setup, timing tips, and a realistic “what you’ll notice in real life” section at the end.
Microgreens 101: What They Are (and What They Aren’t)
Microgreens are young seedlings of vegetables and herbs, typically harvested when the cotyledons (“seed leaves”) are open and the first true leaves
are starting to appear. They’re usually cut above the soil line and eaten freshthink: tiny plants with big personality.
Microgreens often get mixed up with sprouts, but they’re not the same. Sprouts are generally harvested very early (often within about a week),
frequently eaten with the seed and root attached, and have additional food-safety considerations compared to microgreens. Microgreens are typically grown with
light and cut above the growing medium, which changes both flavor and handling.
Why Microgreens Are Basically the “Instant Noodles” of Gardening (In a Good Way)
- Fast results: Many varieties are ready in roughly 1–3 weeks, depending on the crop and conditions.
- Small space: A sunny windowsill or a modest grow light can produce a steady supply.
- High flavor impact: Microgreens can taste more intense than their mature counterpartspeppery, nutty, sweet, or mustardy.
- Easy to scale: One tray for “just a little garnish”… or three trays when you discover you put radish microgreens on everything.
Indoor Setup That Actually Works (Without Turning Your Home Into a Science Lab)
Containers and growing medium
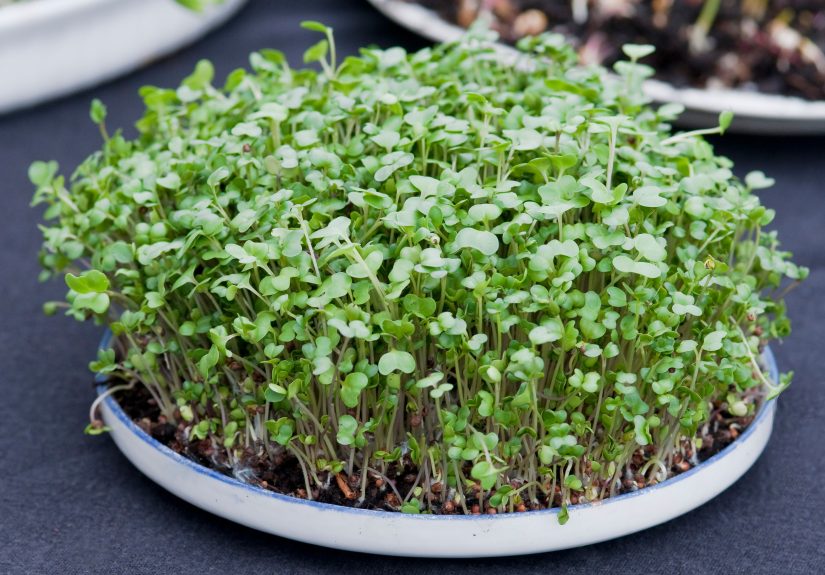
A shallow tray (roughly 1–2 inches of growing medium) with drainage holes is the classic setup. Place it on a second tray to catch drips.
Use a clean, sterile potting mix or a soilless medium; don’t scoop mystery soil from outdoors unless you enjoy surprise fungus as a hobby.
Watering (the “less drama” approach)
Keep the medium moist but not swampy. Many growers prefer bottom watering once seedlings are up: add a little water to the bottom tray and let the
medium wick it up. It reduces splashing and can help keep stems cleaner.
Light and temperature
A bright window can work, but consistency matters. Many microgreens do well with about 6–8 hours of light from a strong window, or longer under LEDs.
For temperature, aim around typical comfortable indoor room tempsmany guides recommend roughly the upper 60s to around 70°F for smooth growth.
Humidity covers (use them… then ditch them)
A clear lid or plastic wrap can help keep moisture steady during germination. The key move: remove the cover soon after sprouting
so humidity doesn’t spike and invite mold to your microgreen party.
Seeding density (aka: “crowded, but not chaotic”)
Microgreens are grown densely, but there’s still a sweet spot. A handy rule of thumb:
about 10–12 seeds per square inch for small seeds and 6–8 seeds per square inch for large seeds.
(You’ll fine-tune by variety and your tray size.)
How We Picked the Best Microgreens to Grow Indoors
“Best” here means: relatively fast, fairly forgiving, strong flavor payoff, widely available seed, and good performance in typical indoor conditions.
Some herbs (like basil) are slower and fussierstill worth it, but we’ll be honest about their diva moments.
Quick Comparison: 10 Best Indoor Microgreens at a Glance
| Microgreen Type | Flavor | Typical Harvest Window | Beginner-Friendly? | Best Uses |
|---|---|---|---|---|
| Radish | Spicy, crisp | ~7–12 days | Yes | Tacos, eggs, sandwiches |
| Broccoli | Mild, fresh | ~8–12 days | Yes | Salads, bowls, smoothies |
| Pea Shoots | Sweet, crunchy | ~10–18 days | Yes | Stir-fries, ramen, salads |
| Sunflower | Nutty, hearty | ~10–14 days | Yes | Wraps, grain bowls |
| Arugula | Peppery | ~7–12 days | Yes | Pizza topping, salads |
| Mustard | Spicy, pungent | ~7–12 days | Yes | Burgers, soups, salads |
| Kale | Mild, green | ~10–16 days | Yes | Everything (seriously) |
| Red Cabbage | Mild, slightly sweet | ~10–16 days | Yes | Slaws, sandwiches |
| Beet | Earthy, colorful stems | ~10–14 days | Mostly | Goat cheese salads, toast |
| Basil | Big herb flavor | ~18–25 days | Intermediate | Pasta, caprese, pesto |
1) Radish Microgreens (Fast, Spicy, and Basically Impossible to Ignore)
Why it’s great indoors
Radish is the classic “I want success quickly” microgreen. It germinates fast, grows evenly, and delivers that satisfying crunch with a peppery bite.
If you’re new, radish is a confidence builder.
Flavor & best uses
Spicy and crisp. Try it on tacos, avocado toast, scrambled eggs, or anywhere you’d normally want a little bite without committing to slicing a whole radish.
Grow notes
- Likes steady moisturenot puddles.
- Give it good light after sprouting so it stays stout, not leggy.
2) Broccoli Microgreens (Mild, Versatile, and “Goes With Everything”)
Why it’s great indoors
Broccoli microgreens are popular because they’re mild and easy to add to meals without taking over the plate. They also tend to grow reliably in dense sowings.
Flavor & best uses
Think “fresh green” with a gentle cabbage-family vibe. Toss into salads, layer onto sandwiches, or add to grain bowls.
If you do smoothies, broccoli microgreens are one of the least offensively green options.
Grow notes
- Good airflow helpsdense plantings can invite damping-off if the surface stays too wet.
- Harvest when the cotyledons look full and healthy and the first true leaves begin to show.
3) Pea Shoot Microgreens (Sweet Crunch With Big “Kitchen Flex” Energy)
Why it’s great indoors
Pea shoots are thick-stemmed, crunchy, and incredibly satisfying. They also look impressive, which is fun when you want your “indoor garden” to feel legit.
Flavor & best uses
Sweet, fresh, and pea-like. Excellent in stir-fries (add at the very end), ramen, salads, and wraps.
Grow notes
- Soak first: Peas have hard seed coats; soaking overnight can improve germination and uniformity.
- They’re heavier seedspress them gently into the medium for good contact.
4) Sunflower Microgreens (Nutty, Filling, and the “I Could Eat a Bowl of This” One)
Why it’s great indoors
Sunflower shoots are sturdy and forgiving. When they’re thriving, they look like tiny edible houseplantsin the best possible way.
Flavor & best uses
Nutty, rich, and crunchy. Use in wraps, grain bowls, salads, or as a base for microgreen “slaws.”
Grow notes
- Don’t overwaterthick seed hulls + constant moisture can invite mold.
- Consider a little extra airflow (a small fan nearby) if your room is humid.
5) Arugula Microgreens (Peppery Gourmet Vibes, Minimal Effort)
Why it’s great indoors
Arugula is quick and flavorfulone of the easiest ways to make a simple meal taste “restaurant-y” without learning how to flambé anything.
Flavor & best uses
Peppery and bright. Scatter over pizza after baking, add to salads, or use as a punchy topping for soups.
Grow notes
- Harvest a bit earlier for a gentler flavor, later for more bite.
- Give strong light after sprouting to keep stems short.
6) Mustard Microgreens (For When You Want “Spicy,” Not “Sort of Spicy”)
Why it’s great indoors
Mustard microgreens grow quickly and deliver real heat. If radish is a playful kick, mustard can be a playful kick with a megaphone.
Flavor & best uses
Sharp, spicy, mustardy. Try them on burgers, with smoked salmon, in salads, or sprinkled on creamy soups.
Grow notes
- Like many fast brassicas, mustard does best with good airflow and not-too-wet media.
- Harvest promptly once they hit your preferred size to keep flavor fresh.
7) Kale Microgreens (Mild, Easy, and the “Daily Driver” Green)
Why it’s great indoors
Kale microgreens are a strong all-purpose option: mild, consistent, and versatile.
If you want one tray that works with almost every meal, kale is a safe bet.
Flavor & best uses
Mild and green. Add to salads, bowls, omelets, sandwichesanything that needs freshness without extra heat.
Grow notes
- Harvest around the time true leaves begin to show for the best texture.
- If you’re mixing seeds, pair kale with similar-speed growers.
8) Red Cabbage Microgreens (Color That Makes Food Look Expensive)
Why it’s great indoors
Red cabbage is beloved for its purple stems and green-purple leavesinstant visual upgrade for salads and sandwiches.
It also grows reliably in a standard indoor setup.
Flavor & best uses
Mild with a subtle sweetness. Perfect for slaws, sandwiches, or topping anything beige (no judgmentwe all eat beige sometimes).
Grow notes
- Good light helps bring out richer color.
- Keep surfaces from staying saturated to reduce damping-off risks.
9) Beet Microgreens (Earthy Flavor + Red Stems = Instant Drama)
Why it’s great indoors
Beet microgreens are a favorite for colorthose red stems show up beautifully on plates.
They’re slightly slower than the fastest brassicas, but still very doable indoors.
Flavor & best uses
Earthy and slightly sweet. Great with goat cheese, citrus, balsamic, or on open-faced toast.
Grow notes
- Beet “seeds” are often clusters; sow evenly and avoid over-thick patches.
- Keep the medium evenly moistdry swings can reduce uniformity.
10) Basil Microgreens (Worth ItBut Yes, It’s a Little Extra)
Why it’s great indoors
Basil microgreens taste like basil turned up to 11. They’re incredible on pasta, tomatoes, eggs, and anything Italian-adjacent.
The tradeoff: basil is slower and can be fussier than the quick brassicas.
Flavor & best uses
Strong basil aroma and flavor. Toss onto pizza after baking, add to caprese salads, or use as a finishing green on creamy soups.
Grow notes
- Expect a longer grow window (often closer to 3+ weeks).
- Warmth and consistent moisture helpbut avoid stale, humid air. Basil appreciates airflow.
Important “Don’t Do This” Note: Skip Nightshade Microgreens
Not every seed belongs in your microgreen tray. Avoid growing microgreens from nightshade crops like tomato, potato, eggplant, and peppers.
Their leaves can contain naturally occurring compounds that aren’t meant for casual snacking. Stick to the common, well-known microgreen families above.
Common Indoor Microgreens Problems (and How to Fix Them)
Problem: Leggy, floppy greens
Usually a light issue. Increase brightness, move closer to a strong window, or use an LED grow light. Rotate trays if window light comes from one direction.
Problem: Mold on the surface
Mold loves still air and wet surfaces. Use a cover only for germination, then remove it soon after sprouting. Reduce surface wetness, bottom-water, and consider
gentle airflow (a small fan nearbynot a leaf hurricane).
Problem: Patchy germination
Often caused by uneven moisture or poor seed-to-medium contact. Mist lightly during germination and gently press seed into the medium. For large seeds, soaking
(like peas) can help.
Problem: Seedlings “melt” at the base (damping-off)
Dense microgreen trays can be prone to damping-off when media stays saturated and airflow is poor. Use clean trays and fresh medium, avoid overwatering, and
improve air movement.
Food Safety: The Not-So-Fun Part You Still Need
Microgreens are often eaten raw, so clean habits matter. Food-safety guidance frequently emphasizes that seeds can be a source of pathogens, and that
sanitation, clean water, and clean harvest practices help reduce risk.
- Start clean: wash hands, sanitize trays, and use a clean growing medium.
- Use safe water: potable (drinkable) water is the easiest default for indoor growing.
- Harvest smart: cut with clean scissors/knife and avoid dragging cut greens through wet soil.
- Wash right before eating: many grow guides recommend washing at serving time, not days ahead.
How to Harvest, Store, and Actually Eat Your Microgreens
Harvest
Most microgreens are harvested when cotyledons are fully open and true leaves are just emerging. Cut just above the soil line with clean scissors or a sharp knife.
Minimize handling so you don’t bruise them (microgreens are tiny, but they do hold grudges).
Store
Store dry, unwashed microgreens in the refrigerator in a breathable container. Many growers aim to use them within about a week for best quality.
If you do wash them, dry thoroughly (salad spinner helps) and eat sooner.
Eat
- Breakfast: eggs + radish or kale microgreens = instant upgrade.
- Lunch: sandwiches/wraps love sunflower and pea shoots.
- Dinner: arugula or basil microgreens as a finishing touch on pasta or soup.
- Snack: microgreen “handfuls” while staring into the fridge is valid.
Conclusion: Your “Fresh Greens Indoors” Game Plan
If you want the highest odds of success, start with radish, broccoli, kale, red cabbage, or arugula. They’re quick, forgiving, and delicious.
Once you’ve got one or two trays thriving, add pea shoots and sunflower for crunch, and try basil when you’re ready for the “slow but fancy” tier.
Keep it simple: clean tray, fresh medium, consistent moisture, good light, and remove humidity covers right after germination. Do thatand you’ll be harvesting
tiny greens that make your meals look like you planned them.
Real-World Indoor Microgreens Experiences (What You’ll Notice After a Few Trays)
The first “experience” most indoor growers have is emotional whiplash: Day 1 looks like you sprinkled seeds on dirt. Day 3 looks like a chia pet audition.
Day 7 looks like you accidentally became the kind of person who says, “Hold on, I need to harvest something” before making lunch.
Here’s what tends to show up in real homes (not just in perfectly lit social media videos). First: your watering style becomes your destiny.
If you’re a “just to be safe, I’ll water again” person, microgreens will politely (or not so politely) teach you about airflow and soggy media. A lot of people
end up switching to bottom watering after the first couple days of sprouting because it keeps the stems cleaner and helps avoid that constant wet surface.
Second: light quality matters more than you expect. A windowsill can be greatuntil winter clouds roll in or the tray starts leaning like it’s
trying to escape. Many home growers notice that even a basic LED grow light makes trays more uniform and sturdier. The difference isn’t subtle: tighter stems,
better color (especially with red cabbage and beet), and fewer “why are you flopping?” moments.
Third: you’ll develop favorites based on your eating habits. People who cook quick meals tend to fall in love with radish because it makes eggs,
noodles, and sandwiches taste brighter in five seconds. Salad people usually become red cabbage fans because color = instant appetite.
If you make bowls and meal prep, sunflower becomes the “I need texture” MVP. And if you’re a pasta or pizza person, basil microgreens can feel like
cheatingin the best way.
Fourth: you’ll learn the “timing trick.” Microgreens don’t all peak on the same day, and harvesting a little earlier or later changes the vibe. Early harvests can be
more tender and mild; a few extra days can mean more intensity (especially mustard). Many growers end up staggering traysone new sow every few daysso they’re
not forced to eat an entire jungle in one weekend.
Finally, the most practical experience: you start noticing waste and fixing it. Maybe your first tray was too thick, or you left the humidity cover on
too long, or you forgot the tray near a cold window. By tray two or three, you naturally start adjusting: slightly fewer seeds, better airflow, a consistent place for
the tray, a simple routine. That’s the real secret. Microgreens aren’t hardthey’re just honest. They reflect your setup quickly, so your improvements pay off fast.