
Table of Contents >> Show >> Hide
- Why Concrete + Gold Works So Well
- Materials and Tools
- Choosing the Right Concrete Mix (and Not Making Soup)
- Project 1: Concrete Tea Light Votive (Step-by-Step)
- Project 2: Concrete Planter with a Gold Accent (Step-by-Step)
- Curing: The Part Everyone Tries to Skip (Don’t)
- Seal It: Protect the Finish, Your Plants, and Your Furniture
- Adding the Gold: Three Ways (From Fancy to Foolproof)
- Design Ideas That Look Custom (Not Complicated)
- Tea Light Safety: Make It Pretty, Keep It Smart
- Troubleshooting (Because Concrete Loves Drama)
- Care and Longevity
- Real-World Maker Notes (Experience That Saves You Time)
- Conclusion
Concrete is the introvert of home décor: quiet, sturdy, and always dressed in neutral. Gold is the extrovert: shiny, dramatic, and not afraid
to be photographed from every angle. Put them together and you get that high-end “designer shelf” vibewithout paying designer-shelf money.
A concrete-and-gold tea light votive can look sculptural even when it’s doing absolutely nothing (a true life skill), and a matching planter
makes your succulents look like they have a skincare routine.
This guide breaks down how to make (or choose, customize, and care for) concrete tea light votives and small planters with gold accents.
You’ll get practical tips on mix consistency, molds, curing, sealing, gilding, andbecause fire is not a “learn by surprise” situationcandle safety.
Why Concrete + Gold Works So Well
The magic is contrast. Concrete brings texture: matte, slightly mottled, a little “I was poured by a minimalist architect who owns exactly one
turtleneck.” Gold adds warmth and light, which keeps concrete from feeling cold or industrial. Together, they fit a bunch of styles:
modern, Scandinavian, boho, glam, rustic, and even “I just moved and my décor is currently three boxes and a dream.”
Style perks you can actually use
- Light play: Gold catches candlelight and makes small spaces feel cozier.
- Camouflage: Concrete hides smudges and tiny imperfections (aka “handmade authenticity”).
- Mix-and-match: One mold can produce a set that looks curated, not copy-pasted.
Materials and Tools
You can go fully DIY (mix, pour, cure, finish) or semi-DIY (buy plain concrete pieces and add the gold yourself). Either way, you’ll want
the right ingredients so your project looks intentionallike “boutique,” not “science fair.”
Concrete basics
- Concrete mix: A bagged mix is easiest for consistent results (look for standard or high-strength mixes).
- Water: Clean, room-temperature water. Too much water makes concrete weaker and more likely to crack.
- Mixing container + stir tool: A bucket and a sturdy stick, trowel, or mixing paddle.
- Gloves + mask: Dry cement dust is irritatingtreat it like glitter’s mean cousin.
Molds and release
- Votive molds: Silicone cupcake liners, silicone molds, small plastic cups, or food containers.
- Planter molds: Two nested containers (one larger, one smaller) to create the “wall” thickness.
- Mold release: Cooking spray, mineral oil, or a dedicated mold release.
- Drainage hole maker: A short straw piece (tiny planters) or a small dowel (larger planters).
Gold finish options
- Gold leaf (metal leaf): Highest shine, most “wow.” Needs adhesive (“size”) and a protective topcoat.
- Metallic wax: Easy, forgiving, great for highlighting edges and texture.
- Metallic acrylic paint: Best for graphic patterns and color-blocking.
Sealing and protection
- Concrete sealer: Helps reduce dusting, staining, and moisture absorption.
- Optional planter liner: A plastic nursery pot or thin insert can simplify plant care.
- Felt pads: Protects shelves and tables from scratches.
Choosing the Right Concrete Mix (and Not Making Soup)
For small décor projects, bagged mixes are convenient because the proportions are already engineered. The goal is a thick, moldable consistency:
it should hold shape, not pour like pancake batter. If you add too much water, you’ll get more shrinkage, more air pockets, and less strength.
Think “thick oatmeal,” not “sad latte.”
Fast-setting vs. regular-setting
- Fast-setting mixes: Great when you want quick demolding, but they reduce your working time.
- Regular mixes: Give you more time to tap out bubbles and adjust edges.
Tip: Mix only what you can place quickly. For tiny molds, small batches reduce waste and prevent the mix from stiffening mid-pour.
Project 1: Concrete Tea Light Votive (Step-by-Step)
A tea light votive is basically a tiny concrete sculpture with a job. The key is creating a clean, centered recess for the tea light cup
while keeping enough concrete beneath it so the base stays strong.
Step 1: Prep your mold
- Coat the inside of the outer mold with a light layer of release (too much can cause surface pitting).
- Choose an “inner form” to create the candle recess: a tea light cup, a smaller plastic cup, or a silicone insert.
- If using a real tea light cup as the recess form, wrap it in plastic wrap or tape for easier removal.
Step 2: Mix your concrete
Add water gradually and mix until uniform. Scrape the sides and bottom so you don’t get dry pockets. If the mix is runny,
stop and add a bit more dry mix (or start over with a smaller test batchyour future self will thank you).
Step 3: Pour and place the recess
- Spoon concrete into the mold about halfway.
- Tap the mold on the table to bring bubbles to the surface (gentle but persistentlike convincing a cat to move).
- Press the inner form into the concrete, keeping it centered.
- Add more concrete around it, leaving the top edge as smooth (or intentionally rough) as you like.
Step 4: Cure, then demold
Let it set until firm. Demolding too early can chip edges. If the piece feels “cool and damp,” it’s still curingbe patient.
After demolding, let it continue curing for several days before sealing or adding gold.
Step 5: Smooth and refine
- Sand the base lightly so it sits flat.
- Soften sharp edges with fine sandpaper for a more polished look.
- Brush off dust before sealing or gilding.
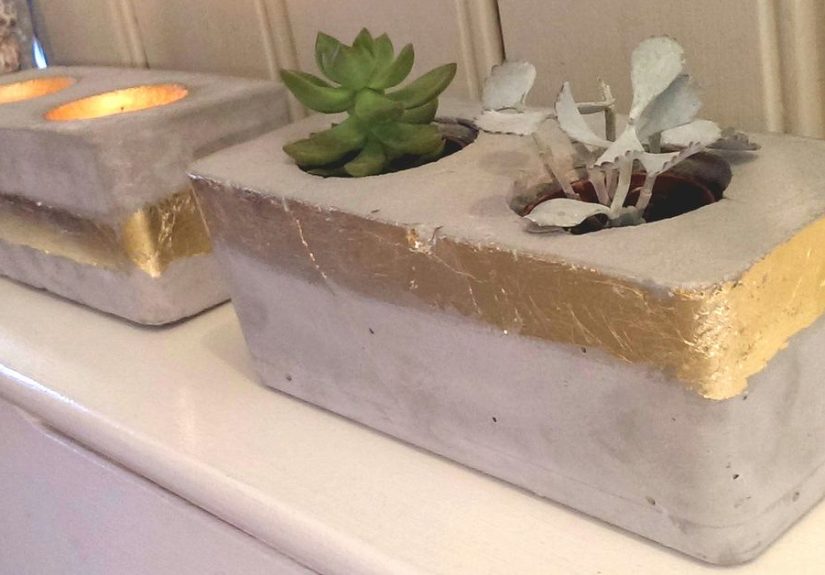
Project 2: Concrete Planter with a Gold Accent (Step-by-Step)
A concrete planter looks expensive because it’s heavy, minimalist, and slightly intimidatinglike it could lecture your pothos about hydration.
The two-container mold method is simple and gives you clean walls.
Step 1: Build the mold “sandwich”
- Choose an outer container (the finished planter shape) and an inner container (creates the hollow).
- Leave at least 1/2 inch of space between them for a sturdy wall.
- Coat both containers (the inside of the outer and the outside of the inner) with release.
Step 2: Add a drainage hole (highly recommended)
Drainage is the difference between a thriving plant and a tiny swamp tragedy. For small planters, a short straw piece hot-glued to the base
works well; for larger planters, a small dowel secured in the center can create a clean hole.
Step 3: Pour, tap, and weigh down
- Add concrete to the outer container.
- Insert the inner container, pushing down until the base thickness looks even.
- Weigh down the inner container with rocks or a jar of coins so it doesn’t float upward.
- Tap the sides to release trapped air.
Step 4: Cure and demold carefully
Let the planter set until it holds its shape, then demold. If it’s stubborn, don’t pry like you’re opening a treasure chestgently flex
silicone molds or run plastic molds under warm water (if appropriate) to help release.
Step 5: Optional “plant-friendly” prep
New concrete can be alkaline. If you’re planting directly into the concrete (not using a liner), consider sealing the inside or using a
removable nursery pot to keep roots from sitting against raw concrete.
Curing: The Part Everyone Tries to Skip (Don’t)
Concrete doesn’t “dry,” it curesmeaning it gains strength through a chemical reaction that needs moisture and reasonable temperatures.
Faster surface hardening doesn’t mean full strength. For small pieces, good curing reduces cracking and dusting and helps sealers bond better.
Easy curing routine for small crafts
- Keep pieces out of direct sun and wind for the first day.
- If your climate is dry, loosely cover with plastic to slow moisture loss.
- Wait several days before sealing; longer is better when you can manage it.
If you want the “why”: hydration needs adequate internal moisture, and curing guidance commonly emphasizes maintaining moisture and moderate
temperature for at least the early curing period to support strength development and reduce cracking.
Seal It: Protect the Finish, Your Plants, and Your Furniture
Sealing is optional, but it’s the difference between “matte modern” and “why is my shelf dusty and slightly stained?”
Sealers also help reduce water absorption in planters and make candle holders easier to wipe clean.
Two common sealer families
- Penetrating sealers: Soak in and reduce water absorption without changing the look much.
- Film-forming sealers: Sit on top and can add sheen (from satin to glossy).
Planter-specific sealing tips
- Seal the inside if planting directly in the concrete, especially for indoor planters.
- Let sealers cure fully before adding soilfollow the product label for dry and cure times.
- If you want the safest “low-commitment” approach, use a liner pot inside your concrete planter.
Adding the Gold: Three Ways (From Fancy to Foolproof)
Option 1: Gold leaf (the dramatic one)
Gold leaf looks incredible on concrete because it highlights texture and edges. It also shows fingerprints like it’s auditioning for a crime show,
so work gently.
- Prep: Clean the concrete and lightly sand the area to be gilded. Remove all dust.
- Base coat (optional): Paint the area a warm ochre or tan so tiny gaps don’t look gray.
- Apply size: Brush on gilding adhesive in your pattern (rim, stripe, geometric blocks).
- Wait for tack: Size should feel tacky, not wet.
- Lay the leaf: Press gently with a soft brush; overlap pieces for full coverage.
- Burnish lightly: Use a clean soft brush to smooth and remove loose flakes.
- Seal: Add a compatible clear topcoat to protect the leaf from rubbing off.
Option 2: Metallic wax (the forgiving one)
Metallic wax is perfect for “kissed-with-gold” edges. Rub it on raised areas and corners to highlight the concrete texture.
It’s also great for beginners because it’s hard to mess up beyond “oops, now it looks even cooler.”
Option 3: Metallic paint (the graphic one)
For crisp patterns, painter’s tape is your best friend. Tape a clean line, paint gold, peel tape, and pretend you always had steady hands.
Seal afterward for durability.
Design Ideas That Look Custom (Not Complicated)
- Gold-dipped base: Paint the bottom third gold for a modern “dipped” look.
- Rim gilding: Gold leaf just the top rim of the plantersubtle, classy, and quick.
- Textured highlight: Use wax on rough concrete for a “found object” vibe.
- Set of three votives: Same shape, different gold patterns (stripe, speckle, full rim) for a styled cluster.
- Concrete + greenery pairing: Succulents, snake plants, pothos, and herbs all photograph beautifully in gray + gold.
Tea Light Safety: Make It Pretty, Keep It Smart
Concrete is nonflammable, but tea lights are still open flames, and heat can transfer to surfaces. Treat your concrete votive like a “heat tool,”
not a harmless decoration. Place it on a stable, heat-resistant surface, keep it away from anything that can burn, and never leave it unattended.
Keep candles and lighters away from kids and pets, and don’t move a candle while wax is liquid.
Quick safety checklist
- Keep burning candles away from curtains, books, bedding, décor, and plants.
- Use sturdy holders that won’t tip.
- Trim and monitor wicks to reduce soot and overly high flames.
- Don’t burn tea lights longer than recommended by the manufacturer.
- Stop using any candle container that cracks, chips, or seems unstable.
Troubleshooting (Because Concrete Loves Drama)
“My piece has lots of holes!”
Those are air pockets. Tap the mold more, use a thicker mix, and press concrete into corners with a spoon. Silicone molds help reduce bubbles,
but tapping is still your MVP.
“It cracked while curing.”
Common causes: too much water, demolding too early, or curing too fast (hot, windy, dry). Use less water, cure more gently, and consider thicker walls.
“The gold looks patchy.”
Patchiness usually means the surface wasn’t fully clean, the adhesive wasn’t evenly applied, or the leaf was placed before the size reached proper tack.
Touch-ups are normalgold leaf is basically the cat of craft materials: gorgeous, picky, and occasionally rude.
“My planter is leaving damp marks.”
Concrete can wick moisture. Seal the inside, add a liner pot, and use a saucer or tray if it’s indoors.
Care and Longevity
- Cleaning: Wipe with a damp cloth. Avoid harsh cleaners that can dull sealers or lift metallic finishes.
- Outdoor use: Freeze-thaw cycles can stress concrete. Consider bringing small planters inside in harsh winters.
- Resealing: If water stops beading or stains appear easily, it may be time to reapply sealer (follow product directions).
- Surface protection: Add felt pads under votives and planters to protect furniture.
Real-World Maker Notes (Experience That Saves You Time)
Here’s what tends to happen after you’ve made a few concrete-and-gold piecesbecause the first one is always the “trial,” and the second one is when you
suddenly develop strong opinions about bubble removal.
First: your mix matters more than your mold. Makers often start with a runny mix because it feels easier to pour, and then wonder why the piece looks
chalky, fragile, or full of pinholes. A stiffer mix takes a little more spooning and pressing, but it rewards you with sharper edges and fewer bubbles.
The sweet spot is when the concrete holds a small mound for a moment before settling. If it’s flowing like a milkshake, it’s probably too wet.
Second: “tapping the mold” is not a suggestionit’s the craft. People who get the cleanest finishes usually develop a rhythm: spoon in concrete, tap,
scrape the sides, tap again, gently jiggle, tap again. If you have a stubborn mold, a few taps can feel like nothing happeneduntil you demold and
realize you just prevented a crater field. If your piece still has tiny pinholes, don’t panic. Some makers embrace them as part of the concrete look
and highlight the texture with a gold wax rub that turns “imperfection” into “intentionally artisanal.”
Third: curing is where patience becomes a design tool. A common mistake is demolding as soon as the surface feels firm. The piece can still be “green”
inside, which makes corners chip easily. Experienced crafters often wait longer than they think they need toespecially for thin-walled planters.
If you can, give it time, then sand. Sanding too early can tear the surface; sanding after a longer cure gives you a smoother, more controlled finish.
Fourth: gold finishing looks best when it has a plan. The easiest way to make gold look expensive is to use it sparingly and consistently.
A thin rim, a single geometric stripe, or a “dipped” base tends to look more modern than random blobs (unless you’re going for celestial chaos, which
is also valid). Tape lines help a lot. Even if your tape job isn’t perfect, tiny irregularities can read as handmade charmespecially against concrete’s
naturally organic surface.
Fifth: planters teach you about moisture faster than any houseplant book. Concrete wicks water, which can be helpful outdoors, but indoors it can leave
marks on wood shelves and windowsills. Makers who keep their sanity long-term usually pick one of two approaches: seal the inside thoroughly, or just
commit to a liner pot. A liner pot also makes plant swaps easier, so your décor can change seasons without you repotting like it’s a competitive sport.
Finally: the best sets are the ones that look related, not identical. A trio of votives in the same shape with different gold placements (rim, stripe,
dotted) feels curated. A planter with a gold rim and a votive with a matching gold stripe feels like a “collection,” which is a fancy word for “I meant
to do that.” Once you make your first good batch, you’ll start noticing where these pieces shine most: on a tray with a small plant, near a mirror, or
anywhere candlelight can bounce off the gold and make your space feel instantly warmer.
Conclusion
Concrete-and-gold tea light votives and planters are one of those rare DIY wins: they look high-end, they’re customizable, and they’re practical.
Focus on a good mix consistency, gentle curing, smart sealing, and a gold finish with intention. And when you light a tea light, keep safety front and
centerbecause the only thing that should be on fire is the vibe.


