Table of Contents >> Show >> Hide
- Chocolate Candy Basics (So Your Kitchen Doesn’t Become a Crime Scene)
- The 12 Easy Chocolate Candy Recipes
- 1) Foolproof 2-Ingredient Microwave Chocolate Fudge
- 2) Classic No-Bake Chocolate Truffles (Ganache Magic)
- 3) Easy Oreo Truffles (Cookies & Cream, No Baking)
- 4) Homemade Peanut Butter Cups (Better Than Store-Bought, Fight Me)
- 5) Buckeyes (The Iconic Peanut Butter Ball Half-Dip)
- 6) Pretzel Rolo Turtles (3 Ingredients, Maximum Crowd-Pleaser)
- 7) Chocolate Peanut Clusters (Fast, Crunchy, and Giftable)
- 8) Peppermint Bark (Holiday Classic, Year-Round Permission Granted)
- 9) Fruit & Nut Chocolate Bark (The “I’m Being Healthy” Candy)
- 10) Chocolate-Covered Strawberries (Simple, Romantic, Slightly Dramatic)
- 11) Matzah Toffee Crack (a.k.a. “Where Did This Disappear To?” Candy)
- 12) Chocolate-Dipped Marshmallows (Cute, Customizable, Kid-Approved)
- Storage, Gifting, and “Help, My Chocolate Looks Weird” Tips
- FAQ
- Conclusion
- Extra: Real-Life Candy-Making Experiences (The Fun Stuff)
If you’ve ever stood in the candy aisle whispering, “I could totally make this,” today is your day.
These easy chocolate candy recipes are built for real life: minimal equipment, simple steps,
and the kind of results that make people assume you own a tiny artisanal chocolate shop (you don’t have to correct them).
We’re talking no-fuss truffles, glossy bark, sweet-salty clusters, and a couple of “how is this even allowed to be this easy?”
microwave miracles. Each recipe includes practical tips, flavor twists, and the small details that keep your chocolate from turning
into a sad, streaky science project.
Chocolate Candy Basics (So Your Kitchen Doesn’t Become a Crime Scene)
Before we dive in, here are the only “rules” you need for homemade chocolate candy. Follow these and you’ll be in the candy-making
fast lane (without the burnout, or the mysterious white chocolate blobs).
- Melt low and slow: Microwave in 20–30 second bursts, stirring between rounds. Chocolate burns faster than your patience.
- Keep water away: Even a few drops can make melted chocolate seize into a gritty mess. Dry bowls, dry utensils, dry everything.
- Chocolate chips vs. bar chocolate: Chips are convenient but can melt thicker. For ultra-smooth dipping and shine, use chopped baking bars or couverture when you can.
- Tempering is optional (mostly): For candies that need a snappy, glossy shell (dipped strawberries, fancy truffles), tempering helps. For fudge and bark, it’s usually fine to skip.
- Don’t rush the set: A short chill is helpful, but big temperature swings can cause condensation and bloom (those whitish streaks). Cool, steady wins.
Keyword check (natural, not annoying): You’re about to make homemade chocolate candy, master melting chocolate,
and stock your fridge with no-bake chocolate treats. That’s basically a life upgrade.
The 12 Easy Chocolate Candy Recipes
Pick one, or pick a weekend and become That Person who gives out little tins of candy like you’re running a delicious underground operation.
(Totally legal. Probably.)
1) Foolproof 2-Ingredient Microwave Chocolate Fudge
This is the gateway candy. Two ingredients. One bowl. No candy thermometer. Maximum “why didn’t I do this sooner?” energy.
- 2 cups semisweet chocolate chips (or chopped chocolate)
- 1 (14 oz) can sweetened condensed milk
- Optional: pinch of salt, 1 tsp vanilla, chopped nuts
- Line an 8×8 pan with parchment (leave overhang so you can lift it out like a magician).
- Microwave chocolate + condensed milk in 30-second bursts, stirring until glossy and smooth.
- Stir in salt/vanilla or mix-ins.
- Spread into pan, chill 2–3 hours, then cut into squares.
Pro tip: If it’s too thick to spread, your chocolate might have cooledwarm for 10 seconds and stir again.
2) Classic No-Bake Chocolate Truffles (Ganache Magic)
Truffles sound fancy because the word “ganache” is French. The process, however, is basically “melt chocolate, chill it, roll it.”
- 8 oz bittersweet or semisweet chocolate, finely chopped
- 1/2 cup heavy cream
- Optional: 1–2 tbsp butter (extra silky), splash of vanilla or espresso
- Coatings: cocoa powder, chopped nuts, toasted coconut, crushed peppermint
- Heat cream until steaming (microwave or stovetop). Don’t boil it into a tantrum.
- Pour over chopped chocolate. Wait 2 minutes, then stir until smooth.
- Chill 1–2 hours until scoopable.
- Scoop and roll into balls quickly (cold hands help). Roll in coatings.
Flavor ideas: orange zest + pinch of salt, espresso powder, cinnamon, or a tiny splash of liqueur.
3) Easy Oreo Truffles (Cookies & Cream, No Baking)
Oreo truffles are the “I brought dessert” cheat code. Crush, mix, roll, dip. Everyone claps anyway.
- 1 (14–16 oz) package Oreo cookies
- 8 oz cream cheese, softened
- 10–12 oz melting chocolate or almond bark
- Optional: extra cookie crumbs, sprinkles
- Crush cookies into fine crumbs (food processor = fast; zip bag + rolling pin = therapeutic).
- Mix crumbs with cream cheese until it becomes a dough.
- Roll into 1-inch balls and chill 20 minutes.
- Dip in melted chocolate and top with crumbs or sprinkles. Chill until set.
Make it yours: Use mint Oreos, golden Oreos, or drizzle white chocolate over dark for instant “bakery display case” vibes.
4) Homemade Peanut Butter Cups (Better Than Store-Bought, Fight Me)
A peanut butter cup should be chocolate on the outside, creamy on the inside, and emotionally supportive in a crisis.
- 2 cups chocolate chips or chopped chocolate
- 1/2 cup creamy peanut butter
- 3 tbsp butter, softened
- 1/4 cup powdered sugar
- Optional: pinch of salt, splash of vanilla, graham cracker crumbs
- Line a mini muffin pan with paper liners.
- Melt chocolate. Spoon 1 tsp into each liner and swirl up the sides. Chill 10 minutes.
- Mix peanut butter + butter + powdered sugar (and salt/vanilla) until thick.
- Drop a small disc of filling into each cup, then top with more melted chocolate.
- Chill until firm, then pop them out like you own the place.
Texture hack: A tablespoon of graham cracker crumbs helps the filling set up neatly and bite clean.
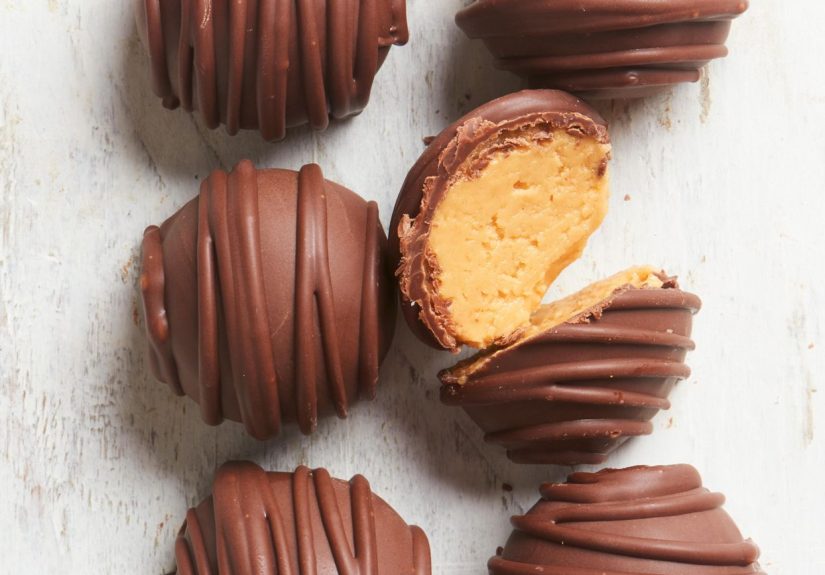
5) Buckeyes (The Iconic Peanut Butter Ball Half-Dip)
Buckeyes are peanut butter fudge balls dipped in chocolate so they look like little nuts. They’re also dangerously snackable.
- 1 1/2 cups peanut butter
- 1/2 cup butter, softened
- 3–4 cups powdered sugar (add until dough is firm)
- 1 tsp vanilla
- 10–12 oz semisweet chocolate for dipping
- Mix peanut butter + butter + vanilla. Add powdered sugar gradually until it forms a rollable dough.
- Roll into balls and chill 30 minutes.
- Melt chocolate. Use a toothpick to dip each ball about 2/3 of the way, leaving a “buckeye” circle on top.
- Let set on parchment. Remove toothpicks; smooth holes with a dab of chocolate if you feel fancy.
Shortcut: If your dough gets sticky, chill it 10 minutes and resume like nothing happened.
6) Pretzel Rolo Turtles (3 Ingredients, Maximum Crowd-Pleaser)
Salty pretzel + caramel-chocolate candy + pecan = turtle candy that tastes like it took effort. It did not.
- Mini pretzel twists or squares
- Rolo candies (unwrapped)
- Pecan halves
- Heat oven to 250°F. Line a baking sheet with parchment.
- Place pretzels down, top each with a Rolo.
- Bake 3–5 minutes until softened (not fully melted into lava).
- Press a pecan half on top, flattening gently. Cool to set.
Variation: Swap pecans for almonds, cashews, or a sprinkle of flaky salt if you’re in your “salted everything” era.
7) Chocolate Peanut Clusters (Fast, Crunchy, and Giftable)
Clusters are the candy equivalent of a one-liner: short, sweet, and hits every time.
- 2 cups mixed chocolate (milk + semisweet works great)
- 2 cups dry-roasted peanuts
- Optional: pinch of salt, a little vanilla, or a spoonful of peanut butter
- Melt chocolate gently (microwave bursts, stir often).
- Fold in peanuts until coated.
- Spoon mounds onto parchment and let set at room temp (or chill 15 minutes).
Upgrade: Toss in crushed pretzels or a handful of toasted coconut for extra texture and “why are these so good?” reactions.
8) Peppermint Bark (Holiday Classic, Year-Round Permission Granted)
Peppermint bark is basically winter in candy form: crisp peppermint, creamy white chocolate, and a satisfying snap.
- 12 oz semisweet chocolate
- 12 oz white chocolate
- 1/2 tsp peppermint extract (optional, use lightly)
- Crushed candy canes
- Line a baking sheet with parchment.
- Melt semisweet chocolate and spread into a thin layer. Chill 10–15 minutes until set.
- Melt white chocolate; stir in a tiny bit of peppermint extract if using.
- Spread white chocolate over the dark layer and immediately sprinkle crushed candy canes.
- Chill to set, then break into rustic shards (aka “handcrafted”).
Tip: Peppermint extract can go from “festive” to “toothpaste” fast. Start small.
9) Fruit & Nut Chocolate Bark (The “I’m Being Healthy” Candy)
Dark chocolate plus dried fruit and nuts feels responsible, like you might also own a water bottle with time stamps on it.
- 12–16 oz dark chocolate
- 1/2 cup toasted nuts (almonds, pistachios, pecans)
- 1/3 cup dried fruit (cranberries, cherries, apricots)
- Optional: flaky salt, orange zest
- Melt chocolate and pour onto parchment. Spread about 1/4-inch thick.
- Scatter nuts and dried fruit on top, pressing lightly so they stick.
- Finish with flaky salt (highly recommended) and chill until firm.
- Break into pieces and try not to “taste test” half of it immediately.
Flavor pairing: pistachios + dried cherries + orange zest is a legitimately fancy combo.
10) Chocolate-Covered Strawberries (Simple, Romantic, Slightly Dramatic)
Chocolate-dipped strawberries are easyunless your berries are wet. Then it’s a slippery situation.
- 1 lb fresh strawberries (dry and room temperature)
- 8–12 oz chopped chocolate (semisweet or dark)
- Optional: white chocolate for drizzles, chopped nuts, sprinkles
- Wash strawberries and dry them completely. Like, “paper towel and patience” completely.
- Melt chocolate gently until smooth.
- Hold each strawberry by the stem and dip, letting excess drip off.
- Set on parchment. Add toppings before the chocolate sets.
- Let set at room temp (best shine) or chill briefly if your kitchen is warm.
Best practice: Serve the same day for peak texture. Strawberries don’t love waiting around.
11) Matzah Toffee Crack (a.k.a. “Where Did This Disappear To?” Candy)
This is the candy that vanishes from the tray first. Crispy base, buttery toffee, melted chocolatebasically edible applause.
- 4–5 sheets matzah (or saltine crackers)
- 1 cup (2 sticks) butter
- 1 cup brown sugar
- 2 cups chocolate chips
- Optional: flaky salt, chopped nuts
- Heat oven to 350°F. Line a rimmed baking sheet with foil + parchment.
- Lay matzah in a single layer.
- Boil butter + brown sugar for ~3 minutes until glossy and bubbling. Pour over matzah and spread quickly.
- Bake 8–10 minutes. Remove and sprinkle chocolate chips over top; wait 5 minutes, then spread smooth.
- Sprinkle salt/nuts. Chill until firm, then break into pieces.
Warning: “Just one piece” is optimistic. Plan accordingly.
12) Chocolate-Dipped Marshmallows (Cute, Customizable, Kid-Approved)
Marshmallows are basically blank canvases. Dip them in chocolate and suddenly they’re party-ready.
- Large marshmallows (or marshmallow hearts/stars)
- 10–12 oz melted chocolate
- Toppings: sprinkles, coconut, crushed peppermint, mini chips
- Optional: lollipop sticks
- Insert sticks if using; chill marshmallows 10 minutes so they’re easier to dip.
- Dip marshmallows halfway into melted chocolate.
- Roll or sprinkle toppings while chocolate is wet.
- Set on parchment and chill until firm.
Glow-up idea: Drizzle with contrasting chocolate for a “professional” finish that took you 12 seconds.
Storage, Gifting, and “Help, My Chocolate Looks Weird” Tips
- Cool, dry storage: Most chocolate candy prefers a cool room (60–70°F) in an airtight container.
- Fridge rules: Use the fridge for cream-based candies (like truffles) and fresh fruit (strawberries). Prevent condensation by keeping them covered.
- Freeze smart: Fudge, bark, clusters, and buckeyes freeze well. Thaw covered to reduce moisture on the surface.
- Chocolate bloom: White streaks usually mean cocoa butter crystallized oddly (temperature swings). It’s not dangerousjust less pretty.
If you want the glossy snap of professional candy, tempering helps. But for these easy homemade chocolate candies,
you can still get awesome results by melting gently, stirring well, and letting candies set without dramatic temperature changes.
FAQ
Do I need a candy thermometer? Not for most recipes here. The only one that benefits is toffee-style candybut our “crack” version is forgiving.
Why did my chocolate seize? Most often: water got in, or you overheated it. Keep everything dry and melt in short bursts.
Can I use white chocolate chips? Yes, but they can be stubborn. Melt slowly and consider a tiny bit of coconut oil for smoother dipping.
What’s the easiest recipe for beginners? Fudge, clusters, or pretzel turtles. All are practically impossible to mess up.
Conclusion
Chocolate candy at home doesn’t have to involve a marble slab, a chef’s jacket, or an existential crisis. Start with one recipe,
learn how your microwave behaves, and soon you’ll have a rotation of easy chocolate candy recipes for holidays,
birthdays, potlucks, and random Tuesdays that deserve a little sparkle.
Now pick your first candy: are we going classic (truffles), nostalgic (buckeyes), or chaotic-good (matzah crack)?
Either way, your future self is going to open the fridge and feel genuinely proud.
Extra: Real-Life Candy-Making Experiences (The Fun Stuff)
Let’s talk about the part no recipe card admits: making chocolate candy is half technique, half vibe. The first time you melt chocolate,
it feels like a high-stakes mission. You stare at the bowl like it might explode. Spoiler: it won’tunless you microwave it for five straight minutes,
at which point the chocolate will turn into a scorched, smoky brick and your kitchen will smell like regret.
The easiest “level up” moment I’ve seen with home candy makers is learning to trust short microwave bursts. Twenty seconds, stir. Twenty seconds, stir.
It feels slow, but it’s faster than starting over. Chocolate holds heat after the microwave stops, so stirring is doing real worklike a tiny spatula
therapist helping the chips melt without panic. When your chocolate turns glossy and fluid, you’ll feel like you just unlocked a secret door in a video game.
Another real-world lesson: humidity is the sneaky villain of shiny chocolate. On a muggy day, chocolate can set a little dull or develop faint streaks.
The candy still tastes amazing, but if you’re aiming for “Instagram perfect,” pick a day when your kitchen isn’t basically a tropical rainforest.
And if you must make candy during humid weather? Embrace toppings. A scatter of nuts, crushed peppermint, or flaky salt covers a multitude of sins and
makes everything look intentional.
Gift-making is where homemade chocolate candy really shines. People love receiving a little box of bark or truffles because it feels personallike you
spent all afternoon crafting it. (Your secret: bark takes about 15 minutes of actual effort.) If you’re gifting, keep textures in mind: clusters and bark
travel like champions. Truffles are more delicate, so pack them snugly and keep them cool. Chocolate-covered strawberries are basically divas: gorgeous,
high-maintenance, and best enjoyed immediately.
If you’re cooking with kids (or adults with kid energy), pretzel turtles and dipped marshmallows are the undefeated champions. The assembly is simple,
there’s plenty of “decorating,” and the success rate is nearly 100%. Plus, kids are wildly confident with sprinkles. They will apply them like they’re
salting icy roads. Do not fight it. Lean in. Call it “maximalist candy design.”
Finally, the best candy-making trick I know is this: build a “candy topping bar.” Put bowls of chopped nuts, cookie crumbs, flaky salt, crushed candy canes,
sprinkles, and toasted coconut on the counter before you start dipping. Chocolate sets quickly, and if you wait until the end to find toppings, you’ll
discover that the chocolate has already hardenedand you’re now pressing sprinkles into a finished shell like a tiny, frustrated archaeologist.
Prep first, dip second, celebrate third.
Make one recipe today, then come back and try another next week. Candy-making is a skill you get better at fast, and the “practice” tastes like chocolate.
That’s the kind of hobby we all deserve.