
Table of Contents >> Show >> Hide
- What you’ll learn
- What “perfect bacon” actually means (and why it’s harder than it looks)
- Method 1: Skillet (stovetop) baconbest flavor control
- Method 2: Oven-baked baconmost even, least babysitting
- Method 3: Air fryer baconfast, crispy, and surprisingly clean
- Method 4: Microwave baconfastest, least mess, surprisingly legit
- The method never to use: cooking bacon where grease can hit exposed heating elements
- Doneness, safety, and avoiding bacon mistakes
- Troubleshooting: why your bacon isn’t cooperating
- Bacon grease: save it (safely) and use it like a smart, salty wizard
- Kitchen experiences: the bacon learning curve (and why everyone has a “bacon phase”)
- Final thoughts
- SEO tags (JSON)
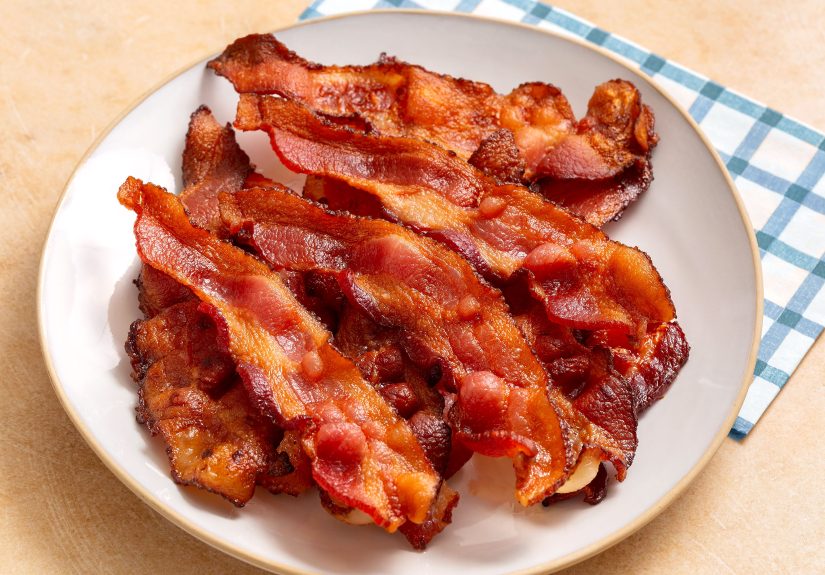
Bacon has one job: show up crispy (or pleasantly chewy), not burned, not rubbery, and definitely not
splattering you like a tiny grease fountain. If you’ve ever stared at a pan of uneven stripssome still
floppy, others basically charcoalyou already know bacon is a drama queen.
This guide breaks down how to cook bacon perfectly using four reliable methodsstovetop,
oven, air fryer, and microwaveplus the one method you should never use (unless you enjoy
living on the edge and cleaning melted bacon fat out of places bacon fat should never go).
What “perfect bacon” actually means (and why it’s harder than it looks)
Bacon perfection is a balancing act between two things that don’t always cooperate:
rendering fat and browning the meat.
-
Rendering = melting the fat slowly so it leaves the strip instead of staying trapped inside it.
Great rendering is what gives you bacon that’s crisp without tasting scorched. -
Browning (hello, savory flavor) happens when the surface dries out enough to take on color.
If you rush browning with high heat, the outside can burn while the fat stays stubbornly unrendered.
The secret isn’t a magic ingredient. It’s heat control, space (don’t crowd your bacon),
and choosing a method that matches your goal: quick breakfast for one, or a whole sheet-pan mountain for a crowd.
Quick method picker
| Method | Best for | Texture sweet spot | Hands-on level |
|---|---|---|---|
| Skillet | Small batches, maximum control | Crisp edges + chewy centers | High |
| Oven | Big batches, even cooking | Consistently crisp, less splatter | Low |
| Air fryer | Fast, very crisp, minimal mess | “Shattering” crisp if you want it | Medium |
| Microwave | Fastest + least cleanup | Crisp-ish, more “snack bacon” | Low |
Method 1: Skillet (stovetop) baconbest flavor control
Skillet bacon is the “I want it exactly like this” method. You can pull strips at different stages of crispness,
control hot spots, and (if you’re feeling fancy) reserve the rendered fat for later.
What you need
- Cast iron or heavy skillet (best for steady heat)
- Tongs
- Paper towels or a wire rack for draining
- Optional: splatter screen (your future self will thank you)
Step-by-step: perfectly cooked stovetop bacon
-
Start cold. Lay strips in a cold pan in a single layer (overlapping = steamed, soggy spots).
Starting cold helps the fat render gradually instead of seizing up. -
Set heat to medium or medium-low. Bacon should sizzle gently, not scream.
If it’s smoking, the pan’s too hot and you’re heading toward bitter, scorched flavor. -
Flip occasionally. Turn every 1–2 minutes once the fat begins to render, adjusting heat as needed.
You’re aiming for slow-and-steady browning. -
Pull early, drain properly. Remove bacon when it’s a shade less done than you wantcarryover heat finishes the job.
Drain on paper towels or (even better) on a rack so steam doesn’t soften the underside.
Pro tips that change everything
- Don’t crowd the pan. Bacon needs room so moisture can escape and browning can happen.
- Manage heat, not time. Timing varies wildly by thickness and pan material.
- For flatter strips: gently press with tongs or a spatula in the last minute (don’t smashthis isn’t a burger).
Best for
Weekend breakfasts, BLTs, and anyone who wants bacon with personality: crispy here, chewy there, and exactly how you like it.
Method 2: Oven-baked baconmost even, least babysitting
If skillet bacon is a solo performance, oven bacon is a well-run orchestra: consistent, efficient, and great for feeding people.
It’s also the method that keeps grease splatter mostly contained, which means less cleanup and fewer “why does my backsplash hate me?” moments.
What you need
- Rimmed sheet pan (importantgrease happens)
- Foil or parchment for easier cleanup
- Optional: wire rack (for maximum crisp) or foil “ridges” (for draining without scrubbing a rack)
Step-by-step: crispy oven bacon (no guesswork)
- Line the pan. Foil makes cleanup easy. Parchment works too (and can reduce sticking).
-
Arrange bacon in one layer. Strips can touch, but shouldn’t overlap.
Want extra-even crisp? Use a rack. Want easier cleanup? Skip the rack and pour off grease later. -
Use the “cold oven” approach for easy crisping.
Put the pan in the oven first, then set the oven to 400°F.
Gradual heat helps render fat before aggressive browning begins. -
Bake until deep golden. Start checking around 15 minutes.
Many batches land around 18–25 minutes depending on thickness and how crispy you want it. -
Drain and cool. Transfer to paper towels or a rack for the final crisp-up.
Bacon firms as it coolsso don’t panic if it seems slightly flexible straight out of the oven.
Oven bacon upgrades (optional, but fun)
- Pepper bacon: cracked black pepper before baking.
- Sweet-heat bacon: a tiny sprinkle of brown sugar + pinch of chili powder (watch closely near the end).
- Extra-flat bacon: bake between two sheet pans (top pan lightly presses strips for fewer curls).
Best for
Brunch spreads, meal prep, and anyone who wants bacon that looks like it graduated with honors: evenly browned, consistently crisp, and not a grease war zone.
Method 3: Air fryer baconfast, crispy, and surprisingly clean
The air fryer is basically a tiny convection oven that decided it was too busy for preheating drama.
It’s excellent for small batches with big crunch. Bonus: the fat collects below, so your bacon doesn’t sit in a shallow fry the whole time.
What you need
- Air fryer basket
- Tongs
- Optional: perforated parchment liner (for easier cleanuponly if your air fryer allows it safely)
Step-by-step: air fryer bacon that actually crisps
- Preheat (recommended). Many air fryers do better and smoke less when preheated.
- Arrange strips with minimal overlap. Slight overlap is okay, but don’t pack it tight.
-
Cook at 350–400°F depending on your goal:
- 350°F tends to render fat well and can reduce smoking; many batches crisp in about 8–13 minutes.
- 400°F is common for faster cooking; expect roughly 8–12 minutes, flipping halfway, depending on thickness.
- Flip halfway. This helps browning and keeps hot spots from winning.
- Drain and serve. Move to paper towels for a minute so the surface stays crisp.
How to prevent smoke in the air fryer
- Clean between batches. Old grease + high heat = smoky kitchen vibes.
- Don’t overcook. Past “crispy” is “burnt,” and burnt fat smokes.
- Use thick-cut wisely. Thick-cut takes longer; lower temps can help render without scorching.
Best for
Two-person breakfasts, quick salads, bacon crumbles, and anyone who wants crisp bacon with less stovetop splatter.
Method 4: Microwave baconfastest, least mess, surprisingly legit
Is microwave bacon the absolute peak of bacon artistry? No. Is it a wildly convenient way to get bacon on a plate
while your coffee is still deciding whether to be effective? Yes.
What you need
- Microwave-safe plate
- Paper towels (or a microwave bacon tray if you have one)
Step-by-step: microwave bacon without sadness
- Line the plate. Use 2–3 layers of paper towels.
- Lay bacon flat. No overlap; overlaps turn soft and uneven.
- Cover completely. Add 2 more paper towels over the top so grease doesn’t splatter.
-
Microwave on high about 1 minute per slice.
Check halfway through; then add time in 30-second increments if needed. - Let it rest. Leave bacon on the towels for 30–60 secondsthis helps it crisp as it cools.
Best for
Quick sandwiches, small portions, dorm kitchens, office breakfasts (if you’re brave), and “I need bacon but I need it yesterday” situations.
The method never to use: cooking bacon where grease can hit exposed heating elements
Here’s the hard line: never cook bacon in a way that lets dripping fat fall directly onto internal heating elements.
That includes:
- Putting bacon in a pop-up toaster (grease drips into the machinehello, fire hazard).
- Cooking bacon directly on a toaster-oven rack without a tray (grease can leak below; many manufacturers explicitly warn against cooking greasy foods on the rack without proper containment).
If you want “toaster oven bacon,” do it the safe way: use a rimmed tray (or a tray + rack) to catch drippings.
The goal is simple: grease stays in the pan, not on the heating element.
Doneness, safety, and avoiding bacon mistakes
Chewy vs. crispy: a practical doneness guide
- Chewy-tender: light browning, fat mostly translucent, strip bends without snapping.
- Tender-crisp: deeper golden color, fat rendered, edges crisp, center still has a little give.
- Shatter-crisp: deep golden to amber, minimal flexibility, breaks cleanly when bent.
Food safety basics for bacon
- Don’t wash raw bacon. It doesn’t help and can spread germs around your sink and countertops.
- Clean and separate. Wash hands after handling raw meat and keep bacon and its juices away from ready-to-eat foods.
- Don’t rely on color alone. Cured meats like bacon can stay pink even when fully cooked.
- Avoid partial cooking. Don’t “half cook” bacon to finish later unless you do it properly and safely with prompt chilling and thorough reheating.
Grease-fire micro-plan (because bacon is delicious, not worth panic)
If grease ignites in a pan, turn off the heat and cover with a lid to smother the flames.
Don’t carry the pan. Don’t add water. Keep a lid nearby when you’re cooking baconthis is one of those boring adult habits that’s secretly heroic.
Troubleshooting: why your bacon isn’t cooperating
“My bacon is soggy.”
- Cause: overcrowding, too-low heat without enough time, or bacon steaming in its own moisture.
- Fix: cook in batches, leave space between strips, and finish by draining on a rack (not stacked on paper towels).
“It’s burnt but still fatty.”
- Cause: heat too highmeat browns before fat renders.
- Fix: lower the heat (or use the oven/air fryer), and aim for gentle sizzling instead of aggressive crackling.
“My strips curl into bacon parentheses.”
- Cause: uneven heat and fast contraction of meat fibers.
- Fix: start cold (skillet), flip more often, or bake between two pans for flatter results.
“My kitchen smells like bacon for three days.”
- Cause: airborne grease + poor ventilation.
- Fix: oven method with a lined pan, run the hood fan, and wipe surfaces soon after cooking.
Bacon grease: save it (safely) and use it like a smart, salty wizard
Rendered bacon fat is liquid gold for savory cooking. Save it if you’ll actually use it.
(If it’s going to sit in the fridge for months like a forgotten science project, let it go.)
How to save bacon grease
- Let grease cool for a few minutes (hot enough to pour, not hot enough to regret).
- Strain through a fine mesh strainer into a heat-safe container.
- Refrigerate and use within a reasonable timeframe; discard if it smells off.
Easy ways to use it
- Roast potatoes or vegetables
- Sauté greens (kale, collards, spinach)
- Start a pan sauce or gravy
- Fry eggs with extra flavor
Kitchen experiences: the bacon learning curve (and why everyone has a “bacon phase”)
Bacon is one of those foods that feels simpleuntil you cook it a few times and realize it’s basically a personality test.
The first time many people make bacon, they treat it like a burger: crank up the heat, stand there confidently, and assume
everything will be fine. Three minutes later, the pan is popping like a tiny volcano, the bacon is dark around the edges,
and the center still looks like it’s auditioning for a role as “uncooked ribbon.” That moment is when your bacon phase begins.
In the skillet phase, you learn the unglamorous truth: bacon doesn’t want to be rushed. The best batches come from a gentle
sizzle and a little patience. You start noticing detailshow thick-cut bacon takes longer, how sugar-cured varieties can burn
faster, how a crowded pan creates pale steamed spots, and how the “crispy vs. chewy” debate is not a debate at allit’s two
different breakfast religions. You also discover that the bacon you liked at a diner isn’t always the bacon you like at home,
because diners have griddles, ventilation systems, and the emotional resilience of people who cook bacon for strangers at 6 a.m.
Then comes the oven era, usually triggered by one of two life events: hosting brunch or deciding your kitchen doesn’t deserve
daily grease trauma. The oven method feels like a cheat code because it produces a whole sheet pan at once, and the bacon looks
strangely professionalflat, evenly browned, and consistent. It’s also when you realize bacon has “carryover crisp.” You pull it,
it seems slightly flexible, and you doubt yourself. Two minutes later, it’s perfect, and you wonder if bacon has been lying to
you your whole life just for fun. You also discover the joy of lining pans: foil becomes your best friend, and you become the kind
of person who says sentences like, “Let it cool so the grease solidifies,” which is both practical and mildly unsettling.
The air fryer phase usually arrives when you want bacon quickly without pan babysittingespecially on mornings when you only need a few
slices. It’s the “small batch luxury” method: crisp results, less splatter, and easy draining. But it teaches another lesson: bacon
smoke is real. If your air fryer isn’t clean, yesterday’s drippings will make today’s bacon taste like a campfire. You start doing
little responsible thingswiping the basket, cooking at a slightly lower temp, and checking earlybecause bacon can go from “golden”
to “bitter” in the time it takes to answer a text.
Finally, there’s the microwave bacon experienceoften misunderstood, frequently judged, and occasionally life-saving. It’s what happens
when you need bacon for a sandwich, a salad, or a quick breakfast and you value speed plus minimal cleanup. You learn the paper towel
sandwich trick, you accept that the texture is different (still tasty, just not quite skillet-level), and you appreciate that your
kitchen stays calm. It’s also the method that makes you realize bacon is flexible: it can be a weekend masterpiece or a weekday shortcut,
and both versions can be valid, delicious, and exactly what you needed.
The one experience that almost everyone shares, though, is discovering what not to do. At some point you’ll see a “hack” involving
putting bacon in a toaster or letting it drip somewhere it shouldn’t. And you’ll feel the same instinctive reaction: “That seems…
flammable.” Trust that instinct. Good bacon is about smart heat and safe setup, not risky stunts. The real bacon glow-up happens when you
find your favorite method, learn its rhythm, and stop chasing gimmicks. The reward is simple: perfect bacon on demandand a kitchen that
doesn’t smell like yesterday’s breakfast forever.


