
Table of Contents >> Show >> Hide
- What Is Stencil Printing, Exactly?
- Tools and Materials You’ll Need
- 13-Step Guide: How to Stencil Print Like a Pro
- Step 1: Choose Your Surface and Project
- Step 2: Pick (or Create) Your Design
- Step 3: Print or Transfer the Design to Stencil Material
- Step 4: Cut Out the Stencil Carefully
- Step 5: Prepare and Protect Your Work Surface
- Step 6: Stabilize the Fabric or Surface
- Step 7: Position and Secure the Stencil
- Step 8: Load Your Brush, Sponge, or Roller (Less Is More)
- Step 9: Apply the Paint in Light, Tapping Motions
- Step 10: Build Up Color in Thin Layers
- Step 11: Lift the Stencil Carefully
- Step 12: Repeat and Create a Pattern or Series
- Step 13: Heat-Set (for Fabric) and Clean Up
- Common Stencil Printing Mistakes (and How to Fix Them)
- Quick FAQ About Stencil Printing
- Real-World Stencil Printing Experiences and Pro Tips (Extra Deep-Dive)
- Start With a “Practice Project” You Don’t Care About
- Keep a “Stencil Notebook” of Colors and Techniques
- Experiment With Ombré and Shading
- Plan Your Pattern Before You Commit
- Accept That a Little Imperfection Adds Charm
- Take Care of Your Stencils and They’ll Take Care of You
- Most Importantly: Have Fun With It
Stencil printing is one of those crafts that makes you feel suspiciously powerful. With one simple template, you can decorate T-shirts, tote bags, walls, posters, and even furniture… over and over again. It’s like having your own tiny printing press, minus the giant machinery and plus a little paint under your fingernails.
This guide walks you through how to stencil print in 13 clear steps, from choosing a design to heat-setting fabric and cleaning up your tools. Whether you’re decorating a wall, a stack of birthday shirts, or a set of tea towels, the basic stencil printing process is very similar. Once you understand the fundamentals, you can adapt these steps to almost any surface.
What Is Stencil Printing, Exactly?
Stencil printing is a method of applying paint or ink through a cut-out design so that only the open areas receive color. The stencil acts like a reusable template: you press paint through the holes, lift the stencil, and like magic, your design appears underneath.
Compared with screen printing, stencil printing is:
- Cheaper: You can start with a sheet of plastic or cardstock and basic craft paint.
- Cleaner: No big screens or messy emulsions, just a stencil, brush, and a bit of paint.
- Easier for beginners: Great for short runs, one-off gifts, or small-batch products.
You can stencil on fabric, paper, wood, walls, glass, and more. The key is choosing the right paint for the surface and keeping your stencil firmly in place to avoid smudges and paint bleed.
Tools and Materials You’ll Need
You don’t need an art degree to stencil print, but a little planning goes a long way. Gather these supplies before you start:
Basic Stencil Printing Supplies
- Stencil material: Mylar, acetate, stencil film, or sturdy cardstock.
- Cutting tool: Craft knife or precision hobby knife, plus a cutting mat.
- Design: Printed graphic, hand-drawn artwork, or pre-made stencil.
- Paint or ink:
- For fabric: fabric paint, textile ink, or acrylic paint mixed with fabric medium.
- For walls/wood: acrylic or latex paint, often slightly thick for less bleeding.
- For paper: acrylic paint or thickened ink.
- Applicator: Stencil brush, foam pouncer, makeup sponge, or small foam roller.
- Repositionable spray adhesive (or low-tack painter’s tape) to hold the stencil down.
- Scrap paper or test fabric for practice prints.
Workspace & Safety Gear
- Drop cloth or old newspaper to protect your table or floor.
- Cardboard, chipboard, or a flat board to support fabric or paper.
- Gloves and an apron or old T-shirt.
- Mask and ventilation if you’re using spray adhesive or spray paint.
Once your supplies are ready, it’s time to walk through the 13 steps that will take you from blank surface to “I made this!” glory.
13-Step Guide: How to Stencil Print Like a Pro
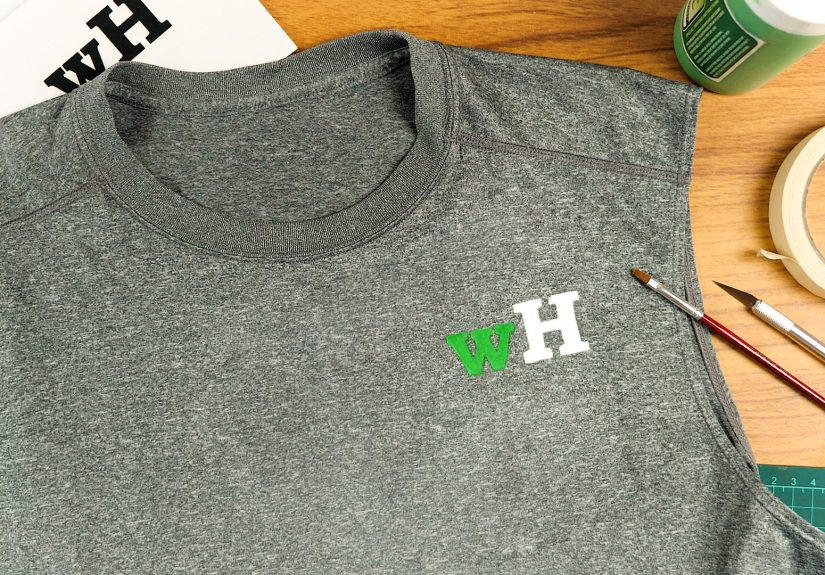
Step 1: Choose Your Surface and Project
Start with what you want to decorate. A T-shirt? A tote bag? A wooden sign? A feature wall? Smooth, flat surfaces are the easiest for beginners. If you’re new to stencil printing, try:
- Cotton T-shirts or tote bags
- Flat paper or cardstock posters
- Unfinished wooden boards or plaques
Avoid super-textured surfaces (like rough brick) until you’re more confidenttexture makes it harder to get crisp edges.
Step 2: Pick (or Create) Your Design
Choose a simple, bold design for your first project: silhouettes, large text, or chunky icons work best. Fine lines and tiny details can be frustrating because they’re harder to cut and easier to tear.
Think in terms of “islands” and “bridges”: any enclosed shape (like the center of an “O”) needs little connectors so it doesn’t fall out of the stencil. These tiny connectors become part of the final design and give that classic stencil look.
Step 3: Print or Transfer the Design to Stencil Material
Print your design on regular paper, or draw it directly onto the stencil film. If your stencil material is transparent, you can tape the design underneath and trace it. If it’s opaque, tape the paper on top and use transfer paper (or just cut through the paper and plastic at once, carefully).
Make sure your design is the exact size you want on your final surfaceresizing after cutting the stencil is not fun.
Step 4: Cut Out the Stencil Carefully
Place your stencil material on a cutting mat. With a sharp craft knife, slowly cut along the lines of your design. Use light pressure and multiple passes rather than trying to slice through in one go. This gives cleaner edges and better control.
Work from the center of the design outward so your hand doesn’t drag across areas you’ve already cut. Replace the blade if it starts to drag or tear the material; a sharp blade is your best friend for crisp prints.
Step 5: Prepare and Protect Your Work Surface
Lay down a drop cloth or old newspaper. Place a piece of cardboard or a flat board under fabric or paper so the paint doesn’t bleed through. If you’re working on a wall or furniture, mask off edges with painter’s tape to protect trim, baseboards, and any areas you don’t want to stencil.
For fabric projects like shirts or tea towels, slide cardboard inside so the paint doesn’t transfer to the back.
Step 6: Stabilize the Fabric or Surface
Wrinkles are the enemy of clean stencils. If you’re stenciling fabric, iron it first and stretch it flat over your board or cardboard. For flexible surfaces, use clips or tape to hold everything taut. For paper, make sure it lies flat and doesn’t curl at the edges.
Step 7: Position and Secure the Stencil
Now, place your stencil exactly where you want the design. Use a ruler or measuring tape if you’re centering text on a shirt or aligning a pattern along a wall. Once you’re happy with the placement, secure it:
- Repositionable spray adhesive: Lightly mist the back of the stencil and press it down. This is excellent for fabric and curved surfaces, and it helps prevent paint from sneaking under the edges.
- Painters’ tape: Use low-tack tape to hold the stencil in place on walls, wood, or paper.
Make sure all edges are firmly pressed down, especially around fine details.
Step 8: Load Your Brush, Sponge, or Roller (Less Is More)
Pour a small amount of paint onto a palette, plate, or scrap cardboard. Dip just the tips of your stencil brush, foam pouncer, or sponge into the paint, then blot off the excess onto a paper towel.
The goal is a “dry” brush: damp with paint, not dripping. Too much paint is the number one cause of fuzzy edges and bleeds.
Step 9: Apply the Paint in Light, Tapping Motions
Use gentle, straight-up-and-down tapping (pouncing) motions instead of brushing side to side. Pouncing pushes paint down through the stencil openings without forcing it under the edges.
Start at the edges of your design and move inward. This reduces the risk of paint collecting along the stencil border and leaking underneath.
Step 10: Build Up Color in Thin Layers
Don’t try to get full, opaque coverage in one pass. Apply a light first layer, let it sit for a minute or two, then add another thin layer. This layered approach gives cleaner lines and prevents paint from soaking or seeping too much into fabric or raw wood.
If you’re using multiple colors in one stencil, start with the lightest color first and work toward darker shades, using separate brushes or sponges for each color to avoid muddying the palette.
Step 11: Lift the Stencil Carefully
When the paint looks even (and you’ve resisted the urge to glob on “just a bit more”), gently peel the stencil straight up from one corner in a smooth motion. Avoid dragging it sidewaysthat can smear the design.
Take a moment to admire your print and mentally high-five yourself. If there are tiny gaps or light spots, you can touch up with a small detail brush after the paint dries a little. Just be careful not to overwork it.
Step 12: Repeat and Create a Pattern or Series
For repeating patternslike an allover wall or a fabric with a repeated motifuse reference marks on your stencil to line up each print. Many commercial stencils have built-in registration marks or cut-out guides. For homemade stencils, you can lightly mark positioning guides with pencil or painter’s tape.
Work systematically: left to right, top to bottom, or in neat rows. Take your time; alignment is the difference between “designer pattern” and “oops, that row is doing its own thing.”
Step 13: Heat-Set (for Fabric) and Clean Up
For fabric projects, most textile paints and fabric mediums need heat to become permanent. Once the paint is fully dry, iron the reverse side on the setting recommended by the paint manufacturer, or tumble-dry if allowed. Always check the paint label for specific instructions.
Clean your tools and stencil right away. Rinse brushes, sponges, and stencils in lukewarm water until the paint is gone. Dried paint can clog stencil openings and make your next print look rough. Lay stencils flat to dry so they don’t warp.
Common Stencil Printing Mistakes (and How to Fix Them)
1. Paint Bleeding Under the Stencil
What it looks like: Fuzzy, blurry edges and blobs instead of crisp lines.
Likely causes: Too much paint, stencil not properly adhered, or a very textured surface.
Fix it: Use less paint, add spray adhesive, and work in thin layers. For very rough surfaces, consider a thicker paint and firmer pouncing motion.
2. Patchy or Uneven Color
What it looks like: Some areas look faded while others are solid.
Likely causes: Not enough paint, uneven pressure, or very absorbent fabric.
Fix it: Add one or two more thin layers. Let each layer set briefly before applying the next for smooth, even coverage.
3. Stencil Shifting Mid-Print
What it looks like: Double images or shadows around the design.
Likely causes: Not enough tape or adhesive, or pressing too hard while painting.
Fix it: Use more painter’s tape or a stronger (but still removable) spray adhesive, and avoid pushing sideways on the stencil while you work.
4. Fabric Feels Stiff After Printing
What it looks like: The printed area feels crunchy or plasticky.
Likely causes: Heavy layers of regular acrylic paint without fabric medium.
Fix it: Use dedicated fabric paint or mix acrylic paint with fabric medium, and keep layers thin. After heat-setting and washing, the print should feel softer.
Quick FAQ About Stencil Printing
What’s the best paint for stencil printing on fabric?
Fabric paint or textile ink is the most reliable choice for T-shirts, tote bags, and linens because it’s designed to flex and survive washing. You can also use regular acrylic paint mixed with fabric medium, which helps the paint bond to fibers and stay softer after drying and washing.
Can I reuse my stencil?
Yesone of the best things about stencil printing is that stencils are reusable. Plastic or Mylar stencils can last for years if you clean them promptly and store them flat. Cardstock stencils can be reused a few times as long as you don’t soak them and you keep the paint fairly dry.
Do I really need spray adhesive?
You don’t have to use spray adhesive, but many stencil artists swear by it, especially on fabric and walls. It helps seal the edges and reduces paint bleed, giving you sharper lines with less hassle.
How do I add more colors to one stencil design?
You can stencil different parts of the design in different colors by using small brushes and masking off sections with tape. Start with lighter colors, let them set slightly, then layer darker colors. Just remember: thin layers and patience are your best tools.
Real-World Stencil Printing Experiences and Pro Tips (Extra Deep-Dive)
Once you’ve done a basic stencil print or two, you’ll start noticing tiny details that make a big difference. Here are some experiential tips and “learned the hard way” lessons to help you level up your stencil printing game.
Start With a “Practice Project” You Don’t Care About
Every experienced crafter has a graveyard of practice piecesmisaligned tea towels, slightly crooked wall motifs, shirts with a mysterious thumbprint in the corner. That’s normal. Plan for it. Use an old pillowcase, scrap fabric, or a piece of cardboard for your first few prints so you can experiment freely without fear of ruining anything precious.
During these practice runs, test how much paint your brush really needs and how quickly it dries on your particular surface. You’ll notice that:
- Fabric soaks up more paint and often needs extra layers.
- Raw wood can show interesting grain through the paint if you use thinner layers.
- Smooth walls may show roller marks if you overload the roller.
Keep a “Stencil Notebook” of Colors and Techniques
If you enjoy stencil printing, treat it a bit like recipe testing. Keep a small notebook (or just snap photos on your phone) documenting which paints, surfaces, and tools you used, and how they behaved. Jot down things like:
- Brand and type of paint or ink
- Surface (cotton, canvas, wood, wall, paper)
- Tool used (brush, foam pouncer, sponge, roller)
- Number of layers and drying time between them
Later, when you want to repeat a projectlike making more of a popular T-shirt design or expanding a stencil pattern onto another wallyou’ll know exactly how you achieved that original look.
Experiment With Ombré and Shading
Once you’re comfortable with a single flat color, try adding depth and dimension. You can create an ombré effect by loading one sponge with a light color and another with a darker shade, then overlapping them slightly where they meet. For subtle shading, use a tiny amount of darker paint around the edges of shapes while keeping the center lighter.
These small variations can make your stenciled designs look more custom and less “off-the-shelf,” especially on home décor like throw pillows and wall art.
Plan Your Pattern Before You Commit
Repeating patternslike allover walls or repeated motifs on curtainslook best when you plan the layout before you start painting. Use a light pencil grid, a measuring tape, or removable chalk lines to map out where each repeat will go. Stand back occasionally and check the overall balance.
For walls, start with the most visible area (often the center) and work outward. That way, if you need to trim or adjust the pattern along a corner or doorway, the “busy” areas are less noticeable.
Accept That a Little Imperfection Adds Charm
Handmade stencil prints almost always have tiny variations: a slightly lighter patch, a microscopic misalignment, a speck of texture where you weren’t expecting it. Instead of seeing these as flaws, treat them like the signature of your handmade process. If you wanted something absolutely flawless, you’d order mass-printed fabric or decals.
That said, if something truly bugs youlike a big smearsometimes you can embrace it creatively. Add a second element (like a small accent shape, extra words, or a deliberate “distressed” effect) to integrate the accident into the design.
Take Care of Your Stencils and They’ll Take Care of You
After a long printing session, it’s tempting to toss your paintbrush in water and leave the stencil “for later.” Try not to. Dried paint can clog fine details and warp thin plastic. Instead, rinse the stencil gently with lukewarm water and pat it dry with a soft cloth or paper towel. Store it flat in a folder or between sheets of cardboard.
The better you treat your stencils, the longer they’ll lastand the more value you’ll get out of the time you spent carefully cutting them in the first place.
Most Importantly: Have Fun With It
Stencil printing is supposed to be enjoyable, not stressful. Put on some music, accept that your first attempt might be “perfectly imperfect,” and enjoy the process. Once you’ve completed a few projects, you’ll find yourself looking around your home thinking, “What else can I stencil?” (Answer: almost everything.)


