Table of Contents >> Show >> Hide
- What a “Marbled Look” Really Is (So You Can Actually Nail It)
- Supplies Checklist (DIY Marble, Not DIY Chaos)
- Prep Like You Mean It (Because Paint Has Standards)
- The Classic Method: Marbled Look With Country Chic Paint (Furniture + Décor)
- Step 1: Base coat (your “stone slab” foundation)
- Step 2: Plan your veins (lightlythis is not a map of interstate highways)
- Step 3: Make veining paint that behaves (thin it a bit)
- Step 4: Paint the first veins (start lighter than you think)
- Step 5: Blur the vein (the secret sauce)
- Step 6: Add depth with mid + dark accents (but don’t outline everything)
- Step 7: Add translucent “stone depth” with glaze + sponge
- Step 8: Optional “milky veil” wash (the realism booster)
- Step 9: Smooth it (because marble is not supposed to feel bumpy)
- Step 10: Seal it for the real world (your finish needs armor)
- Countertops and Tabletops: When to Use a Countertop Kit Instead
- Color Recipes: Pick Your Marble Personality
- Common Mistakes (and How to Fix Them Without Crying)
- Pro Tricks That Make Faux Marble Look Weirdly Real
- How to Care for Your Painted “Marble” So It Stays Pretty
- Wrap-Up: Your Home CalledIt Wants a Fancy Marble Moment
- DIY Experiences: What People Learn After Their First Marble-Paint Project (Real Talk)
Marble is gorgeous. Marble is also the kind of gorgeous that makes your wallet whisper, “Let’s not.”
The good news: you can fake that luxe, veiny stone vibe with paintspecifically, a chalk-style paint setup like Country Chic Paintwithout needing a contractor, a second mortgage, or a crystal ball.
In this guide, you’ll learn how to create a realistic marbled look on furniture, trays, tabletops, and décor using DIY-friendly techniques:
thin base coats, soft veining, gentle blurring, glaze-based depth, and a durable topcoat that keeps your “marble” from becoming “meh-ble.”
We’ll keep it practical, a little playful, and very “you’ve got this.”
What a “Marbled Look” Really Is (So You Can Actually Nail It)
Faux marble works because real marble has a few consistent visual clues:
a creamy base (not stark white), translucent depth (like layers), and veins that look organicwispy, uneven, sometimes broken, sometimes bold.
The veins aren’t perfect lines; they’re more like weather patterns.
Your job isn’t to paint a set of racing stripes. Your job is to suggest stoneby building layers and soft edges.
That’s why chalk-style paints and glazes are helpful: they’re forgiving, easy to sand smooth, and great for layering.
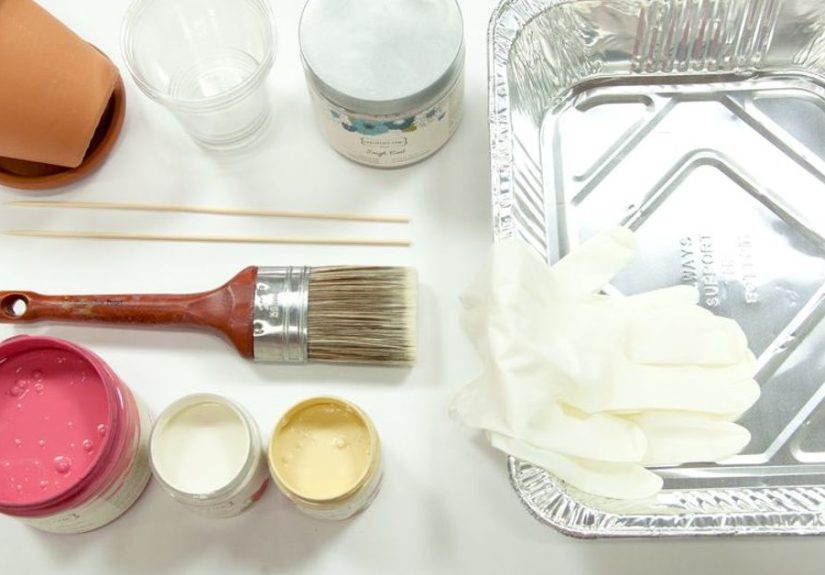
Supplies Checklist (DIY Marble, Not DIY Chaos)
Paint + finishing products
- Country Chic Paint in a white or off-white for the base (creamy whites look more stone-like than bright white).
- 2–3 gray tones for veining (light gray, medium gray, charcoal). Optional: a tiny bit of black for punch.
- Glaze (Country Chic Glaze, or another water-based glaze) to create translucent depth.
- Topcoat for durability (Country Chic Clear Coat for high-use pieces; wax works for low-traffic décor).
Tools
- 220-grit sandpaper (and optionally 320-grit for smoothing between layers)
- Degreaser or mild soap + water and a lint-free cloth
- Painter’s tape (for crisp edges)
- Foam roller or smooth mini roller (great for a sleek “stone slab” base)
- Small artist brush (for veins)
- Natural sea sponge (for soft texture and blending)
- Spray mister bottle (for blurring veins)
- Optional: a feather (surprisingly effective for wispy, uneven veins)
- Drop cloth + disposable gloves
Nice-to-have (highly recommended)
- A practice board (even cardboard works) so your first marble attempt isn’t on the one thing you love most.
- A small marble tile sample photo for inspiration (Carrara, Calacatta, black marblepick your vibe).
Prep Like You Mean It (Because Paint Has Standards)
The fastest way to ruin a marbled finish is skipping prep and then acting shocked when it chips.
Paint is talented, but it’s not a magician.
- Clean thoroughly: Remove wax, oils, fingerprints, kitchen mystery filmeverything.
- Scuff sand: Lightly sand glossy or slick surfaces so paint can grip.
- Dust removal: Wipe off sanding dust (this is not optional if you like smooth finishes).
- Work in friendly conditions: Paint behaves best in a comfortable temperature range with good airflow.
If your surface is super glossy (laminate, lacquer, factory-finished furniture), consider a bonding primer before your base coat.
The goal is “sticks like it pays rent.”
The Classic Method: Marbled Look With Country Chic Paint (Furniture + Décor)
This method is ideal for dresser tops, side tables, shelves, trays, vases, and décor pieces.
It’s layered, realistic, and easy to customize.
Step 1: Base coat (your “stone slab” foundation)
Apply 2–3 thin, even coats of your off-white base color.
Thin coats dry better, level better, and look more professional than a thick, gloopy one-coat miracle attempt.
Use a smooth roller for a sleek finish, or a high-quality synthetic brush if you prefer brushing.
Let each coat dry fully before the next. If you rush, you’ll drag paint and create texture that screams “craft day,” not “quarried in Italy.”
Step 2: Plan your veins (lightlythis is not a map of interstate highways)
Real marble veins often run diagonally. They also vary:
some are hair-thin, some are thicker, and many break apart or fade out.
Decide where you want a few “main veins” and where you want subtle supporting veins.
Pro move: squint at your reference marble image. What you notice while squinting is the pattern you should aim for.
Step 3: Make veining paint that behaves (thin it a bit)
For soft, believable veins, your gray paint should be slightly thinned so it doesn’t sit on the surface like a Sharpie line.
A simple approach: mix a little water into your gray paint until it flows smoothly from a small brush.
You want “wispy and workable,” not “watery puddle.”
Step 4: Paint the first veins (start lighter than you think)
Using your light gray, draw a loose diagonal vein across the surface.
Then immediately make it less perfect:
- Feather method: Drag a feather along the vein to create broken, organic edges.
- Brush wiggle method: Use the side of a small brush and gently wiggle as you move to avoid a rigid line.
- Sponge soften method: Tap lightly with a barely damp natural sea sponge to soften the edges.
Keep veins irregular. Vary length. Vary thickness. Let some disappear.
If every vein looks intentional, it stops looking natural.
Step 5: Blur the vein (the secret sauce)
While the vein is still fresh, mist lightly with water from a spray bottle.
Then blot gently with a sea sponge or soft cloth.
This creates that classic marble “slightly out-of-focus” look.
Mist less than you think you need. You can always mist again.
If you overdo it, you’ll wash the vein away and accidentally invent “faux cloudy nothing.”
Step 6: Add depth with mid + dark accents (but don’t outline everything)
Once the lighter veins are dry, add a few darker accentsthink of them as shadows in the stone.
Use medium gray to strengthen parts of the main veins, then add small charcoal touches in a few spots.
Important: do not trace every line like you’re outlining a coloring book.
Marble veins have uneven intensitydark here, faded there, broken up elsewhere.
Step 7: Add translucent “stone depth” with glaze + sponge
Glaze helps your faux marble look layered instead of flat.
Mix a small amount of paint into glaze (or use tinted glaze) so it’s semi-transparent.
Then apply it with a natural sea sponge in a random, light dabbing pattern.
Think: whispery clouds and soft shifts, not polka dots.
Step back often and check balance. The base should still show through.
Step 8: Optional “milky veil” wash (the realism booster)
If your veins feel too sharp, apply a very thin white wash (base color + plenty of water)
using a foam roller or soft cloth. This slightly “sinks” the veins into the surface,
mimicking the way real marble looks like it has depth under a polished layer.
Step 9: Smooth it (because marble is not supposed to feel bumpy)
After everything dries, lightly sand with 320-grit to knock down any raised texture.
Wipe clean. Your hand should glide over itlike stone, not sandpaper.
Step 10: Seal it for the real world (your finish needs armor)
If this piece will be touched, used, cleaned, or admired by people who leave cups everywhere,
seal it with a durable topcoat.
- High-use surfaces: Use a clear topcoat (like Country Chic Clear Coat). Apply multiple thin coats for durability.
- Low-traffic décor: Wax can work and gives a soft sheen, but it’s not ideal for heavy wear.
Let the finish cure properly before heavy use. This is where patience upgrades your project from “cute” to “credible.”
Countertops and Tabletops: When to Use a Countertop Kit Instead
If you’re marbling a surface that’s going to take daily abuse (kitchen counters, bathroom vanity tops),
consider a dedicated countertop refinishing system or kit designed for maximum wear.
These often include base coats, veining paint, and a protective topcoat meant for stain and scratch resistance.
A common kit workflow looks like this:
clean thoroughly, apply a base coat, add thin veining strokes, then roll on a protective topcoatand wait the recommended time before heavy use.
Translation: your countertop gets a “new surface” moment without ripping anything out.
Color Recipes: Pick Your Marble Personality
Classic Carrara (soft, airy, timeless)
- Base: warm white or soft off-white
- Veins: light gray + medium gray
- Accent: tiny touches of charcoal
- Glaze layer: very subtle gray-white haze
Calacatta (bolder veins, higher drama)
- Base: creamy white
- Veins: medium gray as the “main” vein
- Accent: a few charcoal hits (not everywhere)
- Optional warmth: a faint beige-tinted glaze for warmth
Moody Black Marble (modern, fancy, slightly villainous)
- Base: deep charcoal/black
- Veins: light gray + white (thin and broken)
- Finish: durable topcoat with a sheen you like (satin is forgiving; gloss is bold)
Green Marble (the “wow” accent piece)
- Base: deep green or olive
- Veins: pale green + creamy white + a little gold-toned accent (sparingly)
- Blend: glaze + sponge for layered depth
Common Mistakes (and How to Fix Them Without Crying)
Mistake: Veins look too harsh or “drawn on”
Fix: Lightly mist with water, then blot with a sea sponge to soften. If needed, add a thin milky wash over the whole surface to push veins “down.”
Mistake: Your pattern looks repetitive
Fix: Switch tools (brush → feather → sponge). Break up long veins. Add tiny offshoots. Let some sections stay quiet and minimal.
Mistake: You went too dark too fast
Fix: Sand lightly once dry and add a thin base-color glaze/wash to calm everything down. Marble should feel layered, not shouted.
Mistake: The finish feels rough
Fix: Light sanding (320-grit), wipe clean, then topcoat. Smoothness is a big part of the illusion.
Mistake: Chips or peeling later
Fix: That’s almost always prep. Clean/degrease better, scuff sand slick finishes, and use bonding primer when needed.
Then seal appropriately for the surface’s level of use.
Pro Tricks That Make Faux Marble Look Weirdly Real
- Work in layers: Real marble has depth. Your faux finish should, too.
- Practice first: A quick test board lets you learn vein pressure and misting without consequences.
- Less is more: Over-veining looks busy and fake. Leave breathing room.
- Step back often: What looks chaotic up close often looks perfect from 5–6 feet away.
- Keep edges consistent: If you’re marbling a tabletop, marble the sides too (even lightly) so it looks intentional.
How to Care for Your Painted “Marble” So It Stays Pretty
- Use mild soap and water for cleaning.
- Avoid harsh chemicals and abrasive scrubbers.
- Use coasters and felt pads like the responsible, fancy person your faux marble suggests you are.
- Be gentle during the cure periodfinishes get tougher with time.
Wrap-Up: Your Home CalledIt Wants a Fancy Marble Moment
Creating a marbled look with Country Chic Paint is equal parts art and method:
build a smooth base, paint soft veins, blur them into realism, add translucent depth with glaze, and seal like you mean it.
The best part? You’re not locked into one “marble look.” You can go subtle, dramatic, modern, vintagewhatever your space needs.
And if your first attempt isn’t perfect: congratulations, you are experiencing the same thing every DIYer experiences.
Marble is chaos with good lighting. You’re just translating it into paint.
DIY Experiences: What People Learn After Their First Marble-Paint Project (Real Talk)
Here’s the funny thing about faux marble: it looks intimidating until you do it once, and then your brain immediately goes,
“Wait… I can marble everything.” A tray. A nightstand. A plant stand. The top of a dresser that’s been through three moves and one regrettable
“let’s use it as a workbench” phase. The technique is addictive because it’s forgivingespecially when you embrace the idea that natural stone is
basically beautiful randomness.
One of the most common first-timer realizations is that thin layers beat thick layers every time.
People often start out trying to get full coverage instantly, then discover that heavy paint takes longer to dry, shows more texture, and makes blending harder.
Once you switch to light coats, the whole project feels calmerand your finish starts looking intentional instead of “rushed weekend energy.”
Another big lesson: veins should be edited, not drawn.
A lot of beginners paint a vein and stop thereclean line, crisp edges, very confident. Then they step back and it looks like a lightning bolt sticker.
The moment everything improves is the moment they mist the line, blot it, soften it with a sponge, and let parts break up.
The “imperfections” are what sell the illusion. In other words: the marble look gets better when you stop trying to control it so hard.
People also learn that the best tool is distance. Up close, it’s easy to panic and keep adding details.
From across the room, the pattern suddenly makes sense. Many DIYers start taking quick phone photos from a few feet back
because photos flatten the surface and reveal whether the pattern reads like stone or like paint strokes.
It’s not about being fancyit’s about seeing the whole composition.
Glaze is another “aha” moment. DIYers often describe glaze as the step that makes faux marble feel less like a craft and more like a finish.
The subtle, translucent layer creates depth and helps everything blend together.
Even a light sponge-dab of tinted glaze can make a surface look like it has layers under a polished topexactly what real marble does.
Finally, there’s the durability lesson: the topcoat is not the boring step.
Beginners sometimes want to skip sealing because the paint looks done. Then they remember that tables get used, trays get washed,
and countertops get wiped down a thousand times. Once people choose a finish that matches the surface’s “real life,” they stop babying the piece
and start enjoying itwhich is kind of the whole point of DIY in the first place.