
Table of Contents >> Show >> Hide
- What “Perfect Cupcakes” Actually Means
- Ingredients You Need (and Why They Matter)
- Equipment That Makes Cupcakes Foolproof
- Step-by-Step: How to Make Cupcakes
- Step 1: Prep like a pro
- Step 2: Combine dry ingredients
- Step 3: Cream butter and sugar (if the recipe uses butter)
- Step 4: Add eggs (and don’t panic)
- Step 5: Alternate dry and wet additions
- Step 6: Portion batter evenly
- Step 7: Bake for even rise
- Step 8: Check doneness the smart way
- Step 9: Cool correctly (yes, correctly)
- Perfect Cupcake Texture: The “Why” Behind the Steps
- Cupcake Troubleshooting: Fixes That Actually Work
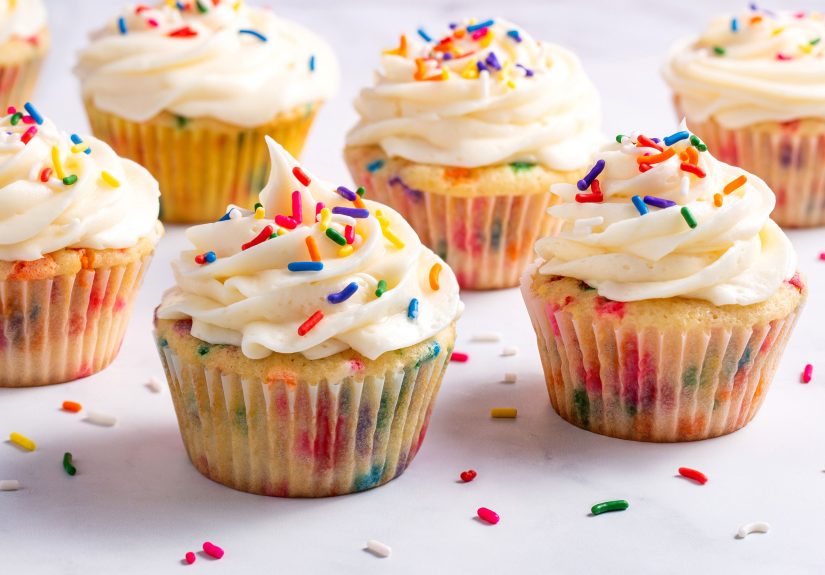
- Frosting and Decorating Without the Drama
- Storage: Keep Cupcakes Moist for Days
- Flavor Variations That Still Bake Perfectly
- FAQ: Cupcake Questions Everyone Asks
- Conclusion
- of Real-Life Cupcake Experience (So You Can Skip the Stress)
Cupcakes look like the easiest dessert on Earthtiny cakes, tiny problems, right? Then you pull a tray from the oven and discover:
half are volcano-domed, three are mysteriously flat, and one looks like it tried to escape the liner. The good news: perfect cupcakes
aren’t luck. They’re a repeatable process.
This guide walks you through how to make cupcakes step by step with bakery-worthy texture: soft crumb, even rise,
moist (not gummy) centers, and frosting that sits proudly instead of sliding off like it’s late for an appointment.
What “Perfect Cupcakes” Actually Means
- Even tops (slight dome is fine; Mount Everest is optional)
- Tender crumb (not rubbery, not bread-like)
- Moist (but not oily or dense)
- Consistent size so they bake evenly and decorate easily
- Flavor that pops even before frosting
Ingredients You Need (and Why They Matter)
You can make cupcakes with pantry basics. The trick is understanding what each ingredient does so you can avoid common fails.
Core cupcake ingredients
- All-purpose flour: Provides structure. Too much = dry; overmixed = tough.
- Sugar: Sweetness + moisture + helps create a tender crumb.
- Butter or oil: Butter brings flavor; oil brings long-lasting moisture. Many great cupcakes use a mix.
- Eggs: Structure and richness. Also help emulsify the batter so it bakes evenly.
- Leavening (baking powder and/or baking soda): The lift. Old leaveners = sad cupcakes.
- Salt: Not optional. Salt makes the flavor taste like… flavor.
- Milk/buttermilk/sour cream: Moisture and tenderness. Buttermilk adds a gentle tang and softer crumb.
- Vanilla: The “cupcake smell” that makes people wander into your kitchen like cartoon characters.
Room temperature isn’t a vibeit’s a technique
For many cupcake recipes (especially butter-based), using room-temperature butter, eggs, and dairy helps the batter
mix smoothly and trap air properly. Cold ingredients can make batter lumpy and can cause uneven rise; overly warm butter can’t hold
air well during mixing. Think “soft but not greasy.”
Equipment That Makes Cupcakes Foolproof
- Standard muffin tin (12-cup)
- Paper liners (or parchment-style liners for a cleaner peel)
- Cookie scoop or ice-cream scoop (for consistent portioning)
- Mixing bowls + whisk
- Hand mixer or stand mixer (helpful, but don’t overdo it)
- Rubber spatula (scrape the bowlyour future self thanks you)
- Wire rack (cooling is part of baking, not an optional side quest)
- Oven thermometer (if your oven liesand many do)
Step-by-Step: How to Make Cupcakes
This step-by-step method works for most classic cupcakes (vanilla, chocolate, funfetti). Your exact ingredient amounts will depend on
the recipe you’re using, but the process is where perfect results happen.
Step 1: Prep like a pro
- Preheat the oven fully (most cupcakes bake around 350°F).
- Line the pan with cupcake liners.
- Measure carefully. If you can, use a kitchen scale for accuracy.
- Bring key ingredients to room temp if your recipe uses the creaming method (butter + sugar).
Why this matters: when the oven is truly hot and your batter is properly mixed, the cupcakes rise quickly and evenly instead of
spreading, sinking, or baking up dense.
Step 2: Combine dry ingredients
In a bowl, whisk together your flour, leavening, and salt (and cocoa powder if making chocolate cupcakes).
Whisking distributes the leavener so you don’t get “one cupcake is perfect and the next is a brick.”
Step 3: Cream butter and sugar (if the recipe uses butter)
Beat butter + sugar until lighter in color and fluffy. This step adds airtiny bubbles that expand in the oven for a
finer crumb. Don’t rush it, but also don’t run the mixer until the butter gets warm and greasy.
Oil-based cupcakes skip this step: you’ll typically whisk oil + sugar + eggs + liquids, then add dry ingredients.
Step 4: Add eggs (and don’t panic)
Add eggs one at a time, mixing just until each disappears. If the batter looks slightly curdled, it often smooths out when you add
the dry ingredients. Scrape the bowl so everything mixes evenly.
Step 5: Alternate dry and wet additions
Add dry ingredients in portions, alternating with milk/buttermilk/sour cream mixture. Mix on low and stop as soon as the flour
streaks are gone.
Key rule: Overmixing develops gluten, which can turn “light cupcakes” into “mildly sweet dinner rolls.”
Step 6: Portion batter evenly
Fill liners about 2/3 full. This gives the cupcakes room to rise without overflowing.
A scoop makes this fast and consistentlike a cupcake assembly line, but cuter.
Step 7: Bake for even rise
Bake on the center rack. Typical bake time for standard cupcakes is about 15–20 minutes at 350°F,
but ovens vary, so start checking a couple minutes early.
Step 8: Check doneness the smart way
- Touch test: Lightly press the topif it springs back, you’re close.
- Toothpick test (updated): Aim for moist crumbs, not a perfectly clean toothpick. Bone-dry can mean overbaked.
- Thermometer option: Many bakers target around 200–210°F internal for cake-style bakes.
Step 9: Cool correctly (yes, correctly)
Let cupcakes cool in the pan for about 5 minutes, then transfer to a wire rack to cool completely.
Frosting warm cupcakes is basically asking buttercream to melt and slide off in public.
Perfect Cupcake Texture: The “Why” Behind the Steps
Why cupcakes get tough
- Too much flour (especially from scooping directly from the bag)
- Overmixing after adding flour
- Overbaking (even 2–3 minutes can dry cupcakes fast)
Why cupcakes sink in the middle
- Underbaked centers
- Oven door opened too early (sudden temp drop)
- Too much leavener (rise too fast, then collapse)
- Overfilled liners
Why cupcakes dome too much
- Oven too hot
- Too much batter per cup
- Mixing that traps too much air or batter set too quickly
If you want flatter tops for decorating, focus on accurate oven temperature, proper fill level, and not over-creaming or overmixing.
Cupcake Troubleshooting: Fixes That Actually Work
Problem: Cupcakes are dry
- Reduce bake time slightly and start checking early.
- Use a thermometer if you tend to overbake.
- Consider a recipe with oil or sour cream for extra moisture.
- Store airtight as soon as fully cool (air is the enemy of moist cake).
Problem: Cupcakes are dense
- Check that baking powder/soda is fresh.
- Don’t overmix once flour goes in.
- Make sure you actually preheated (the oven needs to be hot from the start).
Problem: Cupcakes stick to liners
- Let them cool fully before peelingwarm cupcakes cling.
- Try parchment-style liners.
- Very moist cupcakes may stick more; chilling briefly can help.
Problem: Cupcakes overflow
- Fill only 2/3 full.
- Double-check pan size (standard vs. jumbo).
- Don’t add extra leavener “for fluff.” It backfires.
Frosting and Decorating Without the Drama
Quick buttercream basics
Classic American buttercream is usually butter + confectioners’ sugar + a splash of milk/cream + vanilla + a pinch of salt.
Beat until smooth and fluffy. If it’s too thick, add liquid a teaspoon at a time. If it’s too loose, add more sugar gradually.
Warm kitchen? Your frosting needs a strategy
- Chill your cupcakes before frosting if your room is hot.
- Keep frosting cool and whip briefly if it softens too much.
- Consider stabilizers (like a little extra confectioners’ sugar) if needed.
Decorating tips for clean results
- Use a large piping tip for bakery swirls.
- Pipe from the outside in for a tall spiral.
- Add sprinkles immediatelyfrosting sets a “crust” as it sits.
Storage: Keep Cupcakes Moist for Days
Unfrosted cupcakes
- Store airtight at room temp for 1–2 days for best texture.
- Freeze for longer storage: wrap well and freeze up to a few months.
Frosted cupcakes
Whether cupcakes can sit out depends on the frosting. Many non-perishable-style frostings can be fine at room temperature for a period,
but anything with highly perishable ingredients (certain dairy-heavy fillings, custards, whipped cream) should be refrigerated.
If you refrigerate cupcakes, bring them back toward room temperature before serving for a softer crumb and fuller flavor.
Flavor Variations That Still Bake Perfectly
Vanilla cupcakes
- Use pure vanilla extract for the best flavor.
- Add a tiny splash of almond extract for a “bakery” note (a little goes a long way).
Chocolate cupcakes
- Bloom cocoa in warm liquid (coffee or water) for deeper flavor.
- Don’t overbakechocolate cupcakes dry quickly.
Filled cupcakes
A simple method: fill liners halfway, add a small spoonful of filling, then top with more batter (still aiming for about 2/3 full).
Cool completely before frosting.
FAQ: Cupcake Questions Everyone Asks
Can I turn a cake recipe into cupcakes?
Usually, yes. Bake at the same temperature, but start checking early (often around 15 minutes). Portion to 2/3 full and don’t overcrowd the oven.
Why do my cupcakes bake unevenly?
Common reasons: batter portions aren’t equal, the oven has hot spots, or pans are dark/nonstick and bake faster.
Rotating once midway (if your oven runs uneven) can help.
Should I use paper liners or grease the pan?
Liners make removal easier and keep cupcakes neat. If you skip liners, grease well and expect slightly darker edges.
Conclusion
Perfect cupcakes come down to a handful of repeatable moves: accurate measuring, the right mixing method, not overmixing, filling liners
properly, baking at a true temperature, and cooling completely before decorating. Once you’ve nailed the process, you can swap flavors,
add fillings, and decorate like a prowithout sacrificing texture.
of Real-Life Cupcake Experience (So You Can Skip the Stress)
Here’s what tends to happen the first few times people try to bake cupcakes: they treat cupcakes like “tiny cakes,” rush the batter,
and rely on hope as a primary ingredient. (Hope is great. It is not a leavening agent.) The biggest “aha” moment usually comes when you
realize cupcakes are less forgiving than a full cake because they bake fast. Two extra minutes in the oven doesn’t sound like muchuntil
you taste the difference and wonder why your cupcake suddenly has the hydration level of a saltine cracker.
Another common experience: you finally make a batter that looks perfect, you fill the liners generously because generosity is a virtue,
and then your cupcakes overflow and glue themselves to the pan like they’re filing for residency. This is why the 2/3-full rule feels
boring but works like magic. You get the rise you want without the cupcake equivalent of a wardrobe malfunction.
Most bakers also go through a “toothpick era,” pulling cupcakes only when the toothpick comes out totally clean. The result often tastes
fine on day one, but by day two you’re browsing frosting recipes like frosting is life support (sometimes it is). Learning to pull cupcakes
when they spring back and show a few moist crumbs is a game-changer. If you use a thermometer, you’ll feel like a baking wizardsuddenly
you’re not guessing, you’re verifying.
Then there’s the mixing trap. People love their mixers. Mixers are fun. Mixers also make it dangerously easy to overmix once flour is in the
bowl. A lot of “my cupcakes are tough” stories end with, “I let the mixer run while I answered a text.” The fix isn’t complicated: low speed,
stop early, and finish with a spatula. Your batter should look smooth and combinednot whipped into submission.
Frosting adds its own set of lessons. If you’ve ever piped buttercream onto a warm cupcake, you already know what happens: gravity wins,
and the frosting becomes a glossy puddle with big dreams. Cooling fully (and even chilling briefly in a warm kitchen) makes decorating easier,
cleaner, and way more satisfying. Once you get that first sharp, tall swirl, you’ll understand why people take 47 photos of cupcakes before
anyone is allowed to eat them.
The best part is that cupcake confidence compounds. When you know the process, you can experimentswap flavors, add fillings, test frostings,
and make cupcakes for birthdays, bake sales, or random Tuesdays that need emotional support. Perfect cupcakes aren’t a mystery. They’re a routine
you get good atone tray at a time.


