Table of Contents >> Show >> Hide
- Why Shoes Get Creases and Dents (So You Can Fix the Right Problem)
- Before You Start: Quick Safety Checklist
- Tools That Make This 10x Easier
- Method 1: The Stuff-and-Shape Reset (Best First Step for Most Shoes)
- Method 2: The Damp-Cloth Iron Technique (Great for Leather + Many Sneakers)
- Method 3: Steam + Shape (A Gentler Option for Creases and Dents)
- Method 4: Hair Dryer + Shoe Tree (Beginner-Friendly for Mild Creases)
- How to Fix Dents (Not Just Creases)
- Material-Specific Playbook (Because Shoes Aren’t All the Same)
- Aftercare: Lock In the Improvement (So It Doesn’t Bounce Back Immediately)
- Prevention: Keep Creases and Dents from Coming Back
- When to Stop DIY and Call a Pro
- Real-World Experiences and Lessons (An Extra )
- Conclusion
Shoe creases are like laugh lines: they show you’ve been living. But dents? Dents are like waking up with a mystery bruise and thinking,
“Okay… who did I fight in my sleep?” The good news: while you can’t always erase every wrinkle (especially on real leather), you can
significantly reduce creases, pop out dents, and keep your favorite pairs looking sharperwithout turning your kitchen into a tiny cobbler’s shop.
This guide breaks down what actually works for different materials (leather, synthetic leather, suede/nubuck, canvas/knit),
with safe step-by-step methods, real-life examples, and prevention tips that save you from repeating the “why do my shoes look like crumpled receipts?” cycle.
Why Shoes Get Creases and Dents (So You Can Fix the Right Problem)
Most “damage” people call creases is really one of these:
- Flex creases: Normal folds where your foot bends (vamp/toe box area). Common on leather and synthetic uppers.
- Collapse creases: Deeper wrinkling caused by the shoe losing structure (no shoe trees, too much moisture, thin materials).
- Dents/pressure marks: Localized indentations from storage, travel, heavy objects, or shoes crushed in a closet.
- Toe-box “caves”: The front collapses inward, often on sneakers or soft leather shoes.
Fixing flex creases is about relaxing material + reshaping. Fixing dents is about re-inflating structure.
And preventing both is mostly about support + drying + storage (boring… but powerful).
Before You Start: Quick Safety Checklist
- Patch test first (especially on dyed leather, suede, nubuck, and delicate finishes).
- Avoid direct heat on the upper (no iron-on-leather contact, no “blast it on high” hair dryer decisions).
- Keep moisture controlled: damp cloth, not soaking wet.
- Know your finish: patent leather, metallic, and coated leathers can react badly to heat and conditioners.
Tools That Make This 10x Easier
Pick what fits your situationno need to buy a whole shoe salon:
- Shoe tree (cedar is popular) or a sneaker tree
- Clean cotton cloth or towel (thin enough to diffuse heat)
- Stuffing: socks, towel, tissue paper, or clean rags
- Iron with a low setting or handheld steamer
- Hair dryer (gentle heat option)
- Leather conditioner (for leather uppers only)
- Suede brush (for suede/nubuck)
Method 1: The Stuff-and-Shape Reset (Best First Step for Most Shoes)
If you do nothing else, do this. It helps both creases and dents by pushing the upper back to its intended shape.
It’s also the lowest-risk method for almost every material.
Step-by-step
- Clean the shoe quickly (wipe dirt off leather/synthetics; brush suede).
- Insert a shoe tree. No tree? Pack the toe box firmly with socks or a rolled towel.
- Shape the upper with your hands: smooth the crease outward, press dents from the inside.
- Let it sit 24–48 hours in a cool, dry place (not in direct sun, not next to a heater).
When it works best
- Mild creases and early dents
- Toe-box collapse on sneakers
- Shoes that were crushed in a closet or suitcase
Example
Your leather loafers got dents from being stored under a stack of “I’ll fold these later” laundry.
Stuff them, shape them, and give them a day. You’ll often get a noticeable improvement before you use heat at all.
Method 2: The Damp-Cloth Iron Technique (Great for Leather + Many Sneakers)
This is the classic “uncrease” trick: heat + moisture relaxes the material, and the shoe tree/stuffing holds the shape while it cools.
Done carefully, it can dramatically reduce toe-box creases.
Best for
- Leather dress shoes (smooth leather)
- Many leather/synthetic leather sneakers
- Some canvas uppers (extra caution)
Avoid or use extreme caution for
- Patent leather, metallic finishes, delicate coatings
- Very heat-sensitive plastics/adhesives (some sneakers)
- Suede/nubuck (use a different method or a barely damp cloth)
Step-by-step (safe version)
- Insert a shoe tree or pack the toe tightly with a towel/socks so the crease is pushed outward.
- Dampen a cotton cloth (think “wrung out,” not dripping).
- Lay the cloth over the crease so the iron never touches the shoe directly.
- Set the iron low. Press for 10–15 seconds, then lift and check.
- Repeat in short passes until the crease softens and smooths.
- Leave the tree/stuffing in until the shoe cools completely and dries.
Pro tips (the difference between “nice” and “oops”)
- Short presses beat long ones. You can always do another pass; you can’t un-toast leather.
- Keep the cloth damp. A drying cloth means more direct heat risk.
- Don’t chase perfection. Reducing the crease is realistic; erasing every line forever isn’t.
Method 3: Steam + Shape (A Gentler Option for Creases and Dents)
Steam can relax fibers without direct iron contact. It’s often safer for uppers that don’t love iron pressure.
The key is still the same: heat/steam to relax + support to reshape.
Step-by-step
- Insert a shoe tree or pack the shoe firmly.
- Hold a handheld steamer a short distance away (don’t soak the shoe).
- Steam the creased/dented area briefly.
- Massage the crease outward with your fingers (gentle pressure).
- Let the shoe dry fully with the tree/stuffing in place.
Best for
- Some leather creases when you want less iron contact
- Light dents from storage pressure
- Canvas/knit uppers (with caution and minimal moisture)
Method 4: Hair Dryer + Shoe Tree (Beginner-Friendly for Mild Creases)
If the iron feels too intense, a hair dryer is the “training wheels” version. Controlled warmth can help
relax mild creasingespecially on sneakerswithout the pressure of ironing.
Step-by-step
- Insert a shoe tree or pack the toe box firmly.
- Use a hair dryer on low to medium heat, moving continuously (no hovering in one spot).
- Warm the crease for short bursts (20–40 seconds total), then gently smooth with your fingers.
- Let the shoe cool with the tree/stuffing still inside.
Common mistake
People crank the heat and aim it like they’re drying a wet dog. Don’t. High heat can warp synthetics and weaken adhesives.
How to Fix Dents (Not Just Creases)
Dents are usually a storage problem. The fix is often a combination of internal support and a gentle moisture/heat assist.
Dent Fix #1: Shoe Tree + Time (Often enough)
- Insert a shoe tree that fits snugly (or pack the shoe firmly).
- Press the dent outward from the inside with your thumb.
- Let it sit 24–72 hours.
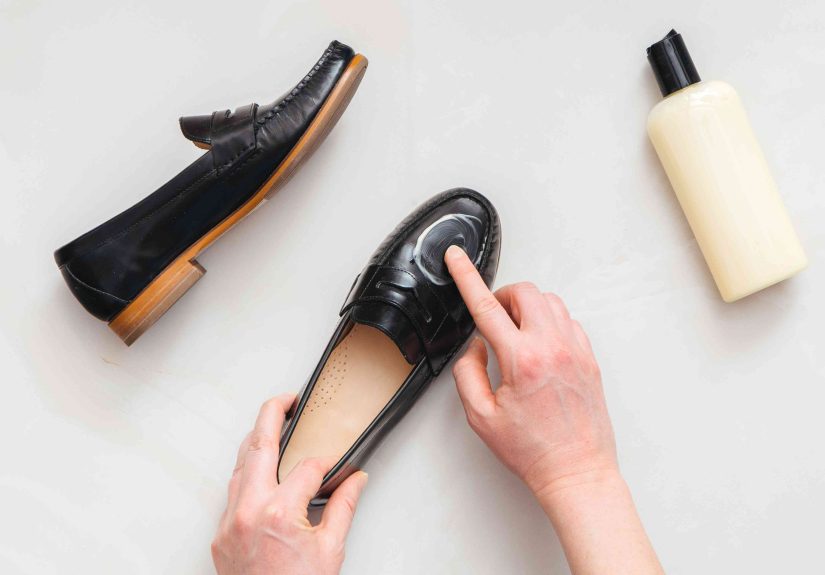
Dent Fix #2: Damp Cloth + Low Heat (For Smooth Leather)
For stubborn pressure marks in smooth leather, you can use the same “damp cloth + low heat” ideajust focus on the dent area.
Keep it gentle and brief.
- Support the shoe from inside (tree or stuffing).
- Cover the dent with a clean damp cloth.
- Press with a low iron in short intervals, checking often.
- Cool/dry fully with the support still in place.
Dent Fix #3: Suede/Nubuck Dents (Steam at a Distance + Brush)
- Insert a shoe tree or pack the shoe.
- Use brief steam from a distance (avoid soaking).
- Let dry naturally.
- Brush the nap with a suede brush to restore texture.
Material-Specific Playbook (Because Shoes Aren’t All the Same)
Smooth Leather (dress shoes, many boots)
- Best fixes: shoe tree + time, damp-cloth iron, gentle steam.
- Aftercare: condition lightly once fully dry to help leather stay supple.
Sneakers (leather/synthetic leather uppers)
- Best fixes: stuffing + damp cloth iron (carefully), hair dryer + tree.
- Extra: consider crease protectors if toe-box creasing drives you nuts.
Suede and Nubuck
- Best fixes: shoe tree + time, steam at a distance, then brush.
- Avoid: heavy water saturation, harsh rubbing, direct iron contact.
Canvas and Knit
- Best fixes: stuffing + time, gentle steam, very cautious low heat.
- Risk: too much heat can shrink or warp; too much moisture can leave marks.
Aftercare: Lock In the Improvement (So It Doesn’t Bounce Back Immediately)
For leather shoes
- Let shoes dry/cool completely before wearing.
- Apply a small amount of leather conditioner (avoid overdoing it).
- Use shoe trees after each wearespecially while the shoe dries from foot moisture.
For sneakers
- Keep the shoe stuffed until fully cool.
- Clean the toe box regularly (dirt can make creases look deeper).
- Rotate pairs so one set isn’t getting flexed daily.
Prevention: Keep Creases and Dents from Coming Back
- Use shoe trees or boot trees after wear (especially for leather).
- Don’t crush shoes in storage: give them breathing room; avoid stacking heavy items on top.
- Rotate your shoes so pairs can fully dry between wears.
- Use a shoehorn so you don’t collapse heel counters and create new dents.
- Travel smart: pack shoes with socks inside and put them in shoe bags to reduce pressure dents.
When to Stop DIY and Call a Pro
If the crease is accompanied by cracking, peeling, severe delamination, or the upper has a delicate finish you can’t replace,
a professional cobbler is the safer bet. DIY is for reducing damagenot gambling with your nicest pair.
Real-World Experiences and Lessons (An Extra )
People tend to learn shoe-crease removal the same way they learn cooking: one confident mistake, followed by a very humble search history.
Here are common real-world scenarios and what usually works bestso you can skip the “crispy toe box” phase.
1) The “One Commute Later” Loafer Crease
A lot of folks buy smooth leather loafers, wear them once, and panic because the vamp creases immediately. That’s normal flex creasing.
The best “fix” isn’t aggressive heatit’s shoe trees + light conditioning and accepting that leather is supposed to move.
When people do try ironing, the ones happiest with the results usually aim for “less noticeable,” not “factory new.”
2) The Sneaker Toe Box That Looks Like an Accordion
This often happens with softer toe boxes (or shoes worn a half-size too big so the foot bends the upper more).
The most consistent improvement comes from packing the toe box firmly (towel, socks, or a sneaker tree),
using short, careful heat passes with a damp cloth, then letting the shoe cool completely while still supported.
The people who get the worst results usually rush and wear the sneaker while it’s still warmmeaning the crease simply reforms.
3) Closet Dents from “Stacking Season”
Dents show up when shoes become the foundation for other life choices: storage bins, books, or that mystery box labeled “Cables.”
The good news is that dents often respond to time and structure. A shoe tree alone can surprise you.
If a dent sticks around on smooth leather, gentle moisture and low heat can help relax the fibersbut patience does more work than force.
4) Suede That Gets Flat Spots
Suede dents can look worse than they are because the nap lies down and reflects light differently. Many people think it’s a permanent crater,
but after light steam at a distance and a good brushing, the texture often comes back. The “lesson learned” here is water control:
too much moisture can stain suede, while too little brushing leaves it looking patchy even when the dent is improved.
5) The Travel-Crush Disaster
Shoes packed without support in luggage can come out looking like they lost a tiny boxing match. The most effective habit change is also the simplest:
stuff shoes with socks (or tees) before packing, and keep heavier items away from the uppers. People who adopt this rarely deal with deep dents again.
6) The “I Used Too Much Heat” Regret
The most common regret story is someone hovering a hair dryer on high over one spot or pressing an iron too long.
Heat is helpful, but it’s not a personality trait. The best experiences come from a “low and slow” approach:
brief warmth, check progress, repeat, then cool fully with support inside. Think of it as shoe skincare, not shoe surgery.
7) The Long-Term Win
The biggest long-term difference isn’t a single dramatic fixit’s a routine: rotate pairs, use shoe trees,
store shoes so they aren’t crushed, and do occasional material-appropriate care (condition leather, brush suede).
The people who do this still get creasesbecause gravity and walking are undefeatedbut their shoes look intentionally worn, not accidentally wrecked.
Conclusion
Getting creases and dents out of shoes isn’t about magicit’s about supporting the shape, using controlled heat or steam when needed,
and finishing with smart aftercare. Start with the lowest-risk method (stuffing + time), move up to damp-cloth ironing or gentle steam,
and focus on reductionnot perfection. Your shoes will look better, last longer, and stop silently judging you from the closet floor.